 vue3实践使用
# 简介
一个是 Composition API,另一个是对 TypeScript 的全面支持。
团队还会出一个 Vue 2.7 的版本,给予 2.x 用户一些在 3.0 版本中被删除方法的警告,这有助于用户的平稳升级。 Nuxt3 好像还在路上,但是目前看来,市面上的各大组件库还没来得及针对 Vue3.0 进行改版升级。
周边的插件如 Vue-Router、Vuex、VSCode 插件 Vetur 等都在有序的进行中
# Vue2与Vue3的对比
- 对TypeScript支持不友好(所有属性都放在了this对象上,难以推倒组件的数据类型)
- 大量的API挂载在Vue对象的原型上,难以实现TreeShaking。
- CompositionAPI。受ReactHook启发
- 更方便的支持了 jsx
- Vue 3 的 Template 支持多个根标签,Vue 2 不支持
- 架构层面对跨平台dom渲染开发支持不友好
- 对虚拟DOM进行了重写、对模板的编译进行了优化操作...
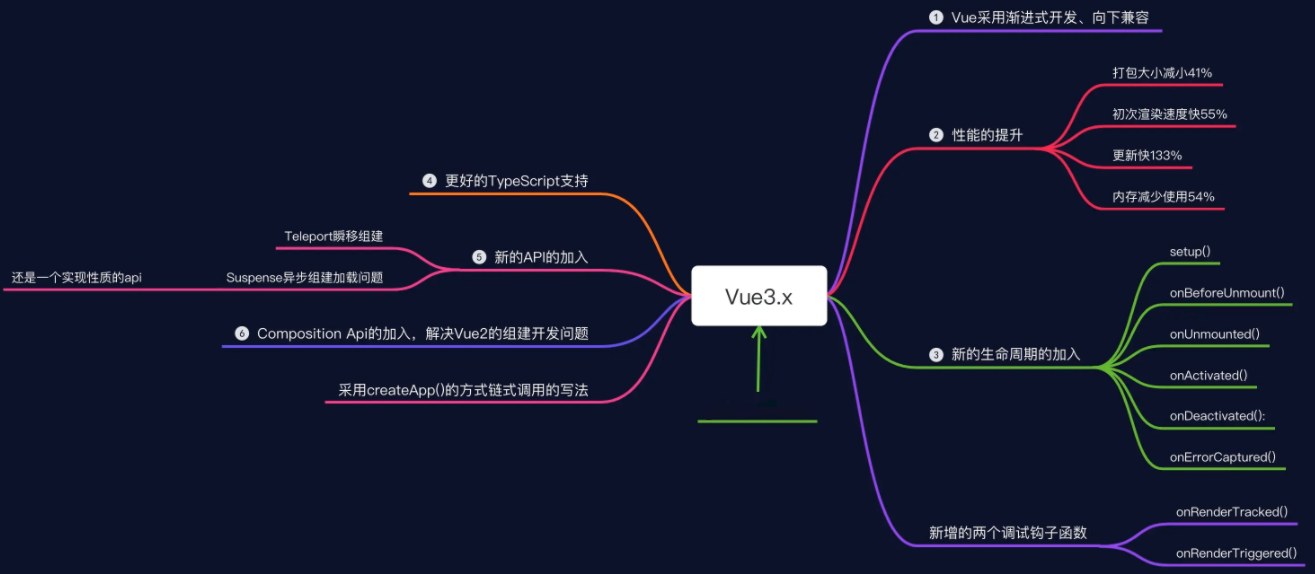
Vue3 是怎么得更快的
- 新增了三个组件:
Fragment支持多个根节点、Suspense可以在组件渲染之前的等待时间显示指定内容、Teleport可以让子组件能够在视觉上跳出父组件(如父组件overflow:hidden) - 新增指令
v-memo,可以缓存 html 模板,比如 v-for 列表不会变化的就缓存,简单说就是用内存换时间 - 支持
Tree-Shaking,会在打包时去除一些无用代码,没有用到的模块,使得代码打包体积更小 - 新增
Composition API可以更好的逻辑复用和代码组织,同一功能的代码不至于像以前一样太分散,虽然 Vue2 中可以用 minxin 来实现复用代码,但也存在问题,比如方法或属性名会冲突,代码来源也不清楚等 - 用
Proxy代替 Object.defineProperty 重构了响应式系统,可以监听到数组下标变化,及对象新增属性,因为监听的不是对象属性,而是对象本身,还可拦截 apply、has 等13种方法 - 重构了虚拟 DOM,在编译时会将事件缓存、将 slot 编译为 lazy 函数、保存静态节点直接复用(静态提升)、以及添加静态标记、Diff 算法使用 最长递增子序列 优化了对比流程,使得虚拟 DOM 生成速度提升
200% - 支持在
<style></style>里使用v-bind,给 CSS 绑定 JS 变量(color: v-bind(str)) - 用
setup代替了 beforeCreate 和 created 这两个生命周期 - 新增了开发环境的两个钩子函数,在组件更新时
onRenderTracked会跟踪组件里所有变量和方法的变化、每次触发渲染时onRenderTriggered会返回发生变化的新旧值,可以让我们进行有针对性调试 - 毕竟 Vue3 是用
TS写的,所以对TS的支持度更好 - Vue3 不兼容
IE11;
兼容式
Vue2和Vue3的生命周期可以混用
- vue2和vue3的生命周期是可以混着一起用的,api和之前没有任何区别,但是我觉得如果你是用vue3再去写项目,我觉得就没有必要再用vue2的api了吧,当然如果你非要混合使用,可以告诉你的是,vue3的api的优先级会更好,打印各个生命周期会发现,优先执行vue3的生命周期,才会执行vue2的。
Vue3中可以使用vue2的写法
- vue3采用渐进式开发,向下兼容,也就是说,我们可以依然使用vue2的语法来完成,这也是尤大非常贴心的为大家考虑项目升级所做的吧。
# Vue3具体更新
- Application API
- Composition API
setup()ref()reactive()、shallowReactive()isRef()toRefs()readonly()、isReadonly()、shallowReadonly()computed()watch()
- 其他新特性
LifeCycleHooks(新的生命周期)Template refsglobalPropertiesSuspenseProvide/Inject
# vue3完整组件模版结构
一个完成的vue 3.x 完整组件模版结构包含了:组件名称、 props、components、setup(hooks、computed、watch、methods 等)
<template>
  <div class="mine" ref="elmRefs">
    <span>{{name}}</span>
    <br>
    <span>{{count}}</span>
    <div>
      <button @click="handleClick">测试按钮</button>
    </div>
    <ul>
      <li v-for="item in list" :key="item.id">{{item.name}}</li>
    </ul>
  </div>
</template>

<script lang="ts">
import { computed, defineComponent, getCurrentInstance, onMounted, PropType, reactive, ref, toRefs } from 'vue';

interface IState {
  count: 0,
  name: string,
  list: Array<object>
}

export default defineComponent({
  name: 'demo',
  // 父组件传子组件参数
  props: {
    name: {
      type: String as PropType<null | ''>,
      default: 'vue3.x'
    },
    list: {
      type: Array as PropType<object[]>,
      default: () => []
    }
  },
  components: {
    /// TODO 组件注册
  },
  emits: ["emits-name"], // 为了提示作用
  setup (props, context) {
    console.log(props.name)
    console.log(props.list)
    const state = reactive<IState>({
      name: 'vue 3.0 组件',
      count: 0,
      list: [
        {
          name: 'vue',
          id: 1
        },
        {
          name: 'vuex',
          id: 2
        }
      ]
    })
    const a = computed(() => state.name)
    onMounted(() => {
    })
    function handleClick () {
      state.count ++
      context.emit('emits-name', state.count)// 调用父组件的方法
    }
    return {
      ...toRefs(state),
      handleClick
    }
  }
});
</script>
2
3
4
5
6
7
8
9
10
11
12
13
14
15
16
17
18
19
20
21
22
23
24
25
26
27
28
29
30
31
32
33
34
35
36
37
38
39
40
41
42
43
44
45
46
47
48
49
50
51
52
53
54
55
56
57
58
59
60
61
62
63
64
65
66
67
68
69
70
71
# 响应式原理
# defineProperty 和 Proxy 的区别
为什么要用 Proxy 代替 defineProperty ?好在哪里?
- Object.defineProperty 是 Es5 的方法,Proxy 是 Es6 的方法
- defineProperty 不能监听到数组下标变化和对象新增属性,Proxy 可以
- defineProperty 是劫持对象属性,Proxy 是代理整个对象
- defineProperty 局限性大,只能针对单属性监听,所以在一开始就要全部递归监听。Proxy 对象嵌套属性运行时递归,用到才代理,也不需要维护特别多的依赖关系,性能提升很大,且首次渲染更快
- defineProperty 会污染原对象,修改时是修改原对象,Proxy 是对原对象进行代理并会返回一个新的代理对象,修改的是代理对象
- defineProperty 不兼容 IE8,Proxy 不兼容 IE11
# vue2
Object.defineProperty的get,set来进行数据劫持,修改,从而响应式,但是它有什么缺点呢😶
- 由于只有get()、set() 方式,所以只能捕获到属性读取和修改操作,当 新增、删除属性时,捕获不到,导致界面也不会更新。
- 直接通过下标修改数组,界面也不会自动更新。
# vue3
对于vue3中的响应式,我们用到的Proxy,当然,我们在vue2里面知道,Proxy是什么,是代理,当然,并不是只用到了它,还有个Window上的内置对象Reflect(反射)
- 通过Proxy(代理): 拦截对象中任意属性的变化, 包括:属性值的读写、属性的添加、属性的删除等。
- 通过Reflect(反射): 对源对象的属性进行操作。
const p=new Proxy(data, {
  // 读取属性时调用
  get (target, propName) {
    return Reflect.get(target, propName)
  },
  //修改属性或添加属性时调用
  set (target, propName, value) {
    return Reflect.set(target, propName, value)
  },
  //删除属性时调用
  deleteProperty (target, propName) {
    return Reflect.deleteProperty(target, propName)
  }
})
2
3
4
5
6
7
8
9
10
11
12
13
14
# Application API
# app属性参数
全局改变的动作,都在 createApp 所创建的应用实例中,如下所示:
Vue2每次都把整个Vue导入,例如Vue2的 main.js 文件中的代码; 但很明显我们的项目中不可能用到Vue所有的API,因此很多模块其实是没有用的
import Vue from 'vue'
import App from './App.vue'
Vue.config.productionTip = false
new Vue({
  render: h => h(App)
}).$mount('#app')
2
3
4
5
6
那么在Vue3中,对外暴露了很多的API供开发者使用,我们可以根据自己的需求,将所需要的API从Vue中导入。例如 main.js 中的代码; 利用了 import 和 export 的导入导出语法,实现了按需打包模块的功能,项目打包后的文件体积明显小了很多
import { createApp } from 'vue';
import App from './App.vue'
createApp(App).mount('#app')

createApp(App).use(router).use(store).mount('#app')
2
3
4
5
那么 app 下这些属性:
component 参数: 第一个参数 string 类型表示组件名,第二个参数 Function 或 Object 返回值: 只传第一个参数,返回组建。带上第二个参数则返回应用程序实例 如何使用:
import { createApp } from 'vue'
const app = createApp({})
// 注册一个 options 对象
app.component('samy-component', {
  /* ... */
})

// 检索注册的组件
const ShiSanComponent = app.component('samy-component')
1
2
3
4
5
6
7
8
9directive 自定义指令变化不大,还是之前那些东西,如下:
app.directive('my-directive', {
  // 挂载前
  beforeMount() {},
  // 挂载后
  mounted() {},
  // 更新前
  beforeUpdate() {},
  // 更新后
  updated() {},
  // 卸载前
  beforeUnmount() {},
  // 卸载后
  unmounted() {}
})

/** v-snine */
app.directive('snine', {
  inserted: function (el) {
    el.snine()
  },
})
1
2
3
4
5
6
7
8
9
10
11
12
13
14
15
16
17
18
19
20
21mixin全局混入
const app = createApp(App)
app.mixin({
  beforeCreate() {
    console.log('我是全局mixin')
  },
})
1
2
3
4
5
6config全局配置(下面讲)
多数全局API都没变化,还是老的 2.x 的写法居多。
Vue3还有filter么;Vue3已经移除了filter;
# 应用的配置项
config 是一个包含 Vue 应用程序全局配置的对象。可以在挂载应用程序之前修改下面列出的属性。
通过vue 实例上config来配置,包含Vue应用程序全局配置的对象。您可以在挂载应用程序之前修改下面列出的属性:
const app = Vue.createApp({})
app.config = {...}
2
devtools 类型: boolean 默认值: true 如何使用:
是否开启 vue-devtools 工具的检测,默认情况下开发环境是 true,生产环境下则为 false。
app.config.devtools = true1errorHandler 类型: Function 默认值: undefined 如何使用:
为组件渲染功能和观察程序期间的未捕获错误分配处理程序。错误和应用程序实例将调用处理程序
app.config.errorHandler = (err, vm, info) => {
  // info 为 Vue 在某个生命周期发生错误的信息
}
1
2
3globalProperties 🌟 类型: [key: string]: any 默认值: undefined 如何使用:
app.config.globalProperties.name = 'samy'
app.component('c-component', {
  //若是组件内也有 name 属性,则组建内的属性权限比较高。
  mounted() {
    console.log(this.name) // 'samy'
  }
})
1
2
3
4
5
6
7还有一个知识点很重要,在 Vue2.x 中,我们定义一个全局属性或者方法都是如下所示:
Vue.prototype.$md5 = () => {}1可以在应用程序内的任何组件实例中访问的全局属性,组件的属性将具有优先权。这可以代替
Vue2.xVue.prototype扩展;在 Vue3.0 中,我们便可这样定义:const app = Vue.createApp({}) app.config.globalProperties.$md5 = () => {} const app = Vue.createApp({}) app.config.globalProperties.$http = 'xxxxxxxxs' // 全局ctx(this) 上挂载 $axios 需要挂载在globalProperties app.config.globalProperties.$axios = axios1
2
3
4
5
6
7可以在组件用通过
getCurrentInstance()来获取全局globalProperties中配置的信息,getCurrentInstance方法获取当前组件的实例,然后通过ctx属性获得当前上下文,这样我们就能在setup中使用router和vuex, 通过这个属性我们就可以操作变量、全局属性、组件属性等等setup( ) { const { ctx } = getCurrentInstance(); ctx.$http }1
2
3
4performance 类型: boolean 默认值: false 如何使用:
将其设置为 true 可在浏览器 devtool 性能/时间线面板中启用组件初始化,编译,渲染和补丁性能跟踪。 仅在开发模式和支持 Performance.mark API的浏览器中工作。
app.config.performance = true1
# 全局API的转移【要点】
2.x 全局 API(Vue) | 3.x 实例 API (app) |
|---|---|
| Vue.config.xxxx | app.config.xxxx |
| Vue.config.productionTip | 移除 |
| Vue.component | app.component |
| Vue.directive | app.directive |
| Vue.mixin | app.mixin |
| Vue.use | app.use |
| Vue.prototype | app.config.globalProperties |
# getCurrentInstance
我们都知道在Vue2的任何一个组件中想要获取当前组件的实例可以通过 this 来得到,而在Vue3中我们大量的代码都在 setup 函数中运行,并且在该函数中 this 指向的是 undefined,那么该如何获取到当前组件的实例呢?
这时可以用到另一个方法,即 getCurrentInstance
<template>
	<p>{{ num }}</p>
</template>
<script>
import {ref, getCurrentInstance} from 'vue'
export default {
    setup() {
        const num = ref(3)
        const instance = getCurrentInstance()
        console.log(instance)
        return {num}
    }
}
</script>
2
3
4
5
6
7
8
9
10
11
12
13
14
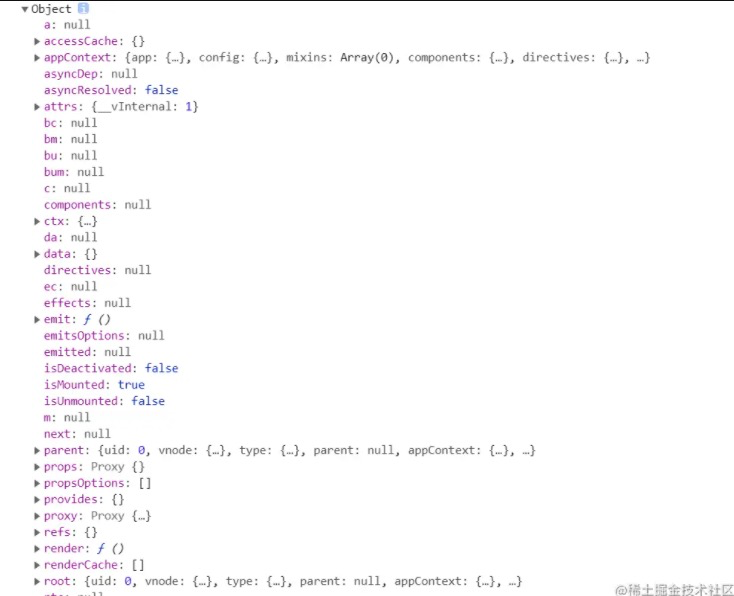
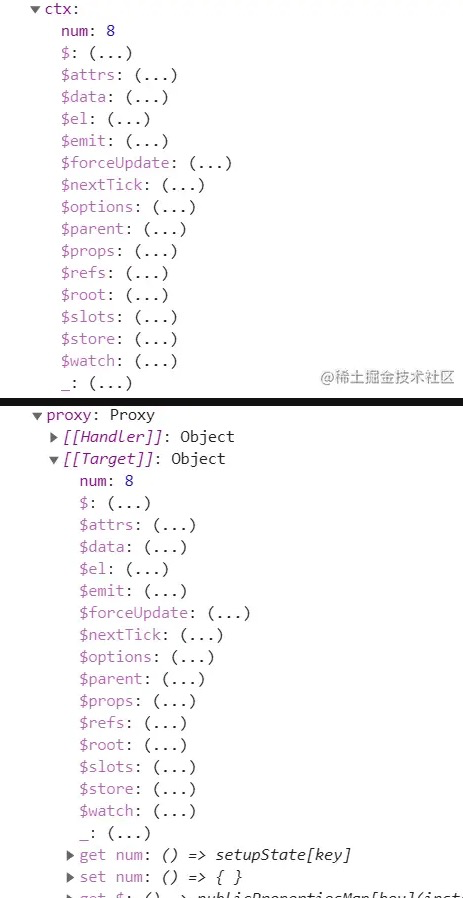
因为 instance 包含的内容太多,所以没截完整,但是主要的内容都在图上了,我们重点来看一下 ctx 和 proxy,因为这两个才是我们想要的 this 的内容;
ctx 和 proxy 的内容十分类似,只是后者相对于前者外部包装了一层 proxy,由此可说明 proxy 是响应式的;
# Composition API
# 简介
众所周知,Vue3.0带来了一个全新的特性——Composition API。字面意思就是“组合API”,它是为了实现基于函数的逻辑复用机制而产生的。
引入Composition API的背景
Composition API解决了什么问题? 使用传统的 Vue2.x 配置方法写组件的时候问题,随着业务复杂度越来越高,代码量会不断的加大。
由于相关业务的代码需要遵循option 的配置写到特定的区域,导致后续维护非常的复杂,同时代码可复用性不高;
Composition API 解决了这个令人头疼的问题;
分类
它为我们提供了几个函数,如下所示:
- LifeCycle Hooks(新的生命周期)
- setup()
- reactive()
- ref()
- isRef()
- toRefs()
- computed()
- watch()
- Template refs
- globalProperties
- Suspense
# 动画图示比较
众所周知,Vue3.0带来了一个全新的特性——Composition API。字面意思就是“组合API”,它是为了实现基于函数的逻辑复用机制而产生的。
# 回顾Option Api
在了解Composition Api之前,首先回顾下我们使用Option Api遇到的问题,我们在Vue2中常常会需要在特定的区域(data,methods,watch,computed...)编写负责相同功能的代码。
# Option Api的缺陷
随着业务复杂度越来越高,代码量会不断的加大;由于相关业务的代码需要遵循option的配置写到特定的区域,导致后续维护非常的复杂,代码可复用性也不高。
# Composition Api优势
显然我们可以更加优雅的组织我们的代码,函数。让相关功能的代码更加有序的组织在一起
# LifeCycle Hooks【要点】
# 生命周期比较
新版的生命周期函数,可以按需导入到组件中,且只能在 setup() 函数中使用, 但是也可以在setup 外定义, 在 setup 中使用;
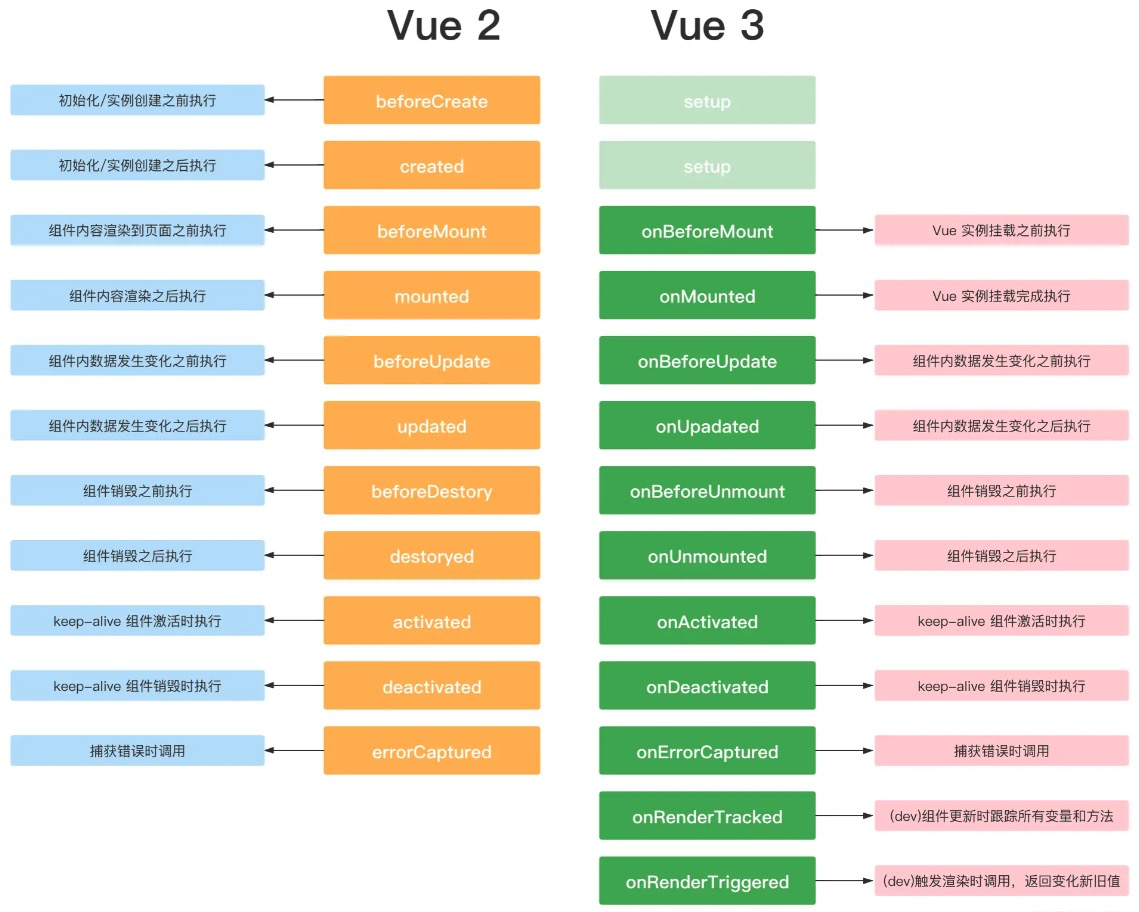
与 2.x 版本相对应的生命周期钩子
vue2和vue3的生命周期对比
| vue2 | vue3 | vue2和3的部分差异比较 |
|---|---|---|
| beforeCreate | setup | setup() :开始创建组件之前,在beforeCreate和created之前执行。创建的是data和method |
| created | setup | |
| beforeMount | onBeforeMount | 组件挂载到节点上之前执行的函数。 |
| mounted | onMounted | 组件挂载完成后执行的函数。 |
| beforeUpdate | onBeforeUpdate | 组件更新之前执行的函数。 |
| updated | onUpdated | 组件更新完成之后执行的函数。 |
| beforeDestroy | onBeforeUnmount | 卸载之前执行的函数。相比改名了 |
| destroyed | onUnmounted | 卸载之后执行的函数。 |
| activated | onActivated | 被包含在中的组件,会多出两个生命周期钩子函数。被激活时执行。 |
| deactivated | onDeactivated | 比如从 A 组件,切换到 B 组件,A 组件消失时执行。 |
| errorCaptured | onErrorCaptured | 当捕获一个来自子孙组件的异常时激活钩子函数。 |
| onRenderTracked | vue3新增的周期用于开发调试使用的 | |
| onRenderTriggered | vue3新增的周期用于开发调试使用的 |
Vue3.0 在 Composition API 中另外加了两个钩子,分别是 onRenderTracked 和 onRenderTriggered,两个钩子函数都接收一个 DebuggerEvent :
export default {
  // 检查哪个依赖性导致组件重新渲染
  onRenderTriggered(e) {
    debugger
  },
}
2
3
4
5
6
说明
vue2的beforeCreate和create变成了setup
vue2的destroyed和beforDestroy变成了onUnmounted:尤大的解释是Unmounted更加语义化,卸载的意思比vue2的销毁更加形象
除了setup外大部分还是vue2的名字,只是在前面加了个on
关于调试函数,目前官方文档也没有过多讲解目的是为了在我们本地开发的时候准备看出各个响应式数据的变化过程。当然,这个后面的官方文档肯定会为大家解惑。
示范
<script lang="ts">
import { set } from 'lodash';
import { defineComponent, onBeforeMount, onBeforeUnmount, onBeforeUpdate, onErrorCaptured, onMounted, onUnmounted, onUpdated } from 'vue';

export default defineComponent({
  setup(props, context) {
    onBeforeMount(()=> {
      console.log('beformounted!')
    })
    onMounted(() => {
      console.log('mounted!')
    })

    onBeforeUpdate(()=> {
      console.log('beforupdated!')
    })
    onUpdated(() => {
      console.log('updated!')
    })

    onBeforeUnmount(()=> {
      console.log('beforunmounted!')
    })
    onUnmounted(() => {
      console.log('unmounted!')
    })

    onErrorCaptured(()=> {
      console.log('errorCaptured!')
    })
    return {}
  }
});
</script>
2
3
4
5
6
7
8
9
10
11
12
13
14
15
16
17
18
19
20
21
22
23
24
25
26
27
28
29
30
31
32
33
34
# hooks函数【要点】
- Vue3 的 hook函数 相当于 vue2 的 mixin, 不同在与 hooks 是函数
- Vue3 的 hook函数 可以帮助我们提高代码的复用性, 让我们能在不同的组件中都利用 hooks 函数
其实就是代码的复用,可以用到外部的数据,生命钩子函数...,具体怎么用直接看代码,
//useMousePosition 一般都是建一个hooks文件夹,都写在里面
import {reactive,onMounted,onBeforeUnmount} from 'vue'
export default function (){
   //鼠标点击坐标
   let point = reactive({
      x:0,
      y:0
   })
   //实现鼠标点击获取坐标的方法
   function savePoint(event){
      point.x = event.pageX
      point.y = event.pageY
      console.log(event.pageX,event.pageY)
   }
   //实现鼠标点击获取坐标的方法的生命周期钩子
   onMounted(()=>{
      window.addEventListener('click',savePoint)
   })
   onBeforeUnmount(()=>{
      window.removeEventListener('click',savePoint)
   })
   return point
}

//在其他地方调用
import useMousePosition from './hooks/useMousePosition'
let point = useMousePosition()
2
3
4
5
6
7
8
9
10
11
12
13
14
15
16
17
18
19
20
21
22
23
24
25
26
27
# setup入口
# 里面参数
setup() 函数是 vue3 中,专门为组件提供的新属性。它为我们使用 vue3 的 Composition API 新特性提供了统一的入口, setup 函数会在 beforeCreate 、created 之前执行, vue3也是取消了这两个钩子,统一用setup代替, 该函数相当于一个生命周期函数,vue中过去的data,methods,watch等全部都用对应的新增api写在setup()函数中;
它接收两个参数 props 和 context。它里面不能使用 this,而是通过 context 对象来代替当前执行上下文绑定的对象,context 对象有四个属性:attrs、slots、emit、expose;
//context.attrs;context.slots;context.emit; context.expose
setup(props, context) {
  // Attribute (非响应式对象,等同于 $attrs)
  context.attrs
  // 插槽 (非响应式对象,等同于 $slots)
  context.slots
  // 触发事件 (方法,等同于 $emit)
  context.emit
  // 暴露公共 property (函数)
  context.expose
  return {}
}
2
3
4
5
6
7
8
9
10
11
12
- props:用来接收
props数据,props是响应式的,当传入新的props时,它将被更新。 - context:用来定义上下文, 上下文对象中包含了一些有用的属性,这些属性在 vue 2.x 中需要通过 this 才能访问到, 在 setup() 函数中无法访问到 this,是个 undefined; 里面可以拿到三个常用的属性;【context.attrs;context.slots;context.emit; context.expose】
- 返回值:return {}, 返回响应式数据, 模版中需要使用的函数;
# 几个注意点
它比
beforeCreate和created这两个生命周期还要快,就是说,setup在beforeCreate,created前,它里面的this打印出来是undefinedsetup可以接受两个参数,第一个参数是
props,也就是组件传值,第二个参数是context,上下文对象,context里面还有三个很重要的东西attrs,slots,emit,它们就相当于vue2里面的this.$attrs,this.$slots,this.$emit。使用插槽时,不能使用
slot="XXX",要使用v-slot,不然会报错;
注意: 因为
props是响应式的, 你不能使用 ES6 解构,它会消除 prop 的响应性。不过你可以使用如下的方式去处理
<script lang="ts">
import { defineComponent, reactive, ref, toRefs } from 'vue';
export default defineComponent({
  setup(props, context) {
    const { title } = toRefs(props) //注意这里使用toRefs处理;
    console.log(title.value)
    return {}
  }
});
</script>
2
3
4
5
6
7
8
9
10
如果 title 是可选的 prop,则传入的 props 中可能没有 title 。在这种情况下,toRefs 将不会为 title 创建一个 ref 。你需要使用 toRef 替代它:
<script lang="ts">
import { defineComponent, reactive, toRef, toRefs } from 'vue';
export default defineComponent({
  setup(props, context) {
    const { title } = toRef(props, 'title')
    console.log(title.value)
    return {}
  }
});
</script>
2
3
4
5
6
7
8
9
10
# 简单的传值实现
//父
<template>
  <div class="home">
    <HelloWorld wish="不掉发" wishes="变瘦" @carried="carried">
      <h3>实现插槽1</h3>
      <template v-slot:dome>
        <h4>实现插槽2</h4>
      </template>
    </HelloWorld>
  </div>
</template>
<script>
import HelloWorld from "./components/HelloWorld";
export default {
  name: 'Home',
  components:{
    HelloWorld
  },
  setup(){
    function carried(value){
      alert(`牛呀,都实现了!!!${value}`)
    }
    return {
      carried
    }
  }
}
</script>

//子
<template>
  <h1>HelloWorld</h1>
  <h1>{{ wish }}</h1>
  <button @click="dream">点击实现</button>
  <slot></slot>
  <slot name="dome"></slot>
</template>
<script>
export default {
  name: "HelloWorld",
  props: ["wish",'wishes'],
  emits:['carried'],
  setup(props,context) {
    console.log(props)
    console.log(context.attrs)
    function dream(){
      context.emit('carried',666)
    }
    return{
      dream
    }
  },
};
</script>
<style scoped></style>
2
3
4
5
6
7
8
9
10
11
12
13
14
15
16
17
18
19
20
21
22
23
24
25
26
27
28
29
30
31
32
33
34
35
36
37
38
39
40
41
42
43
44
45
46
47
48
49
50
51
52
53
54
55
# 3.2+新版本
3.2版本后,直接在<script setup>里面直接初始化;它是 Vue3 的一个新语法糖,在 setup 函数中。所有 ES 模块导出都被认为是暴露给上下文的值,并包含在 setup() 返回对象中。相对于之前的写法,使用后,语法也变得更简单。 在 script setup 中,该方法就不能用了,setup 相当于是一个闭包,除了内部的 template模板,谁都不能访问内部的数据和方法。
使用方式极其简单,仅需要在 script 标签加上 setup 关键字即可。示例:
// 方法
setup(props, context){ return { name:'samy' } }
// 语法糖
<script setup> ... </script>
2
3
4
使用 setup 语法糖时,不用写 export default {},子组件只需要 import 就直接使用,不需要像以前一样在 components 里注册,属性和方法也不用 return。并且里面不需要用 async 就可以直接使用 await,因为这样默认会把组件的 setup 变为 async setup;
用语法糖时,props、attrs、slots、emit、expose 的获取方式也不一样;
- 3.0~3.2版本变成了通过 import 引入的 API:
defineProps、defineEmit、useContext(在3.2版本已废弃),useContext 的属性{ emit, attrs, slots, expose }; - 3.2+版本不需要引入,而直接调用用:
defineProps、defineEmits、defineExpose、useSlots、useAttrs;
# 组件自动注册
在 script setup 中,引入的组件可以直接使用,无需再通过components进行注册,并且无法指定当前组件的名字,它会自动以文件名为主,也就是不用再写name属性了。示例:
<template>
    <Child />
</template>

<script setup>
import Child from './Child.vue'
</script>
2
3
4
5
6
7
如果需要定义类似 name 的属性,可以再加个平级的 script 标签,在里面实现即可。
# 组件核心 API 的使用
# 使用 props
通过defineProps指定当前 props 类型,获得上下文的props对象。示例:
<script setup>
  import { defineProps } from 'vue'
  const props = defineProps({
    title: String,
  })
</script>
2
3
4
5
6
# 使用 emits
使用defineEmit定义当前组件含有的事件,并通过返回的上下文去执行 emit。示例:
<script setup>
  import { defineEmits } from 'vue'
  const emit = defineEmits(['change', 'delete'])
</script>
2
3
4
# 使用 defineExpose
传统的写法,我们可以在父组件中,通过 ref 实例的方式去访问子组件的内容,但在 script setup 中,该方法就不能用了,setup 相当于是一个闭包,除了内部的 template模板,谁都不能访问内部的数据和方法。
**如果需要对外暴露 setup 中的数据和方法,需要使用 defineExpose API。**示例:
<script setup>
	import { defineExpose } from 'vue'
	const a = 1
	const b = 2
	defineExpose({
	    a
	})
</script>
2
3
4
5
6
7
8
# 获取 slots 和 attrs
可以通过useContext从上下文中获取 slots 和 attrs。不过提案在正式通过后,废除了这个语法,被拆分成了useAttrs和useSlots。示例:
// 旧
<script setup>
  import { useContext } from 'vue'
  const { slots, attrs } = useContext()
</script>

// 新
<script setup>
  import { useAttrs, useSlots } from 'vue'
  const attrs = useAttrs()
  const slots = useSlots()
</script>
2
3
4
5
6
7
8
9
10
11
12
# 属性和方法无需返回,直接使用
这可能是带来的较大便利之一,在以往的写法中,定义数据和方法,都需要在结尾 return 出去,才能在模板中使用。在 script setup 中,定义的属性和方法无需返回,可以直接使用!示例:
<template>
  <div>
   	<p>My name is {{name}}</p>
  </div>
</template>

<script setup>
import { ref } from 'vue';
const name = ref('Sam')
</script>
2
3
4
5
6
7
8
9
10
# reactive/shallowReactive
# reactive()
reactive() 函数接收一个普通对象,返回一个响应式的数据对象, 基于proxy来实现,想要使用创建的响应式数据也很简单,创建出来之后,在setup中return出去,直接在template中调用即可;
reactive 相当于 Vue2.x 的 Vue.observable () API,经过 reactive 处理后的函数能变成响应式的数据,类似之前写模板页面时定义的 data 属性的值。
注意: 该 API 返回一个响应式的对象状态。该响应式转换是“深度转换”——它会影响传递对象的所有嵌套 property。
<template>
  {{name}} // test
<template>

<script lang="ts">
import { defineComponent, reactive, ref, toRefs } from 'vue';
export default defineComponent({
  setup(props, context) {
    let state = reactive({
      name: 'test'
      a:0
    });
    function increment() {
      state.a++
    }
    return {
      state,
      increment
    }
  }
});
</script>
2
3
4
5
6
7
8
9
10
11
12
13
14
15
16
17
18
19
20
21
22
# shallowReactive()
创建一个响应式代理,它跟踪其自身属性的响应性shallowReactive生成非递归响应数据,只监听第一层数据的变化,但不执行嵌套对象的深层响应式转换 (暴露原始值)。
<script lang="ts">
import { shallowReactive } from "vue";
export default defineComponent({
  setup() {
    const test = shallowReactive({ num: 1, creator: { name: "撒点了儿" } });
    console.log(test);
    test.creator.name = "掘金";
    return {
      test
    };
  },
});
</script>
2
3
4
5
6
7
8
9
10
11
12
13
# ref/isRef/toRef/toRefs/shallowRef
# ref()
ref() 函数用来根据给定的值创建一个响应式的数据对象,ref() 函数调用的返回值是一个对象,这个对象上只包含一个 value 属性, 只在setup函数内部访问ref函数需要加.value, 通过reactive 来获取ref 的值时,不需要使用.value属性; 其用途创建独立的原始值;
<template>
    <div class="mine">
        {{count}} // 10
    </div>
</template>
<script lang="ts">
import { defineComponent, ref } from 'vue';
export default defineComponent({
  setup() {
    const count = ref<number>(10)
    console.log(count.value); // 在js中获取ref中定义的值, 需要通过value属性
    return {
       count
    }
   }
});
</script>
2
3
4
5
6
7
8
9
10
11
12
13
14
15
16
17
在 reactive 对象中访问 ref 创建的响应式数据;toRefs的使用;
<template>
    <div class="mine">
        {{count}} -{{t}} // 10 -100
    </div>
</template>

<script lang="ts">
import { defineComponent, reactive, ref, toRefs } from 'vue';
export default defineComponent({
  setup() {
    const count = ref<number>(10)
    const obj = reactive({
      t: 100,
      count
    })
    console.log(obj.count); // 通过reactive来获取ref的值时,不需要使用.value属性
    return {
       ...toRefs(obj)
    }
   }
});
</script>
2
3
4
5
6
7
8
9
10
11
12
13
14
15
16
17
18
19
20
21
22
# isRef()
isRef() 用来判断某个值是否为 ref() 创建出来的对象;
<script lang="ts">
import { defineComponent, isRef, ref } from 'vue';
export default defineComponent({
  setup(props, context) {
    const name: string = 'vue'
    const age = ref<number>(18)
    console.log(isRef(age)); // true
    console.log(isRef(name)); // false
    return {
      age,
      name
    }
  }
});
</script>
2
3
4
5
6
7
8
9
10
11
12
13
14
15
# toRef()
toRef翻译过来其实就是把什么变成ref类型的数据;
<template>
  <div class="home">
    <h1>当前姓名:{{names.name}}</h1>
    <h1>当前年龄:{{names.age}}</h1>
    <h1>当前薪水:{{names.job.salary}}K</h1>
    <button @click="names.name+='!'">点击加!</button>
    <button @click="names.age++">点击加一</button>
    <button @click="names.job.salary++">点击薪水加一</button>
  </div>
</template>

<script>
import {reactive} from 'vue'
export default {
  name: 'Home',
  setup(){
    let names=reactive({
      name:'samy',
      age:23,
      job:{
        salary:10
      }
    })
    //现在暴露出去的是简简单单的字符串,字符串没有响应式
    return {
      names,
      name:names.name,
    }
    //要用ref,或者 toRef, toRefs处理后,才有响应式
    return {
      name:ref(names.name),
      name:toRef(names,'name'),
      ...toRefs(names)
    }
  }
}
</script>
2
3
4
5
6
7
8
9
10
11
12
13
14
15
16
17
18
19
20
21
22
23
24
25
26
27
28
29
30
31
32
33
34
35
36
37
# toRefs()
toRefs() 函数可以将 reactive() 创建出来的响应式对象,转换为普通的对象,只不过,这个对象上的每个属性节点,都是 ref() 类型的响应式数据;toRefs()函数对reavtive()函数解构返回;
toRefs 提供了一个方法可以把 reactive 的值处理为 ref,也就是将响应式的对象处理为普通对象。
<template>
  <div class="mine">
    {{name}} // test
    {{age}} // 18
  </div>
</template>

<script lang="ts">
import { defineComponent, reactive, ref, toRefs } from 'vue';
export default defineComponent({
  setup(props, context) {
    let state = reactive({
      name: 'test'
    });
    const age = ref(18)
    return {
      ...toRefs(state),
      age
    }
  }
});
</script>
2
3
4
5
6
7
8
9
10
11
12
13
14
15
16
17
18
19
20
21
22
# shallowRef
- shallowRef:只处理基本数据类型的响应式, 不进行对象的响应式处理。
- shallowReactive:只处理对象最外层属性的响应式(浅响应式)。
之前我们说过如果ref定义的是对象,那么它会自动调用reactive变为Proxy,但是要是用到的是shallowRef那么就不会调用reactive去进行响应式。
let person = shallowReactive({
 name:'大理段氏',
 age:10,
 job:{
   salary:20
 }
})
let x = shallowRef({
 y:0
})
2
3
4
5
6
7
8
9
10
# 相关对比
# ref与toRef的区别
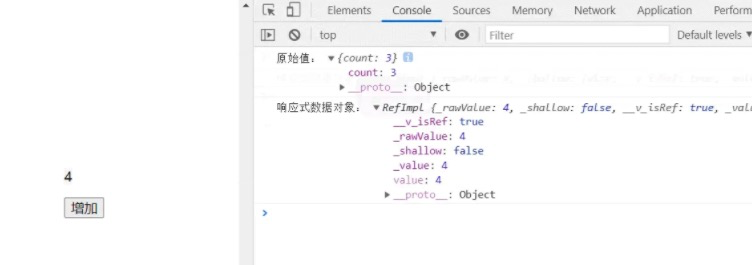
ref是对传入数据的拷贝;toRef是对传入数据的引用;ref的值改变会更新视图;toRef的值改变不会更新视图;

# toRef与toRefs的区别
toRef是单个转化为响应式,那toRefs就是多个转化为响应式;这样的话就减少代码,不然要是有成千上万个;
 <h1>当前姓名:{{name}}</h1>s
 <h1>当前薪水:{{job.salary}}K</h1>
return {
    ...toRefs(names)
}
2
3
4
5
# ref与reactive比较
- ref用来定义:基本类型数据。
- ref通过
Object.defineProperty()的get与set来实现响应式(数据劫持)。 - ref定义的数据:操作数据需要
.value,读取数据时模板中直接读取不需要.value。 - reactive用来定义:对象或数组类型数据。
- reactive通过使用Proxy来实现响应式(数据劫持), 并通过Reflect操作源代码内部的数据。
- reactive定义的数据:操作数据与读取数据:均不需要
.value。
建议:
- 基本类型值(
String、Nmuber、Boolean等)或单值对象(类似像{count: 3}这样只有一个属性值的对象)使用ref - 引用类型值(
Object、Array)使用reactive
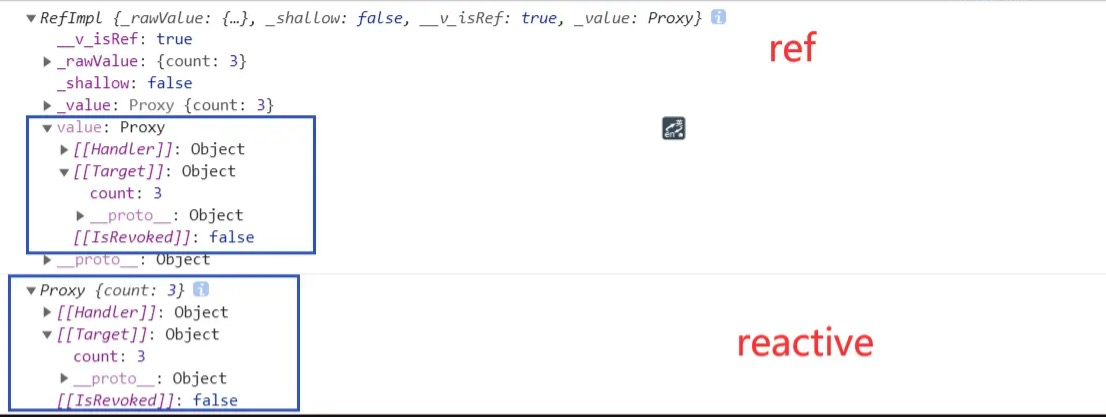
当然,ref可以定义对象或数组的,它只是内部自动调用了reactive来转换。
reactive只能定义对象类型的响应式数据,前面说到的ref里是对象的话,会自动调用reactive,把Object转换为Proxy,那我们来打印一下,你会发现就直接变成了Proxy,之前为什么会.value呢,是因为要去获取值,然后通过reactive变成Proxy,但是现在是直接通过reactive变成Proxy,而且它是进行的一个深层次的响应式,也可以进行数组的响应式;
注意: 这里指的 .value 是在 setup 函数中访问 ref 包装后的对象时才需要加的,在 template 模板中访问时是不需要的,因为在编译时,会自动识别其是否为 ref 包装过的;
<template>
  <div class="home">
    <h1>姓名:{{name}}</h1>
    <h1>年龄:{{age}}</h1>
    <h2>职业:{{job.occupation}}</h2>
    <h2>薪资:{{job.salary}}</h2>
    <button @click="say">修改</button>
  </div>
</template>

<script>
import {ref} from 'vue'
export default {
  name: 'Home',
  setup(){
    let name = ref('samy')
    let age = ref(18)
    let job=ref({
      occupation:'程序员',
      salary:'1k'
    })
    console.log(name)
    console.log(age)
    //方法
    function say(){
      job.value.salary='2k'
    }
    return {
      name,
      age,
      job,
      say
    }
  }
}
</script>
2
3
4
5
6
7
8
9
10
11
12
13
14
15
16
17
18
19
20
21
22
23
24
25
26
27
28
29
30
31
32
33
34
35
36
<template>
  <div class="home">
    <h1>姓名:{{name}}</h1>
    <h1>年龄:{{age}}</h1>
    <h2>职业:{{job.occupation}}<br>薪资:{{job.salary}}</h2>
    <h3>爱好:{{hobby[0]}},{{hobby[1]}},{{ hobby[2] }}</h3>
    <button @click="say">修改</button>
  </div>
</template>

<script>
import {ref,reactive} from 'vue'
export default {
  name: 'Home',
  setup(){
    let name = ref('samy‘)
    let age = ref(18)
    let job=reactive({
      occupation:'程序员',
      salary:'1k'
    })
    let hobby=reactive(['刷剧','吃鸡','睡觉'])
    console.log(name)
    console.log(age)
    //方法
    function say(){
      job.salary='2k'
      hobby[0]='学习'
    }
    return {
      name,
      age,
      job,
      say,
      hobby
    }
  }
}
</script>
2
3
4
5
6
7
8
9
10
11
12
13
14
15
16
17
18
19
20
21
22
23
24
25
26
27
28
29
30
31
32
33
34
35
36
37
38
39
# customRef
customRef创建一个自定义的 ref,并对其依赖项跟踪和更新触发进行显式控制。
单纯觉得这个东西的作用只有防抖的作用;
<template>
  <input type="text" v-model="keyWord">
  <h3>{{keyWord}}</h3>
</template>

<script>
import {customRef} from 'vue'
export default {
  name: 'App',
  setup() {
    //自定义一个ref——名为:myRef
    function myRef(value,times){
      let time
      return customRef((track,trigger)=>{
        return {
          get(){
            console.log(`有人从myRef中读取数据了,我把${value}给他了`)
            track() //通知Vue追踪value的变化(必须要有,并且必须要在return之前)
            return value
          },
          set(newValue){
            console.log(`有人把myRef中数据改为了:${newValue}`)
            clearTimeout(time)
            time = setTimeout(()=>{
              value = newValue
              trigger() //通知Vue去重新解析模板(必须要有)
            },times)
          },
        }
      })
    }
    let keyWord = myRef('HelloWorld',1000) //使用自定义的ref
    return {keyWord}
  }
}
</script>
2
3
4
5
6
7
8
9
10
11
12
13
14
15
16
17
18
19
20
21
22
23
24
25
26
27
28
29
30
31
32
33
34
35
36
# readonly/isReadonly/shallowReadonly
readonly是接收了一个响应式数据然后重新赋值,返回的数据就不允许修改(深层只读);shallowReadonly却只是浅层只读(第一层只读,其余层可以进行修改);
# readonly()/isReadonly()
readonly: 传入ref或reactive对象,并返回一个原始对象的只读代理,对象内部任何嵌套的属性也都是只读的、 并且是递归只读。【深层只读】isReadonly: 检查对象是否是由readonly创建的只读对象
<script lang="ts">
import { readonly, reactive } from "vue";
export default defineComponent({
  setup() {
    const test = reactive({ num: 1 });
    const testOnly = readonly(test);
    console.log(test);
    console.log(testOnly);

    test.num = 110;

    // 此时运行会提示 Set operation on key "num" failed: target is readonly.
    // 而num 依然是原来的值,将无法修改成功
    testOnly.num = 120;

    // 使用isReadonly() 检查对象是否是只读对象
    console.log(isReadonly(test)); // false
    console.log(isReadonly(testOnly)); // true

    // 需要注意的是: testOnly 值会随着 test 值变化
    return {
      test,
      testOnly,
    };
  },
});
</script>
2
3
4
5
6
7
8
9
10
11
12
13
14
15
16
17
18
19
20
21
22
23
24
25
26
27
我们知道const定义的变量也是不能改的,那readonly和const有什么区别?
const是赋值保护,使用const定义的变量,该变量不能重新赋值。但如果const赋值的是对象,那么对象里面的东西是可以改的。原因是const定义的变量不能改说的是,对象对应的那个地址不能改变;- 而
readonly是属性保护,不能给属性重新赋值;
# shallowReadonly()
shallowReadonly 作用只处理对象最外层属性的响应式**(浅响应式)的只读**,但不执行嵌套对象的深度只读转换 (暴露原始值)
<script lang="ts">
import { readonly, reactive } from "vue";
export default defineComponent({
 setup() {
   const test = shallowReadonly({ num: 1, creator: { name: "撒点了儿" } });
   console.log(test);

   // 依然会提示: Set operation on key "num" failed: target is readonly.
   // 而num 依然是原来的值,将无法修改成功
   test.num = 3;
   // 但是对于深层次的属性,依然可以修改
   test.creator.name = "掘金";

   return {
     test
   };
 },
});
</script>
2
3
4
5
6
7
8
9
10
11
12
13
14
15
16
17
18
19
# toRaw/markRaw
# toRaw
toRaw方法是用于获取ref或reactive对象的原始数据的;
toRaw其实就是将一个由reactive生成的响应式对象转为普通对象。如果是ref定义的话,是没有效果的(包括ref定义的对象)如果在后续操作中对数据进行了添加的话,添加的数据为响应式数据,
当然要是将数据进行markRaw操作后就不会变为响应式,
可能大家会说,不就是和readonly一样吗?那肯定不一样咯,readonly是根本没办法改,但markRaw是不转化为响应式,但是数据还会发生改变。
<script>
import {reactive, toRaw} from 'vue'
export default {
    setup() {
        const obj = {
            name: '前端印象',
            age: 22
        }
        const state = reactive(obj)
        const raw = toRaw(state)
        console.log(obj === raw)   // true
    }
}
</script>
2
3
4
5
6
7
8
9
10
11
12
13
14
上述代码就证明了 toRaw 方法从 reactive 对象中获取到的是原始数据,因此我们就可以很方便的通过修改原始数据的值而不更新视图来做一些性能优化了
注意: 补充一句,当
toRaw方法接收的参数是ref对象时,需要加上.value才能获取到原始数据对象
<template>
  <div class="home">
    <h1>当前姓名:{{names.name}}</h1>
    <h1>当前年龄:{{names.age}}</h1>
    <h1>当前薪水:{{names.job.salary}}K</h1>
    <h1 v-if="names.girlFriend">女朋友:{{names.girlFriend}}</h1>
    <button @click="names.name+='!'">点击加!</button>
    <button @click="addAges">点击加一</button>
    <button @click="addSalary">点击薪水加一</button>
    <button @click="add">添加女朋友</button>
    <button @click="addAge">添加女朋友年龄</button>
  </div>
</template>

<script>
import {reactive,toRaw,markRaw} from 'vue'
export default {
  name: 'Home',
  setup(){
    let names=reactive({
      name:'samy',
      age:23,
      job:{
        salary:10
      }
    })
    function addAges(){
      names.age++
      console.log(names)
    }
    function addSalary(){
      let fullName=toRaw(names)
      fullName.job.salary++
      console.log(fullName)
    }
    function add(){
      let girlFriend={sex:'女',age:40}
      names.girlFriend=markRaw(girlFriend)
    }
    function addAge(){
      names.girlFriend.age++
      console.log(names.girlFriend.age)
    }
    return {
      names,
      add,
      addAge,
      addAges,
      addSalary
    }
  }
}
</script>
2
3
4
5
6
7
8
9
10
11
12
13
14
15
16
17
18
19
20
21
22
23
24
25
26
27
28
29
30
31
32
33
34
35
36
37
38
39
40
41
42
43
44
45
46
47
48
49
50
51
52
53
# markRaw
markRaw 方法可以将原始数据标记为非响应式的,即使用 ref 或 reactive 将其包装,仍无法实现数据响应式,其接收一个参数,即原始数据,并返回被标记后的数据
我们来看一下代码
<template>
	<p>{{ state.name }}</p>
	<p>{{ state.age }}</p>
	<button @click="change">改变</button>
</template>

<script>
import {reactive, markRaw} from 'vue'
export default {
    setup() {
        const obj = {
            name: '前端印象',
            age: 22
        }
        // 通过markRaw标记原始数据obj, 使其数据更新不再被追踪
        const raw = markRaw(obj)
        // 试图用reactive包装raw, 使其变成响应式数据
        const state = reactive(raw)
        function change() {
            state.age = 90
            console.log(state);
        }
        return {state, change}
    }
}
</script>
2
3
4
5
6
7
8
9
10
11
12
13
14
15
16
17
18
19
20
21
22
23
24
25
26
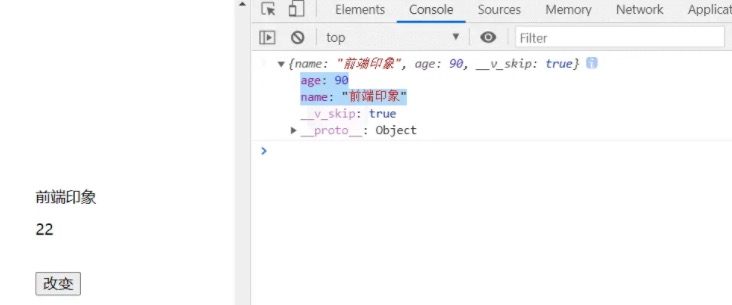
我们来看一下在被 markRaw 方法处理过后的数据是否还能被 reactive 包装成响应式数据;
# 响应式判断【要点】
下面是vue3给的一些判断方法
isRef: 检查值是否为一个 ref 对象。
isReactive:检查对象是否是由 reactive (opens new window) 创建的响应式代理。
isReadonly: 检查对象是否是由 readonly (opens new window) 创建的只读代理。
isProxy:检查对象是否是由 reactive (opens new window) 或 readonly (opens new window) 创建的 proxy。
import {ref, reactive,readonly,isRef,isReactive,isReadonly,isProxy } from 'vue'
export default {
  name:'App',
  setup(){
    let fullName = reactive({name:'小唐',price:'20k'})
    let num = ref(0)
    let fullNames = readonly(fullName)
    console.log(isRef(num))
    console.log(isReactive(fullName))
    console.log(isReadonly(fullNames))
    console.log(isProxy(fullName))
    console.log(isProxy(fullNames))
    console.log(isProxy(num))
    return {}
  }
}
2
3
4
5
6
7
8
9
10
11
12
13
14
15
16
# watch()/watchEffect/computed
# watch
watch:watch( source, cb, [options] )
参数说明:
- source:可以是表达式或函数,用于指定监听的依赖对象
- cb:依赖对象变化后执行的回调函数
- options:可参数,可以配置的属性有 immediate(立即触发回调函数)、deep(深度监听)
options参数:
因为 watch 方法的第一个参数我们已经指定了监听的对象,因此当组件初始化时,不会执行第二个参数中的回调函数,若我们想让其初始化时就先执行一遍,可以在第三个参数对象中设置 immediate: true;
watch方法默认是渐层的监听我们指定的数据,例如如果监听的数据有多层嵌套,深层的数据变化不会触发监听的回调,若我们想要其对深层数据也进行监听,可以在第三个参数对象中设置 deep: true;
补充: watch方法会返回一个stop方法,若想要停止监听,便可直接执行该stop函数
watch 函数用来侦听特定的数据源,并在回调函数中执行副作用。默认情况是懒执行的,也就是说仅在侦听的源数据变更时才执行回调。
# 监听用ref声明的数据源
<script lang="ts">
import { defineComponent, ref, watch } from 'vue';
interface Person {
  name: string,
  age: number
}
export default defineComponent({
  setup(props, context) {
    const age = ref<number>(10);
    watch(age, () => console.log(age.value)); // 100
    age.value = 100 // 修改age 时会触发watch 的回调, 打印变更后的值
    return {
      age
    }
  }
});
</script>
2
3
4
5
6
7
8
9
10
11
12
13
14
15
16
17
<template>
  <div class="home">
    <h1>当前数字为:{{num}}</h1>
<button @click="num++">点击数字加一</button>
</div>
</template>

<script>
import {ref,watch} from 'vue'
export default {
  name: 'Home',
  setup(){
    let num=ref('0')
    watch(num,(newValue,oldValue)=>{
      console.log(`当前数字增加了,${newValue},${oldValue}`)
    })
    //既然监听的是数组,那么得到的newValue和oldValue也就是数组,那么数组中的第一个就是你监视的第一个参
    watch([num,msg],(newValue,oldValue)=>{
      console.log('当前改变了',newValue,oldValue)
    })
    return {
      num
    }
  }
}
</script>
2
3
4
5
6
7
8
9
10
11
12
13
14
15
16
17
18
19
20
21
22
23
24
25
26
带参数监听
setup(){
  let names=reactive({
    familyName: 'z',
    age:23,
    job:{
      salary:10
    }
  })
  //watch([num,msg],(newValue,oldValue)=>{
  //   console.log('当前改变了',newValue,oldValue)
  //},{immediate:true,deep:true})
  //监听对象变动
  watch(names,(newValue,oldValue)=>{
    console.log(`names改变了`,newValue,oldValue)
  },{deep:false})
  //监听对象里面的单个
  watch(names.age,(newValue,oldValue)=>{
    console.log(`names改变了`,newValue,oldValue)
  })
  //监听的是深度的属性;会发现我要是只监听第一层是监听不到的,那么我们有两种写法
  //第一种
  watch(()=> names.job.salary,(newValue,oldValue)=>{
    console.log('names改变了',newValue,oldValue)
  })
  //第二种
  watch(()=> names.job,(newValue,oldValue)=>{
    console.log('names改变了',newValue,oldValue)
  },{deep:true})

  return {
    names
  }
}
2
3
4
5
6
7
8
9
10
11
12
13
14
15
16
17
18
19
20
21
22
23
24
25
26
27
28
29
30
31
32
33
# 监听用reactive声明的数据源
<script lang="ts">
import { computed, defineComponent, reactive, toRefs, watch } from 'vue';
interface Person {
  name: string,
  age: number
}
export default defineComponent({
  setup(props, context) {
    const state = reactive<Person>({ name: 'vue', age: 10 })
    watch(
      () => state.age,
      (age, preAge) => {
        console.log(age); // 100
        console.log(preAge); // 10
      }
    )
    state.age = 100// 修改age时会触发watch的回调, 打印变更前后的值
    return {
      ...toRefs(state)
    }
  }
});
</script>
2
3
4
5
6
7
8
9
10
11
12
13
14
15
16
17
18
19
20
21
22
23
# 同时监听多个值
watch([a, b], ([newValA, newValB], [oldValA, oldValB]) => {
	console.log(newValA, newValB, '===', oldValA, oldValB)
})
2
3
<script lang="ts">
import { computed, defineComponent, reactive, toRefs, watch } from 'vue';
interface Person {
  name: string,
  age: number
}
export default defineComponent({
  setup(props, context) {
    const state = reactive<Person>({ name: 'vue', age: 10 })
    watch(
      [() => state.age, () => state.name],
      ([newName, newAge], [oldName, oldAge]) => {
        console.log(newName);
        console.log(newAge);
        console.log(oldName);
        console.log(oldAge);
      }
    )
    // 修改age时会触发watch的回调, 打印变更前后的值, 此时需要注意, 更改其中一个值, 都会执行watch的回调
    state.age = 100
    state.name = 'vue3'
    return {
      ...toRefs(state)
    }
  }
});
</script>
2
3
4
5
6
7
8
9
10
11
12
13
14
15
16
17
18
19
20
21
22
23
24
25
26
27
# stop停止监听
在 setup() 函数内创建的 watch 监视,会在当前组件被销毁的时候自动停止。如果想要明确地停止某个监视,可以调用 watch() 函数的返回值即可,语法如下:
<script lang="ts">
import { set } from 'lodash';
import { computed, defineComponent, reactive, toRefs, watch } from 'vue';
interface Person {
  name: string,
  age: number
}
export default defineComponent({
  setup(props, context) {
    const state = reactive<Person>({ name: 'vue', age: 10 })

    const stop =  watch(
      [() => state.age, () => state.name],
      ([newName, newAge], [oldName, oldAge]) => {
        console.log(newName);
        console.log(newAge);

        console.log(oldName);
        console.log(oldAge);
      }
    )
    // 修改age 时会触发watch 的回调, 打印变更前后的值, 此时需要注意, 更改其中一个值, 都会执行watch的回调
    state.age = 100
    state.name = 'vue3'

    setTimeout(()=> {
      stop()
      // 此时修改时, 不会触发watch 回调
      state.age = 1000
      state.name = 'vue3-'
    }, 1000) // 1秒之后讲取消watch的监听

    return {
      ...toRefs(state)
    }
  }
});
</script>
2
3
4
5
6
7
8
9
10
11
12
13
14
15
16
17
18
19
20
21
22
23
24
25
26
27
28
29
30
31
32
33
34
35
36
37
38
# watchEffect()
# 使用
watchEffect 被称之为副作用,立即执行传入的一个函数,并响应式追踪其依赖,并在其依赖变更时重新运行该函数。
在业务中,我们不必去特意的监听某某属性,而是直接把他写在其回调函数中,就可以自动帮我们收集依赖了。watch是要自己配置监听;
watchEffect是vue3的新函数,它是来和watch来抢饭碗的,它和watch是一样的功能,那它有什么优势呢?
- 自动默认开启了
immediate:true - 用到了谁就监视谁;
其实,watchEffect有点像computed,都是里面的值发生了改变就调用一次,但是呢computed要写返回值,而watchEffect不用写返回值。
import { reactive, computed, watchEffect } from 'vue'
export default {
  setup() {
    const state = reactive({ a: 0 })
    const double = computed(() => state.a * 3)
    function increment() {
      state.count++
    }
    //并没有像 watch 方法一样先给其传入一个依赖,而是直接指定了一个回调函数
    //当组件初始化时,将该回调函数执行一次,自动获取到需要检测的数据是 state.count 和 state.name
    const wa = watchEffect(() => {
      // 使用到了哪个 ref/reactive 对象.value, 就监听哪个
      console.log(double.value)
    })
    // 可以通过 wa.stop 停止监听
    return {
      state,
      increment
    }
  }
}
2
3
4
5
6
7
8
9
10
11
12
13
14
15
16
17
18
19
20
21
# watch与watchEffect 比较
共同点是 watch 和 watchEffect 会共享以下四种行为:
停止监听:组件卸载时都会自动停止监听;清除副作用:onInvalidate 会作为回调的第三个参数传入;副作用刷新时机:响应式系统会缓存副作用函数,并异步刷新,避免同一个 tick 中多个状态改变导致的重复调用;监听器调试:开发模式下可以用 onTrack 和 onTrigger 进行调试;
watch 和 watchEffect 都是用来监视某项数据变化从而执行指定的操作的,但用法上还是有所区别;
watchEffect,它与 watch 的区别主要有以下几点:
- 不需要手动传入依赖;
- 每次初始化时会执行一次回调函数来自动获取依赖;
- 无法获取到原值,只能得到变化后的值;
# computed()
该函数用来创造计算属性,和过去一样,它返回的值是一个ref对象。 里面可以传方法,或者一个对象,对象中包含set()、get()方法;
这就比较直观了,computed 在 Vue2.x 就存在了,只不过现在使用的形式变了一下,需要被计算的属性,通过上述形式返回。
# 创建只读的计算属性
import { computed, defineComponent, ref } from 'vue';
export default defineComponent({
  setup(props, context) {
   const state = reactive({
    a: 0
   })
    const age = ref(18)
// 根据 age 的值,创建一个响应式的计算属性 readOnlyAge,它会根据依赖的 ref 自动计算并返回一个新的 ref
    const readOnlyAge = computed(() => age.value++) // 19
    const double = computed(() => state.a * 3)
    return {
     state,
     double,
      age,
      readOnlyAge
    }
  }
});
</script>
2
3
4
5
6
7
8
9
10
11
12
13
14
15
16
17
18
19
要是你去修改计算出来的东西,你知道会发生什么吗?警告的意思是计算出来的东西是一个只读属性。
那要是我们想要修改怎么办呢,那么就要用到computed的终结写法;
<template>
  <div class="home">
    姓:<input type="text" v-model="names.familyName"><br>
    名:<input type="text" v-model="names.lastName"><br>
    姓名:<input type="text" v-model="names.fullName"><br>
  </div>
</template>

<script>
import {reactive,computed} from 'vue'
export default {
  name: 'Home',
  setup(){
    let names=reactive({
      familyName:'zh',
      lastName:'smy'
    })
    names.fullName=computed({
      get(){
        return names.familyName+'.'+names.lastName
      },
      set(value){
        let  nameList=value.split('.')
        names.familyName=nameList[0]
        names.lastName=nameList[1]
      }
    })
    return {
      names
    }
  }
}
</script>
2
3
4
5
6
7
8
9
10
11
12
13
14
15
16
17
18
19
20
21
22
23
24
25
26
27
28
29
30
31
32
33
# 通过set/ge创建可读写的计算属性
<script lang="ts">
import { computed, defineComponent, ref } from 'vue';
export default defineComponent({
  setup(props, context) {
    const age = ref<number>(18)
    const computedAge = computed({
      get: () => age.value + 1,
      set: value => age.value + value
    })
    // 为计算属性赋值的操作,会触发 set 函数, 触发 set 函数后,age 的值会被更新
    age.value = 100
    return {
      age,
      computedAge
    }
  }
});
</script>
2
3
4
5
6
7
8
9
10
11
12
13
14
15
16
17
18
# 其他新特性
# Template refs
获取标签元素
通过refs 来回去真实dom元素, 这个和react 的用法一样,为了获得对模板内元素或组件实例的引用,我们可以像往常一样在setup()中声明一个ref并返回它;
补充:设置的元素引用变量只有在组件挂载后才能访问到,因此在挂载前对元素进行操作都是无效的
- 还是跟往常一样,在
html中写入ref的名称 - 在
steup中定义一个ref steup中返回ref的实例onMounted中可以得到ref的RefImpl的对象, 通过.value获取真实dom
<template>
  <!--第一步:还是跟往常一样,在 html 中写入 ref 的名称-->
  <div class="mine" ref="elmRefs">
    <span>1111</span>
  </div>
</template>

<script lang="ts">
import { set } from 'lodash';
import { defineComponent, onMounted, ref } from 'vue';
export default defineComponent({
  setup(props, context) {
    // 获取真实dom
    const elmRefs = ref<null | HTMLElement>(null);
    onMounted (() => {
      console.log(elmRefs.value); // 得到一个 RefImpl 的对象, 通过 .value 访问到数据
    })
    return {
      elmRefs
    }
  }
});
</script>
2
3
4
5
6
7
8
9
10
11
12
13
14
15
16
17
18
19
20
21
22
23
获取标签元素
最后再补充一个 ref 另外的作用,那就是可以获取到标签元素或组件
在Vue2中,我们获取元素都是通过给元素一个 ref 属性,然后通过 this.$refs.xx 来访问的,但这在Vue3中已经不再适用了;接下来看看Vue3中是如何获取元素的吧;
<template>
  <div>
    <div ref="el">div元素</div>
  </div>
</template>

<script>
import { ref, onMounted } from 'vue'
export default {
  setup() {
      // 创建一个DOM引用,名称必须与元素的ref属性名相同
      const el = ref(null)
      // 在挂载后才能通过 el 获取到目标元素
      onMounted(() => {
        el.value.innerHTML = '内容被修改'
      })
      // 把创建的引用 return 出去
      return {el}
  }
}
</script>
2
3
4
5
6
7
8
9
10
11
12
13
14
15
16
17
18
19
20
21
获取元素的操作一共分为以下几个步骤:
- 先给目标元素的
ref属性设置一个值,假设为el - 然后在
setup函数中调用ref函数,值为null,并赋值给变量el,这里要注意,该变量名必须与我们给元素设置的ref属性名相同 - 把对元素的引用变量
el返回(return)出去
# Fragment
Vue3实现了不再限于模板中的单个根节点;
对我而言这个更像是一种概念,它的意思就相当于创建页面时,给了一个虚拟根标签VNode,因为我们知道在vue2里面,我们是有根标签这个概念的,但是到来vue3,它是自动给你创建个虚拟根标签VNode(Fragment),所以可以不要根标签。好处就是 减少标签层级, 减小内存占用;
# Teleport瞬间移动组件
teleport,字面意思就是远距离传送,我们可以把它理解为传送门的意思。
teleport 提供了一种有趣的方法,允许我们控制在 DOM 中哪个父节点下渲染了 HTML,而不必求助于全局状态或将其拆分为两个组件。
其实就是可以不考虑写在什么位置,可以定义teleport在任意标签里进行定位等(常见操作为模态框),除了body外,还可以写css选择器(id,class)
其实,有一个非常常见的需求就是,我们经常要通过点击一个按钮,来实现模态框的效果。而在 vue3 之前,我们基本上控制它都是点击后上下会形成一个父子组件的关系,这样子感觉独立性就没有那么强了。
因此, vue3 为了解决该问题,就用了 teleport 来解决。 teleport 就仿佛一个传送门,像上图这样,比如我们点击了打开按钮,那么点击完了之后,使用传送门瞬间移动到另外一个地方(模态框 Model )。再点击关闭按钮,传送门模态框 Modal 就消失了。
//id定位
<teleport to="#app">
  <div class="four">
    <div class="five"></div>
  </div>
</teleport>
//class定位
<teleport to=".one">
  <div class="four">
    <div class="five"></div>
  </div>
</teleport>
//示例
<template>
  <div class="one">
    <h1>第一层</h1>
    <div class="two">
      <h1>第二层</h1>
      <div class="three">
        <h1>第三层</h1>
        <teleport to="body">
          <div class="four">
            <div class="five"></div>
          </div>
        </teleport>
      </div>
    </div>
  </div>
</template>

<script>
  export default {
    name:'App',
    setup(){
      return {}
    }
  }
</script>

<style lang="less">
  .one{
    width: 100%;
    background-color: blue;
    .two{
      margin: 20px;
      background-color: aqua;
      .three{
        margin: 20px;
        background-color: aliceblue;
      }
    }
  }
  .four{
    position: absolute;
    top: 0;
    bottom: 0;
    left: 0;
    right: 0;
    background-color: rgba(0, 0, 0, 0.5);
    .five{
      position: absolute;
      top: 50%;
      left: 50%;
      transform: translate(-50%,-50%);
      width: 300px;
      height: 300px;
      left: 50%;
      background-color:#f60;
    }
  }
</style>
2
3
4
5
6
7
8
9
10
11
12
13
14
15
16
17
18
19
20
21
22
23
24
25
26
27
28
29
30
31
32
33
34
35
36
37
38
39
40
41
42
43
44
45
46
47
48
49
50
51
52
53
54
55
56
57
58
59
60
61
62
63
64
65
66
67
68
69
70
71
大家可以看到,通过 teleport 的方式,现在的模态框成功显示在 id 为 app 的 div 同一层下,达到了相互独立,而不再是父子层级的结果。
在上面的案例中,我们学习到了通过使用 vue3 新推出的 teleport 特性,将组件渲染到另外一个 DOM 节点的方法,这样使得组件之间的独立性更强。
# Suspense异步请求组件
suspense组件提供了一个方案,允许将等待过程提升到组件树中处理,而不是在单个组件中。
在开始介绍 Vue 的 Suspense 组件之前,我们有必要先了解一下 React 的 Suspense 组件,因为他们的功能类似。
React.lazy 接受一个函数,这个函数需要动态调用 import()。它必须返回一个 Promise,该 Promise 需要 resolve 一个 default export 的 React 组件。
在 web 世界中,经常遇到很多的异步请求困境。在发起异步请求时,我们往往需要去判断这些异步请求的状态,然后呢,根据这些请求来展示不同的界面。
那现在呢, vue3 推出了一个新的内置组件 Suspense , Suspense 是一个特殊的组件,它会有两个 template slot ,刚开始会渲染 feedback 内容,直到达到某个条件以后,才会渲染正式的内容,也就是default的内容。这样呢,进行异步内容的渲染就会变得特别简单。
同时值得注意的是,如果使用 Suspense ,要返回一个 promise 而不是一个对象。
import React, { Suspense } from 'react';
const myComponent = React.lazy(() => import('./Component'));

function MyComponent() {
  return (
    <div>
      <Suspense fallback={<div>Loading...</div>}>
        <myComponent />
      </Suspense>
    </div>
  );
}
2
3
4
5
6
7
8
9
10
11
12
Vue3 也新增了 React.lazy 类似功能的 defineAsyncComponent 函数,处理动态引入(的组件)。defineAsyncComponent可以接受返回承诺的工厂函数。当您从服务器检索到组件定义时,应该调用Promise的解析回调。您还可以调用reject(reason)来指示负载已经失败
import { defineAsyncComponent } from 'vue'
const AsyncComp = defineAsyncComponent(() =>
  import('./components/AsyncComponent.vue')
)
app.component('async-component', AsyncComp)

//setTimeOut方式模拟
<template>
  <h1>{{result}}</h1>
</template>
<script lang="ts">
import { defineComponent } from 'vue'
export default defineComponent({
  setup() {
    //使用Suspense需要返回一个对象
    return new Promise((resolve) => {
      setTimeout(() => {
        return resolve({
          result: '10000'
        })
      }, 3000)
    })
  }
})
</script>
2
3
4
5
6
7
8
9
10
11
12
13
14
15
16
17
18
19
20
21
22
23
24
25
Vue3 也新增了 Suspense 组件:
<template>
  <Suspense>
    <template #default>
      <my-component />
      <my-component2 />
    </template>
    <template #fallback>
      Loading ...
    </template>
  </Suspense>
</template>

<script lang='ts'>
 import { defineComponent, defineAsyncComponent } from "vue";
 const MyComponent = defineAsyncComponent(() => import('./Component'));

export default defineComponent({
   components: {
     MyComponent
   },
   setup() {
     return {}
   }
})
</script>
2
3
4
5
6
7
8
9
10
11
12
13
14
15
16
17
18
19
20
21
22
23
24
25
可以看到,通过 Suspense ,可以很轻易的发起一个异步请求。刚开始是fallback状态,之后达到 3s 的时间之后,切换到default的状态,显示出对应的异步请求内容。
# 多个异步
同时发起了两个异步请求,并且在Suspense中的default插槽里面同时使用。同样的,浏览器会先显示fallback的内容,之后等到时机到了,就显示我们请求的内容。依据这样的例子,显示更多的请求也同样有效。这样对比起来,发送多个异步请求是不是就方便了许多。
# 抓取错误
这个时候我们可以使用一个钩子函数,这个函数叫做 onErrorCaptured ,接下来我们来看下怎么抓取。
我们将父组件 index.vue 进行改造,具体代码如下:
<template>
  <div id="app">
    <p>{{error}}</p>
    <Suspense>
      <template #default>
        <async-show />
        <dog-show />
      <template #fallback>
        <h1>Loading !...</h1>
      </template>
    </Suspense>
  </div>
</template>

<script lang="ts">
import { onErrorCaptured } from 'vue'
import AsyncShow from './components/AsyncShow.vue'
import DogShow from './components/DogShow.vue'

export default {
  name: 'App',
  components: {
    AsyncShow,
    DogShow
  },
  setup() {
    const error = ref(null)
    onErrorCaptured((e: any) => {
      error.value = e
      return true
    })
    return{
        error
    }
  }
};
</script>
2
3
4
5
6
7
8
9
10
11
12
13
14
15
16
17
18
19
20
21
22
23
24
25
26
27
28
29
30
31
32
33
34
35
36
37
# Provide/Inject
通常,当我们需要从父组件向子组件传递数据时,我们使用 props。想象一下这样的结构:有一些深度嵌套的组件,而深层的子组件只需要父组件的部分内容。在这种情况下,如果仍然将 prop 沿着组件链逐级传递下去,可能会很麻烦。
对于这种情况,我们可以使用一对provide 和 inject。无论组件层次结构有多深,父组件都可以作为其所有子组件的依赖提供者。这个特性有两个部分:父组件有一个 provide 选项来提供数据,子组件有一个 inject 选项来开始使用这些数据。具体使用如下:
# 基础使用
// 父组件
<script lang="ts">
import { defineComponent } from 'vue';
export default defineComponent({
  provide: {
    provideData: { name: "撒点了儿" },
  }
});
</script>

// 子组件
<template>
  <div class="hello">
    <h1>{{ msg }}</h1>
    {{ provideData }}
  </div>
</template>

<script lang="ts">
export default defineComponent({
  name: "HelloWorld",
  props: {
    msg: String,
  },
  inject: ["provideData"],
});
</script>
2
3
4
5
6
7
8
9
10
11
12
13
14
15
16
17
18
19
20
21
22
23
24
25
26
27
# setup()中使用
在 setup() 中使用, 则需要从 vue 显式导入provide、inject方法。导入以后,我们就可以调用它来定义暴露给我们的组件方式。provide 函数允许你通过两个参数定义属性:
name:参数名称value:属性的值
<script lang="ts">
import { provide } from "vue";
import HelloWorldVue from "./components/HelloWorld.vue";
export default defineComponent({
  name: "App",
  components: {
    HelloWorld: HelloWorldVue,
  },
  setup() {
    provide("provideData", {
      name: "撒点了儿",
    });
    let fullname = reactive({name:'月',salary:'1k'})
		provide('fullname',fullname) //给自己的后代组件传递数据
    return {...toRefs(fullname)}
  },
});
</script>

<script lang="ts">
import { provide, inject } from "vue";
export default defineComponent({
  name: "HelloWorld",
  props: {
    msg: String,
  },
  setup() {
    const provideData = inject("provideData");
    console.log(provideData); //  { name: "撒点了儿"  }
    let fullname = inject('fullname')
    return {
      provideData,
      fullname,
    };
  },
});
</script>
2
3
4
5
6
7
8
9
10
11
12
13
14
15
16
17
18
19
20
21
22
23
24
25
26
27
28
29
30
31
32
33
34
35
36
37
# 传递响应数据
为了增加 provide 值和 inject 值之间的响应性,我们可以在 provide 值时使用 ref 或 reactive。
如果要确保通过 provide 传递的数据不会被 inject 的组件更改,我们建议对提供者的 property 使用 readonly。
<script lang="ts">
import { provide, reactive, ref } from "vue";
import HelloWorldVue from "./components/HelloWorld.vue";
export default defineComponent({
  name: "App",
  components: {
    HelloWorld: HelloWorldVue,
  },
  setup() {
    const age = ref(18);
    provide("provideData", {
      age,
      data: reactive({ name: "撒点了儿" }),
    });
  },
});
</script>

<script lang="ts">
import { inject } from "vue";
export default defineComponent({
  name: "HelloWorld",
  props: {
    msg: String,
  },
  setup() {
    const provideData = inject("provideData");
    console.log(provideData);
    return {
      provideData,
    };
  },
});
</script>
2
3
4
5
6
7
8
9
10
11
12
13
14
15
16
17
18
19
20
21
22
23
24
25
26
27
28
29
30
31
32
33
34
# 其他改变
移除keyCode作为 v-on 的修饰符,同时也不再支持config.keyCodes
移除v-on.native修饰符
移除过滤器(filter)
# 实践优化
- 尽可能使用
ref代替reactive; - 当包装大量数据时,使用
shallowRef代替ref; - 在内部使用
watch或watchEffect时,也要尽可能配置immediate和flush选项;
# 浅引用
当包装大量数据时,使用shallowRef代替ref。
export function useFetch<T>(url: MaybeRef<string>) {
  // 使用' shallowRef '来防止深层反应
  const data = shallowRef<T | undefined>()
  const error = shallowRef<Error | undefined>()

  fetch(unref(url))
    .then(r => r.json())
    .then(r => data.value = r)
    .catch(e => error.value = e)

  /* ... */
}
2
3
4
5
6
7
8
9
10
11
12
# vue 3 的生态
- 官网 (opens new window)
- 源码 (opens new window)
- vite构建器 (opens new window)
- 脚手架: (opens new window)https://cli.vuejs.org/
- vue-router-next (opens new window)
- vuex4.0 (opens new window)
UI 组件库
- vant2.x (opens new window)
- Ant Design of Vue 2.x (opens new window)
- [element-plus](
# 参考链接
- https://juejin.cn/post/6887359442354962445
- https://juejin.cn/post/6890545920883032071
