 vue2x题汇总及原理分析
# 对MVVM原理的理解?
点击查看
# 图示:
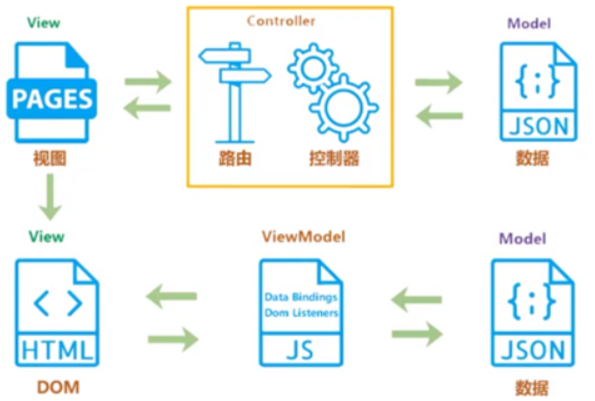
# 分析:
- 传统的
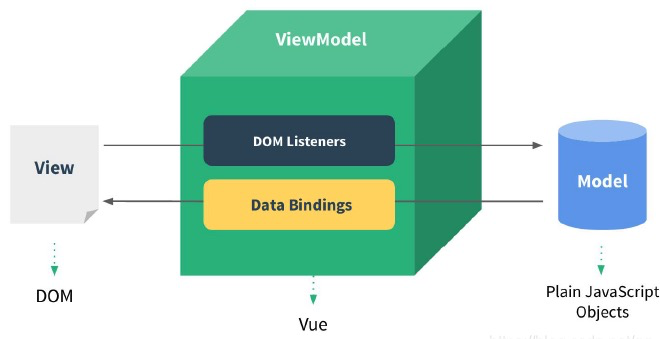
MVC指的是,用户操作会请求服务器路由,路由会调用对应的控制器来处理,控制器会获取数据。将结果返回给前端,页面重新渲染; MVVM:传统的前端会将数据手动渲染到页面上,MVVM模式不需要用户收到操作DOM元素,将数据绑定到ViewModel层上,会自动将数据渲染到页面中,视图变化会通知ViewModel层更新数据。ViewModel就是我们MVVM模式中的桥梁;
# vue响应原理/双向数据绑定
点击查看
# 核心答案:
数组和对象类型当值变化时如何劫持到。对象内部通过defineReactive方法,使用Object.defineProperty将属性进行劫持(只会劫持已经存在的属性data对象里面的数据),数组则是通过重写数组方法来实现。
这里在回答时可以带出一些相关知识点(比如多层对象是通过递归来实现劫持,顺带提出
Vue3中是使用proxy来实现响应式数据)
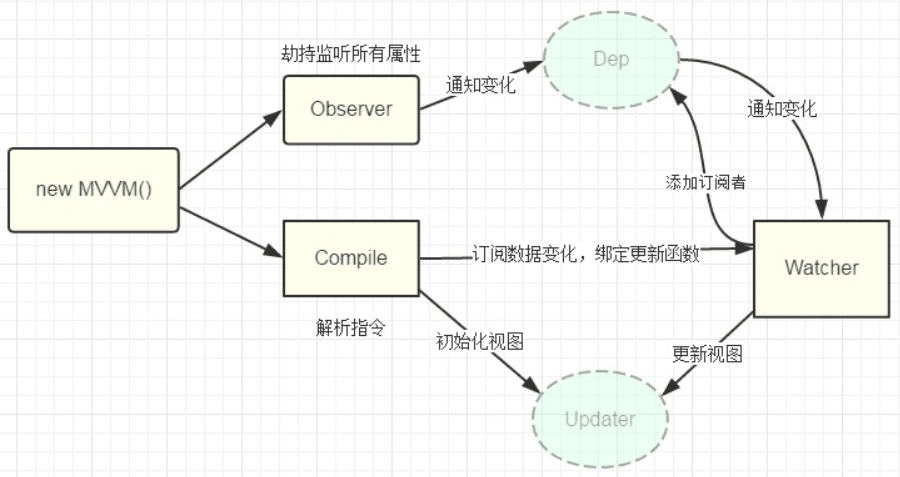
vue 实现数据双向绑定主要是
Vue 采用 数据劫持 结合 发布者-订阅者 模式的方式,通过 Object.defineProperty() 来劫持各个属性的 setter 以及 getter,在数据发生变化的时候,发布消息给依赖收集器,去通知观察者,做出对应的回调函数去更新视图。在数据变动时发布消息给订阅者,触发相应的监听回调。【要点】
具体就是【要点】:Vue实现数据双向绑定的效果,需要三大模块; MVVM作为绑定的入口,整合Observer,Compile和Watcher三者(OCWD),通过Observe来监听model的变化,通过Compile来解析编译模版指令,最终利用Watcher搭起Observer和Compile之前的通信桥梁,从而达到数据变化 => 更新视图,视图交互变化(input) => 数据model变更的双向绑定效果。【要点】
Vue 数据双向绑定主要是:数据变化更新视图,视图变化更新数据即:
- 输入框内容变化时,Data 中的数据同步变化。即 View => Data 的变化。
- Data 中的数据变化时,文本节点的内容同步变化。即 Data => View 的变化。
其中,View 变化更新 Data ,可以通过事件监听的方式来实现,所以 Vue 的数据双向绑定的工作主要是如何根据 Data 变化更新 View。

# 原理:
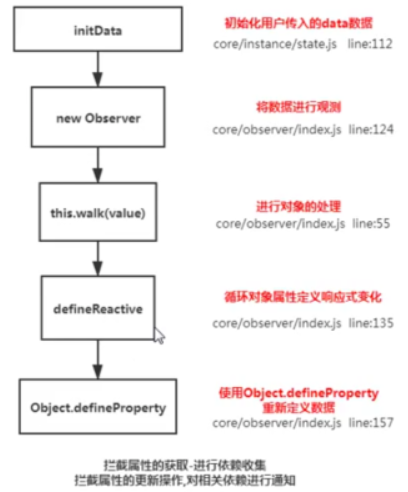
源码位置:
src/core/observer/index.js:135
  walk(obj: Object) {
    const keys = Object.keys(obj);
    /*walk方法会遍历对象的每一个属性进行defineReactive绑定*/
    for (let i = 0; i < keys.length; i++) {
      defineReactive(obj, keys[i], obj[keys[i]]);
    }
  }
/*为对象defineProperty上在变化时通知的属性*/
export function defineReactive(
  obj: Object,
  key: string,
  val: any,
  customSetter?: Function
) {
  /*在闭包中定义一个dep对象, 每个属性都增加一个dep 收集依赖*/
  const dep = new Dep();

  const property = Object.getOwnPropertyDescriptor(obj, key);
  if (property && property.configurable === false) {
    return;
  }

  /*如果之前该对象已经预设了getter以及setter函数则将其取出来,新定义的getter/setter中会将其执行,保证不会覆盖之前已经定义的getter/setter。*/
  // cater for pre-defined getter/setters
  const getter = property && property.get;
  const setter = property && property.set;

  /*对象的子对象递归进行observe并返回子节点的Observer对象*/
  let childOb = observe(val);
  Object.defineProperty(obj, key, {
    enumerable: true,
    configurable: true,
    get: function reactiveGetter() {
      /*如果原本对象拥有getter方法则执行*/
      const value = getter ? getter.call(obj) : val;
      if (Dep.target) {
        /*进行依赖收集*/
        dep.depend();
        if (childOb) {
          /*子对象进行依赖收集,其实就是将同一个watcher观察者实例放进了两个depend中,一个是正在本身闭包中的depend,另一个是子元素的depend*/
          childOb.dep.depend();// 数组依赖收集
        }
        if (Array.isArray(value)) {
          dependArray(value);
        }
      }
      return value;
    },
    set: function reactiveSetter(newVal) {
      const value = getter ? getter.call(obj) : val;
      /* eslint-disable no-self-compare */
      if (newVal === value || (newVal !== newVal && value !== value)) {
        return;
      }
      /* eslint-enable no-self-compare */
      if (process.env.NODE_ENV !== "production" && customSetter) {
        customSetter();
      }
      if (setter) {
        setter.call(obj, newVal);
      } else {
        val = newVal;
      }
      /*新的值需要重新进行observe,保证数据响应式*/
      childOb = observe(newVal);
      /*dep对象通知所有的观察者*/
      dep.notify();
    },
  });
}
2
3
4
5
6
7
8
9
10
11
12
13
14
15
16
17
18
19
20
21
22
23
24
25
26
27
28
29
30
31
32
33
34
35
36
37
38
39
40
41
42
43
44
45
46
47
48
49
50
51
52
53
54
55
56
57
58
59
60
61
62
63
64
65
66
67
68
69
70
# 补充回答:
内部依赖收集是怎样做到的,每个属性都拥有自己的dep属性,存放他所依赖的watcher,当属性变化后会通知自己对应的watcher去更新 (其实后面会讲到每个对象类型自己本身也拥有一个dep属性,这个在$set面试题中在进行讲解)
这里可以引出性能优化相关的内容
- 对象层级过深,性能就会差 ;
- 不需要响应数据的内容不要放到data中 ;
Object.freeze() 可以冻结数据;
# 快速Mock:
观察者模式实现:(源码精简)
三步骤:
- 通过
watcher.evaluate()将自身实例赋值给Dep.target - 调用
dep.depend()将dep实例将 watcher 实例 push 到 dep.subs中 - 通过数据劫持,在调用被劫持的对象的 set 方法时,调用 dep.subs 中所有的
watcher.update()
class Dep {// 观察者
    constructor() {
        this.subs = []
    }
    addSub(sub) {
        this.subs.push(sub)
    }
    depend() {
        if (Dep.target) {
            Dep.target.addDep(this);
        }
    }
    notify() {
        this.subs.forEach(sub => sub.update())
    }
}

class Watcher {// 被观察者
    constructor(vm, expOrFn) {
        this.vm = vm;
        this.getter = expOrFn;
        this.value;
    }
    get() {
        Dep.target = this;
        var vm = this.vm;
        var value = this.getter.call(vm, vm);
        return value;
    }
    evaluate() {
        this.value = this.get();
    }
    addDep(dep) {
        dep.addSub(this);
    }
    update() {
        console.log('更新, value:', this.value)
    }
}
// 观察者实例
var dep = new Dep();
//  被观察者实例
var watcher = new Watcher({x: 1}, (val) => val);
watcher.evaluate();//通过 `watcher.evaluate()` 将自身实例赋值给 `Dep.target`

// 观察者监听被观察对象
dep.depend()//调用 `dep.depend()` 将dep实例的 watcher 实例 push 到 dep.subs中
dep.notify()//通过数据劫持,在调用被劫持的对象的set方法时,调用 dep.subs 中所有的 `watcher.update()`
2
3
4
5
6
7
8
9
10
11
12
13
14
15
16
17
18
19
20
21
22
23
24
25
26
27
28
29
30
31
32
33
34
35
36
37
38
39
40
41
42
43
44
45
46
47
48
js 实现简单的双向绑定
<body>
    <div id="app">
        <input type="text" id="txt">
        <p id="show"></p>
    </div>
    <script>
        window.onload = function() {
            let obj = {};
            Object.defineProperty(obj, "txt", {
                get: function() {
                    return obj;
                },
                set: function(newValue) {
                    document.getElementById("txt").value = newValue;
                    document.getElementById("show").innerHTML  = newValue;
                }
            })
            document.addEventListener("keyup", function(e) {
                obj.txt = e.target.value;
            })
        }
    </script>
</body>
2
3
4
5
6
7
8
9
10
11
12
13
14
15
16
17
18
19
20
21
22
23
<body>
    <div id="app"></div>
    <script>
        let state = {count:0,a:1,a:{b:{c:{}}}}; // 1.变成响应式的数据
        let active;
        function defineReactive(obj){
            for(let key in obj){
                let value = obj[key]; // 对象对应的值
                let dep = [];
                Object.defineProperty(obj,key,{ // defineProperty
                    get(){
                        if(active){
                            dep.push(active);   // 依赖收集
                        }
                        return value;
                    },
                    set(newValue){ // 触发更新
                        value = newValue;
                        dep.forEach(watcher =>watcher());
                    }
                });
            }
        }
        defineReactive(state);
        // 插入到页面的功能 需要保存起来
        const watcher = (fn)=>{
            active = fn;
            fn(); // 调用函数
            active = null; // 后续不在watcher中取值 不触发依赖收集
        }
        watcher(()=>{
            app.innerHTML = state.count; // 取值
        })
        watcher(()=>{
            console.log(state.count);
        })
        state.count
        state.count++;
    </script>
</body>
2
3
4
5
6
7
8
9
10
11
12
13
14
15
16
17
18
19
20
21
22
23
24
25
26
27
28
29
30
31
32
33
34
35
36
37
38
39
40
# 简写描述
# 数据劫持部分
vue 双向数据绑定是通过 数据劫持 结合 发布订阅模式 的方式来实现的,也就是说数据和视图同步,数据发生变化,视图跟着变化,视图变化,数据也随之发生改变; 核心:Object.defineProperty() 方法。
- 如果是对象则采用Object.defineProperty()的方式定义数据拦截;
- 如果是数组,则覆盖数组的7个变更方法实现变更通知;
function defineReactive(obj, key, val) {
  Object.defineProperty(obj, key, {
    get() {
      return val
    },
    set(v) {
      val = v
      notify()
    }
  })
}

const arrayProto = Array.prototype
const arrayMethods = Object.create(arrayProto)

['push','pop','shift','unshift','splice','sort','reverse']
  .forEach(function (method) {
  const original = arrayProto[method]
  def(arrayMethods, method, function mutator (...args) {
    const result = original.apply(this, args)
    notify()
    return result
  })
})
2
3
4
5
6
7
8
9
10
11
12
13
14
15
16
17
18
19
20
21
22
23
24
# 视图更新部分
- 由于 Vue 执行一个组件的 render 函数是由 Watcher 去代理执行的,Watcher 在执行前会把 Watcher 自身先赋值给 Dep.target 这个全局变量,等待响应式属性去收集它。
- 在组件执行render函数时访问了响应式属性,响应式属性就会精确的收集到当前全局存在的 Dep.target 作为自身的依赖。
- 在响应式属性发生更新时通知 Watcher 去重新调用
vm._update(vm._render())进行组件的视图更新,视图更新的时候会通过diff算法对比新老vnode差异,通过patch即时更新DOM。
# Vue中组件的data为啥是函数?
点击查看
组件的data为啥是返回函数; new Vue({data:{}})却返回对象;
# 核心答案:
因为js本身的特性带来的,如果 data 是一个对象,那么由于对象本身属于引用类型,当我们修改其中的一个属性时,使得所有组件实例共用了一份data,造成了数据污染,会影响到所有Vue实例的数据。
每次使用组件时都会对组件进行实例化操作,并且调用data函数返回一个对象作为组件的数据源。这样可以保证多个组件间数据互不影响;
同一个组件被复用多次,会创建多个实例。这些实例用的是同一个构造函数,如果data是一个对象得话,那么所有组件都共享了一个对象。为了保证组件的数据独立性要求每个组件必须通过data函数返回一个对象作为组件的状态;
# 原理:
源码位置:
src/core/instance/state.js:128
/*初始化data*/
function initData(vm: Component) {
  /*得到data数据*/
  let data = vm.$options.data;
  data = vm._data = typeof data === "function" ? getData(data, vm) : data || {};

  /*对对象类型进行严格检查,只有当对象是纯javascript对象的时候返回true*/
  if (!isPlainObject(data)) {
    data = {};
    process.env.NODE_ENV !== "production" &&
      warn(
        "data functions should return an object:\n" +
          "https://vuejs.org/v2/guide/components.html#data-Must-Be-a-Function",
        vm
      );
  }
  .....
}

function getData(data: Function, vm: Component): any {
  try {
    return data.call(vm);
  } catch (e) {
    handleError(e, vm, `data()`);
    return {};
  }
}
2
3
4
5
6
7
8
9
10
11
12
13
14
15
16
17
18
19
20
21
22
23
24
25
26
27
# 快速Mock:
function VueComponent(params) {}

VueComponent.prototype.$options = {
  // data: { name: "samy" },
  data() {
    return { name: "samy" };
  },
};

let vc1 = new VueComponent();
let vc2 = new VueComponent();
// vc1.$options.data = "samy1";
// vc2.$options.data = "samy2";
// console.log(vc1.$options);
// console.log(vc2.$options);
vc1.$options.data().name = "samy1";
vc2.$options.data().name = "samy2";
console.log(vc1.$options.data());
console.log(vc2.$options.data());
2
3
4
5
6
7
8
9
10
11
12
13
14
15
16
17
18
19
class Vue{
    constructor(options){
        this.data = options.data();
    }
}
let data = ()=>({a:1})
let d1 = new Vue({data});
let d2 = new Vue({data});
d1.data.a = 100;
console.log(d2); // 1
2
3
4
5
6
7
8
9
10
源码位置:
core/global-api/extend:33,src/core/util/options:121
策略模式合并options; Vue.extend通过一个对象创建一个构造函数;
 /*
   使用基础 Vue 构造器,创建一个“子类”。
   其实就是扩展了基础构造器,形成了一个可复用的有指定选项功能的子构造器。
   参数是一个包含组件option的对象。  https://cn.vuejs.org/v2/api/#Vue-extend-options
   */
  Vue.extend = function (extendOptions: Object): Function {
    extendOptions = extendOptions || {}
    /*父类的构造*/
    const Super = this
    /*父类的cid*/
    const SuperId = Super.cid
    const cachedCtors = extendOptions._Ctor || (extendOptions._Ctor = {})
    /*如果构造函数中已经存在了该cid,则代表已经extend过了,直接返回*/
    if (cachedCtors[SuperId]) {
      return cachedCtors[SuperId]
    }

    const name = extendOptions.name || Super.options.name
    if (process.env.NODE_ENV !== 'production') {
      /*name只能包含字母与连字符*/
      if (!/^[a-zA-Z][\w-]*$/.test(name)) {
        warn(
          'Invalid component name: "' + name + '". Component names ' +
          'can only contain alphanumeric characters and the hyphen, ' +
          'and must start with a letter.'
        )
      }
    }

    /*
      Sub构造函数其实就一个_init方法,这跟Vue的构造方法是一致的,在_init中处理各种数据初始化、生命周期等。
      因为Sub作为一个Vue的扩展构造器,所以基础的功能还是需要保持一致,跟Vue构造器一样在构造函数中初始化_init。
    */
    const Sub = function VueComponent (options) {
      this._init(options)
    }
    /*继承父类*/
    Sub.prototype = Object.create(Super.prototype)
    /*构造函数*/
    Sub.prototype.constructor = Sub
    /*创建一个新的cid*/
    Sub.cid = cid++
    /*将父组件的option与子组件的合并到一起(Vue有一个cid为0的基类,即Vue本身,会将一些默认初始化的option何入)*/
    Sub.options = mergeOptions(
      Super.options,
      extendOptions
    )
    /*es6语法,super为父类构造*/
    Sub['super'] = Super
2
3
4
5
6
7
8
9
10
11
12
13
14
15
16
17
18
19
20
21
22
23
24
25
26
27
28
29
30
31
32
33
34
35
36
37
38
39
40
41
42
43
44
45
46
47
48
49
mixin
/*合并两个option对象到一个新的对象中*/
export function mergeOptions(
  parent: Object,
  child: Object,
  vm?: Component
): Object {
  if (process.env.NODE_ENV !== "production") {
    /*检查是否是有效的组件名*/
    checkComponents(child);
  }

  if (typeof child === "function") {
    child = child.options;
  }

  /*确保所有props option序列化成正确的格式*/
  normalizeProps(child);
  /*将函数指令序列化后加入对象*/
  normalizeDirectives(child);
  /*
    https://cn.vuejs.org/v2/api/#extends
    允许声明扩展另一个组件(可以是一个简单的选项对象或构造函数),而无需使用
    将child的extends也加入parent扩展
  */
  const extendsFrom = child.extends;
  if (extendsFrom) {
    parent = mergeOptions(parent, extendsFrom, vm);
  }
  /*child的mixins加入parent中*/
  if (child.mixins) {
    for (let i = 0, l = child.mixins.length; i < l; i++) {
      parent = mergeOptions(parent, child.mixins[i], vm);
    }
  }
  const options = {};
  let key;
  for (key in parent) {
    mergeField(key);
  }
  /*合并parent与child*/
  for (key in child) {
    if (!hasOwn(parent, key)) {
      mergeField(key);
    }
  }
  function mergeField(key) {
    /*strats里面存了options中每一个属性(el、props、watch等等)的合并方法,先取出*/
    const strat = strats[key] || defaultStrat;
    /*根据合并方法来合并两个option*/
    options[key] = strat(parent[key], child[key], vm, key);
  }
  return options;
}

strats.data = function (
  parentVal: any,
  childVal: any,
  vm?: Component
): ?Function {
  if (!vm) {
    // in a Vue.extend merge, both should be functions
    if (!childVal) {
      return parentVal;
    }
    if (typeof childVal !== "function") {
      process.env.NODE_ENV !== "production" &&
        warn(
          'The "data" option should be a function ' +
            "that returns a per-instance value in component " +
            "definitions.",
          vm
        );
      return parentVal;
    }
    if (!parentVal) {
      return childVal;
    }
    // when parentVal & childVal are both present,
    // we need to return a function that returns the
    // merged result of both functions... no need to
    // check if parentVal is a function here because
    // it has to be a function to pass previous merges.
    return function mergedDataFn() {
      return mergeData(childVal.call(this), parentVal.call(this));
    };
  } else if (parentVal || childVal) {
    return function mergedInstanceDataFn() {
      // instance merge
      const instanceData =
        typeof childVal === "function" ? childVal.call(vm) : childVal;
      const defaultData =
        typeof parentVal === "function" ? parentVal.call(vm) : undefined;
      if (instanceData) {
        return mergeData(instanceData, defaultData);
      } else {
        return defaultData;
      }
    };
  }
};
2
3
4
5
6
7
8
9
10
11
12
13
14
15
16
17
18
19
20
21
22
23
24
25
26
27
28
29
30
31
32
33
34
35
36
37
38
39
40
41
42
43
44
45
46
47
48
49
50
51
52
53
54
55
56
57
58
59
60
61
62
63
64
65
66
67
68
69
70
71
72
73
74
75
76
77
78
79
80
81
82
83
84
85
86
87
88
89
90
91
92
93
94
95
96
97
98
99
100
# vue 中怎么重置 data?
# 核心答案:
使用Object.assign();
vm.$data可以获取当前状态下的data,vm.$options.data可以获取到组件初始化状态下的data。Object.assign(this.$data, this.$options.data())
# Vue如何检测数组变化?
点击查看
# 核心答案:
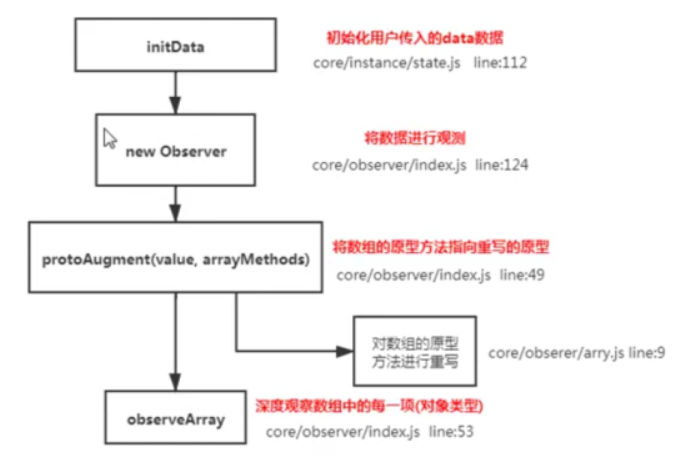
数组考虑性能原因没有用defineProperty对数组的每一项进行拦截,而是选择重写数组(push,pop,unshift,shift,splice,sort,reverse)7个方法进行重写。
# 原理:
// 缓存数组原型
const arrayProto = Array.prototype;
// 实现 arrayMethods.__proto__ === Array.prototype
export const arrayMethods = Object.create(arrayProto);
// 需要进行功能拓展的方法
const methodsToPatch = [
  "push",
  "pop",
  "shift",
  "unshift",
  "splice",
  "sort",
  "reverse"
];

/**
 * Intercept mutating methods and emit events
 */
methodsToPatch.forEach(function(method) {
  // 缓存原生数组方法
  const original = arrayProto[method];
  def(arrayMethods, method, function mutator(...args) {
    // 执行并缓存原生数组功能
    const result = original.apply(this, args);
    // 响应式处理
    const ob = this.__ob__;
    let inserted;
    switch (method) {
    // push、unshift会新增索引,所以要手动observer
      case "push":
      case "unshift":
        inserted = args;
        break;
      // splice方法,如果传入了第三个参数,也会有索引加入,也要手动observer。
      case "splice":
        inserted = args.slice(2);
        break;
    }
    //
    if (inserted) ob.observeArray(inserted);// 获取插入的值,并设置响应式监听
    // notify change
    ob.dep.notify();// 通知依赖更新
    // 返回原生数组方法的执行结果
    return result;
  });
});
2
3
4
5
6
7
8
9
10
11
12
13
14
15
16
17
18
19
20
21
22
23
24
25
26
27
28
29
30
31
32
33
34
35
36
37
38
39
40
41
42
43
44
45
46
源码位置:
src/core/observer/array.js:8
简单来说就是,重写了数组中的那些原生方法,
- 首先获取到这个数组的__ob__,也就是它的Observer对象,
- 如果有新的值,就调用observeArray继续对新的值观察变化(也就是通过
target__proto__ == arrayMethods来改变了数组实例的型), - 然后手动调用notify,通知渲染watcher,执行update。
# 补充回答:
在Vue中修改数组的索引和长度是无法监控到的**。需要通过以上7种变异方法修改数组才会触发数组对应的watcher进行更新**。数组中如果是对象数据类型也会进行递归劫持。
那如果想更改索引更新数据怎么办?
可以通过Vue.$set()来进行处理 =》 核心内部用的是splice方法
# 快速Mock:
let state = [1,2,3] // 1.变成响应式的数据
let originalArray = Array.prototype; // 数组原来的方法
let arrayMethods = Object.create(originalArray)// 不是深拷贝
function defineReactive(obj){
    arrayMethods.push = function (...args) {
        originalArray.push.call(this,...args)// 函数劫持
        render(); // 更新视图
    }
    obj.__proto__ = arrayMethods; // 不行可以循环赋值, js中的原型链
}
defineReactive(state); //
// 插入到页面的功能 需要保存起来
function render(){
    app.innerHTML = state;
}
render();
setTimeout(() => {
    state.push(4)
}, 1000);
2
3
4
5
6
7
8
9
10
11
12
13
14
15
16
17
18
19
20
# Vue.set/delete方法是如何实现的?
点击查看
# 核心答案:
为什么$set可以触发更新,我们给对象和数组本身都增加了dep属性。当给对象新增不存在的属性则触发对象依赖的watcher去更新,当修改数组索引时我们调用数组本身的splice方法去更新数组
# 原理:
设置示范:
- Vue.set(info,age,22)
- Vue.set(array,1,100)
源码位置:
src/core/observer/index:202
export function set (target: Array | Object, key: any, val: any): any {
    // 1.是开发环境 target 没定义或者是基础类型则报错
    if (process.env.NODE_ENV !== 'production' &&
        (isUndef(target) || isPrimitive(target))
    ) {
        warn(`Cannot set reactive property on undefined, null, or primitive value: ${(target: any)}`)
    }
    // 2.如果是数组 Vue.set(array,1,100); 调用我们重写的splice方法 (这样可以更新视图)
    if (Array.isArray(target) && isValidArrayIndex(key)) {
        target.length = Math.max(target.length, key)
        target.splice(key, 1, val)
        return val
    }
    // 3.如果是对象本身的属性,则直接添加即可
    if (key in target && !(key in Object.prototype)) {
        target[key] = val
        return val
    }
    const ob = (target: any).__ob__
    // 4.如果是Vue实例 或 根数据data时 报错
    if (target._isVue || (ob && ob.vmCount)) {
        process.env.NODE_ENV !== 'production' && warn(
        'Avoid adding reactive properties to a Vue instance or its root $data ' +
        'at runtime - declare it upfront in the data option.'
        )
        return val
    }
    // 5.如果不是响应式的也不需要将其定义成响应式属性
    if (!ob) {
        target[key] = val
        return val
    }
    // 6.将属性定义成响应式的
    defineReactive(ob.value, key, val)
    // 7.通知视图更新
    ob.dep.notify()
    return val
}
2
3
4
5
6
7
8
9
10
11
12
13
14
15
16
17
18
19
20
21
22
23
24
25
26
27
28
29
30
31
32
33
34
35
36
37
38
阅读以上源码可知,vm.$set 的实现原理是:
- 如果目标是数组,直接使用数组的 splice 方法触发相应式;
- 如果目标是对象,会先判断属性是否存在、对象是否是响应式,最终如果要对属性进行响应式处理,则是通过调用 defineReactive 方法进行响应式处理( defineReactive 方法就是 Vue 在初始化对象时,给对象属性采用 Object.defineProperty 动态添加 getter 和 setter 的功能所调用的方法)
delete的实现
export function del(target: Array<any> | Object, key: any) {
  if (Array.isArray(target) && typeof key === "number") {
    target.splice(key, 1);
    return;
  }
  const ob = (target: any).__ob__;
  if (target._isVue || (ob && ob.vmCount)) {
    process.env.NODE_ENV !== "production" &&
      warn(
        "Avoid deleting properties on a Vue instance or its root $data " +
        "- just set it to null."
      );
    return;
  }
  if (!hasOwn(target, key)) {
    return;
  }
  delete target[key];
  if (!ob) {
    return;
  }
  ob.dep.notify();
}
2
3
4
5
6
7
8
9
10
11
12
13
14
15
16
17
18
19
20
21
22
23
# 其他相关题:
# 为什么会出现vue修改数据后页面没有刷新?
受 ES5 的限制,Vue.js 不能检测到对象属性的添加或删除。因为 Vue.js 在初始化实例时将属性转为 getter/setter,所以属性必须在 data 对象上才能让 Vue.js 转换它,才能让它是响应的。
# vue不能检测数组或对象变动问题的解决方法有哪些?
- vm.$set(vm.items, indexOfItem, newValue)
- vm.items.splice
- 使用this.$forceupdate强制刷新
- 使用Proxy
- 使用立即执行函数
# 为何Vue采用异步渲染?
点击查看
# 理解:
vue是组件级更新
因为如果不采用异步更新,那么每次更新数据都会对当前组件进行重新渲染,所以为了性能考虑。Vue会在本轮数据更新后,再去异步更新视图;
# 原理:
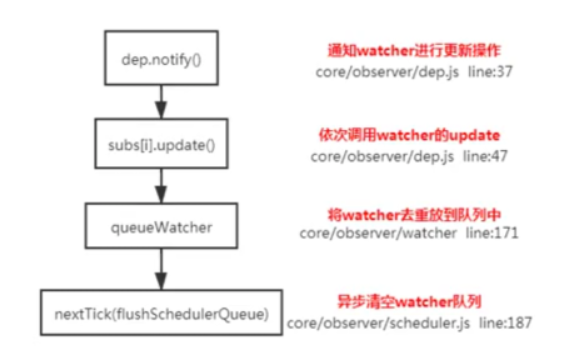
源码位置:src/core/observer/dep.js:34
 /*通知所有订阅者*/
  notify () {
    // stabilize the subscriber list first
    const subs = this.subs.slice()
    for (let i = 0, l = subs.length; i < l; i++) {
      subs[i].update()
    }
  }
2
3
4
5
6
7
8
源码位置:src/core/observer/watcher.js:179
   /*调度者接口,当依赖发生改变的时候进行回调。*/
  update () {
    /* istanbul ignore else */
    if (this.lazy) {
      this.dirty = true
    } else if (this.sync) {
      /*同步则执行run直接渲染视图*/
      this.run()
    } else {
      /*异步推送到观察者队列中,下一个tick时调用。*/
      queueWatcher(this)
    }
  }
2
3
4
5
6
7
8
9
10
11
12
13
源码位置:src/core/observer/scheduler.js:156
 /*将一个观察者对象push进观察者队列,在队列中已经存在相同的id则该观察者对象将被跳过,除非它是在队列被刷新时推送*/
export function queueWatcher (watcher: Watcher) {
  /*获取watcher的id*/
  const id = watcher.id
  /*检验id是否存在,已经存在则直接跳过,不存在则标记哈希表has,用于下次检验*/
  if (has[id] == null) {
    has[id] = true
    if (!flushing) {
      /*如果没有flush掉,直接push到队列中即可*/
      queue.push(watcher)
    } else {
      // if already flushing, splice the watcher based on its id
      // if already past its id, it will be run next immediately.
      let i = queue.length - 1
      while (i >= 0 && queue[i].id > watcher.id) {
        i--
      }
      queue.splice(Math.max(i, index) + 1, 0, watcher)
    }
    // queue the flush
    if (!waiting) {
      waiting = true
      //调用nextTick方法, 批量的进行更新
      nextTick(flushSchedulerQueue)
    }
  }
}

/*nextTick的回调函数,在下一个tick时flush掉两个队列同时运行watchers*/
function flushSchedulerQueue() {
  flushing = true;
  let watcher, id;
  /*
    给queue排序,这样做可以保证:
    1.组件更新的顺序是从父组件到子组件的顺序,因为父组件总是比子组件先创建。
    2.一个组件的user watchers比render watcher先运行,因为user watchers往往比render watcher更早创建
    3.如果一个组件在父组件watcher运行期间被销毁,它的watcher执行将被跳过。
  */
  queue.sort((a, b) => a.id - b.id);

  /*这里不用index = queue.length;index > 0; index--的方式写是因为不要将length进行缓存,因为在执行处理现有watcher对象期间,更多的watcher对象可能会被push进queue*/
  for (index = 0; index < queue.length; index++) {
    watcher = queue[index];
    id = watcher.id;
    /*将has的标记删除*/
    has[id] = null;
    /*执行watcher*/
    watcher.run();
    // in dev build, check and stop circular updates.
    /*
      在测试环境中,检测watch是否在死循环中
      比如这样一种情况
      watch: {
        test () {
          this.test++;
        }
      }
      持续执行了一百次watch代表可能存在死循环
    */
    if (process.env.NODE_ENV !== "production" && has[id] != null) {
      circular[id] = (circular[id] || 0) + 1;
      if (circular[id] > MAX_UPDATE_COUNT) {
        warn(
          "You may have an infinite update loop " +
            (watcher.user
              ? `in watcher with expression "${watcher.expression}"`
              : `in a component render function.`),
          watcher.vm
        );
        break;
      }
    }
  }

  // keep copies of post queues before resetting state
  /**/
  /*得到队列的拷贝*/
  const activatedQueue = activatedChildren.slice();
  const updatedQueue = queue.slice();

  /*重置调度者的状态*/
  resetSchedulerState();

  // call component updated and activated hooks
  /*使子组件状态都改编成active同时调用activated钩子*/
  callActivatedHooks(activatedQueue);
  /*调用updated钩子*/
  callUpdateHooks(updatedQueue);

  // devtool hook
  /* istanbul ignore if */
  if (devtools && config.devtools) {
    devtools.emit("flush");
  }
}
2
3
4
5
6
7
8
9
10
11
12
13
14
15
16
17
18
19
20
21
22
23
24
25
26
27
28
29
30
31
32
33
34
35
36
37
38
39
40
41
42
43
44
45
46
47
48
49
50
51
52
53
54
55
56
57
58
59
60
61
62
63
64
65
66
67
68
69
70
71
72
73
74
75
76
77
78
79
80
81
82
83
84
85
86
87
88
89
90
91
92
93
94
95
# 快速Mock:
# nextTick在哪里使用?原理是?
点击查看
大家所熟悉的 Vue API Vue.nextTick 全局方法和 vm.$nextTick 实例方法的内部都是调用 nextTick 函数,该函数的作用可以理解为异步执行传入的函数。
其实nextTick就是一个把回调函数推入任务队列的方法。
# 核心答案:
nextTick中的回调是在下次 DOM 更新循环结束之后执行的延迟回调。在修改数据之后立即使用这个方法,获取更新后的 DOM。原理就是异步方法(promise,mutationObserver,setImmediate,setTimeout)经常与事件环一起来问(宏任务和微任务)
延迟调用优先级如下:Promise > MutationObserver > setImmediate > setTimeout【PMSS】
# 原理:
nextTick方法主要使用了宏任务和微任务,定义了一个异步方法。多次调用nextTick会将方法存入队列中,通过这个异步方法清空当前队列。所以这个nextTick方法就是异步方法;
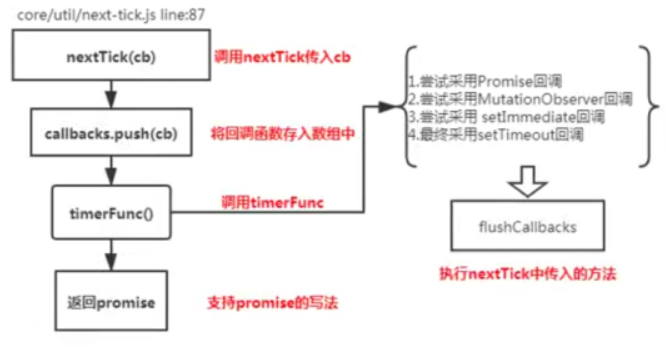
Vue.nextTick 内部逻辑; 源码位置:
src/core/global-api/index.js:45
在执行 initGlobalAPI(Vue) 初始化 Vue 全局 API 中,这么定义 Vue.nextTick。
function initGlobalAPI(Vue) {
    //...
    Vue.nextTick = nextTick;
}
2
3
4
可以看出是直接把 nextTick 函数赋值给 Vue.nextTick,就可以了,非常简单。
vm.$nextTick 内部逻辑; 源码位置:
src/core/observer/watcher.js:179
Vue.prototype.$nextTick = function (fn) {
    return nextTick(fn, this)
};
2
3
源码位置:src/core/util/env.js:78
export const nextTick = (function () {
  /*存放异步执行的回调*/
  const callbacks = [];
  /*一个标记位,如果已经有timerFunc被推送到任务队列中去则不需要重复推送*/
  let pending = false;
  /*一个函数指针,指向函数将被推送到任务队列中,等到主线程任务执行完时,任务队列中的timerFunc被调用*/
  let timerFunc;

  /*下一个tick时的回调*/
  //function flushCallbacks () {
  function nextTickHandler() {
    /*一个标记位,标记等待状态(即函数已经被推入任务队列或者主线程,已经在等待当前栈执行完毕去执行),这样就不需要在push多个回调到callbacks时将timerFunc多次推入任务队列或者主线程*/
    pending = false;
    /*执行所有callback*/
    const copies = callbacks.slice(0);
    callbacks.length = 0;
    for (let i = 0; i < copies.length; i++) {
      copies[i]();
    }
  }

  // the nextTick behavior leverages the microtask queue, which can be accessed
  // via either native Promise.then or MutationObserver.
  // MutationObserver has wider support, however it is seriously bugged in
  // UIWebView in iOS >= 9.3.3 when triggered in touch event handlers. It
  // completely stops working after triggering a few times... so, if native
  // Promise is available, we will use it:
  /* istanbul ignore if */

  /*
    这里解释一下,一共有Promise、MutationObserver以及setTimeout三种尝试得到timerFunc的方法。
    优先使用Promise,在Promise不存在的情况下使用MutationObserver,这两个方法的回调函数都会在microtask中执行,它们会比setTimeout更早执行,所以优先使用。
    如果上述两种方法都不支持的环境则会使用setTimeout,在task尾部推入这个函数,等待调用执行。
  */
  if (typeof Promise !== "undefined" && isNative(Promise)) {
    /*使用Promise*/
    var p = Promise.resolve();
    var logError = (err) => {
      console.error(err);
    };
    timerFunc = () => {
      p.then(nextTickHandler).catch(logError);
      // in problematic UIWebViews, Promise.then doesn't completely break, but
      // it can get stuck in a weird state where callbacks are pushed into the
      // microtask queue but the queue isn't being flushed, until the browser
      // needs to do some other work, e.g. handle a timer. Therefore we can
      // "force" the microtask queue to be flushed by adding an empty timer.
      if (isIOS) setTimeout(noop);
    };
  } else if (
    typeof MutationObserver !== "undefined" &&
    (isNative(MutationObserver) ||
      // PhantomJS and iOS 7.x
      MutationObserver.toString() === "[object MutationObserverConstructor]")
  ) {
    // use MutationObserver where native Promise is not available,
    // e.g. PhantomJS IE11, iOS7, Android 4.4
    /*新建一个textNode的DOM对象,用MutationObserver绑定该DOM并指定回调函数,在DOM变化的时候则会触发回调,该回调会进入主线程(比任务队列优先执行),即textNode.data = String(counter)时便会加入该回调*/
    var counter = 1;
    var observer = new MutationObserver(nextTickHandler);
    var textNode = document.createTextNode(String(counter));
    observer.observe(textNode, {
      characterData: true,
    });
    timerFunc = () => {
      counter = (counter + 1) % 2;
      textNode.data = String(counter);
    };
  } else {
    // fallback to setTimeout
    /*使用setTimeout将回调推入任务队列尾部*/
    timerFunc = () => {
      setTimeout(nextTickHandler, 0);
    };
  }
2
3
4
5
6
7
8
9
10
11
12
13
14
15
16
17
18
19
20
21
22
23
24
25
26
27
28
29
30
31
32
33
34
35
36
37
38
39
40
41
42
43
44
45
46
47
48
49
50
51
52
53
54
55
56
57
58
59
60
61
62
63
64
65
66
67
68
69
70
71
72
73
74
75
# 补充回答:
vue多次更新数据,最终会进行批处理更新。内部调用的就是nextTick实现了延迟更新,用户自定义的nextTick中的回调会被延迟到更新完成后调用,从而可以获取更新后的DOM。
# 快速Mock:
let cbs = [];
let pending = false;
function flushCallbacks() {
    cbs.forEach(fn=>fn());
}
function nextTick(fn) {
    cbs.push(fn);
    if (!pending) {
        pending = true;
        setTimeout(() => {
            flushCallbacks();
        }, 0);
    }
}
function render() {
    console.log('rerender');
};
nextTick(render)
nextTick(render)
nextTick(render);
console.log('sync...')
2
3
4
5
6
7
8
9
10
11
12
13
14
15
16
17
18
19
20
21
# 应用场景
- 在Vue生命周期的created()钩子函数进行的DOM操作一定要放在Vue.nextTick()的回调函数中,原因:是created()钩子函数执行时DOM其实并未进行渲染。
- 在数据变化后要执行的某个操作,而这个操作需要使用随数据改变而改变的DOM结构的时候,这个操作应该放在Vue.nextTick()的回调函数中,原因:Vue异步执行DOM更新,只要观察到数据变化,Vue将开启一个队列,并缓冲在同一个事件循环中发生的所有数据改变,如果同一个watcher被多次触发,只会被推入到队列中一次
//改变数据
vm.message="changed";
//想要立即使用更新后的DOM,这样不行,因为设置message后DOM还没有更新
console.log(vm.$el.textContent)//并不会得到"changed"
//这样可以,nextTick里面的代码在DOM更新后执行
Vue.nextTick(function(){
    //DOM更新,可以得到"changed"
    console.log(vm.$el.textContent)
})

//作为一个promise使用,不传参数时回调
Vue.nextTick().then(function(){
    //DOM更新时的执行代码
})
2
3
4
5
6
7
8
9
10
11
12
13
14
# 请说下v-if和v-show的区别?
点击查看
# 表面分析:
- v-if 如果条件不成立不会渲染当前指令所在节点的 dom 元素;
- v-show 只是切换当前 dom 的显示或者隐藏;
# 核心答案:
- v-if在编译过程中会被转化成三元表达式,条件不满足时不渲染此节点。
- v-show会被编译成指令,条件不满足时控制样式将对应节点隐藏 (内部其他指令依旧会继续执行)
扩展回答: 频繁控制显示隐藏尽量不使用v-if,v-if和v-for尽量不要连用,要处理的话,使用在外一层控制或者用计算属性处理;
# 原理:
# v-if源码剖析:
源码位置:
src/compiler/codegen/index.js:155
/*处理v-if*/
function genIf(el: any): string {
  /*标记位*/
  el.ifProcessed = true; // avoid recursion
  return genIfConditions(el.ifConditions.slice());
}

function genIfConditions (
    conditions: ASTIfConditions,
    state: CodegenState,
    altGen?: Function,
    altEmpty?: string
    ): string {
    if (!conditions.length) {
        return altEmpty || '_e()'
    }
    const condition = conditions.shift()
    if (condition.exp) {   // 如果有表达式
        return `(${condition.exp})?${ // 将表达式作为条件拼接成元素
        genTernaryExp(condition.block)
        }:${
        genIfConditions(conditions, state, altGen, altEmpty)
        }`
    } else {
        return `${genTernaryExp(condition.block)}` // 没有表达式直接生成元素 像v-else
    }
    // v-if with v-once should generate code like (a)?_m(0):_m(1)
    function genTernaryExp (el) {
        return altGen
        ? altGen(el, state)
        : el.once
            ? genOnce(el, state)
            : genElement(el, state)
    }
}
2
3
4
5
6
7
8
9
10
11
12
13
14
15
16
17
18
19
20
21
22
23
24
25
26
27
28
29
30
31
32
33
34
35
# v-show源码剖析:
源码位置:
src/platforms/web/runtime/directives/show.js:15
v-show会解析成指令,变为display:none;
  bind(el: any, { value }: VNodeDirective, vnode: VNodeWithData) {
    vnode = locateNode(vnode);
    const transition = vnode.data && vnode.data.transition;
    const originalDisplay = (el.__vOriginalDisplay =
      el.style.display === "none" ? "" : el.style.display);//获取原始显示值
    if (value && transition && !isIE9) {
      vnode.data.show = true;
      enter(vnode, () => {
        el.style.display = originalDisplay;
      });
    } else {
      el.style.display = value ? originalDisplay : "none";//根据属性控制显示或者隐藏
    }
  },
2
3
4
5
6
7
8
9
10
11
12
13
14
# 编译后分析比较:
v-if
const VueTemplateCompiler = require('vue-template-compiler');
let r1 = VueTemplateCompiler.compile(`
    <div v-if="true"><span v-for="i in 3">hello</span></div>`
);
/** with(this) {
 *   return (true) ? _c('div', _l((3), function (i) { return _c('span', [_v("hello")]) }), 0) : _e()
 * }
**/
2
3
4
5
6
7
8
v-show
const VueTemplateCompiler = require('vue-template-compiler');
let r1 = VueTemplateCompiler.compile(`<div v-show="true"</div>`);
// with(this) {
//   return _c('div', {
//       directives:[{
//           name:"show",
//           rawName:"v-show",
//           value:(true),
//           expression:"true",
//       }]
//   })
// }
2
3
4
5
6
7
8
9
10
11
12
# v-if与v-for的优先级
# 核心答案:
v-for和v-if不要在同一个标签中使用,因为解析时先解析v-for在解析v-if。如果遇到需要同时使用时可以考虑写成计算属性的方式。
# 原理:
源码位置:
src/compiler/codegen/index.js:55
/*处理element,分别处理static静态节点、v-once、v-for、v-if、template、slot以及组件或元素*/
function genElement(el: ASTElement): string {
  if (el.staticRoot && !el.staticProcessed) {
    /*处理static静态节点*/
    return genStatic(el);
  } else if (el.once && !el.onceProcessed) {
    /*处理v-once*/
    return genOnce(el);
  } else if (el.for && !el.forProcessed) {
    /*处理v-for*/
    return genFor(el);
  } else if (el.if && !el.ifProcessed) {
    /*处理v-if*/
    return genIf(el);
  } else if (el.tag === "template" && !el.slotTarget) {
    /*处理template*/
    return genChildren(el) || "void 0";
  } else if (el.tag === "slot") {
    /*处理slot*/
    return genSlot(el);
  } else {
    // component or element
    /*处理组件或元素*/
    let code;
    if (el.component) {
      code = genComponent(el.component, el);
    } else {
      const data = el.plain ? undefined : genData(el);

      const children = el.inlineTemplate ? null : genChildren(el, true);
      code = `_c('${el.tag}'${
        data ? `,${data}` : "" // data
      }${
        children ? `,${children}` : "" // children
      })`;
    }
    // module transforms
    for (let i = 0; i < transforms.length; i++) {
      code = transforms[i](el, code);
    }
    return code;
  }
}

/*处理v-if*/
function genIf(el: any): string {
  /*标记位*/
  el.ifProcessed = true; // avoid recursion
  return genIfConditions(el.ifConditions.slice());
}

/*处理if条件*/
function genIfConditions(conditions: ASTIfConditions): string {
  /*表达式不存在*/
  if (!conditions.length) {
    return "_e()";
  }
  const condition = conditions.shift();
  if (condition.exp) {
    return `(${condition.exp})?${genTernaryExp(
      condition.block
    )}:${genIfConditions(conditions)}`;
  } else {
    return `${genTernaryExp(condition.block)}`;
  }

  // v-if with v-once should generate code like (a)?_m(0):_m(1)
  /*v-if与v-once同时存在的时候应该使用三元运算符,譬如说(a)?_m(0):_m(1)*/
  function genTernaryExp(el) {
    return el.once ? genOnce(el) : genElement(el);
  }
}

/*处理v-for循环*/
function genFor(el: any): string {
  const exp = el.for;
  const alias = el.alias;
  const iterator1 = el.iterator1 ? `,${el.iterator1}` : "";
  const iterator2 = el.iterator2 ? `,${el.iterator2}` : "";
  if (
    process.env.NODE_ENV !== "production" &&
    maybeComponent(el) &&
    el.tag !== "slot" &&
    el.tag !== "template" &&
    !el.key
  ) {
    warn(
      `<${el.tag} v-for="${alias} in ${exp}">: component lists rendered with ` +
        `v-for should have explicit keys. ` +
        `See https://vuejs.org/guide/list.html#key for more info.`,
      true /* tip */
    );
  }

  /*标记位,避免递归*/
  el.forProcessed = true; // avoid recursion
  return (
    `_l((${exp}),` +
    `function(${alias}${iterator1}${iterator2}){` +
    `return ${genElement(el)}` +
    "})"
  );
}
2
3
4
5
6
7
8
9
10
11
12
13
14
15
16
17
18
19
20
21
22
23
24
25
26
27
28
29
30
31
32
33
34
35
36
37
38
39
40
41
42
43
44
45
46
47
48
49
50
51
52
53
54
55
56
57
58
59
60
61
62
63
64
65
66
67
68
69
70
71
72
73
74
75
76
77
78
79
80
81
82
83
84
85
86
87
88
89
90
91
92
93
94
95
96
97
98
99
100
101
102
103
# 编译后分析比较:
const VueTemplateCompiler = require('vue-template-compiler');
let r1 = VueTemplateCompiler.compile(`
    <div v-if="true"><span v-for="i in 3">hello</span></div>`
);
/** with(this) {
 *   return (true) ? _c('div', _l((3), function (i) { return _c('span', [_v("hello")]) }), 0) : _e()
 * }
**/
2
3
4
5
6
7
8
v-for 会比 v-if 的优先级高一些,如果连用的话会把 v-if 给每个元素都添加一下,会造成性能问题 (使用计算属性优化)
const VueTemplateCompiler = require('vue-template-compiler');
let r1 = VueTemplateCompiler.compile(`<div v-if="false" v-for="i in 3">hello</div>`);

/** with(this) {
 *    return _l((3), function (i) { return (false) ? _c('div', [_v("hello")]) : _e() })
 *  }
**/;
2
3
4
5
6
7
# v-for为什么要加key
点击查看
为了在比对过程中进行复用 ;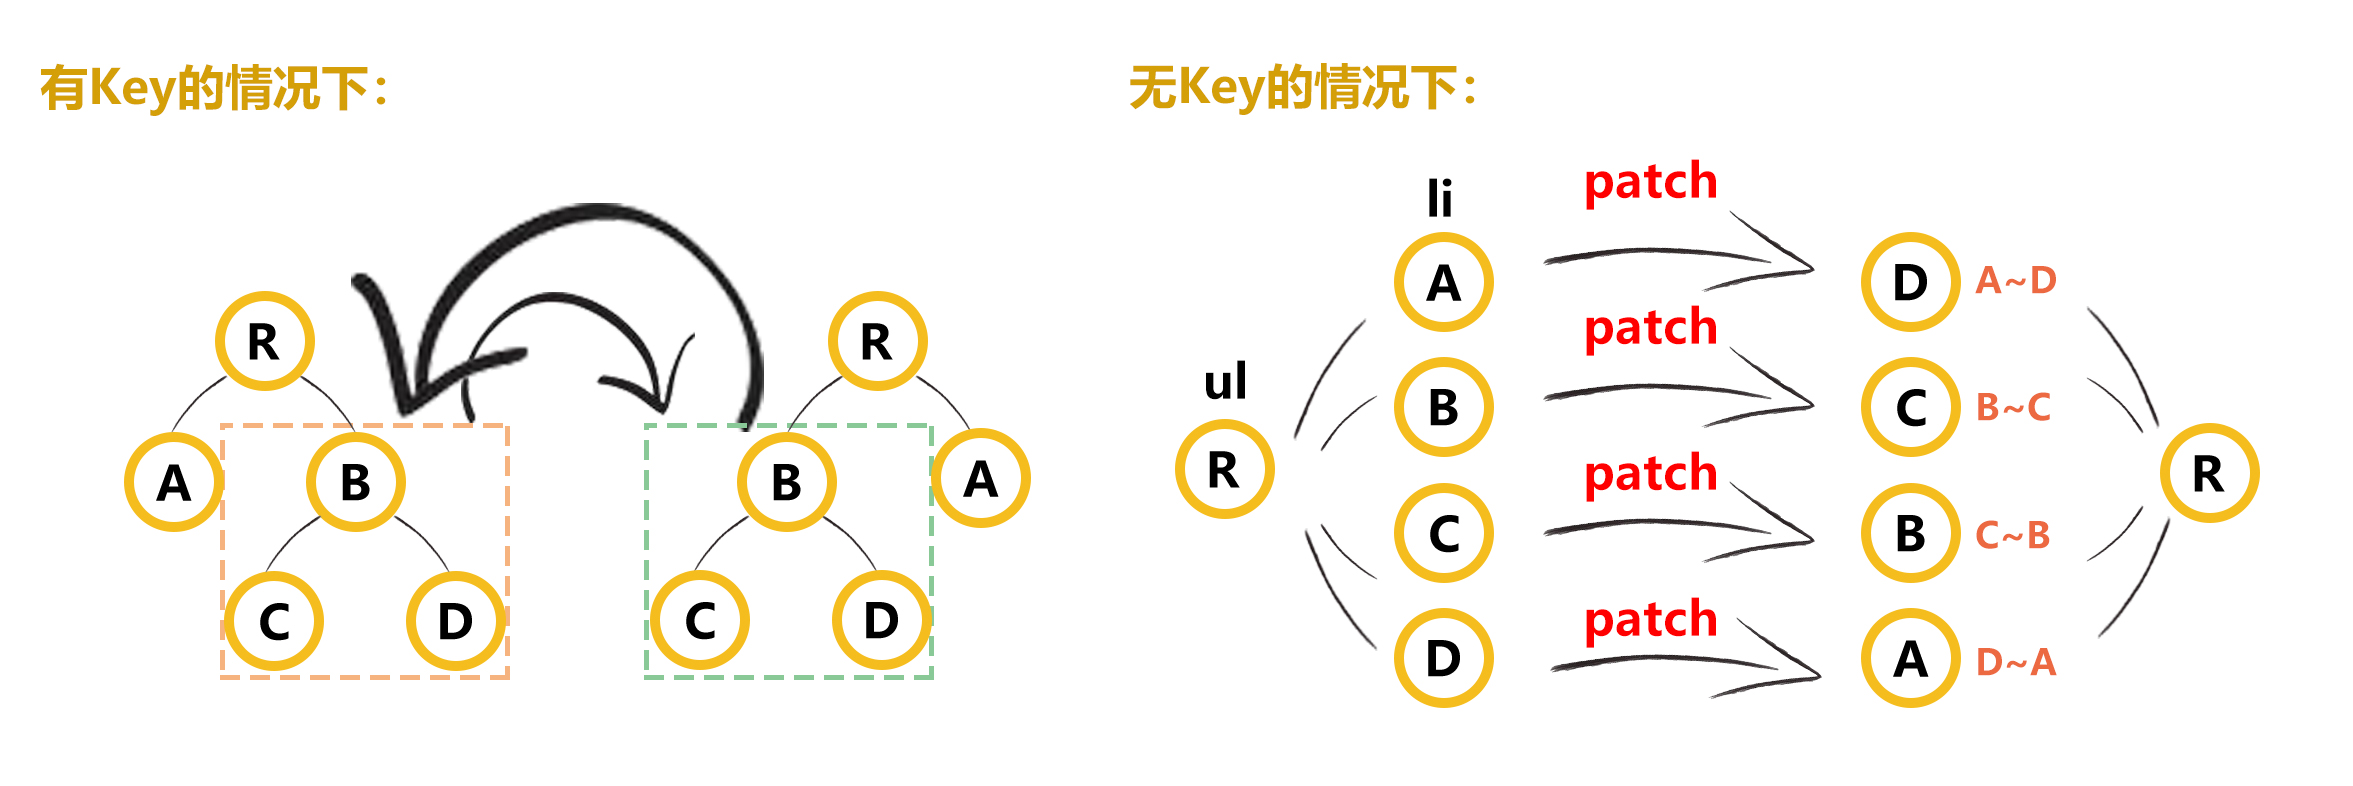
而且key, 不能是index或者随机数;如果是的话,在操作添加或者删除时会错位;
# 原理:
patch函数关键代码:
function patch (oldVnode, vnode) {
    if (isUndef(vnode)) {
      if (isDef(oldVnode)) invokeDestroyHook(oldVnode)
      return
    }

    let isInitialPatch = false
    const insertedVnodeQueue = []
    if (isUndef(oldVnode)) {
      // empty mount (likely as component), create new root element
      isInitialPatch = true
      createElm(vnode, insertedVnodeQueue)
    } else {
      const isRealElement = isDef(oldVnode.nodeType)
      if (!isRealElement && sameVnode(oldVnode, vnode)) {
        // patch existing root node
        patchVnode(oldVnode, vnode, insertedVnodeQueue, null, null, removeOnly)
      } else {
      // some code
      }
    }
    return vnode
}
2
3
4
5
6
7
8
9
10
11
12
13
14
15
16
17
18
19
20
21
22
23
patch函数接收oldVnode和vnode,也就是要比较的新旧节点对象。
首先会用isUndef函数判断传入的两个vnode是否为空对象再做相应处理。当两个都为节点对象时,再用sameVnode来判断是否为同一节点,再判断本次操作是新增、修改、还是移除。
function sameVnode (a, b) {
  return (
    a.key === b.key // key值
    &&
      (
        a.tag === b.tag &&  // 标签名
        a.isComment === b.isComment && // 是否为注释节点
        isDef(a.data) === isDef(b.data) && // 是否都定义了data,data包含一些具体信息,例如onclick , style
        sameInputType(a, b) // 当标签是<input>的时候,type必须相同
      )
  )
}
2
3
4
5
6
7
8
9
10
11
12
- sameVnode通过判断key、标签名、是否为注释、data等是否相等,来判断是否需要进行比较。
- 值得比较则执行patchVnode,不值得比较则用Vnode替换oldVnode,再渲染真实dom。
- patchVnode会对oldVnode和vnode进行对比,然后进行DOM更新。这个会在diff算法里再进行说明。
v-for通常都是生成一样的标签,所以key会是patch判断是否相同节点的唯一标识,如果不设置key,它的值就是undefined,则可能永远认为这是两个相同节点,就会去做pathVnode pdateChildren的更新操作,这造成了大量的dom更新操作,所以设置唯一的key是必要的。
# computed/watch/method的区别
点击查看
# 核心答案:
- watch借助vue响应式原理,默认在取值时将watcher存放到对应属性的dep中,当数据发生变化时通知对应的watcher重新执行;
- 默认
computed也是一个watcher是具备缓存的,只要当依赖的属性发生变化时才会更新视图;
三者的初始化顺序:
/*初始化props、methods、data、computed与watch*/
export function initState(vm: Component) {
  vm._watchers = [];
  const opts = vm.$options;
  /*初始化props*/
  if (opts.props) initProps(vm, opts.props);
  /*初始化方法*/
  if (opts.methods) initMethods(vm, opts.methods);
  /*初始化data*/
  if (opts.data) {
    initData(vm); // 初始化数据
  } else {
    /*该组件没有data的时候绑定一个空对象*/
    observe((vm._data = {}), true /* asRootData */);
  }
  /*初始化computed*/
  if (opts.computed) initComputed(vm, opts.computed);
  /*初始化watchers*/
  if (opts.watch) initWatch(vm, opts.watch);
}
2
3
4
5
6
7
8
9
10
11
12
13
14
15
16
17
18
19
20
# 原理:
# computed的实现:
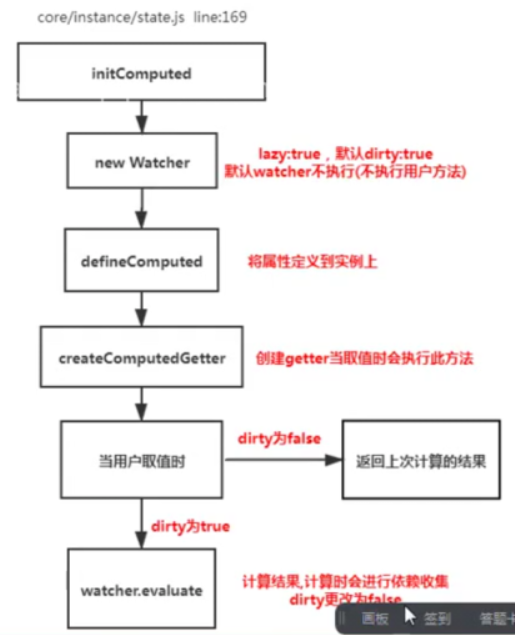 源码位置:
源码位置: src/core/instance/state.js:232
/*初始化props、methods、data、computed与watch*/
export function initState(vm: Component) {
  vm._watchers = [];
  const opts = vm.$options;
  /*初始化props*/
  if (opts.props) initProps(vm, opts.props);
  /*初始化方法*/
  if (opts.methods) initMethods(vm, opts.methods);
  /*初始化data*/
  if (opts.data) {
    initData(vm); // 初始化数据
  } else {
    /*该组件没有data的时候绑定一个空对象*/
    observe((vm._data = {}), true /* asRootData */);
  }
  /*初始化computed*/
  if (opts.computed) initComputed(vm, opts.computed);
  /*初始化watchers*/
  if (opts.watch) initWatch(vm, opts.watch);
}

/*初始化computed*/
function initComputed(vm: Component, computed: Object) {
  const watchers = (vm._computedWatchers = Object.create(null));
  for (const key in computed) {
    const userDef = computed[key];
    /*
      计算属性可能是一个function,也有可能设置了get以及set的对象。
      可以参考 https://cn.vuejs.org/v2/guide/computed.html#计算-setter
    */
    let getter = typeof userDef === "function" ? userDef : userDef.get;
    if (process.env.NODE_ENV !== "production") {
      /*getter不存在的时候抛出warning并且给getter赋空函数*/
      if (getter === undefined) {
        warn(
          `No getter function has been defined for computed property "${key}".`,
          vm
        );
        getter = noop;
      }
    }
    // create internal watcher for the computed property.
    /*
      为计算属性创建一个内部的监视器Watcher,保存在vm实例的_computedWatchers中
      这里的computedWatcherOptions参数传递了一个lazy为true,会使得watch实例的dirty为true
    */
    watchers[key] = new Watcher(vm, getter, noop, computedWatcherOptions);

    /*组件正在定义的计算属性已经定义在现有组件的原型上则不会进行重复定义*/
    if (!(key in vm)) {
      /*定义计算属性*/
      defineComputed(vm, key, userDef);
    } else if (process.env.NODE_ENV !== "production") {
      /*如果计算属性与已定义的data或者props中的名称冲突则发出warning*/
      if (key in vm.$data) {
        warn(`The computed property "${key}" is already defined in data.`, vm);
      } else if (vm.$options.props && key in vm.$options.props) {
        warn(
          `The computed property "${key}" is already defined as a prop.`,
          vm
        );
      }
    }
  }
}

const computedWatcherOptions = { lazy: true };
/*定义计算属性*/
export function defineComputed(
  target: any,
  key: string,
  userDef: Object | Function
) {
  if (typeof userDef === "function") {
    /*创建计算属性的getter*/
    sharedPropertyDefinition.get = createComputedGetter(key);
    /*
      当userDef是一个function的时候是不需要setter的,所以这边给它设置成了空函数。
      因为计算属性默认是一个function,只设置getter。
      当需要设置setter的时候,会将计算属性设置成一个对象。参考:https://cn.vuejs.org/v2/guide/computed.html#计算-setter
    */
    sharedPropertyDefinition.set = noop;
  } else {
    /*get不存在则直接给空函数,如果存在则查看是否有缓存cache,没有依旧赋值get,有的话使用createComputedGetter创建*/
    sharedPropertyDefinition.get = userDef.get
      ? userDef.cache !== false
        ? createComputedGetter(key)
        : userDef.get
      : noop;
    /*如果有设置set方法则直接使用,否则赋值空函数*/
    sharedPropertyDefinition.set = userDef.set ? userDef.set : noop;
  }
  /*defineProperty上getter与setter*/
  Object.defineProperty(target, key, sharedPropertyDefinition);
}

/*创建计算属性的getter*/
function createComputedGetter(key) {
  return function computedGetter() { //取值的时候回调用此方法
    const watcher = this._computedWatchers && this._computedWatchers[key];
    if (watcher) {
      /*实际是脏检查,在计算属性中的依赖发生改变的时候dirty会变成true,在get的时候重新计算计算属性的输出值*/
      if (watcher.dirty) {
        watcher.evaluate();
      }
      /*依赖收集*/
      if (Dep.target) {
        watcher.depend();
      }
      return watcher.value;
    }
  };
}
2
3
4
5
6
7
8
9
10
11
12
13
14
15
16
17
18
19
20
21
22
23
24
25
26
27
28
29
30
31
32
33
34
35
36
37
38
39
40
41
42
43
44
45
46
47
48
49
50
51
52
53
54
55
56
57
58
59
60
61
62
63
64
65
66
67
68
69
70
71
72
73
74
75
76
77
78
79
80
81
82
83
84
85
86
87
88
89
90
91
92
93
94
95
96
97
98
99
100
101
102
103
104
105
106
107
108
109
110
111
112
113
源码位置: src/core/observer/watcher.js:30
export default class Watcher {
  constructor(
    vm: Component,
    expOrFn: string | Function,
    cb: Function,
    options?: Object
  ) {
    this.vm = vm;
    /*_watchers存放订阅者实例*/
    vm._watchers.push(this);
    // options
    if (options) {
      this.deep = !!options.deep;
      this.user = !!options.user;
      this.lazy = !!options.lazy;
      this.sync = !!options.sync;
    } else {
      this.deep = this.user = this.lazy = this.sync = false;
    }
    this.cb = cb;
    this.id = ++uid; // uid for batching
    this.active = true;
    this.dirty = this.lazy; // for lazy watchers
    this.deps = [];
    this.newDeps = [];
    this.depIds = new Set();
    this.newDepIds = new Set();
    this.expression =
      process.env.NODE_ENV !== "production" ? expOrFn.toString() : "";
    // parse expression for getter
    /*把表达式expOrFn解析成getter*/
    if (typeof expOrFn === "function") {
      this.getter = expOrFn;
    } else {
      this.getter = parsePath(expOrFn);
      if (!this.getter) {
        this.getter = function () {};
        process.env.NODE_ENV !== "production" &&
          warn(
            `Failed watching path: "${expOrFn}" ` +
              "Watcher only accepts simple dot-delimited paths. " +
              "For full control, use a function instead.",
            vm
          );
      }
    }
    this.value = this.lazy ? undefined : this.get();
  }

  /*获取观察者的值*/
  evaluate() {
    this.value = this.get(); //详见下面wacther的源码;
    this.dirty = false;
  }

/*调度者接口,当依赖发生改变的时候进行回调。*/
  update() {
    /* istanbul ignore else */
    if (this.lazy) {
      this.dirty = true;
    } else if (this.sync) {
      /*同步则执行run直接渲染视图*/
      this.run();
    } else {
      /*异步推送到观察者队列中,下一个tick时调用。*/
      queueWatcher(this);
    }
  }
2
3
4
5
6
7
8
9
10
11
12
13
14
15
16
17
18
19
20
21
22
23
24
25
26
27
28
29
30
31
32
33
34
35
36
37
38
39
40
41
42
43
44
45
46
47
48
49
50
51
52
53
54
55
56
57
58
59
60
61
62
63
64
65
66
67
68
# watch的实现:
还是借助vue响应式原理,默认在取值时将watcher存放到对应属性的dep中,当数据发生变化时通知对应的watcher重新执行;
源码位置:
src/core/instance/state.js:387
/*初始化watchers*/
function initWatch(vm: Component, watch: Object) {
  for (const key in watch) {
    const handler = watch[key];
    /*数组则遍历进行createWatcher*/
    if (Array.isArray(handler)) {
      for (let i = 0; i < handler.length; i++) {
        createWatcher(vm, key, handler[i]);
      }
    } else {
      createWatcher(vm, key, handler);
    }
  }
}

/*创建一个观察者Watcher*/
//这里涉及了watch的三种写法,1.值是对象、2.值是数组、3.值是字符串 (如果是对象可以传入一些watch参数),最终会调用vm.$watch来实现
function createWatcher(vm: Component, key: string, handler: any) {
  let options;
  /*对对象类型进行严格检查,只有当对象是纯javascript对象的时候返回true*/
  // 如果是对象则提取函数 和配置
  if (isPlainObject(handler)) {
    /*
      这里是当watch的写法是这样的时候
      watch: {
          test: {
              handler: function () {},
              deep: true
          }
      }
    */
    options = handler;
    handler = handler.handler;
  }
  if (typeof handler === "string") {
    /*
        当然,也可以直接使用vm中methods的方法
    */
    handler = vm[handler];
  }
  /*用$watch方法创建一个watch来观察该对象的变化*/
  vm.$watch(key, handler, options);
}

 /*
    https://cn.vuejs.org/v2/api/#vm-watch
    $watch方法 用以为对象建立观察者监视变化
  */
 //扩展Vue原型上的方法,都通过mixin的方式来进行添加的。
  Vue.prototype.$watch = function (
    expOrFn: string | Function,
    cb: Function,
    options?: Object
  ): Function {
    const vm: Component = this;
    options = options || {};
    options.user = true;
    const watcher = new Watcher(vm, expOrFn, cb, options);
    /*有immediate参数的时候会立即执行*/
    if (options.immediate) {
      cb.call(vm, watcher.value);
    }
    /*返回一个取消观察函数,用来停止触发回调*/
    return function unwatchFn() {
      /*将自身从所有依赖收集订阅列表删除*/
      watcher.teardown();
    };
  };
2
3
4
5
6
7
8
9
10
11
12
13
14
15
16
17
18
19
20
21
22
23
24
25
26
27
28
29
30
31
32
33
34
35
36
37
38
39
40
41
42
43
44
45
46
47
48
49
50
51
52
53
54
55
56
57
58
59
60
61
62
63
64
65
66
67
68
# watch中的deep:true是如何实现的
点击查看
# 核心答案:
当用户指定了watch中的deep属性为true时,如果当前监控的值是数组类型,会对对象中的每一项进行求值,此时会将当前watcher存入到对应属性的依赖中,这样数组中对象发生变化时也会通知数据更新;
ps: computed时不用设置的,默认获取对象中全部数据,再JSON.stringify({})到渲染页面上;
# 原理:
/*获得getter的值并且重新进行依赖收集*/
  get() {
    /*将自身watcher观察者实例设置给Dep.target,用以依赖收集。*/
    pushTarget(this);
    let value;
    const vm = this.vm;

    /*
      执行了getter操作,看似执行了渲染操作,其实是执行了依赖收集。
      在将Dep.target设置为自生观察者实例以后,执行getter操作。
      譬如说现在的的data中可能有a、b、c三个数据,getter渲染需要依赖a跟c,
      那么在执行getter的时候就会触发a跟c两个数据的getter函数,
      在getter函数中即可判断Dep.target是否存在然后完成依赖收集,
      将该观察者对象放入闭包中的Dep的subs中去。
    */
    if (this.user) {
      try {
        value = this.getter.call(vm, vm);
      } catch (e) {
        handleError(e, vm, `getter for watcher "${this.expression}"`);
      }
    } else {
      value = this.getter.call(vm, vm);
    }
    // "touch" every property so they are all tracked as
    // dependencies for deep watching
    /*如果存在deep,则触发每个深层对象的依赖,追踪其变化*/
    if (this.deep) {
      /*递归每一个对象或者数组,触发它们的getter,使得对象或数组的每一个成员都被依赖收集,形成一个“深(deep)”依赖关系*/
      traverse(value);
    }

    /*将观察者实例从target栈中取出并设置给Dep.target*/
    popTarget();
    this.cleanupDeps();
    return value;
  }
2
3
4
5
6
7
8
9
10
11
12
13
14
15
16
17
18
19
20
21
22
23
24
25
26
27
28
29
30
31
32
33
34
35
36
37
# Vue的生命周期方法有哪些?
点击查看
# 图示:
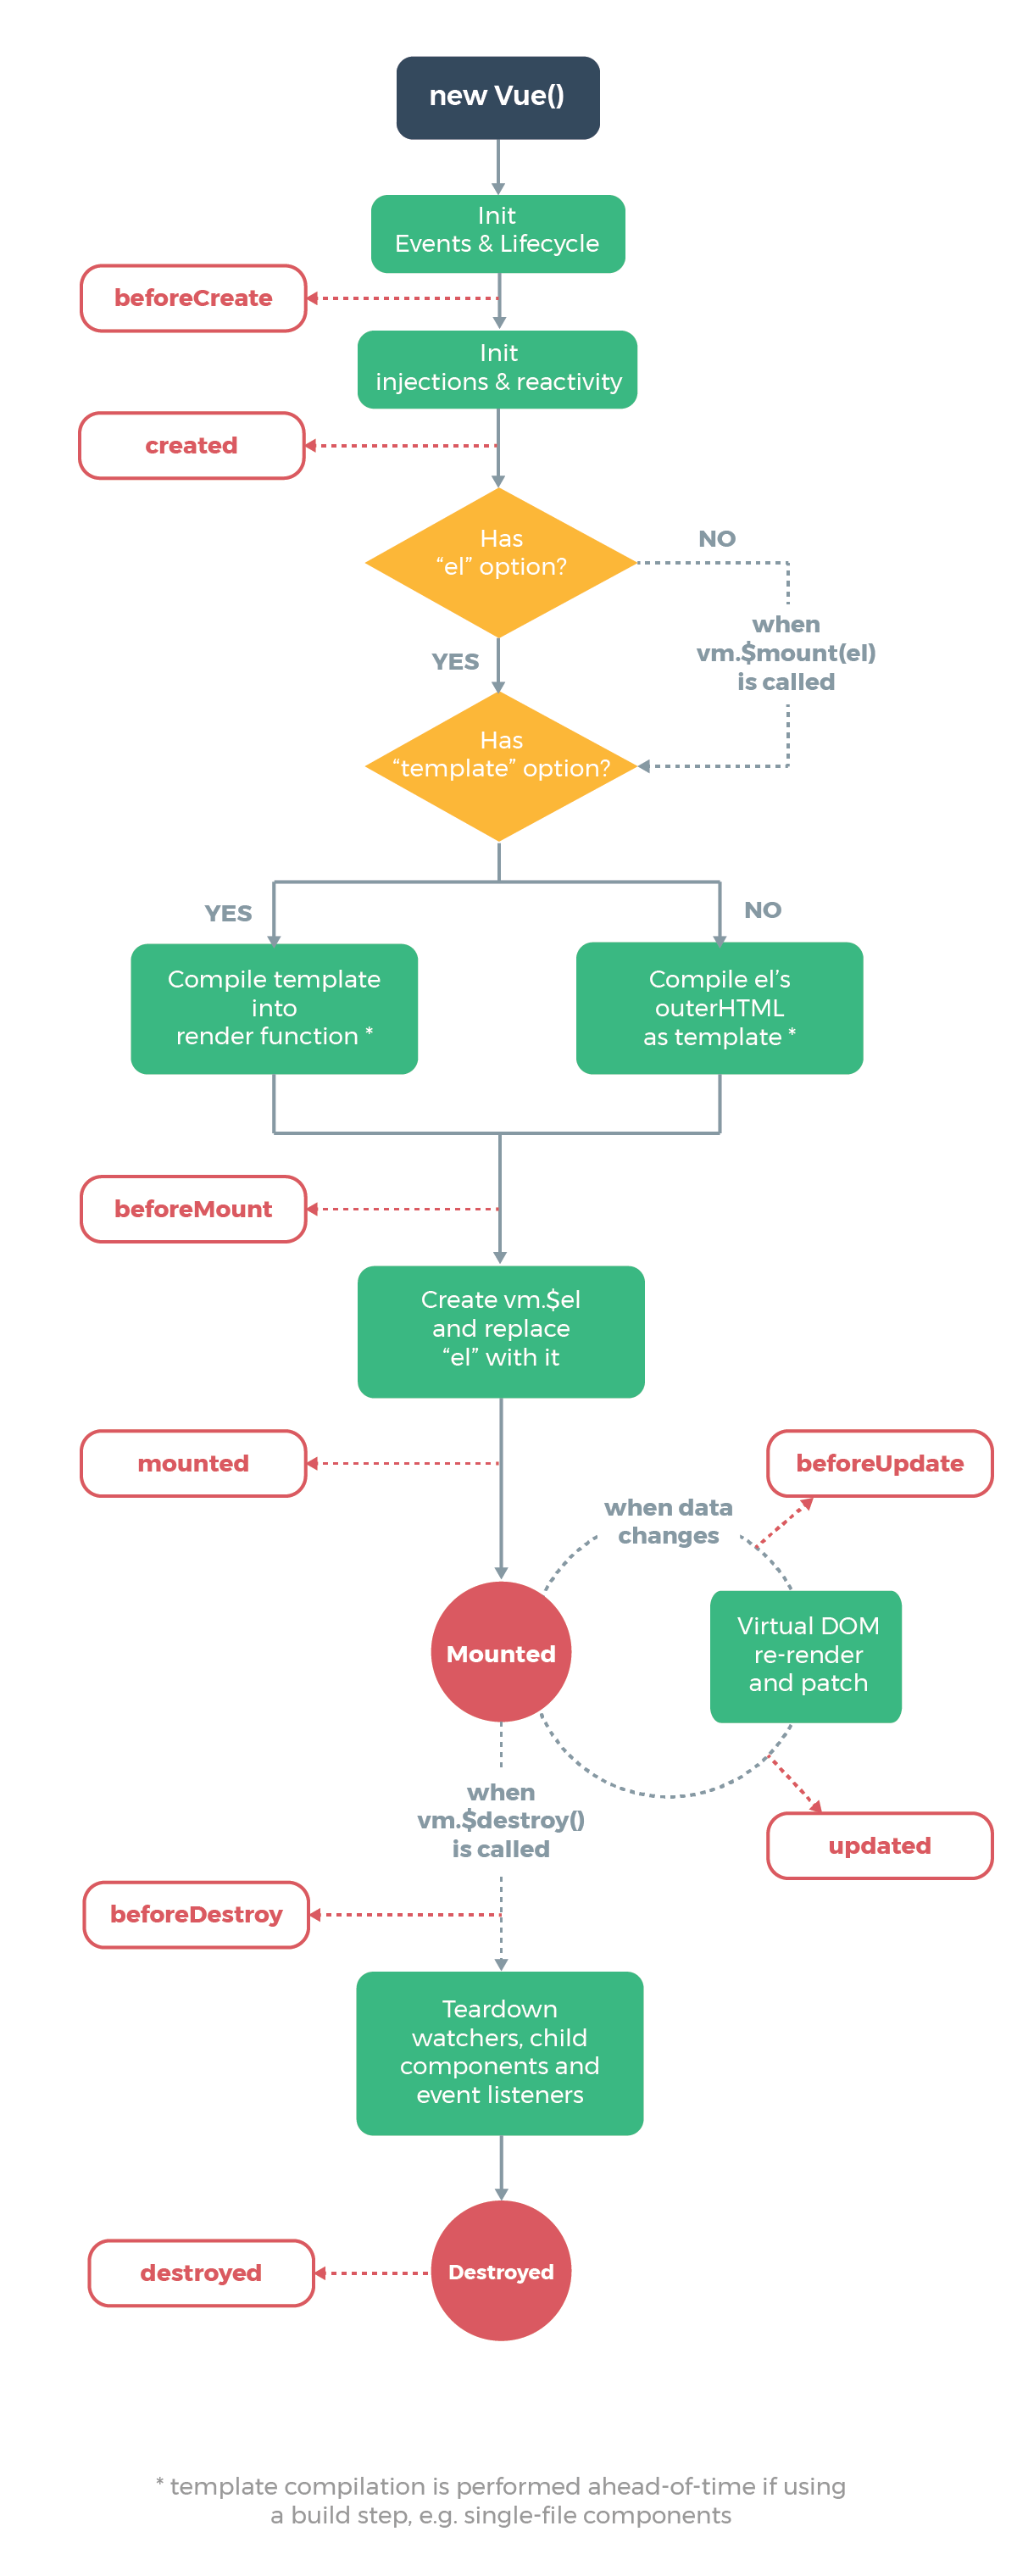
# 核心答案:
# 生命周期
Vue 实例有一个完整的生命周期,也就是从开始创建、初始化数据、编译模版、挂载 Dom -> 渲染、更新 -> 渲染、卸载等一系列过程,我们称这是 Vue 的生命周期。
生命周期的作用
它的生命周期中有多个事件钩子,让我们在控制整个Vue实例的过程时更容易形成好的逻辑;
各个生命周期及描述 (8+2)
| 生命周期 | 描述 |
|---|---|
| beforeCreate | 组件实例被创建之初,组件的属性生效之前;vue实例的挂载元素$el和数据对象 data都是undefined, 还未初始化; 在实例初始化之后,数据观测(data observer) 和 event/watcher 事件配置之前被调用。 |
| created | 实例已经创建完成之后被调用。在这一步,实例已完成以下的配置:数据观测(data observer),属性和方法的运算, watch/event 事件回调。但真实 dom 还没有生成,$el 还不可用 |
| beforeMount | 在挂载开始之前被调用:相关的 render 函数首次被调用;vue实例的$el和data都初始化了 |
| mounted | el 被新创建的 vm.$el 替换,并挂载到实例上去之后调用该钩子;在 mounted 被调用前,Vue 已经将编译好的模板挂载到页面上,所以在 mounted 中可以访问操作 DOM。 |
| beforeUpdate | 组件数据更新之前调用,发生在虚拟 DOM 打补丁之前 |
| update | 组件数据更新之后;由于数据更改导致的虚拟 DOM 重新渲染和打补丁,在这之后会调用该钩子。 |
| activited | keep-alive 专属,组件被激活时调用 |
| deactivated | keep-alive 专属,组件被销毁时调用 |
| beforeDestory | 组件销毁前调用;在这一步,实例仍然完全可用。 |
| destoryed | 组件销毁后调用;调用后,Vue 实例指示的所有东西都会解绑定,所有的事件监听器会被移除,所有的子实例也会被销毁。 该钩子在服务器端渲染期间不被调用。 |
# 补充回答:
created实例已经创建完成,因为它是最早触发的原因可以进行一些数据,资源的请求。(服务端渲染支持created方法)mounted实例已经挂载完成,可以进行一些DOM操作beforeUpdate可以在这个钩子中进一步地更改状态,这不会触发附加的重渲染过程。updated可以执行依赖于 DOM 的操作。然而在大多数情况下,应该避免在此期间更改状态,因为这可能会导致更新无限循环。 该钩子在服务器端渲染期间不被调用。destroyed可以执行一些优化操作,清空定时器,解除绑定事件
# 第一次页面加载会触发哪几个生命周期
第一次页面加载时会触发 beforeCreate, created, beforeMount, mounted 这几个生命周期。
# 生命周期内调用异步请求
created, mounted (一般统一放在这里,但是服务器渲染SSR没有这个生命周期)
可以在钩子函数 created、beforeMount、mounted 中进行调用,因为在这三个钩子函数中,data 已经创建,可以将服务端端返回的数据进行赋值。但是推荐在 created 钩子函数中调用异步请求,因为在 created 钩子函数中调用异步请求有以下优点:
- 能更快获取到服务端数据,减少页面 loading 时间;
- ssr 不支持 beforeMount 、mounted 钩子函数,所以放在 created 中有助于一致性;
# DOM 渲染在哪个周期就已经完成
挂载前后阶段;在 beforeMounted 时它执行了 render 函数,对 $el 和 data 进行了初始化,但此时还是挂载到虚拟的 DOM 节点,然后它在 mounted 时就完成了 DOM 渲染,这时候我们一般还进行 Ajax 交互。Vue 在 render 中 createElement 的时候,并不是产生真实的 DOM 元素;
dom是在 mounted 中完成渲染;
# 何时需要使用
beforeDestory
- 可能在当前页面中使用
$on方法,那需要在组件销毁前解绑; - 清除自己定义的定时器;
- 清除事件的绑定
scroll,mousemove, ...
# 原理:
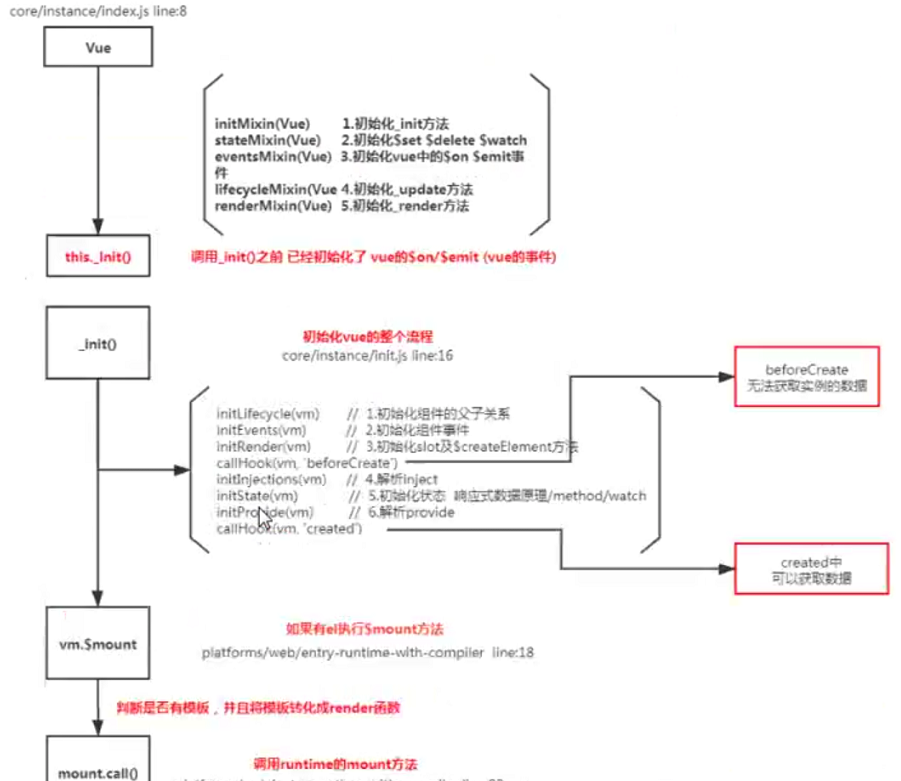
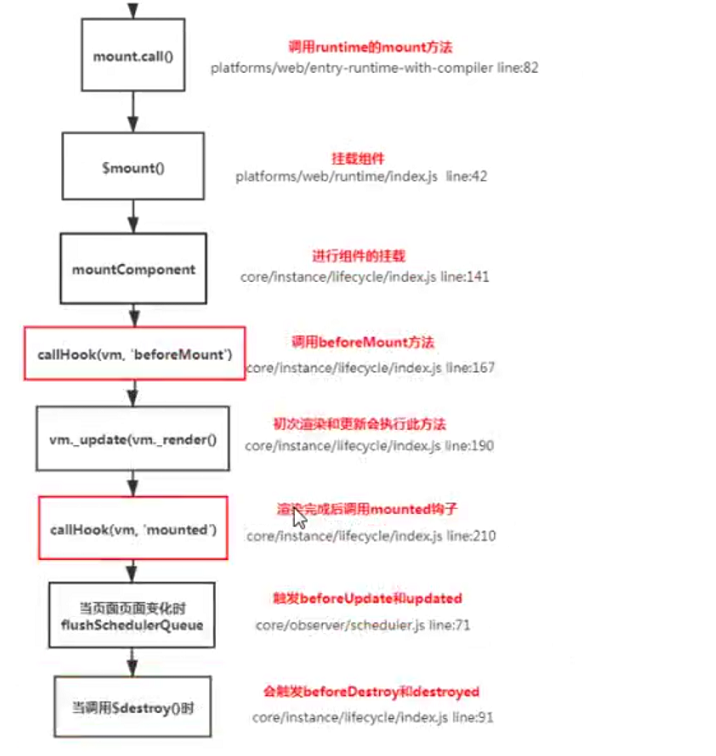
# 生命周期钩子是如何实现的?
点击查看
# 核心答案:
Vue的生命周期钩子就是回调函数而已,当创建组件实例的过程中会调用对应的钩子方法
# 补充回答:
内部主要是使用callHook方法来调用对应的方法。核心是一个发布订阅模式,将钩子订阅好(内部采用数组的方式存储),在对应的阶段进行发布!
# 源码分析:
源码位置:
src/core/util/options.js:146、core/instance/lifecycle.js:336
function Vue (options) {
  if (process.env.NODE_ENV !== 'production' &&
    !(this instanceof Vue)) {
    warn('Vue is a constructor and should be called with the `new` keyword')
  }
  /*初始化*/
  this._init(options)
}
initMixin(Vue)
stateMixin(Vue)
eventsMixin(Vue)
lifecycleMixin(Vue)
renderMixin(Vue)

 if (vm._isMounted) {
   callHook(vm, "beforeUpdate");
 }

/*调用钩子函数并且触发钩子事件*/
export function callHook(vm: Component, hook: string) {
  const handlers = vm.$options[hook];
  if (handlers) {
    for (let i = 0, j = handlers.length; i < j; i++) {
      try {
        handlers[i].call(vm);
      } catch (e) {
        handleError(e, vm, `${hook} hook`);
      }
    }
  }
  if (vm._hasHookEvent) {
    vm.$emit("hook:" + hook);
  }
}
2
3
4
5
6
7
8
9
10
11
12
13
14
15
16
17
18
19
20
21
22
23
24
25
26
27
28
29
30
31
32
33
34
# 快速Mock:
合并参数
// function callHook (vm: Component, hook: string) {
//   pushTarget()
//   const handlers = vm.$options[hook]
//   const info = `${hook} hook`
//   if (handlers) {
//     for (let i = 0, j = handlers.length; i < j; i++) {
//       invokeWithErrorHandling(handlers[i], vm, null, vm, info)
//     }
//   }
//   if (vm._hasHookEvent) {
//     vm.$emit('hook:' + hook)
//   }
//   popTarget()
// }

function mergeHook(parentVal, childValue) {
    if (childValue) {
        if (parentVal) {
            return parentVal.concat(childValue);
        } else {
            return [childValue]
        }
    } else {
        return parentVal;
    }
}
function mergeOptions(parent, child) {
    let opts = {};
    for (let key in child) {
        opts[key] = mergeHook(parent[key], child[key]);
    }
    return opts;
}
function callHook(vm, key) {
    vm.options[key].forEach(hook => hook());
}

function Vue(options) {
    this.options = mergeOptions(this.constructor.options, options);
    callHook(this, 'beforeCreate');
}
Vue.options = {}
new Vue({
    beforeCreate() {
        console.log('before create')
    }
})
2
3
4
5
6
7
8
9
10
11
12
13
14
15
16
17
18
19
20
21
22
23
24
25
26
27
28
29
30
31
32
33
34
35
36
37
38
39
40
41
42
43
44
45
46
47
# Vue组件间传值通讯的方式?
点击查看
单向数据流;
# 核心答案:
- props和$emit :父组件向子组件传递数据是通过prop传递的,子组件传递数据给父组件是通过$emit触发事件来做到的;
- $parent,$children: 获取当前组件的父组件和当前组件的子组件;
$refs获取实例的方式调用组件的属性或者方法;- 父组件中通过
provide来提供变量,然后在子组件中通过inject来注入变量; $attrs和$listeners:A->B->C。Vue 2.4 开始提供了$attrs和$listeners来解决这个问题;envetBus平级组件数据传递;这种情况下可以使用中央事件总线的方式;vuex状态管理;
# 原理分析:
# props实现
src/core/instance/init.js:74、scr/core/instance/state:64、src/core/vdom/create-component.js:101
initLifecycle(vm);
/*初始化事件*/
initEvents(vm);
/*初始化render*/
initRender(vm);
/*调用beforeCreate钩子函数并且触发beforeCreate钩子事件*/
callHook(vm, "beforeCreate");
initInjections(vm); // resolve injections before data/props
/*初始化props、methods、data、computed与watch*/
initState(vm);
initProvide(vm); // resolve provide after data/props
/*调用created钩子函数并且触发created钩子事件*/
callHook(vm, "created");
2
3
4
5
6
7
8
9
10
11
12
13
export function initState(vm: Component) {
  vm._watchers = [];
  const opts = vm.$options;
  /*初始化props*/
  if (opts.props) initProps(vm, opts.props);
 }
/*初始化props*/
function initProps(vm: Component, propsOptions: Object) {
  const propsData = vm.$options.propsData || {};
  const props = (vm._props = {});
  // cache prop keys so that future props updates can iterate using Array
  // instead of dynamic object key enumeration.
  /*缓存属性的key,使得将来能直接使用数组的索引值来更新props来替代动态地枚举对象*/
  const keys = (vm.$options._propKeys = []);
  /*根据$parent是否存在来判断当前是否是根结点*/
  const isRoot = !vm.$parent;
  // root instance props should be converted
  /*根结点会给shouldConvert赋true,根结点的props应该被转换*/
  observerState.shouldConvert = isRoot;
  for (const key in propsOptions) {
    /*props的key值存入keys(_propKeys)中*/
    keys.push(key);
    /*验证prop,不存在用默认值替换,类型为bool则声称true或false,当使用default中的默认值的时候会将默认值的副本进行observe*/
    const value = validateProp(key, propsOptions, propsData, vm);
    /* istanbul ignore else */
    if (process.env.NODE_ENV !== "production") {
      /*判断是否是保留字段,如果是则发出warning*/
      if (isReservedProp[key] || config.isReservedAttr(key)) {
        warn(
          `"${key}" is a reserved attribute and cannot be used as component prop.`,
          vm
        );
      }
      defineReactive(props, key, value, () => {
        /*
          由于父组件重新渲染的时候会重写prop的值,所以应该直接使用prop来作为一个data或者计算属性的依赖
          https://cn.vuejs.org/v2/guide/components.html#字面量语法-vs-动态语法
        */
        if (vm.$parent && !observerState.isSettingProps) {
          warn(
            `Avoid mutating a prop directly since the value will be ` +
              `overwritten whenever the parent component re-renders. ` +
              `Instead, use a data or computed property based on the prop's ` +
              `value. Prop being mutated: "${key}"`,
            vm
          );
        }
      });
    } else {
      defineReactive(props, key, value);
    }
    // static props are already proxied on the component's prototype
    // during Vue.extend(). We only need to proxy props defined at
    // instantiation here.
    /*Vue.extend()期间,静态prop已经在组件原型上代理了,我们只需要在这里进行代理prop*/
    if (!(key in vm)) {
      proxy(vm, `_props`, key);
    }
  }
  observerState.shouldConvert = true;
}
2
3
4
5
6
7
8
9
10
11
12
13
14
15
16
17
18
19
20
21
22
23
24
25
26
27
28
29
30
31
32
33
34
35
36
37
38
39
40
41
42
43
44
45
46
47
48
49
50
51
52
53
54
55
56
57
58
59
60
61
# emit事件机制实现
src/core/instance/init.js:74、src/core/instance/events.js:12、src/core/vdom/create-component.js:101
/*初始化事件*/
export function initEvents(vm: Component) {
  /*在vm上创建一个_events对象,用来存放事件。*/
  vm._events = Object.create(null);
  /*这个bool标志位来表明是否存在钩子,而不需要通过哈希表的方法来查找是否有钩子,这样做可以减少不必要的开销,优化性能。*/
  vm._hasHookEvent = false;
  // init parent attached events
  /*初始化父组件attach的事件*/
  const listeners = vm.$options._parentListeners;
  if (listeners) {
    updateComponentListeners(vm, listeners);
  }
}
/*更新组件的监听事件*/
export function updateComponentListeners(
  vm: Component,
  listeners: Object,
  oldListeners: ?Object
) {
  target = vm;
  updateListeners(listeners, oldListeners || {}, add, remove, vm);
}

/*为Vue原型加入操作事件的方法*/
export function eventsMixin (Vue: Class<Component>) {
  const hookRE = /^hook:/
  Vue.prototype.$on = function (event: string | Array<string>, fn: Function): Component {
    const vm: Component = this
    if (Array.isArray(event)) {
      for (let i = 0, l = event.length; i < l; i++) {
        vm.$on(event[i], fn)
      }
    } else {
      (vm._events[event] || (vm._events[event] = [])).push(fn)
      // optimize hook:event cost by using a boolean flag marked at registration
      // instead of a hash lookup
      if (hookRE.test(event)) {
        vm._hasHookEvent = true
      }
    }
    return vm
  }

  Vue.prototype.$once = function (event: string, fn: Function): Component {
    const vm: Component = this
    function on () {
      vm.$off(event, on)
      fn.apply(vm, arguments)
    }
    on.fn = fn
    vm.$on(event, on)
    return vm
  }

  Vue.prototype.$off = function (event?: string | Array<string>, fn?: Function): Component {
    const vm: Component = this
    // all
    if (!arguments.length) {
      vm._events = Object.create(null)
      return vm
    }
    // array of events
    if (Array.isArray(event)) {
      for (let i = 0, l = event.length; i < l; i++) {
        vm.$off(event[i], fn)
      }
      return vm
    }
    // specific event
    const cbs = vm._events[event]
    if (!cbs) {
      return vm
    }
    if (!fn) {
      vm._events[event] = null
      return vm
    }
    // specific handler
    let cb
    let i = cbs.length
    while (i--) {
      cb = cbs[i]
      if (cb === fn || cb.fn === fn) {
        cbs.splice(i, 1)
        break
      }
    }
    return vm
  }

  Vue.prototype.$emit = function (event: string): Component {
    const vm: Component = this
    if (process.env.NODE_ENV !== 'production') {
      const lowerCaseEvent = event.toLowerCase()
      if (lowerCaseEvent !== event && vm._events[lowerCaseEvent]) {
        tip(
          `Event "${lowerCaseEvent}" is emitted in component ` +
          `${formatComponentName(vm)} but the handler is registered for "${event}". ` +
          `Note that HTML attributes are case-insensitive and you cannot use ` +
          `v-on to listen to camelCase events when using in-DOM templates. ` +
          `You should probably use "${hyphenate(event)}" instead of "${event}".`
        )
      }
    }
    let cbs = vm._events[event]
    if (cbs) {
      cbs = cbs.length > 1 ? toArray(cbs) : cbs
      const args = toArray(arguments, 1)
      const info = `event handler for "${event}"`
      for (let i = 0, l = cbs.length; i < l; i++) {
        invokeWithErrorHandling(cbs[i], vm, args, vm, info)
      }
    }
    return vm
  }
}
2
3
4
5
6
7
8
9
10
11
12
13
14
15
16
17
18
19
20
21
22
23
24
25
26
27
28
29
30
31
32
33
34
35
36
37
38
39
40
41
42
43
44
45
46
47
48
49
50
51
52
53
54
55
56
57
58
59
60
61
62
63
64
65
66
67
68
69
70
71
72
73
74
75
76
77
78
79
80
81
82
83
84
85
86
87
88
89
90
91
92
93
94
95
96
97
98
99
100
101
102
103
104
105
106
107
108
109
110
111
112
113
114
115
116
# parent&children实现
src/core/instance/lifecycle.js:32、src/core/vdom/create-component.js:47、
/*初始化生命周期*/
export function initLifecycle(vm: Component) {
  const options = vm.$options;

  // locate first non-abstract parent
  /* 将vm对象存储到parent组件中(保证parent组件是非抽象组件,比如keep-alive) */
  let parent = options.parent;
  if (parent && !options.abstract) {
    while (parent.$options.abstract && parent.$parent) {
      parent = parent.$parent;
    }
    parent.$children.push(vm);
  }

  vm.$parent = parent;
  vm.$root = parent ? parent.$root : vm;

  vm.$children = [];
  vm.$refs = {};

  vm._watcher = null;
  vm._inactive = null;
  vm._directInactive = false;
  vm._isMounted = false;
  vm._isDestroyed = false;
  vm._isBeingDestroyed = false;
}
2
3
4
5
6
7
8
9
10
11
12
13
14
15
16
17
18
19
20
21
22
23
24
25
26
27
  prepatch(oldVnode: MountedComponentVNode, vnode: MountedComponentVNode) {
    const options = vnode.componentOptions;
    const child = (vnode.componentInstance = oldVnode.componentInstance);
    updateChildComponent(
      child,
      options.propsData, // updated props
      options.listeners, // updated listeners
      vnode, // new parent vnode
      options.children // new children
    );
  },
2
3
4
5
6
7
8
9
10
11
# provide&inject实现
src/core/instance/init.js:74、src/core/instance/inject.js:7
initInjections(vm) // resolve injections before data/props
/*初始化props、methods、data、computed与watch*/
initState(vm)
initProvide(vm) // resolve provide after data/props
2
3
4
export function initProvide(vm: Component) {
  const provide = vm.$options.provide;
  if (provide) {
    vm._provided = typeof provide === "function" ? provide.call(vm) : provide;
  }
}

export function initInjections(vm: Component) {
  const result = resolveInject(vm.$options.inject, vm);
  if (result) {
    Object.keys(result).forEach((key) => {
      /* istanbul ignore else */
      /*为对象defineProperty上在变化时通知的属性*/
      if (process.env.NODE_ENV !== "production") {
        defineReactive(vm, key, result[key], () => {
          warn(
            `Avoid mutating an injected value directly since the changes will be ` +
              `overwritten whenever the provided component re-renders. ` +
              `injection being mutated: "${key}"`,
            vm
          );
        });
      } else {
        defineReactive(vm, key, result[key]);
      }
    });
  }
}

export function resolveInject(inject: any, vm: Component): ?Object {
  if (inject) {
    // inject is :any because flow is not smart enough to figure out cached
    // isArray here
    const isArray = Array.isArray(inject);
    const result = Object.create(null);
    const keys = isArray
      ? inject
      : hasSymbol
      ? Reflect.ownKeys(inject)
      : Object.keys(inject);

    for (let i = 0; i < keys.length; i++) {
      const key = keys[i];
      const provideKey = isArray ? key : inject[key];
      let source = vm;
      while (source) {
        if (source._provided && provideKey in source._provided) {
          result[key] = source._provided[provideKey];
          break;
        }
        source = source.$parent; // 指定$parent
      }
    }
    return result;
  }
}
2
3
4
5
6
7
8
9
10
11
12
13
14
15
16
17
18
19
20
21
22
23
24
25
26
27
28
29
30
31
32
33
34
35
36
37
38
39
40
41
42
43
44
45
46
47
48
49
50
51
52
53
54
55
56
# $attrs&$listener实现
src/core/instance/lifecycle.js:215、src/core/instance/render.js:49、
# $refs实现
src/core/vdom/modules/ref.js:20、src/core/vdom/create-component.js:47、
将真实DOM或者组件实例挂载在当前实例的$refs属性上
export default {
  create(_: any, vnode: VNodeWithData) {
    registerRef(vnode);
  },
  update(oldVnode: VNodeWithData, vnode: VNodeWithData) {
    if (oldVnode.data.ref !== vnode.data.ref) {
      registerRef(oldVnode, true);
      registerRef(vnode);
    }
  },
  destroy(vnode: VNodeWithData) {
    registerRef(vnode, true);
  },
};
/*注册一个ref(即在$refs中添加或者删除对应的Dom实例),isRemoval代表是增加还是移除,*/
export function registerRef(vnode: VNodeWithData, isRemoval: ?boolean) {
  const key = vnode.data.ref;
  if (!key) return;

  const vm = vnode.context;
  const ref = vnode.componentInstance || vnode.elm;
  const refs = vm.$refs;
  if (isRemoval) {
    /*移除一个ref*/
    if (Array.isArray(refs[key])) {
      remove(refs[key], ref);
    } else if (refs[key] === ref) {
      refs[key] = undefined;
    }
  } else {
    /*增加一个ref*/
    if (vnode.data.refInFor) {
      /*如果是在一个for循环中,则refs中key对应的是一个数组,里面存放了所有ref指向的Dom实例*/
      if (Array.isArray(refs[key]) && refs[key].indexOf(ref) < 0) {
        refs[key].push(ref);
      } else {
        refs[key] = [ref];
      }
    } else {
      /*不在一个for循环中则直接放入refs即可,ref指向Dom实例*/
      refs[key] = ref;
    }
  }
}
2
3
4
5
6
7
8
9
10
11
12
13
14
15
16
17
18
19
20
21
22
23
24
25
26
27
28
29
30
31
32
33
34
35
36
37
38
39
40
41
42
43
44
  /*初始化组件*/
  function initComponent(vnode, insertedVnodeQueue) {
    /*把之前已经存在的VNode队列合并进去*/
    if (isDef(vnode.data.pendingInsert)) {
      insertedVnodeQueue.push.apply(
        insertedVnodeQueue,
        vnode.data.pendingInsert
      );
    }
    vnode.elm = vnode.componentInstance.$el;
    if (isPatchable(vnode)) {
      /*调用create钩子*/
      invokeCreateHooks(vnode, insertedVnodeQueue);
      /*为scoped CSS 设置scoped id*/
      setScope(vnode);
    } else {
      // empty component root.
      // skip all element-related modules except for ref (#3455)
      /*注册ref*/
      registerRef(vnode);
      // make sure to invoke the insert hook
      insertedVnodeQueue.push(vnode);
    }
  }
2
3
4
5
6
7
8
9
10
11
12
13
14
15
16
17
18
19
20
21
22
23
24
# 相关
# 子组件可以直接改变父组件的数据么?说说你的理由?
主要是为了维护父子组件的单向数据流
每次父组件发生更新时,子组件中所有的prop都将会刷新为最新的值
如果这样做的话,Vue会在浏览器控制台中发出警告
Vue提倡单向数据流,即父级props的更新会流向子组件,但是反过来则不行。这是为了防止意外的改变父组件的状态,使得应用的数据流变得难以理解,导致数据流混乱。如果破环了单向数据流,当应用复杂情况时,debug的成本会非常高
只有通过$emit派发一个自定义事件,父组件接收后,由父组件修改.
# $attrs与provide/inject的区别
点击查看
#
$attrs是为了解决什么问题出现的?应用场景有哪些?provide/inject 不能解决它能解决的问题吗?
# 核心答案:
- $attrs主要的作用就是实现批量传递数据。
- provide/inject更适合应用在插件中,主要是实现跨级数据传递;
常见使用场景可以分为三类:
- 父子通信:props / $emit;$parent / $children/ ref;$attrs/$listeners;provide / inject API;
- 兄弟通信:eventBus; Vuex
- 跨级通信:
$emit/$on,Vuex;$attrs/$listeners;provide / inject API
# Vue.mixin的使用场景和原理?
#
Vue中相同逻辑如何抽离?
点击查看
Vue.mixin用法给组件每个生命周期,函数等都混入一些公共逻辑;
# 核心答案:
Vue.mixin的作用就是抽离公共的业务逻辑,原理类似“对象的继承”,当组件初始化时会调用mergeOptions方法进行合并,采用策略模式针对不同的属性进行合并。如果混入的数据和本身组件中的数据冲突,会采用“就近原则”以组件的数据为准。
# 补充回答:
mixin中有很多缺陷 "命名冲突问题"、"依赖问题"、"数据来源问题", 这里强调一下mixin的数据是不会被共享的!
# 实现原理:
源码位置:
core/global-api/mixin:5
/* @flow */

import { mergeOptions } from "../util/index";

/*初始化mixin*/
export function initMixin(Vue: GlobalAPI) {
  /*https://cn.vuejs.org/v2/api/#Vue-mixin*/
  Vue.mixin = function (mixin: Object) {
    /*mergeOptions合并optiuons*///将当前定义的属性合并到每个组件中
    this.options = mergeOptions(this.options, mixin);
  };
}
2
3
4
5
6
7
8
9
10
11
12
/*合并两个option对象到一个新的对象中*/
export function mergeOptions(
  parent: Object,
  child: Object,
  vm?: Component
): Object {
  if (process.env.NODE_ENV !== "production") {
    /*检查是否是有效的组件名*/
    checkComponents(child);
  }

  if (typeof child === "function") {
    child = child.options;
  }

  /*确保所有props option序列化成正确的格式*/
  normalizeProps(child);
  /*将函数指令序列化后加入对象*/
  normalizeDirectives(child);
  /*
    https://cn.vuejs.org/v2/api/#extends
    允许声明扩展另一个组件(可以是一个简单的选项对象或构造函数),而无需使用
    将child的extends也加入parent扩展
  */
  const extendsFrom = child.extends;
  if (extendsFrom) {
    parent = mergeOptions(parent, extendsFrom, vm);
  }
  /*child的mixins加入parent中*/
  if (child.mixins) {
    for (let i = 0, l = child.mixins.length; i < l; i++) {
      parent = mergeOptions(parent, child.mixins[i], vm);
    }
  }
  const options = {};
  let key;
  for (key in parent) {
    mergeField(key);
  }
  /*合并parent与child*/
  for (key in child) {
    if (!hasOwn(parent, key)) {
      mergeField(key);
    }
  }
  function mergeField(key) {
    /*strats里面存了options中每一个属性(el、props、watch等等)的合并方法,先取出*/
    const strat = strats[key] || defaultStrat;
    /*根据合并方法来合并两个option*/
    options[key] = strat(parent[key], child[key], vm, key);
  }
  return options;
}
2
3
4
5
6
7
8
9
10
11
12
13
14
15
16
17
18
19
20
21
22
23
24
25
26
27
28
29
30
31
32
33
34
35
36
37
38
39
40
41
42
43
44
45
46
47
48
49
50
51
52
53
# 快速Mock:
Vue.mixin = function (obj) {
	this.options = mergeOptions(this.options,obj);
}
Vue.mixin({
	beforeCreate(){
		console.log('before create ok')
	}
})
2
3
4
5
6
7
8
# Vue.use的作用及原理?
点击查看
# 核心答案:
Vue.use是用来使用插件的,可以在插件中扩展全局组件、指令、原型方法等。
# 原理
源码位置:
core/global-api/use.js:5
Vue.use = function (plugin: Function | Object) {
    // 插件不能重复的加载
    const installedPlugins = (this._installedPlugins || (this._installedPlugins = []))
    if (installedPlugins.indexOf(plugin) > -1) {
        return this
    }
    // additional parameters
    const args = toArray(arguments, 1)
    args.unshift(this)  // install方法的第一个参数是Vue的构造函数,其他参数是Vue.use中除了第一个参数的其他参数
    if (typeof plugin.install === 'function') { // 调用插件的install方法
        plugin.install.apply(plugin, args)  Vue.install = function(Vue,args){}
    } else if (typeof plugin === 'function') { // 插件本身是一个函数,直接让函数执行
        plugin.apply(null, args)
    }
    installedPlugins.push(plugin) // 缓存插件
    return this
}
2
3
4
5
6
7
8
9
10
11
12
13
14
15
16
17
# 快速mock:
在vuex中的使用;
// Vue.use 方法会调用插件的install方法,此方法中的参数就是Vue的构造函数

// Vue.use = function (plugin) { // vue中类似use原理实现
//     plugin.install(this);
// }
// 插件的安装 Vue.use(Vuex)
export const install = (_Vue) => {
  if (Vue && _Vue === Vue) {
    if (process.env.NODE_ENV !== "production") {
      console.error(
        "[vuex] already installed. Vue.use(Vuex) should be called only once."
      );
    }
    return;
  }
  Vue = _Vue; // _Vue 是Vue的构造函数;vue缓存起来再暴露出去
  applyMixin(Vue); // 需要将根组件中注入的store 分派给每一个组件 (子组件) Vue.mixin
};
2
3
4
5
6
7
8
9
10
11
12
13
14
15
16
17
18
# vue描述下常见指令
点击查看
v-once渲染一次 (可用作优化,但是使用频率极少)v-html将字符串转化成dom插入到标签中 (会导致xss攻击问题,并且覆盖子元素)v-if/v-else/v-else-if不满足时dom不存在(可以使用template标签)v-show不满足时dom隐藏 (不能使用template标签)v-for循环字符串、对象、数字、数组 (循环时必须加key,尽量不采用索引)v-bind可以简写成: 属性(style、class...)绑定v-on可以简写成@ 给元素绑定事件 (常用修饰符 .stop、.prevent、.self、.once、.passive)v-model双向绑定 (支持.trim、.number修饰符)
# Vue事件修饰符有哪些?
点击查看
# 核心答案:
事件修饰符有:.capture、.once、.passive 、.stop、.self、.prevent、
# 实现原理:
源码位置:
src/compiler/codegen/events.js:42源码位置:
src/core/vdom/helpers/update-listeners.js:65
//①生成ast时处理
export function addHandler (
    el: ASTElement,
    name: string,
    value: string,
    modifiers: ?ASTModifiers,
    important?: boolean,
    warn?: ?Function,
    range?: Range,
    dynamic?: boolean
    ) {
    modifiers = modifiers || emptyObject
    // check capture modifier
    if (modifiers.capture) { // 如果是capture 加!
        delete modifiers.capture
        name = prependModifierMarker('!', name, dynamic)
    }
    if (modifiers.once) {  // 如果是once加~
        delete modifiers.once
        name = prependModifierMarker('~', name, dynamic)
    }
    /* istanbul ignore if */
    if (modifiers.passive) { // 如果是passive 加&
        delete modifiers.passive
        name = prependModifierMarker('&', name, dynamic)
    }
}
2
3
4
5
6
7
8
9
10
11
12
13
14
15
16
17
18
19
20
21
22
23
24
25
26
27
源码位置:
src/compiler/helpers.js:69
//②codegen时处理
const genGuard = condition => `if(${condition})return null;`
const modifierCode: { [key: string]: string } = {
    stop: '$event.stopPropagation();', // 增加阻止默认事件
    prevent: '$event.preventDefault();', // 阻止默认行为
    self: genGuard(`$event.target !== $event.currentTarget`), // 点击是否是自己
}
for (const key in handler.modifiers) {
    if (modifierCode[key]) {
        genModifierCode += modifierCode[key]
    }
    if (genModifierCode) {
        code += genModifierCode
    }
    const handlerCode = isMethodPath
    ? `return ${handler.value}($event)`
    : isFunctionExpression
        ? `return (${handler.value})($event)`
        : isFunctionInvocation
        ? `return ${handler.value}`
        : handler.value
    return `function($event){${code}${handlerCode}}`
}

//③处理on事件
for (name in on) {
    def = cur = on[name]
    old = oldOn[name]
    event = normalizeEvent(name) // 处理& ! ~
    if (isTrue(event.once)) {
        cur = on[name] = createOnceHandler(event.name, cur, event.capture)
    }
    add(event.name, cur, event.capture, event.passive, event.params) // 调用addEventListener绑定事件
}
2
3
4
5
6
7
8
9
10
11
12
13
14
15
16
17
18
19
20
21
22
23
24
25
26
27
28
29
30
31
32
33
34
# Vue中事件绑定的原理
点击查看
# 理解:
Vue的事件绑定分为两种:
- 原生Dom的事件绑定,采用的
addEnventListener实现; - 组件的事件绑定,采用的是
$on实现; 组件中的nativeOn等价于普通元素on, 组件的on会单独处理;
# 原理:
# 事件的编译
let compiler = require("vue-template-compiler");
let r1 = compiler.compile("<div @click='fn()' > xxx </div>");
let r2 = compiler.compile(
  "<my-component @click.native='fn' @onclick='fn1'>xxx </my-component>"
);
console.log(r1.render);
//with(this){return _c('div',{on:{"click":function($event){return fn()}}},[_v(" xxx ")])}
console.log(r2.render);
// with(this){return _c('my-component',{on:{"onclick":fn1},nativeOn:{"click":function($event){return fn($event)}}},[_v("xxx ")])}
2
3
4
5
6
7
8
9
# 源码实现
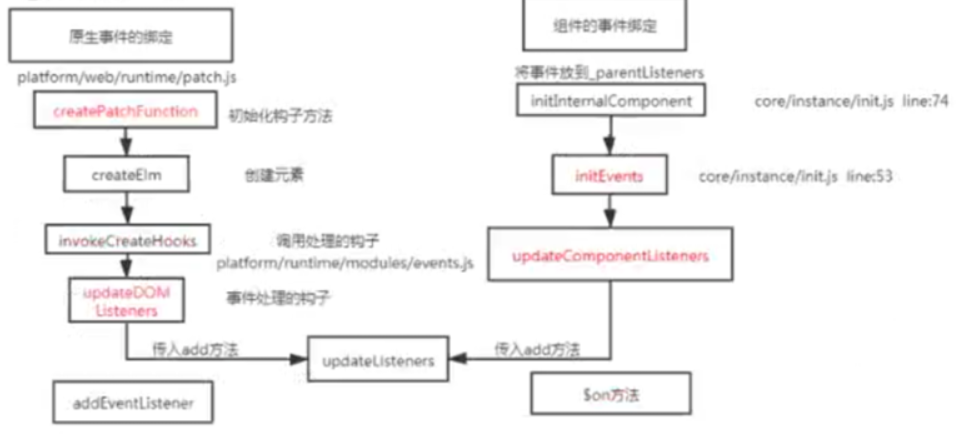
原生dom的绑定
- vue在创建dom时会调用
createElm,默认会调用invokeCreateHooks; - 会遍历当前平台下相对的属性处理代码,其中就有
updateComponentListeners方法,内部传入add方法;
源码位置:
src/core/vdom/create-component:155
  // extract listeners, since these needs to be treated as
  // child component listeners instead of DOM listeners
  const listeners = data.on;
  // replace with listeners with .native modifier
  data.on = data.nativeOn;

  if (isTrue(Ctor.options.abstract)) {
    // abstract components do not keep anything other than props & listeners
    data = {};
  }
2
3
4
5
6
7
8
9
10
源码位置:
src/core/instance/event:37
/*更新组件的监听事件*/
export function updateComponentListeners(
  vm: Component,
  listeners: Object,
  oldListeners: ?Object
) {
  target = vm;
  updateListeners(listeners, oldListeners || {}, add, remove, vm);
}
2
3
4
5
6
7
8
9
# 实践
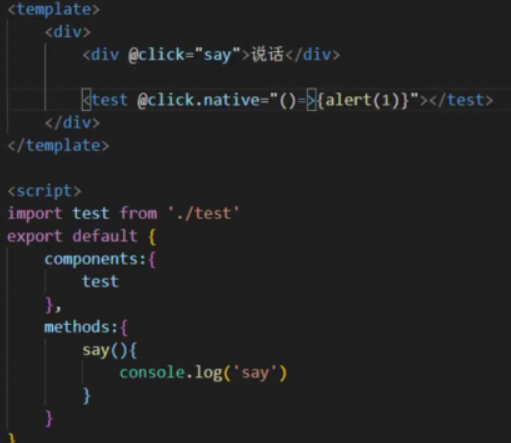
点击查看
# Vue.directive源码实现
点击查看
# 核心答案:
# 实现原理
# 格式化挂载
源码位置:
core/global-api/assets.js
把定义的内容进行格式化挂载到Vue.options属性上
/*选项/资源集合*/
export const ASSET_TYPES = [
  'component',
  'directive',
  'filter'
]

ASSET_TYPES.forEach(type => {
    Vue[type] = function (
        id: string,
        definition: Function | Object
    ): Function | Object | void {
        if (!definition) {
        return this.options[type + 's'][id]
        } else { // 如果是指令 将指令的定义包装成对象
        if (type === 'directive' && typeof definition === 'function') {
            definition = { bind: definition, update: definition }
        }
        this.options[type + 's'][id] = definition // 将指令的定义绑定在Vue.options上
        return definition
        }
    }
})
2
3
4
5
6
7
8
9
10
11
12
13
14
15
16
17
18
19
20
21
22
23
# 指令初始化
源码位置:
platforms\web\runtime\directives\model.js
export default {
  inserted(el, binding, vnode) {
    if (vnode.tag === "select") {
      const cb = () => {
        setSelected(el, binding, vnode.context);
      };
      cb();
      /* istanbul ignore if */
      if (isIE || isEdge) {
        setTimeout(cb, 0);
      }
    } else if (
      vnode.tag === "textarea" ||
      el.type === "text" ||
      el.type === "password"
    ) {
      el._vModifiers = binding.modifiers;
      if (!binding.modifiers.lazy) {
        // Safari < 10.2 & UIWebView doesn't fire compositionend when
        // switching focus before confirming composition choice
        // this also fixes the issue where some browsers e.g. iOS Chrome
        // fires "change" instead of "input" on autocomplete.
        el.addEventListener("change", onCompositionEnd);
        if (!isAndroid) {
          el.addEventListener("compositionstart", onCompositionStart);
          el.addEventListener("compositionend", onCompositionEnd);
        }
        /* istanbul ignore if */
        if (isIE9) {
          el.vmodel = true;
        }
      }
    }
2
3
4
5
6
7
8
9
10
11
12
13
14
15
16
17
18
19
20
21
22
23
24
25
26
27
28
29
30
31
32
33
# 如何理解自定义指令?
点击查看
# 核心答案:
指令的实现原理,可以从编译原理=>代码生成=>指令钩子实现进行概述
# 实现步骤:
- 1.在生成
ast语法树时,遇到指令会给当前元素添加directives属性 - 2.通过
genDirectives生成指令代码 - 3.在patch前将指令的钩子提取到
cbs中, 在patch过程中调用对应的钩子 - 4.当执行指令对应钩子函数时,调用对应指令定义的方法
# 源码分析:
源码位置:
src/compiler/helpers.js:42源码位置:
src/compiler/codegen/index.js:309源码位置:
src/core/vdom/patch:70源码位置:
src/core/vdom/modules/directives:7
export function addDirective (
    el: ASTElement,
    name: string,
    rawName: string,
    value: string,
    arg: ?string,
    isDynamicArg: boolean,
    modifiers: ?ASTModifiers,
    range?: Range
    ) {
    (el.directives || (el.directives = [])).push(rangeSetItem({ // 给元素添加directives属性
        name,
        rawName,
        value,
        arg,
        isDynamicArg,
        modifiers
    }, range))
    el.plain = false
}
2
3
4
5
6
7
8
9
10
11
12
13
14
15
16
17
18
19
20
function genDirectives (el: ASTElement, state: CodegenState): string | void {
    const dirs = el.directives
    if (!dirs) return
    let res = 'directives:['
    let hasRuntime = false
    let i, l, dir, needRuntime
    for (i = 0, l = dirs.length; i < l; i++) {
        dir = dirs[i]
        needRuntime = true
        if (needRuntime) {
        hasRuntime = true
        // 将指令生成字符串directives:[{name:'def',rawName:'v-def'}]...
        res += `{name:"${dir.name}",rawName:"${dir.rawName}"${
            dir.value ? `,value:(${dir.value}),expression:${JSON.stringify(dir.value)}` : ''
        }${
            dir.arg ? `,arg:${dir.isDynamicArg ? dir.arg : `"${dir.arg}"`}` : ''
        }${
            dir.modifiers ? `,modifiers:${JSON.stringify(dir.modifiers)}` : ''
        }},`
        }
    }
    if (hasRuntime) {
        return res.slice(0, -1) + ']'
    }
}
2
3
4
5
6
7
8
9
10
11
12
13
14
15
16
17
18
19
20
21
22
23
24
25
const hooks = ['create', 'activate', 'update', 'remove', 'destroy']
const { modules, nodeOps } = backend // // modules包含指令对应的hook
for (i = 0; i < hooks.length; ++i) {
    cbs[hooks[i]] = []
    for (j = 0; j < modules.length; ++j) {
        // 格式化的结果{create:[hook],update:[hook],destroy:[hook]}
        if (isDef(modules[j][hooks[i]])) {
            cbs[hooks[i]].push(modules[j][hooks[i]])
        }
    }
}
2
3
4
5
6
7
8
9
10
11
export default { // 无论更新创建销毁调用的都是 updateDirectives方法
    create: updateDirectives,
    update: updateDirectives,
    destroy: function unbindDirectives (vnode: VNodeWithData) {
       updateDirectives(vnode, emptyNode)
    }
}

function updateDirectives (oldVnode: VNodeWithData, vnode: VNodeWithData) {
    if (oldVnode.data.directives || vnode.data.directives) { // 创建更新都调用此方法
        _update(oldVnode, vnode) // 指令的核心方法
    }
}

function _update (oldVnode, vnode) {
    const isCreate = oldVnode === emptyNode
    const isDestroy = vnode === emptyNode
    // 获取指令名称
    const oldDirs = normalizeDirectives(oldVnode.data.directives, oldVnode.context)
    const newDirs = normalizeDirectives(vnode.data.directives, vnode.context)

    const dirsWithInsert = []
    const dirsWithPostpatch = []

    let key, oldDir, dir
    for (key in newDirs) {
        oldDir = oldDirs[key]
        dir = newDirs[key]
        if (!oldDir) { // 没有旧的 说明是绑定 调用bind钩子
            // new directive, bind
            callHook(dir, 'bind', vnode, oldVnode)
            if (dir.def && dir.def.inserted) {
                dirsWithInsert.push(dir)
            }
        } else { // 存在指令则是更新操作
            // existing directive, update
            dir.oldValue = oldDir.value
            dir.oldArg = oldDir.arg
            callHook(dir, 'update', vnode, oldVnode)
            if (dir.def && dir.def.componentUpdated) { // 如果有componentUpdated方法
                dirsWithPostpatch.push(dir)
            }
        }
    }

    if (dirsWithInsert.length) { // 如果有insert钩子
        const callInsert = () => { // 生成回调方法
            for (let i = 0; i < dirsWithInsert.length; i++) {
                callHook(dirsWithInsert[i], 'inserted', vnode, oldVnode)
            }
        }
        if (isCreate) { // 是创建增加insert钩子
            mergeVNodeHook(vnode, 'insert', callInsert)
        } else {
            callInsert()
        }
    }

    if (dirsWithPostpatch.length) { // 如果有componentUpdated在次合并钩子
        mergeVNodeHook(vnode, 'postpatch', () => {
            for (let i = 0; i < dirsWithPostpatch.length; i++) {
                callHook(dirsWithPostpatch[i], 'componentUpdated', vnode, oldVnode)
            }
        })
    }

    if (!isCreate) { // 否则就是调用卸载钩子
        for (key in oldDirs) {
            if (!newDirs[key]) {
                // no longer present, unbind
                callHook(oldDirs[key], 'unbind', oldVnode, oldVnode, isDestroy)
            }
        }
    }
}
2
3
4
5
6
7
8
9
10
11
12
13
14
15
16
17
18
19
20
21
22
23
24
25
26
27
28
29
30
31
32
33
34
35
36
37
38
39
40
41
42
43
44
45
46
47
48
49
50
51
52
53
54
55
56
57
58
59
60
61
62
63
64
65
66
67
68
69
70
71
72
73
74
75
# v-model双向绑定原理及自定义
点击查看
vue 双向数据绑定是通过 数据劫持 结合 发布订阅模式 的方式来实现的,也就是说数据和视图同步,数据发生变化,视图跟着变化,视图变化,数据也随之发生改变; 核心:Object.defineProperty() 方法。
v-model本质上是语法糖,v-model在内部为不同的输入元素使用不同的属性并抛出不同的事件;
- text 和 textarea 元素使用 value 属性和 input 事件
- checkbox 和 radio 使用 checked 属性和 change 事件
- select 字段将 value 作为 prop 并将 change 作为事件
# 具体总括:
组件:
v-model就是value+input方法的语法糖;原生:
v-model可以看成value+input方法的语法糖;input,checkbox,select
# 分析:
组件的v-model就是value+input方法的语法糖;
<el-checkbox v-model="check"></el-checkbox>
<el-checkbox :value="" @input=""></el-checkbox>
2
可以自定重新定义v-model的含义;
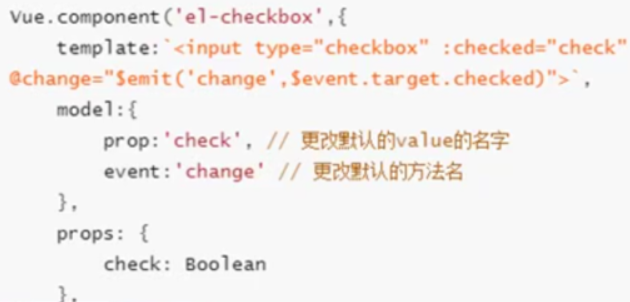
# 原理:
**组件:**会将组件的v-model默认转化成value+input方法的语法糖;
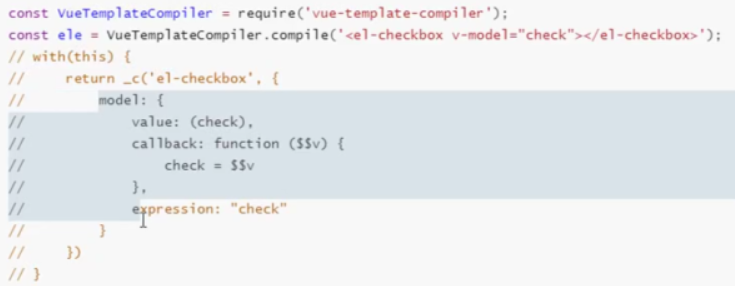
源码位置:
core/vdom/create-component:232
  data = data || {};
  // transform component v-model data into props & events
  if (isDef(data.model)) {
    transformModel(Ctor.options, data);
  }

// transform component v-model info (value and callback) into
// prop and event handler respectively.
function transformModel(options, data: any) {
  const prop = (options.model && options.model.prop) || "value";
  const event = (options.model && options.model.event) || "input";
  (data.props || (data.props = {}))[prop] = data.model.value;
  const on = data.on || (data.on = {});
  if (isDef(on[event])) {
    on[event] = [data.model.callback].concat(on[event]);
  } else {
    on[event] = data.model.callback;
  }
}
2
3
4
5
6
7
8
9
10
11
12
13
14
15
16
17
18
19
**原生:**原生的v-model,会根据标签的不同生成不同的事件和属性
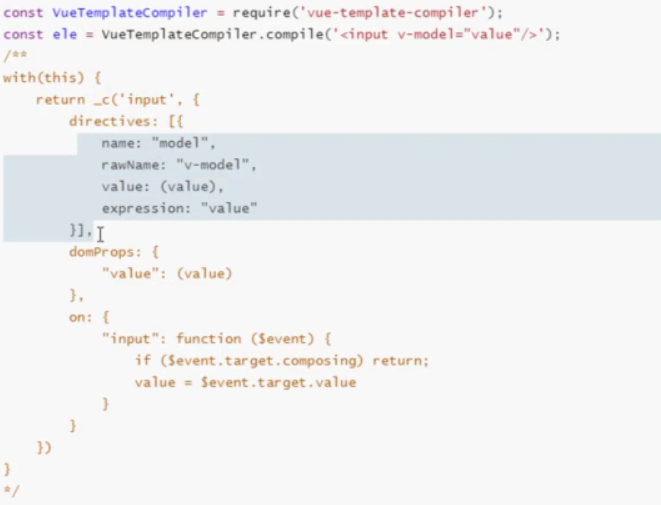
- 编译时:不同的标签解析出的内容不一样;
- 运行时:会对元素处理一些关于输入法的问题;
源码位置:
platforms\web\compiler\directives\model.js
export default function model (
  el: ASTElement,
  dir: ASTDirective,
  _warn: Function
): ?boolean {
  warn = _warn
  const value = dir.value
  const modifiers = dir.modifiers
  const tag = el.tag
  const type = el.attrsMap.type

  if (process.env.NODE_ENV !== 'production') {
    const dynamicType = el.attrsMap['v-bind:type'] || el.attrsMap[':type']
    if (tag === 'input' && dynamicType) {
      warn(
        `<input :type="${dynamicType}" v-model="${value}">:\n` +
        `v-model does not support dynamic input types. Use v-if branches instead.`
      )
    }
    // inputs with type="file" are read only and setting the input's
    // value will throw an error.
    if (tag === 'input' && type === 'file') {
      warn(
        `<${el.tag} v-model="${value}" type="file">:\n` +
        `File inputs are read only. Use a v-on:change listener instead.`
      )
    }
  }

  if (tag === 'select') {
    genSelect(el, value, modifiers)
  } else if (tag === 'input' && type === 'checkbox') {
    genCheckboxModel(el, value, modifiers)
  } else if (tag === 'input' && type === 'radio') {
    genRadioModel(el, value, modifiers)
  } else if (tag === 'input' || tag === 'textarea') {
    genDefaultModel(el, value, modifiers)
  } else if (!config.isReservedTag(tag)) {
    genComponentModel(el, value, modifiers)
    // component v-model doesn't need extra runtime
    return false
  } else if (process.env.NODE_ENV !== 'production') {
    warn(
      `<${el.tag} v-model="${value}">: ` +
      `v-model is not supported on this element type. ` +
      'If you are working with contenteditable, it\'s recommended to ' +
      'wrap a library dedicated for that purpose inside a custom component.'
    )
  }

  // ensure runtime directive metadata
  return true
}

function genDefaultModel (
  el: ASTElement,
  value: string,
  modifiers: ?ASTModifiers
): ?boolean {
  const type = el.attrsMap.type
  const { lazy, number, trim } = modifiers || {}
  const needCompositionGuard = !lazy && type !== 'range'
  const event = lazy
    ? 'change'
    : type === 'range'
      ? RANGE_TOKEN
      : 'input'

  let valueExpression = '$event.target.value'
  if (trim) {
    valueExpression = `$event.target.value.trim()`
  }
  if (number) {
    valueExpression = `_n(${valueExpression})`
  }

  let code = genAssignmentCode(value, valueExpression)
  if (needCompositionGuard) {
    code = `if($event.target.composing)return;${code}`
  }

  addProp(el, 'value', `(${value})`)
  addHandler(el, event, code, null, true)
  if (trim || number || type === 'number') {
    addHandler(el, 'blur', '$forceUpdate()')
  }
}
2
3
4
5
6
7
8
9
10
11
12
13
14
15
16
17
18
19
20
21
22
23
24
25
26
27
28
29
30
31
32
33
34
35
36
37
38
39
40
41
42
43
44
45
46
47
48
49
50
51
52
53
54
55
56
57
58
59
60
61
62
63
64
65
66
67
68
69
70
71
72
73
74
75
76
77
78
79
80
81
82
83
84
85
86
87
源码位置:
platforms\web\runtime\directives\model.js
export default {
  inserted(el, binding, vnode) {
    if (vnode.tag === "select") {
      const cb = () => {
        setSelected(el, binding, vnode.context);
      };
      cb();
      /* istanbul ignore if */
      if (isIE || isEdge) {
        setTimeout(cb, 0);
      }
    } else if (
      vnode.tag === "textarea" ||
      el.type === "text" ||
      el.type === "password"
    ) {
      el._vModifiers = binding.modifiers;
      if (!binding.modifiers.lazy) {
        // Safari < 10.2 & UIWebView doesn't fire compositionend when
        // switching focus before confirming composition choice
        // this also fixes the issue where some browsers e.g. iOS Chrome
        // fires "change" instead of "input" on autocomplete.
        el.addEventListener("change", onCompositionEnd);
        if (!isAndroid) {
          el.addEventListener("compositionstart", onCompositionStart);
          el.addEventListener("compositionend", onCompositionEnd);
        }
        /* istanbul ignore if */
        if (isIE9) {
          el.vmodel = true;
        }
      }
    }
2
3
4
5
6
7
8
9
10
11
12
13
14
15
16
17
18
19
20
21
22
23
24
25
26
27
28
29
30
31
32
33
# v-if、v-show、v-html 的原理
点击查看
- v-if会调用addIfCondition方法,生成vnode的时候会忽略对应节点,render的时候就不会渲染;
- v-show会生成vnode,render的时候也会渲染成真实节点,只是在render过程中会在节点的属性中修改show属性值,也就是常说的display;
- v-html会先移除节点下的所有节点,调用html方法,通过addProp添加innerHTML属性,归根结底还是设置innerHTML为v-html的值。
# v-html会导致哪些问题?
点击查看
# 理解:
- 可能会导致
xss攻击; v-html会替换掉标签内部的子元素;
# 原理:
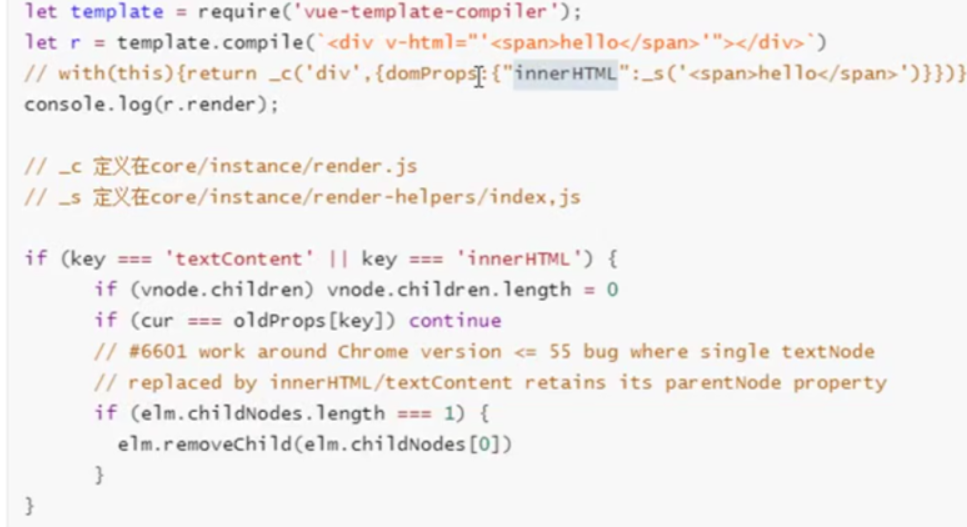
源码:
platforms\web\compiler\directives\html.js,shared\util.js
import { addProp } from 'compiler/helpers'
export default function html (el: ASTElement, dir: ASTDirective) {
  if (dir.value) {
    addProp(el, 'innerHTML', `_s(${dir.value})`)
  }
}

/*将属性放入ele的props属性中*/
export function addProp (el: ASTElement, name: string, value: string) {
  (el.props || (el.props = [])).push({ name, value })
}

  /*
    内部处理render的函数
    这些函数会暴露在Vue原型上以减小渲染函数大小
  */
  /*处理v-once的渲染函数*/
  Vue.prototype._o = markOnce;
  /*将字符串转化为数字,如果转换失败会返回原字符串*/
  Vue.prototype._n = toNumber;
  /*将val转化成字符串*/
  Vue.prototype._s = toString;
  /*处理v-for列表渲染*/
  Vue.prototype._l = renderList;
  /*处理slot的渲染*/
  Vue.prototype._t = renderSlot;
  /*检测两个变量是否相等*/
  Vue.prototype._q = looseEqual;
  /*检测arr数组中是否包含与val变量相等的项*/
  Vue.prototype._i = looseIndexOf;
  /*处理static树的渲染*/
  Vue.prototype._m = renderStatic;
  /*处理filters*/
  Vue.prototype._f = resolveFilter;
  /*从config配置中检查eventKeyCode是否存在*/
  Vue.prototype._k = checkKeyCodes;
  /*合并v-bind指令到VNode中*/
  Vue.prototype._b = bindObjectProps;
  /*创建一个文本节点*/
  Vue.prototype._v = createTextVNode;
  /*创建一个空VNode节点*/
  Vue.prototype._e = createEmptyVNode;
  /*处理ScopedSlots*/
  Vue.prototype._u = resolveScopedSlots;

/**
 * Convert a value to a string that is actually rendered.
 */
 /*将val转化成字符串*/
export function toString (val: any): string {
  return val == null
    ? ''
    : typeof val === 'object'
      ? JSON.stringify(val, null, 2)
      : String(val)
}
2
3
4
5
6
7
8
9
10
11
12
13
14
15
16
17
18
19
20
21
22
23
24
25
26
27
28
29
30
31
32
33
34
35
36
37
38
39
40
41
42
43
44
45
46
47
48
49
50
51
52
53
54
55
56
源码:
platforms\web\runtime\modules\dom-props.js
function updateDOMProps (oldVnode: VNodeWithData, vnode: VNodeWithData) {
  if (isUndef(oldVnode.data.domProps) && isUndef(vnode.data.domProps)) {
    return
  }
  let key, cur
  const elm: any = vnode.elm
  const oldProps = oldVnode.data.domProps || {}
  let props = vnode.data.domProps || {}
  // clone observed objects, as the user probably wants to mutate it
  if (isDef(props.__ob__)) {
    props = vnode.data.domProps = extend({}, props)
  }

  for (key in oldProps) {
    if (isUndef(props[key])) {
      elm[key] = ''
    }
  }
  for (key in props) {
    cur = props[key]
    // ignore children if the node has textContent or innerHTML,
    // as these will throw away existing DOM nodes and cause removal errors
    // on subsequent patches (#3360)
    if (key === 'textContent' || key === 'innerHTML') {
      if (vnode.children) vnode.children.length = 0
      if (cur === oldProps[key]) continue
    }

    if (key === 'value') {
      // store value as _value as well since
      // non-string values will be stringified
      elm._value = cur
      // avoid resetting cursor position when value is the same
      const strCur = isUndef(cur) ? '' : String(cur)
      if (shouldUpdateValue(elm, vnode, strCur)) {
        elm.value = strCur
      }
    } else {
      elm[key] = cur
    }
  }
}
2
3
4
5
6
7
8
9
10
11
12
13
14
15
16
17
18
19
20
21
22
23
24
25
26
27
28
29
30
31
32
33
34
35
36
37
38
39
40
41
42
43
# keep-alive了解及原理使用?
点击查看
#
keep-alive平时在哪使用?原理是?
keep-alive可以实现组件的缓存,当组件切换时不会对单曲最近进行卸载。
常用的2个属性include/exclude,2个生命周期activated/deactivated;
# 核心答案:
keep-alive主要是缓存,采用的是LRU算法。 最近最久未使用法。
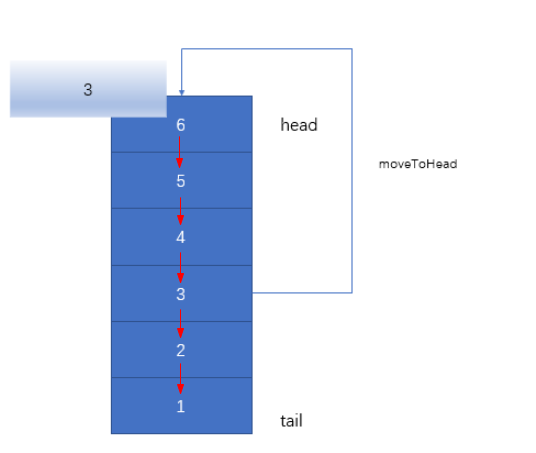
# 原理:
源码:
src/core/components/keep-alive.js
- 通过this.$slots.default拿到插槽组件,也就是keep-alive包裹的组件,getFirstComponentChild获取第一个子组件,获取该组件的name(存在组件名则直接使用组件名,否则会使用tag)。接下来会将这个name通过include与exclude属性进行匹配,匹配不成功(说明不需要进行缓存)则不进行任何操作直接返回vnode,(vnode节点描述对象,vue通过vnode创建真实的DOM)
- 匹配到了就开始缓存,根据key在this.cache中查找,如果存在则说明之前已经缓存过了,直接将缓存的vnode的componentInstance(组件实例)覆盖到目前的vnode上面。否则将vnode存储在cache中。并且通过remove(keys, key),将当前的key从keys中删除再重新keys.push(key),这样就改变了当前key在keys中的位置。这个是为了实现max的功能,并且遵循缓存淘汰策略。
- 如果没匹配到,说明没缓存过,这时候需要进行缓存,并且判断当前缓存的个数是否超过max指定的个数,如果超过,则销毁keys里的最后一个组件,并从keys中移除,这个就是LRU(Least Recently Used :最近最少使用 )缓存淘汰算法。
- 最后返回vnode或者默认插槽的第一个组件进行DOM渲染。
* keep-alive组件 */
export default {
  name: "keep-alive",
  /* 抽象组件 */
  abstract: true,

  props: {
    include: patternTypes,
    exclude: patternTypes,
  },

  created() {
    /* 缓存对象 */
    this.cache = Object.create(null); //创建缓存对象;
    this.keys=[]
  },

  /* destroyed钩子中销毁所有cache中的组件实例和key */
  destroyed() {
    for (const key in this.cache) {
      pruneCacheEntry(this.cache[key]);
    }
  },

  watch: {
    /* 监视include以及exclude属性,在被修改的时候对cache进行修正,进行缓存处理 */
    include(val: string | RegExp) {
      pruneCache(this.cache, this._vnode, (name) => matches(val, name));
    },
    exclude(val: string | RegExp) {
      pruneCache(this.cache, this._vnode, (name) => !matches(val, name));
    },
  },

  render() {
    /* 得到slot插槽中的第一个组件 */
    const vnode: VNode = getFirstComponentChild(this.$slots.default);

    const componentOptions: ?VNodeComponentOptions =
      vnode && vnode.componentOptions;
    if (componentOptions) {
      // check pattern
      /* 获取组件名称,优先获取组件的name字段,否则是组件的tag */
      const name: ?string = getComponentName(componentOptions);
      /* name不在inlcude中或者在exlude中则直接返回vnode(没有取缓存) */
      if (
        name &&
        ((this.include && !matches(this.include, name)) ||
          (this.exclude && matches(this.exclude, name)))
      ) {
        return vnode;
      }
      const key: ?string =
        vnode.key == null
          ? // same constructor may get registered as different local components
            // so cid alone is not enough (#3269)
            componentOptions.Ctor.cid +
            (componentOptions.tag ? `::${componentOptions.tag}` : "")
          : vnode.key;
      /* 如果已经做过缓存了则直接从缓存中获取组件实例给vnode,还未缓存过则进行缓存 */
      if (this.cache[key]) {
        vnode.componentInstance = this.cache[key].componentInstance;
        // remove(keys,key) [a,b,c,d] => [a,c,b] => [b,c,d]
      } else {
        this.cache[key] = vnode;
      }
      //将组件的keepAlive属性设置为true
      vnode.data.keepAlive=true//判断是否执行组件的created、mounted生命周期函数
    }
    return vnode;
  },
};
2
3
4
5
6
7
8
9
10
11
12
13
14
15
16
17
18
19
20
21
22
23
24
25
26
27
28
29
30
31
32
33
34
35
36
37
38
39
40
41
42
43
44
45
46
47
48
49
50
51
52
53
54
55
56
57
58
59
60
61
62
63
64
65
66
67
68
69
70
71
72
首次渲染 组件的首次渲染:判断组件的abstract属性,才往父组件里面挂载DOM
    const options=vm.$options
    let parent=options.parent
    if(parent && !options.abstract){//判断组件的abstract属性,才往父组件里面挂载DOM
        while(parent.$options.abstract && parent.$parent){
            parent=parent.$parent
        }
        parent.$children.push(vm)
    }
    vm.$parent=parent
    vm.$root=parent?parent:$root:vm
    vm.$children=[]
    vm.$refs={}
    vm._watcher=null
    vm._inactive=null
    vm._directInactive=false
    vm._isMounted=false
    vm._isDestroyed=false
    vm._isBeingDestoryed=false
}
2
3
4
5
6
7
8
9
10
11
12
13
14
15
16
17
18
19
判断当前keepAlive和componentInstance是否存在来判断是否要执行组件perpatch还是执行创建componentInstance
init(vnode:VNodeWithData,hydrating:boolean):?boolean{
 if(vnode.componentInstance && !vnode.componentInstance.__isDestroyed && vnode.data.keepAlive){//首次渲染 vnode.componentInstance为undefined
        const mounteNode:any=vnode
        componentVNodeHooks.prepatch(mountedNode,mountedNode)//prepatch函数执行的是组件更新的过程
    }else{
        const child=vnode.componentInstance=createComponentInstanceForVnode(vnode,activeInstance)
    }
    child.$mount(hydrating?vode.elm:undefined,hydrating)
}
2
3
4
5
6
7
8
9
prepatch操作就不会在执行组件的mounted和created声明周期函数,而是直接将DOM插入
# LRU缓存策略
LRU缓存策略:从内存找出最久未使用的数据并置换新的数据 LRU(least recently used)算法根据数据的历史访问记录来进行淘汰数据,其核心思想是:如果数据最近被访问过,那么将来被访问的几率也更高。最常见的实现是使用一个链表保存缓存数据,
详细算法实现如下
- 新数据插入到链表头部
- 每当缓存数据被访问,则将数据移到链表头部
- 链表满的时候,将链表尾部的数据丢弃
# 生命周期
使用keep-alive标签后,会有两个生命周期函数分别是:activated、deactivated;
activated:页面渲染的时候被执行。deactivated:页面被隐藏或者页面即将被替换成新的页面时被执行。
keep-alive是一个抽象的组件,缓存的组件不会被mounted,为此提供activated和deactivated钩子函数
在2.1.0 版本后keep-alive新加入了两个属性: include(包含的组件缓存生效) 与 exclude(排除的组件不缓存,优先级大于include) 。
当引入keep-alive的时候,页面第一次进入,钩子的触发顺序 created-> mounted-> activated,退出时触发deactivated。当再次进入(前进或者后退)时,只触发activated。
事件挂载的方法等,只执行一次的放在 mounted 中;组件每次进去都执行的方法放在 activated 中, activated 中的方法不管是否需要缓存都会执行。
# 使用
<template>
  <div class="app" id="app">
    <keep-alive>
      <router-view v-if="$route.meta.keepAlive"></router-view>
    </keep-alive>
    <router-view v-if="!$route.meta.keepAlive"></router-view>
  </div>
</template>

<script>
export default {
  name: 'App'
}
</script>

<style lang="less"></style>
2
3
4
5
6
7
8
9
10
11
12
13
14
15
16
# Vue为什么需要虚拟DOM?
# 用
vnode来描述一个DOM结构
点击查看
减少了对真实DOM的操作;
总体流程:会将template ast树 => codegen => 转化为render函数 => 内部调用的就是_c方法 => 虚拟dom
# 核心答案:
Virtual DOM就是用js对象来描述真实DOM,是对真实DOM的抽象,由于直接操作DOM性能低但是js层的操作效率高,可以将DOM操作转化成对象操作,最终通过diff算法比对差异进行更新DOM(减少了对真实DOM的操作)。虚拟DOM不依赖真实平台环境从而也可以实现跨平台。
# 补充回答:
虚拟DOM的实现就是普通对象包含tag、data、children等属性对真实节点的描述。(本质上就是在JS和DOM之间的一个缓存)
# 原理:
源码位置:
src/core/vdom/vnode:3
 constructor (
    tag?: string,
    data?: VNodeData,
    children?: ?Array<VNode>,
    text?: string,
    elm?: Node,
    context?: Component,
    componentOptions?: VNodeComponentOptions
  ) {
    /*当前节点的标签名*/
    this.tag = tag
    /*当前节点对应的对象,包含了具体的一些数据信息,是一个VNodeData类型,可以参考VNodeData类型中的数据信息*/
    this.data = data
    /*当前节点的子节点,是一个数组*/
    this.children = children
    /*当前节点的文本*/
    this.text = text
    /*当前虚拟节点对应的真实dom节点*/
    this.elm = elm
    /*当前节点的名字空间*/
    this.ns = undefined
    /*当前节点的编译作用域*/
    this.context = context
    /*函数化组件作用域*/
    this.functionalContext = undefined
    /*节点的key属性,被当作节点的标志,用以优化*/
    this.key = data && data.key
    /*组件的option选项*/
    this.componentOptions = componentOptions
    /*当前节点对应的组件的实例*/
    this.componentInstance = undefined
    /*当前节点的父节点*/
    this.parent = undefined
    /*简而言之就是是否为原生HTML或只是普通文本,innerHTML的时候为true,textContent的时候为false*/
    this.raw = false
    /*是否为静态节点*/
    this.isStatic = false
    /*是否作为跟节点插入*/
    this.isRootInsert = true
    /*是否为注释节点*/
    this.isComment = false
    /*是否为克隆节点*/
    this.isCloned = false
    /*是否有v-once指令*/
    this.isOnce = false
  }
2
3
4
5
6
7
8
9
10
11
12
13
14
15
16
17
18
19
20
21
22
23
24
25
26
27
28
29
30
31
32
33
34
35
36
37
38
39
40
41
42
43
44
45
46
源码位置:
src/core/vdom/create-element:23
export function createElement(
  context: Component,
  tag: any,
  data: any,
  children: any,
  normalizationType: any,
  alwaysNormalize: boolean
): VNode {
  /*兼容不传data的情况*/
  if (Array.isArray(data) || isPrimitive(data)) {
    normalizationType = children;
    children = data;
    data = undefined;
  }
  /*如果alwaysNormalize为true,则normalizationType标记为ALWAYS_NORMALIZE*/
  if (isTrue(alwaysNormalize)) {
    normalizationType = ALWAYS_NORMALIZE;
  }
  /*创建虚拟节点*/
  return _createElement(context, tag, data, children, normalizationType);
}

/*创建VNode节点*/
export function _createElement(
  context: Component,
  tag?: string | Class<Component> | Function | Object,
  data?: VNodeData,
  children?: any,
  normalizationType?: number
): VNode {
  /*
    如果data未定义(undefined或者null)或者是data的__ob__已经定义(代表已经被observed,上面绑定了Oberver对象),
    https://cn.vuejs.org/v2/guide/render-function.html#约束
    那么创建一个空节点
  */
  if (isDef(data) && isDef((data: any).__ob__)) {
    process.env.NODE_ENV !== "production" &&
      warn(
        `Avoid using observed data object as vnode data: ${JSON.stringify(
          data
        )}\n` + "Always create fresh vnode data objects in each render!",
        context
      );
    return createEmptyVNode();
  }
  /*如果tag不存在也是创建一个空节点*/
  if (!tag) {
    // in case of component :is set to falsy value
    return createEmptyVNode();
  }
  // support single function children as default scoped slot
  /*默认默认作用域插槽*/
  if (Array.isArray(children) && typeof children[0] === "function") {
    data = data || {};
    data.scopedSlots = { default: children[0] };
    children.length = 0;
  }
  if (normalizationType === ALWAYS_NORMALIZE) {
    children = normalizeChildren(children);
  } else if (normalizationType === SIMPLE_NORMALIZE) {
    children = simpleNormalizeChildren(children);
  }
  let vnode, ns;
  if (typeof tag === "string") {
    let Ctor;
    /*获取tag的名字空间*/
    ns = config.getTagNamespace(tag);
    /*判断是否是保留的标签*/
    if (config.isReservedTag(tag)) {
      // platform built-in elements
      /*如果是保留的标签则创建一个相应节点*/
      vnode = new VNode(
        config.parsePlatformTagName(tag),
        data,
        children,
        undefined,
        undefined,
        context
      );
    } else if (
      isDef((Ctor = resolveAsset(context.$options, "components", tag)))
    ) {
      // component
      /*从vm实例的option的components中寻找该tag,存在则就是一个组件,创建相应节点,Ctor为组件的构造类*/
      vnode = createComponent(Ctor, data, context, children, tag);
    } else {
      /*未知的元素,在运行时检查,因为父组件可能在序列化子组件的时候分配一个名字空间*/
      vnode = new VNode(tag, data, children, undefined, undefined, context);
    }
  } else {
    // direct component options / constructor
    /*tag不是字符串的时候则是组件的构造类*/
    vnode = createComponent(tag, data, context, children);
  }
  if (isDef(vnode)) {
    /*如果有名字空间,则递归所有子节点应用该名字空间*/
    if (ns) applyNS(vnode, ns);
    return vnode;
  } else {
    /*如果vnode没有成功创建则创建空节点*/
    return createEmptyVNode();
  }
}
2
3
4
5
6
7
8
9
10
11
12
13
14
15
16
17
18
19
20
21
22
23
24
25
26
27
28
29
30
31
32
33
34
35
36
37
38
39
40
41
42
43
44
45
46
47
48
49
50
51
52
53
54
55
56
57
58
59
60
61
62
63
64
65
66
67
68
69
70
71
72
73
74
75
76
77
78
79
80
81
82
83
84
85
86
87
88
89
90
91
92
93
94
95
96
97
98
99
100
101
102
103
# 快速Mock:
/*
 * @Author: samy
 * @email: yessz#foxmail.com
 * @time: 2021-02-11 00:02:16
 * @modAuthor: samy
 * @modTime: 2021-02-11 00:09:25
 * @desc:
 * @Copyright © 2015~2021 BDP FE
 */
function _c(tag, data, ...children) {
  let key = data.key;
  delete data.key;
  children = children.map((children) => {
    if (typeof child === "object") {
      return child;
    } else {
      return vnode(undefined, undefined, undefined, undefined, children);
    }
  });
  return vnode(tag, data, key, children);
}

function vnode(tag, data, key, children, text) {
  return {
    tag, // 当前节点的标签名
    data, // 当前标签上的属性
    key, //唯一表示用户可能传递
    children,
    text,
  };
}

let r = _c("div", { id: "container" }, _c("p", {}, "hello"), "damy");
console.log(r);
// { tag: 'div',
//   data: { id: 'container' },
//   key: undefined,
//   children:
//    [ { tag: undefined,
//        data: undefined,
//        key: undefined,
//        children: undefined,
//        text: [Object] },
//      { tag: undefined,
//        data: undefined,
//        key: undefined,
//        children: undefined,
//        text: 'damy' } ],
//   text: undefined }
2
3
4
5
6
7
8
9
10
11
12
13
14
15
16
17
18
19
20
21
22
23
24
25
26
27
28
29
30
31
32
33
34
35
36
37
38
39
40
41
42
43
44
45
46
47
48
49
# Vue中的diff原理
点击查看
# 核心答案:
Vue的diff算法是平级比较,不考虑跨级比较的情况。内部采用深度递归的方式 + 双指针的方式进行比较。Vue3中采用最长递增子序列实现diff算法;
**diff算法的时间复杂度:O(n)**两个树的完全的diff算法是一个时间复杂度为O(n3), vue进行了优化将O(n3)复杂度的问题转换成O(n)复杂度的问题【只比较同级不考虑跨级问题】,在前端当中,很少会跨越层次地移动DOM元素,所以Virtual Dom只会对同一个层次的元素进行对比;
diff主要流程:
先同级比较,再比较子节点;
- 先比较是否是相同节点;
- 相同节点比较属性,并复用老节点;
- 先判断一方有儿子,一方没有儿子的情况;
- 如果老有,新没有,移除老节点的信息,
- 如果老没有,新有,把新节点的信息替换到老节点上;
- 比较都有儿子的情况;【最复杂的,子流程】
- 考虑老节点和新节点儿子的情况;
- 优化比较:头头、尾尾、头尾、尾头;
- 比对查找进行复用;
- 递归比较子节点;
# 三步骤
patch
patchVnode
updateChildren
function patch (oldVnode, vnode, hydrating, removeOnly, parentElm, refElm) {
    /*vnode不存在则直接调用销毁钩子*/
    if (isUndef(vnode)) {
      if (isDef(oldVnode)) invokeDestroyHook(oldVnode)
      return
    }

    let isInitialPatch = false
    const insertedVnodeQueue = []

    if (isUndef(oldVnode)) {
      // empty mount (likely as component), create new root element
      isInitialPatch = true
      createElm(vnode, insertedVnodeQueue, parentElm, refElm)
    } else {
      /*标记旧的VNode是否有nodeType*/
      /*Github:https://github.com/answershuto*/
      const isRealElement = isDef(oldVnode.nodeType)
      if (!isRealElement && sameVnode(oldVnode, vnode)) {
        // patch existing root node
        /*是同一个节点的时候直接修改现有的节点*/
        patchVnode(oldVnode, vnode, insertedVnodeQueue, removeOnly)
   ...
   return vnode.elm
2
3
4
5
6
7
8
9
10
11
12
13
14
15
16
17
18
19
20
21
22
23
24
25
function patchVnode (
    oldVnode,
    vnode,
    insertedVnodeQueue,
    ownerArray,
    index,
    removeOnly
  ) {
    // 两个vnode相同,说明不需要diff,直接返回
    if (oldVnode === vnode) {
      return
    }

    // 如果传入了ownerArray和index,可以进行重用vnode,updateChildren里用来替换位置
    if (isDef(vnode.elm) && isDef(ownerArray)) {
      // clone reused vnode
      vnode = ownerArray[index] = cloneVNode(vnode)
    }

    const elm = vnode.elm = oldVnode.elm

    // 如果oldVnode的isAsyncPlaceholder属性为true时,跳过检查异步组件,return
    if (isTrue(oldVnode.isAsyncPlaceholder)) {
      if (isDef(vnode.asyncFactory.resolved)) {
        hydrate(oldVnode.elm, vnode, insertedVnodeQueue)
      } else {
        vnode.isAsyncPlaceholder = true
      }
      return
    }
    /*
      如果新旧VNode都是静态的,同时它们的key相同(代表同一节点),
      并且新的VNode是clone或者是标记了once(标记v-once属性,只渲染一次),
      那么只需要替换elm以及componentInstance即可。
    */
    if (isTrue(vnode.isStatic) &&
      isTrue(oldVnode.isStatic) &&
      vnode.key === oldVnode.key &&
      (isTrue(vnode.isCloned) || isTrue(vnode.isOnce))
    ) {
      vnode.componentInstance = oldVnode.componentInstance
      return
    }

    let i
    const data = vnode.data
    if (isDef(data) && isDef(i = data.hook) && isDef(i = i.prepatch)) {
      i(oldVnode, vnode)
    }

    const oldCh = oldVnode.children
    const ch = vnode.children
    if (isDef(data) && isPatchable(vnode)) {
      for (i = 0; i < cbs.update.length; ++i) cbs.update[i](oldVnode, vnode)
      if (isDef(i = data.hook) && isDef(i = i.update)) i(oldVnode, vnode)
    }
    /*如果这个VNode节点没有text文本时*/
    if (isUndef(vnode.text)) {
      if (isDef(oldCh) && isDef(ch)) {
      // 两个vnode都定义了子节点,并且不相同,就对子节点进行diff
        if (oldCh !== ch) updateChildren(elm, oldCh, ch, insertedVnodeQueue, removeOnly)
      } else if (isDef(ch)) {
      // 如果只有新的vnode定义了子节点,则进行添加子节点的操作
        if (process.env.NODE_ENV !== 'production') {
          checkDuplicateKeys(ch)
        }
        if (isDef(oldVnode.text)) nodeOps.setTextContent(elm, '')
        addVnodes(elm, null, ch, 0, ch.length - 1, insertedVnodeQueue)
      } else if (isDef(oldCh)) {
      // 如果只有旧的vnode定义了子节点,则进行删除子节点的操作
        removeVnodes(oldCh, 0, oldCh.length - 1)
      } else if (isDef(oldVnode.text)) {
        nodeOps.setTextContent(elm, '')
      }
    } else if (oldVnode.text !== vnode.text) {
      nodeOps.setTextContent(elm, vnode.text)
    }
    if (isDef(data)) {
      if (isDef(i = data.hook) && isDef(i = i.postpatch)) i(oldVnode, vnode)
    }
  }
2
3
4
5
6
7
8
9
10
11
12
13
14
15
16
17
18
19
20
21
22
23
24
25
26
27
28
29
30
31
32
33
34
35
36
37
38
39
40
41
42
43
44
45
46
47
48
49
50
51
52
53
54
55
56
57
58
59
60
61
62
63
64
65
66
67
68
69
70
71
72
73
74
75
76
77
78
79
80
81
function updateChildren (parentElm, oldCh, newCh, insertedVnodeQueue, removeOnly) {
    // 声明oldCh和newCh的头尾索引和头尾的vnode,
    let oldStartIdx = 0
    let newStartIdx = 0
    let oldEndIdx = oldCh.length - 1
    let oldStartVnode = oldCh[0]
    let oldEndVnode = oldCh[oldEndIdx]
    let newEndIdx = newCh.length - 1
    let newStartVnode = newCh[0]
    let newEndVnode = newCh[newEndIdx]
    let oldKeyToIdx, idxInOld, vnodeToMove, refElm

    const canMove = !removeOnly

    if (process.env.NODE_ENV !== 'production') {
      checkDuplicateKeys(newCh)
    }

    while (oldStartIdx <= oldEndIdx && newStartIdx <= newEndIdx) {
      if (isUndef(oldStartVnode)) {
        oldStartVnode = oldCh[++oldStartIdx] // Vnode has been moved left
      } else if (isUndef(oldEndVnode)) {
        oldEndVnode = oldCh[--oldEndIdx]
        // 判断两边的头是不是相同节点
      } else if (sameVnode(oldStartVnode, newStartVnode)) {
        patchVnode(oldStartVnode, newStartVnode, insertedVnodeQueue, newCh, newStartIdx)
        oldStartVnode = oldCh[++oldStartIdx]
        newStartVnode = newCh[++newStartIdx]
        // 判断尾部是不是相同节点
      } else if (sameVnode(oldEndVnode, newEndVnode)) {
        patchVnode(oldEndVnode, newEndVnode, insertedVnodeQueue, newCh, newEndIdx)
        oldEndVnode = oldCh[--oldEndIdx]
        newEndVnode = newCh[--newEndIdx]
        // 判断旧节点头部是不是与新节点的尾部相同,相同则把头部往右移
      } else if (sameVnode(oldStartVnode, newEndVnode)) { // Vnode moved right
        patchVnode(oldStartVnode, newEndVnode, insertedVnodeQueue, newCh, newEndIdx)
        canMove && nodeOps.insertBefore(parentElm, oldStartVnode.elm, nodeOps.nextSibling(oldEndVnode.elm))
        oldStartVnode = oldCh[++oldStartIdx]
        newEndVnode = newCh[--newEndIdx]
        // 判断旧节点尾部是不是与新节点的头部相同,相同则把头部往左移
      } else if (sameVnode(oldEndVnode, newStartVnode)) { // Vnode moved left
        patchVnode(oldEndVnode, newStartVnode, insertedVnodeQueue, newCh, newStartIdx)
        canMove && nodeOps.insertBefore(parentElm, oldEndVnode.elm, oldStartVnode.elm)
        oldEndVnode = oldCh[--oldEndIdx]
        newStartVnode = newCh[++newStartIdx]
      } else {
       /*
          生成一个key与旧VNode的key对应的哈希表
        */
        if (isUndef(oldKeyToIdx)) oldKeyToIdx = createKeyToOldIdx(oldCh, oldStartIdx, oldEndIdx)
        idxInOld = isDef(newStartVnode.key)
          ? oldKeyToIdx[newStartVnode.key]
          : findIdxInOld(newStartVnode, oldCh, oldStartIdx, oldEndIdx)
        if (isUndef(idxInOld)) { // New element
          createElm(newStartVnode, insertedVnodeQueue, parentElm, oldStartVnode.elm, false, newCh, newStartIdx)
        } else {
          vnodeToMove = oldCh[idxInOld]
          if (sameVnode(vnodeToMove, newStartVnode)) {
            patchVnode(vnodeToMove, newStartVnode, insertedVnodeQueue, newCh, newStartIdx)
            oldCh[idxInOld] = undefined
            canMove && nodeOps.insertBefore(parentElm, vnodeToMove.elm, oldStartVnode.elm)
          } else {
            // same key but different element. treat as new element
            createElm(newStartVnode, insertedVnodeQueue, parentElm, oldStartVnode.elm, false, newCh, newStartIdx)
          }
        }
        newStartVnode = newCh[++newStartIdx]
      }
    }
    // oldCh或者newCh遍历完,说明剩下的节点不是新增就是删除
    if (oldStartIdx > oldEndIdx) {
      refElm = isUndef(newCh[newEndIdx + 1]) ? null : newCh[newEndIdx + 1].elm
      addVnodes(parentElm, refElm, newCh, newStartIdx, newEndIdx, insertedVnodeQueue)
    } else if (newStartIdx > newEndIdx) {
      removeVnodes(oldCh, oldStartIdx, oldEndIdx)
    }
  }
2
3
4
5
6
7
8
9
10
11
12
13
14
15
16
17
18
19
20
21
22
23
24
25
26
27
28
29
30
31
32
33
34
35
36
37
38
39
40
41
42
43
44
45
46
47
48
49
50
51
52
53
54
55
56
57
58
59
60
61
62
63
64
65
66
67
68
69
70
71
72
73
74
75
76
77
# 补充回答:
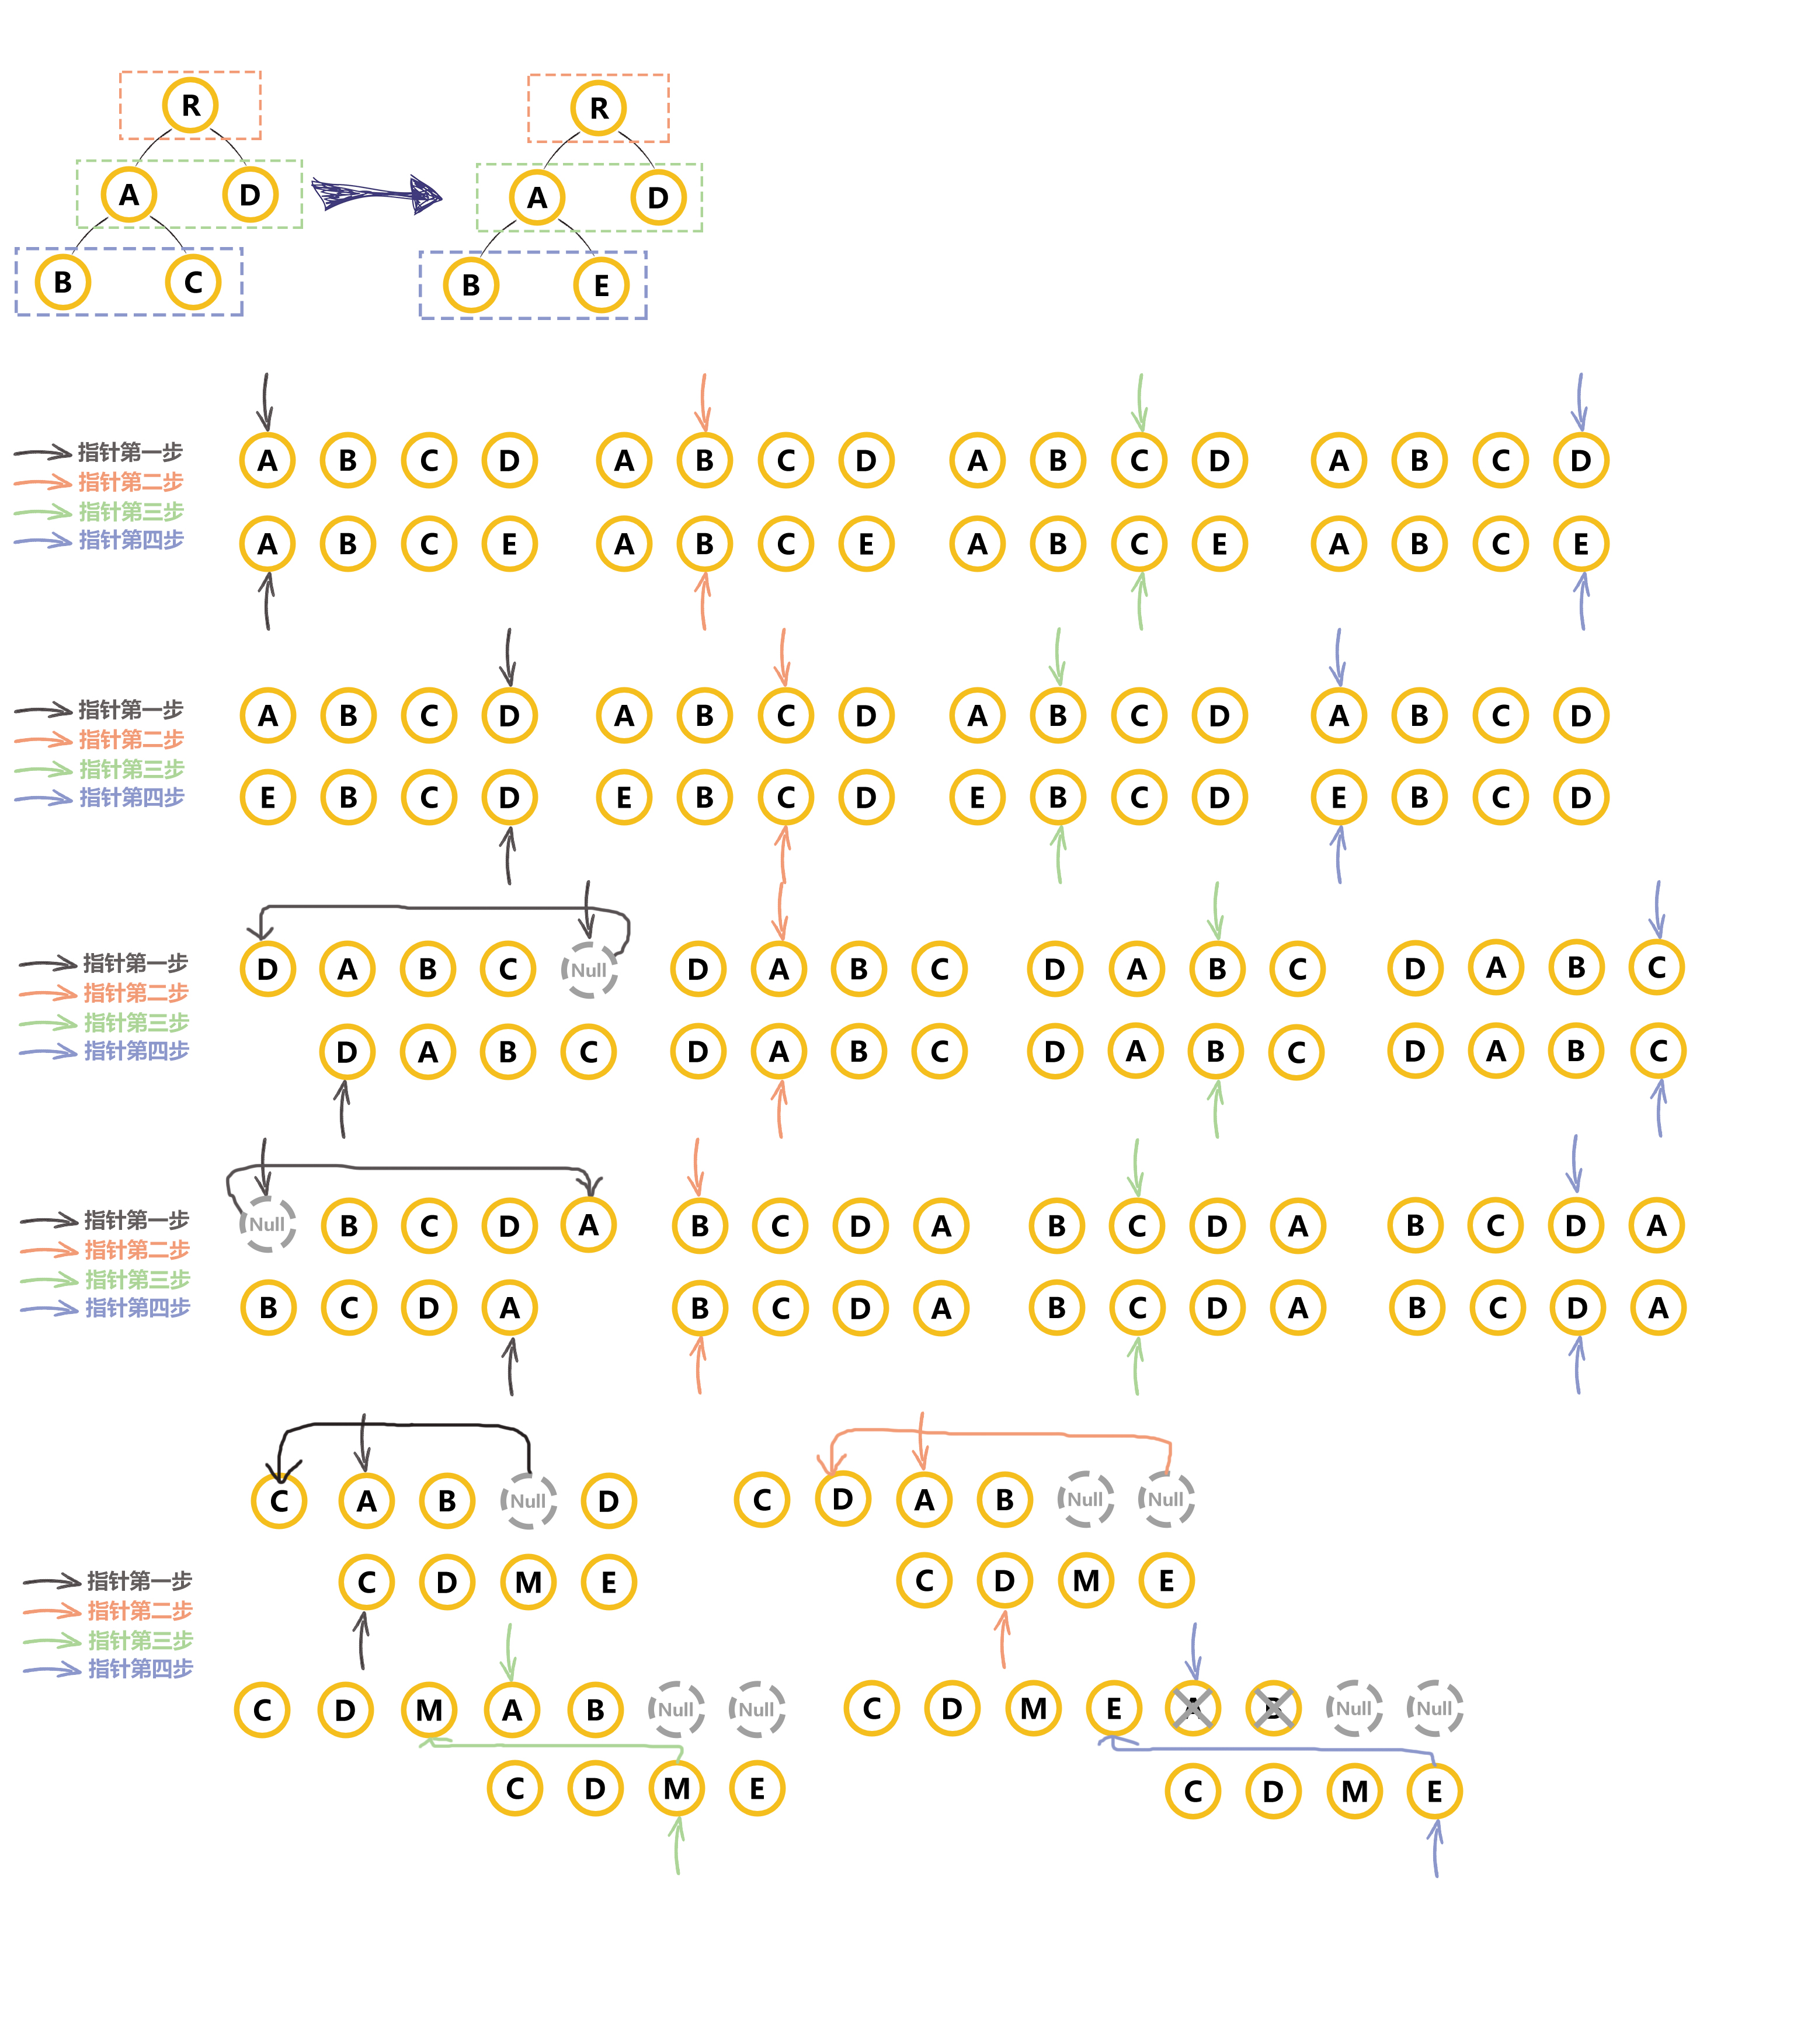
# 原理:
源码位置:
src/core/vdom/patch:501
Vue2内部采用深度递归的方式 + 双指针的方式进行比较;Vue3中采用最长递增子序列实现diff算法;
/*patch VNode节点*/
  function patchVnode(oldVnode, vnode, insertedVnodeQueue, removeOnly) {
    /*两个VNode节点相同则直接返回*/
    if (oldVnode === vnode) {
      return;
    }
    /*
      如果新旧VNode都是静态的,同时它们的key相同(代表同一节点),
      并且新的VNode是clone或者是标记了once(标记v-once属性,只渲染一次),
      那么只需要替换elm以及componentInstance即可。
    */
    if (
      isTrue(vnode.isStatic) &&
      isTrue(oldVnode.isStatic) &&
      vnode.key === oldVnode.key &&
      (isTrue(vnode.isCloned) || isTrue(vnode.isOnce))
    ) {
      vnode.elm = oldVnode.elm;
      vnode.componentInstance = oldVnode.componentInstance;
      return;
    }
    let i;
    const data = vnode.data;
    if (isDef(data) && isDef((i = data.hook)) && isDef((i = i.prepatch))) {
      /*i = data.hook.prepatch,如果存在的话,见"./create-component componentVNodeHooks"。*/
      i(oldVnode, vnode);
    }
    const elm = (vnode.elm = oldVnode.elm);
    const oldCh = oldVnode.children;
    const ch = vnode.children;
    if (isDef(data) && isPatchable(vnode)) {
      /*调用update回调以及update钩子*/
      for (i = 0; i < cbs.update.length; ++i) cbs.update[i](oldVnode, vnode);
      if (isDef((i = data.hook)) && isDef((i = i.update))) i(oldVnode, vnode);
    }
    /*如果这个VNode节点没有text文本时*/
    if (isUndef(vnode.text)) {
      if (isDef(oldCh) && isDef(ch)) {
        /*新老节点均有children子节点,则对子节点进行diff操作,调用updateChildren*/
        if (oldCh !== ch)
          updateChildren(elm, oldCh, ch, insertedVnodeQueue, removeOnly);
      } else if (isDef(ch)) {
        /*如果老节点没有子节点而新节点存在子节点,先清空elm的文本内容,然后为当前节点加入子节点*/
        if (isDef(oldVnode.text)) nodeOps.setTextContent(elm, "");
        addVnodes(elm, null, ch, 0, ch.length - 1, insertedVnodeQueue);
      } else if (isDef(oldCh)) {
        /*当新节点没有子节点而老节点有子节点的时候,则移除所有ele的子节点*/
        removeVnodes(elm, oldCh, 0, oldCh.length - 1);
      } else if (isDef(oldVnode.text)) {
        /*当新老节点都无子节点的时候,只是文本的替换,因为这个逻辑中新节点text不存在,所以直接去除ele的文本*/
        nodeOps.setTextContent(elm, "");
      }
    } else if (oldVnode.text !== vnode.text) {
      /*当新老节点text不一样时,直接替换这段文本*/
      nodeOps.setTextContent(elm, vnode.text);
    }
    /*调用postpatch钩子*/
    if (isDef(data)) {
      if (isDef((i = data.hook)) && isDef((i = i.postpatch)))
        i(oldVnode, vnode);
    }
  }

function updateChildren(
    parentElm,
    oldCh,
    newCh,
    insertedVnodeQueue,
    removeOnly
  ) {
    let oldStartIdx = 0;
    let newStartIdx = 0;
    let oldEndIdx = oldCh.length - 1;
    let oldStartVnode = oldCh[0];
    let oldEndVnode = oldCh[oldEndIdx];
    let newEndIdx = newCh.length - 1;
    let newStartVnode = newCh[0];
    let newEndVnode = newCh[newEndIdx];
    let oldKeyToIdx, idxInOld, elmToMove, refElm;

    // removeOnly is a special flag used only by <transition-group>
    // to ensure removed elements stay in correct relative positions
    // during leaving transitions
    const canMove = !removeOnly;

    while (oldStartIdx <= oldEndIdx && newStartIdx <= newEndIdx) {
      if (isUndef(oldStartVnode)) {
        oldStartVnode = oldCh[++oldStartIdx]; // Vnode has been moved left
      } else if (isUndef(oldEndVnode)) {
        oldEndVnode = oldCh[--oldEndIdx];
      } else if (sameVnode(oldStartVnode, newStartVnode)) {
        /*前四种情况其实是指定key的时候,判定为同一个VNode,则直接patchVnode即可,分别比较oldCh以及newCh的两头节点2*2=4种情况*/
        patchVnode(oldStartVnode, newStartVnode, insertedVnodeQueue);
        oldStartVnode = oldCh[++oldStartIdx];
        newStartVnode = newCh[++newStartIdx];
      } else if (sameVnode(oldEndVnode, newEndVnode)) {
        patchVnode(oldEndVnode, newEndVnode, insertedVnodeQueue);
        oldEndVnode = oldCh[--oldEndIdx];
        newEndVnode = newCh[--newEndIdx];
      } else if (sameVnode(oldStartVnode, newEndVnode)) {
        // Vnode moved right
        patchVnode(oldStartVnode, newEndVnode, insertedVnodeQueue);
        canMove &&
          nodeOps.insertBefore(
            parentElm,
            oldStartVnode.elm,
            nodeOps.nextSibling(oldEndVnode.elm)
          );
        oldStartVnode = oldCh[++oldStartIdx];
        newEndVnode = newCh[--newEndIdx];
      } else if (sameVnode(oldEndVnode, newStartVnode)) {
        // Vnode moved left
        patchVnode(oldEndVnode, newStartVnode, insertedVnodeQueue);
        canMove &&
          nodeOps.insertBefore(parentElm, oldEndVnode.elm, oldStartVnode.elm);
        oldEndVnode = oldCh[--oldEndIdx];
        newStartVnode = newCh[++newStartIdx];
      } else {
        /*
          生成一个key与旧VNode的key对应的哈希表(只有第一次进来undefined的时候会生成,也为后面检测重复的key值做铺垫)
          比如childre是这样的 [{xx: xx, key: 'key0'}, {xx: xx, key: 'key1'}, {xx: xx, key: 'key2'}]  beginIdx = 0   endIdx = 2
          结果生成{key0: 0, key1: 1, key2: 2}
        */
        if (isUndef(oldKeyToIdx))
          oldKeyToIdx = createKeyToOldIdx(oldCh, oldStartIdx, oldEndIdx);
        /*如果newStartVnode新的VNode节点存在key并且这个key在oldVnode中能找到则返回这个节点的idxInOld(即第几个节点,下标)*/
        idxInOld = isDef(newStartVnode.key)
          ? oldKeyToIdx[newStartVnode.key]
          : null;
        if (isUndef(idxInOld)) {
          // New element
          /*newStartVnode没有key或者是该key没有在老节点中找到则创建一个新的节点*/
          createElm(
            newStartVnode,
            insertedVnodeQueue,
            parentElm,
            oldStartVnode.elm
          );
          newStartVnode = newCh[++newStartIdx];
        } else {
          /*获取同key的老节点*/
          elmToMove = oldCh[idxInOld];
          /* istanbul ignore if */
          if (process.env.NODE_ENV !== "production" && !elmToMove) {
            /*如果elmToMove不存在说明之前已经有新节点放入过这个key的Dom中,提示可能存在重复的key,确保v-for的时候item有唯一的key值*/
            warn(
              "It seems there are duplicate keys that is causing an update error. " +
                "Make sure each v-for item has a unique key."
            );
          }
          if (sameVnode(elmToMove, newStartVnode)) {
            /*如果新VNode与得到的有相同key的节点是同一个VNode则进行patchVnode*/
            patchVnode(elmToMove, newStartVnode, insertedVnodeQueue);
            /*因为已经patchVnode进去了,所以将这个老节点赋值undefined,之后如果还有新节点与该节点key相同可以检测出来提示已有重复的key*/
            oldCh[idxInOld] = undefined;
            /*当有标识位canMove实可以直接插入oldStartVnode对应的真实Dom节点前面*/
            canMove &&
              nodeOps.insertBefore(
                parentElm,
                newStartVnode.elm,
                oldStartVnode.elm
              );
            newStartVnode = newCh[++newStartIdx];
          } else {
            // same key but different element. treat as new element
            /*当新的VNode与找到的同样key的VNode不是sameVNode的时候(比如说tag不一样或者是有不一样type的input标签),创建一个新的节点*/
            createElm(
              newStartVnode,
              insertedVnodeQueue,
              parentElm,
              oldStartVnode.elm
            );
            newStartVnode = newCh[++newStartIdx];
          }
        }
      }
    }
    if (oldStartIdx > oldEndIdx) {
      /*全部比较完成以后,发现oldStartIdx > oldEndIdx的话,说明老节点已经遍历完了,新节点比老节点多,所以这时候多出来的新节点需要一个一个创建出来加入到真实Dom中*/
      refElm = isUndef(newCh[newEndIdx + 1]) ? null : newCh[newEndIdx + 1].elm;
      addVnodes(
        parentElm,
        refElm,
        newCh,
        newStartIdx,
        newEndIdx,
        insertedVnodeQueue
      );
    } else if (newStartIdx > newEndIdx) {
      /*如果全部比较完成以后发现newStartIdx > newEndIdx,则说明新节点已经遍历完了,老节点多余新节点,这个时候需要将多余的老节点从真实Dom中移除*/
      removeVnodes(parentElm, oldCh, oldStartIdx, oldEndIdx);
    }
  }
2
3
4
5
6
7
8
9
10
11
12
13
14
15
16
17
18
19
20
21
22
23
24
25
26
27
28
29
30
31
32
33
34
35
36
37
38
39
40
41
42
43
44
45
46
47
48
49
50
51
52
53
54
55
56
57
58
59
60
61
62
63
64
65
66
67
68
69
70
71
72
73
74
75
76
77
78
79
80
81
82
83
84
85
86
87
88
89
90
91
92
93
94
95
96
97
98
99
100
101
102
103
104
105
106
107
108
109
110
111
112
113
114
115
116
117
118
119
120
121
122
123
124
125
126
127
128
129
130
131
132
133
134
135
136
137
138
139
140
141
142
143
144
145
146
147
148
149
150
151
152
153
154
155
156
157
158
159
160
161
162
163
164
165
166
167
168
169
170
171
172
173
174
175
176
177
178
179
180
181
182
183
184
185
186
187
188
189
190
191
192
193
# Vue中模板编译原理?
点击查看
# 核心答案:
- 将
template转行成render函数; - template=> ast => codegen => with+function 实现生成render方法;
核心步骤:
- 1.将template模板转换成
ast语法树 -parserHTML; - 2.对静态语法做静态标记 -
markUp; - 3.重新生成代码 -
codeGen;
如何将template转换成render函数(这里要注意的是我们在开发时尽量不要使用template,因为将template转化成render方法需要在运行时进行编译操作会有性能损耗,同时引用带有compiler包的vue体积也会变大。默认.vue文件中的template处理是通过vue-loader来进行处理的并不是通过运行时的编译 - 后面我们会说到默认vue项目中引入的vue.js是不带有compiler模块的)。
# 补充回答:
模板引擎的实现原理就是new Function + with来进行实现的;
vue-loader中处理template属性主要靠的是vue-template-compiler模块
let code = generate(root);//根据语法树生产新的代码;
//with会不安全,但是可以帮助我们解决作用域的问题;
let render = `with(this){return ${code}}`;
let renderFu = new Function(render);//包装成函数; 【模板引擎实现原理】
2
3
4
# 原理:
源码位置:
src/compiler/index.js:11
function baseCompile(
  template: string,
  options: CompilerOptions
): CompiledResult {
  /*parse解析得到ast树*/
  const ast = parse(template.trim(), options);
  /*
    将AST树进行优化
    优化的目标:生成模板AST树,检测不需要进行DOM改变的静态子树。
    一旦检测到这些静态树,我们就能做以下这些事情:
    1.把它们变成常数,这样我们就再也不需要每次重新渲染时创建新的节点了。
    2.在patch的过程中直接跳过。
 */
  optimize(ast, options);
  /*根据ast树生成所需的code(内部包含render与staticRenderFns)*/
  const code = generate(ast, options);
  return {
    ast,
    render: code.render,
    staticRenderFns: code.staticRenderFns,
  };
}

/*新建成Funtion对象*/
function makeFunction(code, errors) {
  try {
    return new Function(code);
  } catch (err) {
    errors.push({ err, code });
    return noop;
  }
}
export function createCompiler(baseOptions: CompilerOptions) {}
2
3
4
5
6
7
8
9
10
11
12
13
14
15
16
17
18
19
20
21
22
23
24
25
26
27
28
29
30
31
32
33
34
源码位置:
src/core/instance/render.js
 /*处理v-once的渲染函数*/
  Vue.prototype._o = markOnce
  /*将字符串转化为数字,如果转换失败会返回原字符串*/
  Vue.prototype._n = toNumber
  /*将val转化成字符串*/
  Vue.prototype._s = toString
  /*处理v-for列表渲染*/
  Vue.prototype._l = renderList
  /*处理slot的渲染*/
  Vue.prototype._t = renderSlot
  /*检测两个变量是否相等*/
  Vue.prototype._q = looseEqual
  /*检测arr数组中是否包含与val变量相等的项*/
  Vue.prototype._i = looseIndexOf
  /*处理static树的渲染*/
  Vue.prototype._m = renderStatic
  /*处理filters*/
  Vue.prototype._f = resolveFilter
  /*从config配置中检查eventKeyCode是否存在*/
  Vue.prototype._k = checkKeyCodes
  /*合并v-bind指令到VNode中*/
  Vue.prototype._b = bindObjectProps
  /*创建一个文本节点*/
  Vue.prototype._v = createTextVNode
  /*创建一个空VNode节点*/
  Vue.prototype._e = createEmptyVNode
  /*处理ScopedSlots*/
  Vue.prototype._u = resolveScopedSlots
}
2
3
4
5
6
7
8
9
10
11
12
13
14
15
16
17
18
19
20
21
22
23
24
25
26
27
28
29
# 快速Mock:
<script src="node_modules/vue-template-compiler/browser.js"></script>
<script>
    // template=> ast => codegen => with+function 实现生成render方法
    let {ast,render } = VueTemplateCompiler.compile(`<div>{{aaa}}</div>`);
    console.log(ast,render)
    // 模板引擎的实现原理 with + new Function
    console.log(new Function(render))
    // render方法执行完毕后生成的是虚拟dom
    // with(this){return _c('div',[_s(aaa)])}
    // 代码生成
</script>
2
3
4
5
6
7
8
9
10
11
# Vue template到render的过程?
点击查看
# 过程解析
vue的模板编译过程如下:template - ast - render函数
vue在模板编译中执行compileToFunctions将template转化成render函数
compileToFunctions的主要核心点:
1:调用parse方法将template转化为ast树(抽象语法树)
parse的目的:是把template转化为ast树,它是一种用js对象的形式来描述整个模板。
解析过程:利用正则表达式顺序解析模板,当解析到开始标签、闭合标签、文本的时候都会分别执行对应的回调函数,来达到构成ast树
ast元素节点(type)总共三种类型:普通元素--1,表达式--2,纯文本--3
2:对静态节点做优化 这个过程主要分析出哪些是静态节点,在其做一个标记,为后面的更新渲染可以直接跳过,静态节点做优化
深度遍历AST,查看每个子树的节点元素是否为静态节点或者静态节点根。如果为静态节点,他们生成的dom永远不会改变,这对运行时模板更新起到优化作用
3:生成代码 generate将ast抽象语法树编译成render字符串并将静态部分放到staticRender中,最后通过new Function(render)生成render函数
# slot是如何实现的?什么时候用它?
点击查看
# 理解:
# 普通插槽
普通插槽(模板传入到组件中,数据采用父组件数据)
- 创建组件虚拟节点时,会将组件的儿子的虚拟节点保存起来。当初始化组件时,通过插槽属性将儿子进行分类;
{a:[vnode],b:[vnode]}; - 渲染组件时会拿到对应的
slot属性的节点进行替换操作;【插槽的作用域为父组件】
# 作用域插槽
作用域插槽(在父组件中访问子组件数据)
- 作用域插槽在解析的时候,不会作为组件的孩子节点;
- 会解析成函数,当子组件渲染时,会调用此函数进行渲染;【插槽的作用域为子组件】
普通插槽和作用域插槽的区别:
- 普通插槽是在父组件编译和渲染阶段生成 vnodes,所以数据的作用域是
父组件实例,子组件渲染的时候直接拿到这些渲染好的 vnodes - 对于作用域插槽,父组件在编译和渲染阶段并不会直接生成 vnodes,而是在父节点 vnode 的 data 中保留一个 scopedSlots 对象,存储着不同名称的插槽以及它们对应的渲染函数,只有在编译和渲染子组件阶段才会执行这个渲染函数生成 vnodes,由于是在子组件环境执行的,所以对应的数据作用域是
子组件实例。 - 简单地说,两种插槽的目的都是让子组件 slot 占位符生成的内容由父组件来决定,但数据的作用域会根据它们 vnodes 渲染时机不同而不同。
# 编译分析:
const children = $scopedSlots.default ? $scopedSlots.default() : $slots.default;
普通插槽
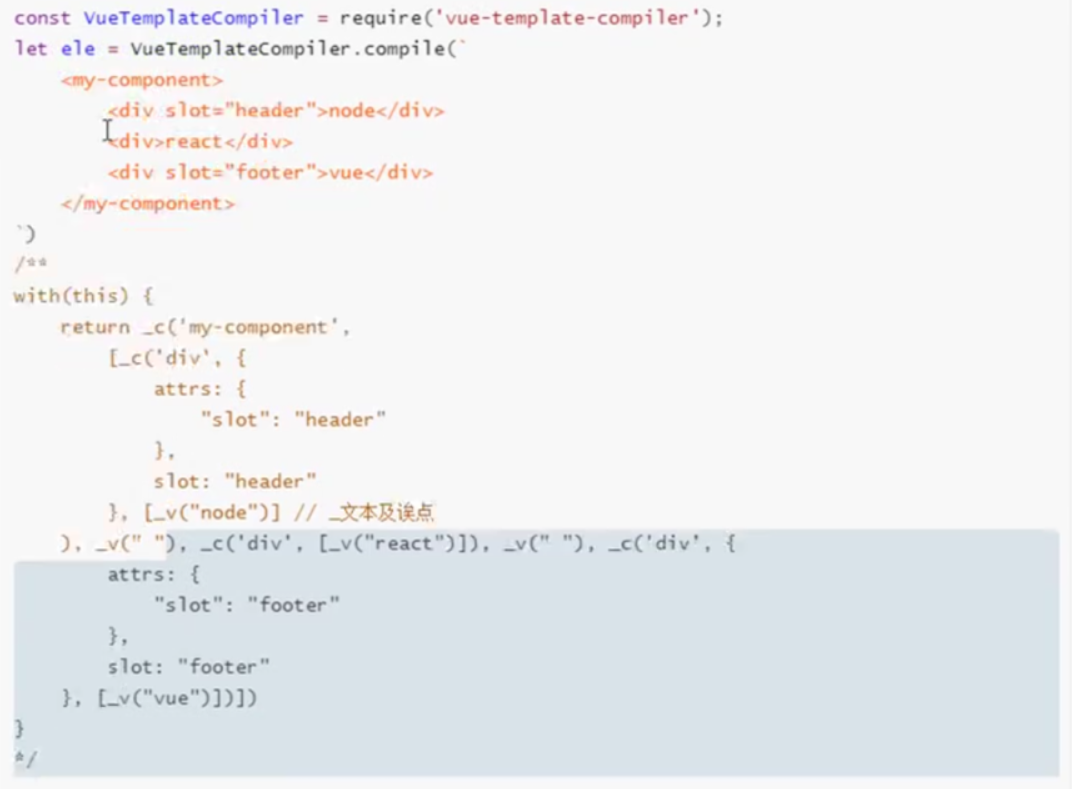
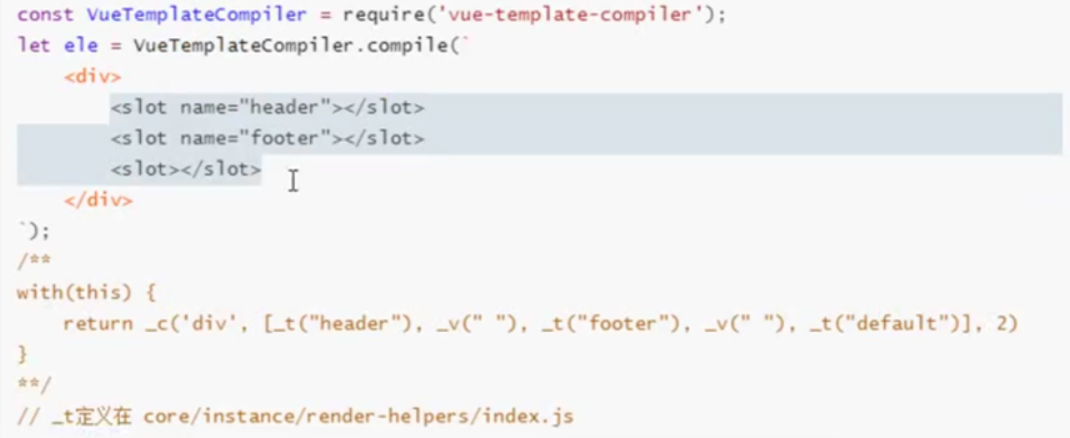
作用域插槽
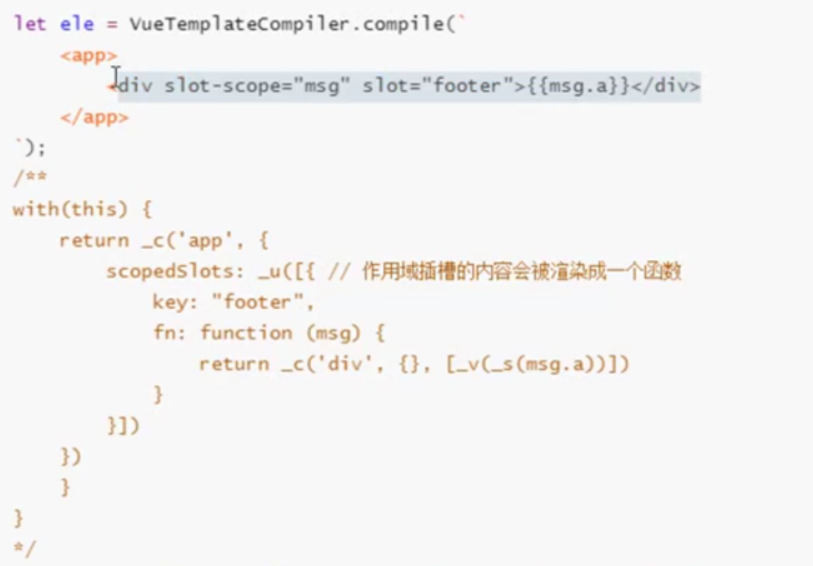
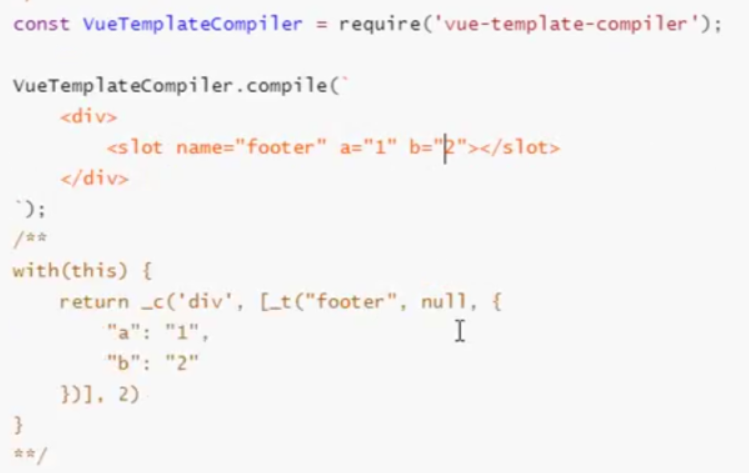
# 原理:
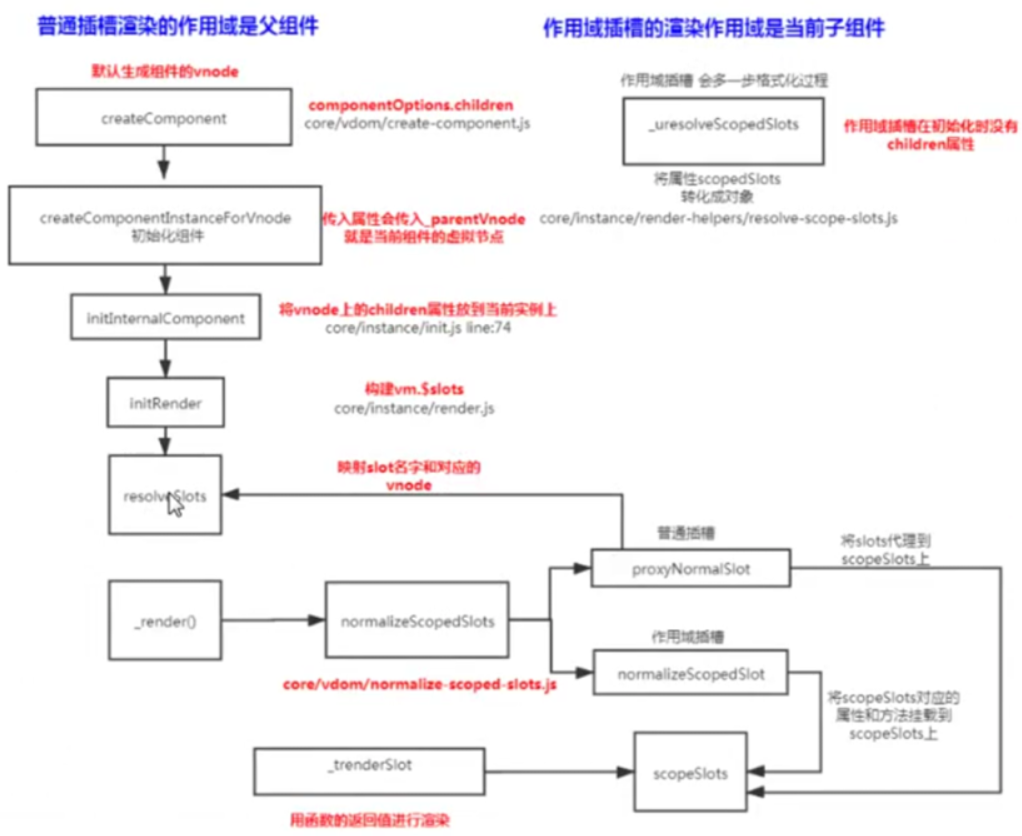
# 示范:
实现了内容分发,提高了组件自定义的程度,让组件变的更加灵活
默认插槽:
无需name属性,取子组件肚子里第一个元素节点作为默认插槽。
<!-- 子组件,组件名:child-component -->
<div class="child-page">
    <h1>子页面</h1>
    <slot></slot> <!-- 替换为 <p>hello,world!</p> -->
</div>

<!-- 父组件 -->
<div class="parent-page">
    <child-component>
        <p>hello,world!</p>
    </child-component>
</div>

<!-- 渲染结果 -->
<div class="parent-page">
    <div class="child-page">
        <h1>子页面</h1>
        <p>hello,world!</p>
    </div>
</div>
2
3
4
5
6
7
8
9
10
11
12
13
14
15
16
17
18
19
20
具名插槽:【default】
在多个插槽的情况下使用,利用name标识插槽。
<!-- 子组件,组件名:child-component -->
<div class="child-page">
    <h1>子页面</h1>
    <slot name="header"></slot>
    <slot></slot>  <!-- 等价于 <slot name="default"></slot> -->
    <slot name="footer"></slot>
</div>

<!-- 父组件 -->
<div class="parent-page">
    <child-component>
        <template v-slot:header>
          <p>头部</p>
        </template>
        <template v-slot:footer>
          <p>脚部</p>
        </template>
        <p>身体</p>
    </child-component>
</div>

<!-- 渲染结果 -->
<div class="parent-page">
    <div class="child-page">
        <h1>子页面</h1>
        <p>头部</p>
        <p>身体</p>
        <p>脚部</p>
    </div>
</div>
2
3
4
5
6
7
8
9
10
11
12
13
14
15
16
17
18
19
20
21
22
23
24
25
26
27
28
29
30
作用域插槽:
子组件给父组件传递数据。
<!-- 子组件,组件名:child-component -->
<div class="child-page">
    <h1>子页面</h1>
    <slot name="header" data="data from child-component."></slot>
</div>

<!-- 父组件 -->
<div class="parent-page">
    <child-component>
        <template v-slot:header="slotProps">
          <p>头部: {{ slotProps.data }}</p>
        </template>
    </child-component>
</div>

<!-- 渲染结果 -->
<div class="parent-page">
    <div class="child-page">
        <h1>子页面</h1>
        <p>头部: data from child-component.</p>
    </div>
</div>
2
3
4
5
6
7
8
9
10
11
12
13
14
15
16
17
18
19
20
21
22
# 组件中写name选项又哪些好处及作用?
# Vue的组件渲染和更新过程?
点击查看
# 核心答案:
- 渲染组件时,会通过
Vue.extend方法构建子组件的构造函数,并进行实例化,最终手动调用$mount()进行挂载; - 更新组件时,会进行
patchvnode流程,核心就是diff算法;
父子组件渲染的先后顺序;
组件是如何渲染到页面上的;
①在渲染父组件时会创建父组件的虚拟节点,其中可能包含子组件的标签 ;
②在创建虚拟节点时,获取组件的定义使用
Vue.extend生成组件的构造函数;③将虚拟节点转化成真实节点时,会创建组件的实例并且调用组件的$mount方法;
④所以组件的创建过程是先父后子;
# 原理:
源码位置:
src/core/vdom/create-component:25,src/core/vdom/patch:125
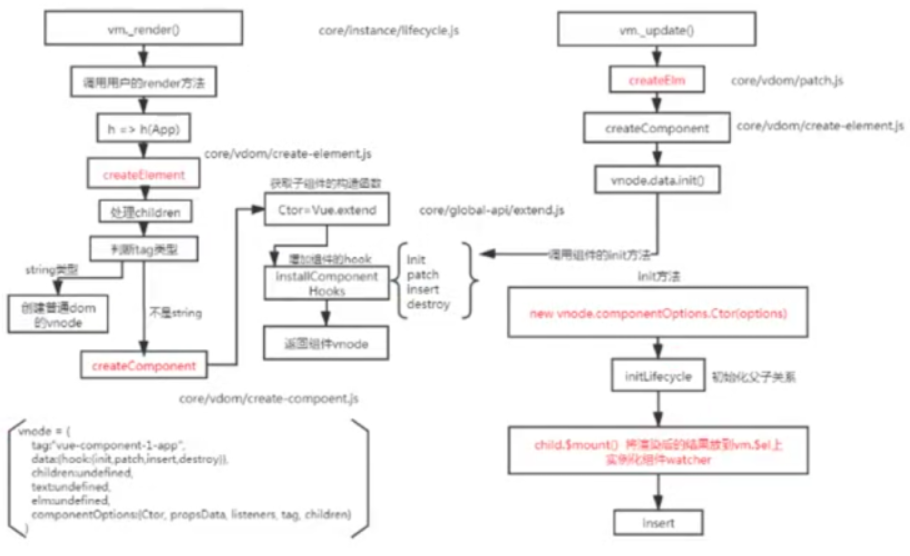
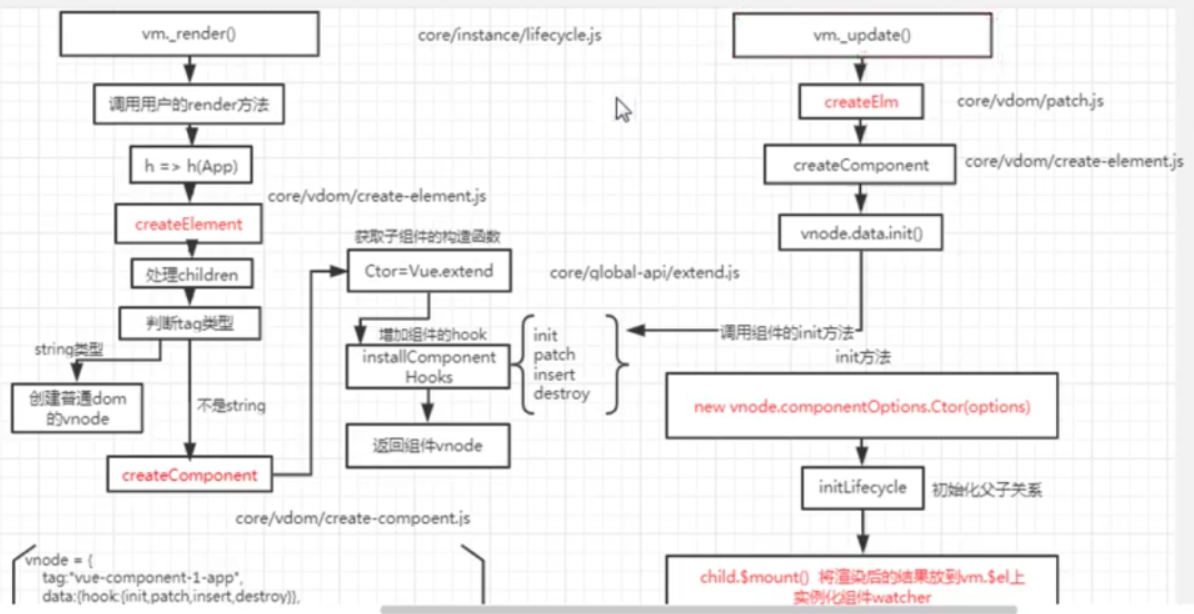
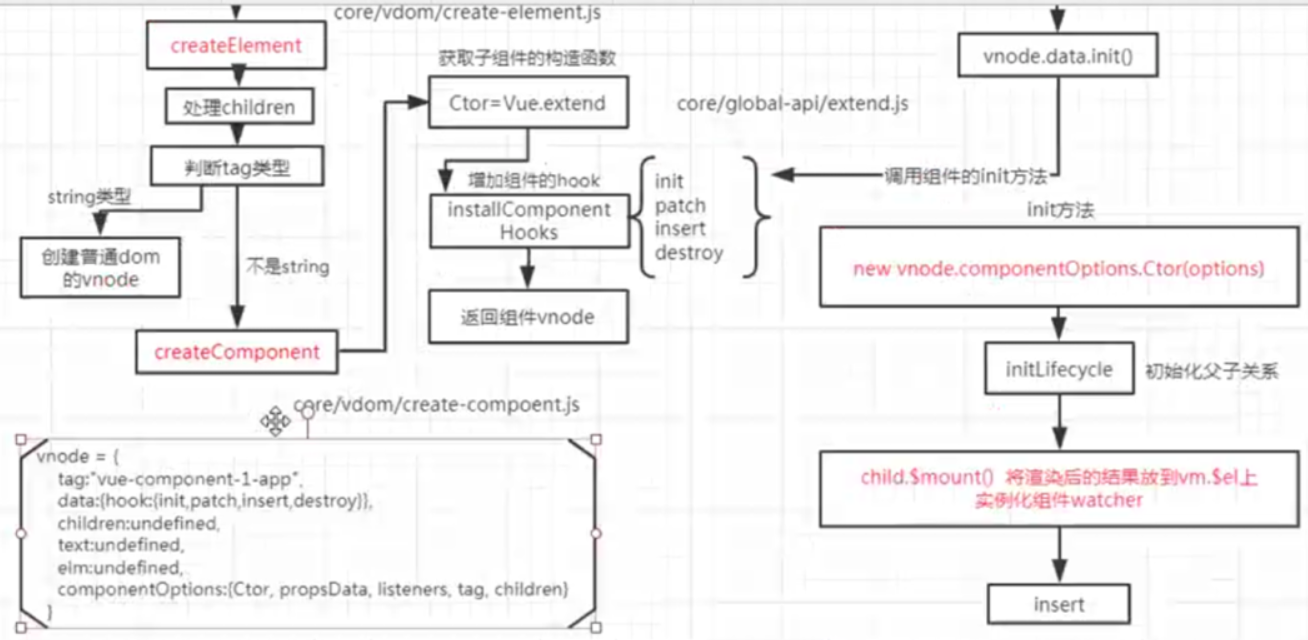
// hooks to be invoked on component VNodes during patch
/*被用来在VNode组件patch期间触发的钩子函数集合*/
const componentVNodeHooks = {
  init(
    vnode: VNodeWithData,
    hydrating: boolean,
    parentElm: ?Node,
    refElm: ?Node
  ): ?boolean {
    if (!vnode.componentInstance || vnode.componentInstance._isDestroyed) {
      const child = (vnode.componentInstance = createComponentInstanceForVnode(
        vnode,
        activeInstance,
        parentElm,
        refElm
      ));
      child.$mount(hydrating ? vnode.elm : undefined, hydrating);
    } else if (vnode.data.keepAlive) {
      // kept-alive components, treat as a patch
      const mountedNode: any = vnode; // work around flow
      componentVNodeHooks.prepatch(mountedNode, mountedNode);
    }
  },
2
3
4
5
6
7
8
9
10
11
12
13
14
15
16
17
18
19
20
21
22
23
# vue父子组件的生命周期调用顺序
点击查看
# 核心答案
可以归类为以下 4 部分:
加载渲染过程; 这个特别点;后面的mount操作顺序;
父 beforeCreate -> 父 created -> 父 beforeMount -> 子 beforeCreate -> 子 created -> 子 beforeMount -> 子 mounted -> 父 mounted
子组件更新过程;
父 beforeUpdate -> 子 beforeUpdate -> 子 updated -> 父 updated
父组件更新过程;
父 beforeUpdate -> 父 updated
销毁过程;
父 beforeDestroy -> 子 beforeDestroy -> 子 destroyed -> 父 destroyed
# 理解:
组件的调用顺序都是先父后子,渲染完成的顺序肯定是先子后父;
组件的销毁操作先父后子,销毁完成是先子后父;
# 父监听到子的生命周期
有父组件 Parent 和子组件 Child,如果父组件监听到子组件挂载 mounted 就做一些逻辑处理,
方式一:以上需要手动通过 $emit 触发父组件的事件; 可以通过以下写法实现:
// Parent.vue
<Child @mounted="doSomething"/>
// Child.vue
mounted() {
  this.$emit("mounted");
}
2
3
4
5
6
方式二:更简单的方式可以在父组件引用子组件时通过 @hook 来监听即可,如下所示:
//  Parent.vue
<Child @hook:mounted="doSomething" ></Child>
doSomething() {
   console.log('父组件监听到 mounted 钩子函数 ...');
},
//  Child.vue
mounted(){
   console.log('子组件触发 mounted 钩子函数 ...');
},
// 以上输出顺序为:
// 子组件触发 mounted 钩子函数 ...
// 父组件监听到 mounted 钩子函数 ...
2
3
4
5
6
7
8
9
10
11
12
当然 @hook 方法不仅仅是可以监听 mounted,其它的生命周期事件,例如:created, updated 等都可以监听。
示例优化:
mounted: function () {//优化后
  var picker = new Pikaday({
    field: this.$refs.input,
    format: 'YYYY-MM-DD'
  })
  this.$once('hook:beforeDestroy', function () {
    picker.destroy()
  })
}
2
3
4
5
6
7
8
9
# 原理:
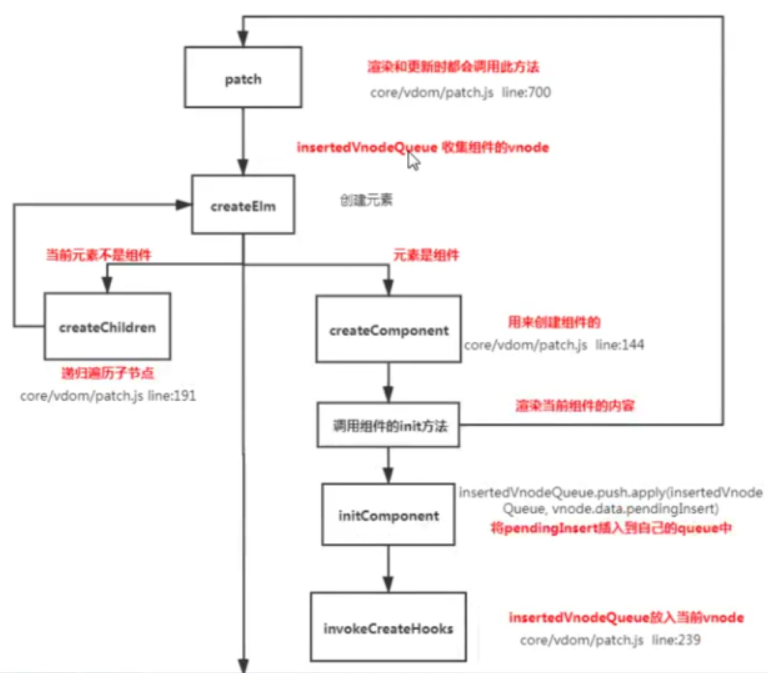

原理:
core\vdom\patch.js
  /*创建一个组件*/
  function createComponent(vnode, insertedVnodeQueue, parentElm, refElm) {
    let i = vnode.data;
    if (isDef(i)) {
      const isReactivated = isDef(vnode.componentInstance) && i.keepAlive;
      if (isDef((i = i.hook)) && isDef((i = i.init))) {
        i(vnode, false /* hydrating */, parentElm, refElm);
      }
      // after calling the init hook, if the vnode is a child component
      // it should've created a child instance and mounted it. the child
      // component also has set the placeholder vnode's elm.
      // in that case we can just return the element and be done.
      /*
        在调用了init钩子以后,如果VNode是一个子组件,它应该已经创建了一个子组件实例并挂载它。
        子组件也应该设置了一个VNode占位符,我们直接返回组件实例即可。
        意思就是如果已经存在组件实例,则不需要重新创建一个新的,我们要做的就是初始化组件以及激活组件即可,还是用原来的组件实例。
      */
      if (isDef(vnode.componentInstance)) {
        /*初始化组件*/
        initComponent(vnode, insertedVnodeQueue);
        if (isTrue(isReactivated)) {
          reactivateComponent(vnode, insertedVnodeQueue, parentElm, refElm);
        }
        return true;
      }
    }
  }
  /*初始化组件*/
  function initComponent(vnode, insertedVnodeQueue) {
    /*把之前已经存在的VNode队列合并进去*/
    if (isDef(vnode.data.pendingInsert)) {
      insertedVnodeQueue.push.apply(
        insertedVnodeQueue,
        vnode.data.pendingInsert
      );
    }
    vnode.elm = vnode.componentInstance.$el;
    if (isPatchable(vnode)) {
      /*调用create钩子*/
      invokeCreateHooks(vnode, insertedVnodeQueue);
      /*为scoped CSS 设置scoped id*/
      setScope(vnode);
    } else {
      // empty component root.
      // skip all element-related modules except for ref (#3455)
      /*注册ref*/
      registerRef(vnode);
      // make sure to invoke the insert hook
      insertedVnodeQueue.push(vnode);
    }
  }
  function invokeInsertHook(vnode, queue, initial) {
    // delay insert hooks for component root nodes, invoke them after the
    // element is really inserted
    if (isTrue(initial) && isDef(vnode.parent)) {
      vnode.parent.data.pendingInsert = queue;
    } else {
      for (let i = 0; i < queue.length; ++i) {
        queue[i].data.hook.insert(queue[i]);
      }
    }
  }
2
3
4
5
6
7
8
9
10
11
12
13
14
15
16
17
18
19
20
21
22
23
24
25
26
27
28
29
30
31
32
33
34
35
36
37
38
39
40
41
42
43
44
45
46
47
48
49
50
51
52
53
54
55
56
57
58
59
60
61
62
源码:core\instance\lifecycle.js
  Vue.prototype.$destroy = function () {
    const vm: Component = this;
    if (vm._isBeingDestroyed) {
      return;
    }
    /* 调用beforeDestroy钩子 */
    callHook(vm, "beforeDestroy");
    /* 标志位 */
    vm._isBeingDestroyed = true;
    // remove self from parent
    const parent = vm.$parent;
    if (parent && !parent._isBeingDestroyed && !vm.$options.abstract) {
      remove(parent.$children, vm);
    }
    // teardown watchers
    /* 该组件下的所有Watcher从其所在的Dep中释放 */
    if (vm._watcher) {
      vm._watcher.teardown();
    }
    let i = vm._watchers.length;
    while (i--) {
      vm._watchers[i].teardown();
    }
    // remove reference from data ob
    // frozen object may not have observer.
    if (vm._data.__ob__) {
      vm._data.__ob__.vmCount--;
    }
    // call the last hook...
    vm._isDestroyed = true;
    // invoke destroy hooks on current rendered tree
    vm.__patch__(vm._vnode, null);//先销毁儿子
    // fire destroyed hook
    /* 调用destroyed钩子 */
    callHook(vm, "destroyed");
    // turn off all instance listeners.
    /* 移除所有事件监听 */
    vm.$off();
    // remove __vue__ reference
    if (vm.$el) {
      vm.$el.__vue__ = null;
    }
    // remove reference to DOM nodes (prevents leak)
    vm.$options._parentElm = vm.$options._refElm = null;
  };
2
3
4
5
6
7
8
9
10
11
12
13
14
15
16
17
18
19
20
21
22
23
24
25
26
27
28
29
30
31
32
33
34
35
36
37
38
39
40
41
42
43
44
45
# 为什么要使用异步组件?
点击查看
# 核心答案:
如果组件功能多打包出的结果会变大,可以采用异步的方式来加载组件。主要依赖import()这个语法,可以实现文件的分割加载;
component: () => import('@/views/login'), //require([])
# 原理:
源码位置:
src/core/vdom/create-component.js:164、src/core/vdom/create-functional-component.js:5,core\vdom\helpers\resolve-async-component.js
/*创建一个组件节点,返回Vnode节点*/
export function createComponent(
  Ctor: Class<Component> | Function | Object | void,
  data?: VNodeData,
  context: Component,
  children: ?Array<VNode>,
  tag?: string
): VNode | void {
  /*没有传组件构造类直接返回*/
  if (isUndef(Ctor)) {
    return;
  }

  /*_base存放了Vue,作为基类,可以在里面添加扩展*/
  const baseCtor = context.$options._base;

  // plain options object: turn it into a constructor
  if (isObject(Ctor)) {
    Ctor = baseCtor.extend(Ctor);
  }

  // if at this stage it's not a constructor or an async component factory,
  // reject.
  /*如果在该阶段Ctor依然不是一个构造函数或者是一个异步组件工厂则直接返回*/
  if (typeof Ctor !== "function") {
    if (process.env.NODE_ENV !== "production") {
      warn(`Invalid Component definition: ${String(Ctor)}`, context);
    }
    return;
  }

  // async component
  /*处理异步组件*/
  if (isUndef(Ctor.cid)) {
    Ctor = resolveAsyncComponent(Ctor, baseCtor, context);
    if (Ctor === undefined) {
      // return nothing if this is indeed an async component
      // wait for the callback to trigger parent update.
      /*如果这是一个异步组件则会不会返回任何东西(undifiened),直接return掉,等待回调函数去触发父组件更新。s*/
      return;
    }
  }

  // resolve constructor options in case global mixins are applied after
  // component constructor creation
  resolveConstructorOptions(Ctor);

  data = data || {};

  // transform component v-model data into props & events
  if (isDef(data.model)) {
    transformModel(Ctor.options, data);
  }

  // extract props
  const propsData = extractPropsFromVNodeData(data, Ctor, tag);

  // functional component
  if (isTrue(Ctor.options.functional)) {
    return createFunctionalComponent(Ctor, propsData, data, context, children);
  }

  // extract listeners, since these needs to be treated as
  // child component listeners instead of DOM listeners
  const listeners = data.on;
  // replace with listeners with .native modifier
  data.on = data.nativeOn;

  if (isTrue(Ctor.options.abstract)) {
    // abstract components do not keep anything
    // other than props & listeners
    data = {};
  }

  // merge component management hooks onto the placeholder node
  mergeHooks(data);

  // return a placeholder vnode
  const name = Ctor.options.name || tag;
  const vnode = new VNode(
    `vue-component-${Ctor.cid}${name ? `-${name}` : ""}`,
    data,
    undefined,
    undefined,
    undefined,
    context,
    { Ctor, propsData, listeners, tag, children }
  );
  return vnode;
}
2
3
4
5
6
7
8
9
10
11
12
13
14
15
16
17
18
19
20
21
22
23
24
25
26
27
28
29
30
31
32
33
34
35
36
37
38
39
40
41
42
43
44
45
46
47
48
49
50
51
52
53
54
55
56
57
58
59
60
61
62
63
64
65
66
67
68
69
70
71
72
73
74
75
76
77
78
79
80
81
82
83
84
85
86
87
88
89
90
export function resolveAsyncComponent(
  factory: Function,
  baseCtor: Class<Component>,
  context: Component
): Class<Component> | void {
  /*出错组件工厂返回出错组件*/
  if (isTrue(factory.error) && isDef(factory.errorComp)) {
    return factory.errorComp;
  }

  /*resoved时候返回resolved组件*/
  if (isDef(factory.resolved)) {
    return factory.resolved;// 再次渲染时可以拿到获取最新的组件
  }

  /*加载组件*/
  if (isTrue(factory.loading) && isDef(factory.loadingComp)) {
    return factory.loadingComp;
  }

  if (isDef(factory.contexts)) {
    // already pending
    factory.contexts.push(context);
  } else {
    const contexts = (factory.contexts = [context]);
    let sync = true;

    const forceRender = () => {
      for (let i = 0, l = contexts.length; i < l; i++) {
        contexts[i].$forceUpdate();
      }
    };

    const resolve = once((res: Object | Class<Component>) => {
      // cache resolved
      factory.resolved = ensureCtor(res, baseCtor);
      // invoke callbacks only if this is not a synchronous resolve
      // (async resolves are shimmed as synchronous during SSR)
      if (!sync) {
        forceRender();
      }
    });

    const reject = once((reason) => {
      process.env.NODE_ENV !== "production" &&
        warn(
          `Failed to resolve async component: ${String(factory)}` +
            (reason ? `\nReason: ${reason}` : "")
        );
      if (isDef(factory.errorComp)) {
        factory.error = true;
        forceRender(); // 强制更新视图,重新渲染
      }
    });

    const res = factory(resolve, reject);

    if (isObject(res)) {
      if (typeof res.then === "function") {
        // () => Promise
        if (isUndef(factory.resolved)) {
          res.then(resolve, reject);
        }
      } else if (
        isDef(res.component) &&
        typeof res.component.then === "function"
      ) {
        res.component.then(resolve, reject);

        if (isDef(res.error)) {
          factory.errorComp = ensureCtor(res.error, baseCtor);
        }

        if (isDef(res.loading)) {
          factory.loadingComp = ensureCtor(res.loading, baseCtor);
          if (res.delay === 0) {
            factory.loading = true;
          } else {
            setTimeout(() => {
              if (isUndef(factory.resolved) && isUndef(factory.error)) {
                factory.loading = true;
                forceRender();
              }
            }, res.delay || 200);
          }
        }

        if (isDef(res.timeout)) {
          setTimeout(() => {
            reject(
              process.env.NODE_ENV !== "production"
                ? `timeout (${res.timeout}ms)`
                : null
            );
          }, res.timeout);
        }
      }
    }
    sync = false;
    // return in case resolved synchronously
    return factory.loading ? factory.loadingComp : factory.resolved;
  }
}
2
3
4
5
6
7
8
9
10
11
12
13
14
15
16
17
18
19
20
21
22
23
24
25
26
27
28
29
30
31
32
33
34
35
36
37
38
39
40
41
42
43
44
45
46
47
48
49
50
51
52
53
54
55
56
57
58
59
60
61
62
63
64
65
66
67
68
69
70
71
72
73
74
75
76
77
78
79
80
81
82
83
84
85
86
87
88
89
90
91
92
93
94
95
96
97
98
99
100
101
102
103
# 示范
const AsyncComponent = () => ({
  // 需要加载的组件 (应该是一个 `Promise` 对象)
  component: import('./MyComponent.vue'),
  // 异步组件加载时使用的组件
  loading: LoadingComponent,
  // 加载失败时使用的组件
  error: ErrorComponent,
  // 展示加载时组件的延时时间。默认值是 200 (毫秒)
  delay: 200,
  // 如果提供了超时时间且组件加载也超时了,
  // 则使用加载失败时使用的组件。默认值是:`Infinity`
  timeout: 3000
})
2
3
4
5
6
7
8
9
10
11
12
13
# vue中使用了哪些设计模式?
点击查看
# 工厂模式
工厂模式 - 传入参数即可创建实例 (createElement)
根据传入的参数不同返回不同的实例;创建VNode虚拟节点;
export function _createElement (
  context: Component,
  tag?: string | Class<Component> | Function | Object,
  data?: VNodeData,
  children?: any,
  normalizationType?: number
): VNode | Array<VNode> {
  // ...
  if (typeof tag === 'string') {
    let Ctor
    ns = (context.$vnode && context.$vnode.ns) || config.getTagNamespace(tag)
    if (config.isReservedTag(tag)) {
      vnode = new VNode(
        config.parsePlatformTagName(tag), data, children,
        undefined, undefined, context
      )
    } else if ((!data || !data.pre) && isDef(Ctor = resolveAsset(context.$options, 'components', tag))) {
      vnode = createComponent(Ctor, data, context, children, tag)
    } else {
      vnode = new VNode(
        tag, data, children,
        undefined, undefined, context
      )
    }
  } else {
    vnode = createComponent(tag, data, context, children)
  }
  // ....
}
2
3
4
5
6
7
8
9
10
11
12
13
14
15
16
17
18
19
20
21
22
23
24
25
26
27
28
29
# 单例模式
单例模式就是整个程序有且仅有一个实例。
export function install (_Vue) {
  if (Vue && _Vue === Vue) {
    if (__DEV__) {
      console.error(
        '[vuex] already installed. Vue.use(Vuex) should be called only once.'
      )
    }
    return
  }
  Vue = _Vue
  applyMixin(Vue)
}
2
3
4
5
6
7
8
9
10
11
12
# 观察者模式
- vue 响应式;watcher
&dep的关系 - DOM事件;
**“Vue 双向绑定实现”;**在 Vue 中,如何实现响应式也是使用了该模式。对于需要实现响应式的对象来说,在 get 的时候会进行依赖收集,当改变了对象的属性时,就会触发派发更新。
简单的观察者模式: (仿 Vue 实现)
class Dep {// 观察者
    constructor() {
        this.subs = []
    }
    addSub(sub) {
        this.subs.push(sub)
    }
    depend() {
        if (Dep.target) {
            Dep.target.addDep(this);
        }
    }
    notify() {
        this.subs.forEach(sub => sub.update())
    }
}

class Watcher {// 被观察者
    constructor(vm, expOrFn) {
        this.vm = vm;
        this.getter = expOrFn;
        this.value;
    }
    get() {
        Dep.target = this;
        var vm = this.vm;
        var value = this.getter.call(vm, vm);
        return value;
    }
    evaluate() {
        this.value = this.get();
    }
    addDep(dep) {
        dep.addSub(this);
    }
    update() {
        console.log('更新, value:', this.value)
    }
}
// 观察者实例
var dep = new Dep();
//  被观察者实例
var watcher = new Watcher({x: 1}, (val) => val);
watcher.evaluate();//通过 `watcher.evaluate()` 将自身实例赋值给 `Dep.target`

// 观察者监听被观察对象
dep.depend()//调用 `dep.depend()` 将dep实例的 watcher 实例 push 到 dep.subs中
dep.notify()//通过数据劫持,在调用被劫持的对象的set方法时,调用 dep.subs 中所有的 `watcher.update()`
2
3
4
5
6
7
8
9
10
11
12
13
14
15
16
17
18
19
20
21
22
23
24
25
26
27
28
29
30
31
32
33
34
35
36
37
38
39
40
41
42
43
44
45
46
47
48
# 发布/订阅模式
是观察者模式的变体,比观察者模式多了一个调度中心
- 发布者发布信息到调度中心;
- 调度中心和订阅者直接完成订阅和触发事件事件;
使用场景案例:“DOM 的 addEventListener 事件”;
订阅者把自己想订阅的事件注册到调度中心,当该事件触发时候,发布者发布该事件到调度中心,由调度中心统一调度订阅者注册到调度中心的处理代码。
Vue.prototype.$on = function (event: string | Array<string>, fn: Function): Component {
    const vm: Component = this
    if (Array.isArray(event)) {
      for (let i = 0, l = event.length; i < l; i++) {
        vm.$on(event[i], fn)
      }
    } else {
      (vm._events[event] || (vm._events[event] = [])).push(fn)
      if (hookRE.test(event)) {
        vm._hasHookEvent = true
      }
    }
    return vm
  }
Vue.prototype.$emit = function (event: string): Component {
    const vm: Component = this
    let cbs = vm._events[event]
    if (cbs) {
      cbs = cbs.length > 1 ? toArray(cbs) : cbs
      const args = toArray(arguments, 1)
      const info = `event handler for "${event}"`
      for (let i = 0, l = cbs.length; i < l; i++) {
        invokeWithErrorHandling(cbs[i], vm, args, vm, info)
      }
    }
    return vm
}
2
3
4
5
6
7
8
9
10
11
12
13
14
15
16
17
18
19
20
21
22
23
24
25
26
27
# 代理模式
代理模式给某一个对象提供一个代理对象,并由代理对象控制对原对象的引用。
(防抖和节流) => 返回替代 (例如:Vue3中的proxy)
ES6的 Proxy 相信大家都不会陌生,Vue 3.0 的双向绑定原理就是依赖 ES6 的 Proxy 来实现,给一个简单的例子:
let star = {
    name: 'samy,
    song: '~鸡你太美~'
    age: 40,
    phone: 13089898989
}

let agent = new Proxy(star , {
    get(target , key) {
        if(key == 'phone') {
            // 返回经济人自己的电话
            return 15667096303
        }
        if(key == 'price') {
           return 20000000000
        }
        return target[key]
    },
    set(target , key , val) {
       if(key === 'customPrice') {
          if(val < 100000000) {
              throw new Error('价格太低')
          }
          else {
              target[key] = value;
              return true
          }
       }
    }
})

// agent 对象会根据相应的代理规则,执行相应的操作:
agent.phone // 15667096303
agent.price // 20000000000
2
3
4
5
6
7
8
9
10
11
12
13
14
15
16
17
18
19
20
21
22
23
24
25
26
27
28
29
30
31
32
33
34
# 策略模式
策略模式指对象有某个行为,但是在不同的场景中,该行为有不同的实现方案。
vue中的源码实现mixin;
function initMixin(Vue) {
  Vue.mixin = function (mixin) {
    // Vue.options = {created:[a,b]}
    this.options = mergeOptions(this.options, mixin);// 将属性合并到Vue.options上
    return this;
}}
2
3
4
5
6
// 入口:合并参数属性
// {a:1}  {a:2}  => {a:2}
// {a:1}  {}  => {a:1}
// 自定义的策略
// 1.如果父亲有的儿子也有,应该用儿子替换父亲
// 2.如果父亲有值儿子没有,用父亲的
export function mergeOptions(parent, child) {
    // 遍历父亲 ,可能是父亲有 儿子没有
    const options = {};
    // 父亲和儿子都有
    for (let key in parent) {
        mergeField(key)
    }
    // 儿子有父亲没有
    for (let key in child) {
        //  如果已经合并过了就不需要再次合并了
        if (!parent.hasOwnProperty(key)) { //判断属性过滤
            mergeField(key);
        }
    }

    // 默认的合并策略 但是有些属性 需要有特殊的合并方式 生命周期的合并
    //合并 策略模式;
    function mergeField(key) {
        // 根据key 不同的策略来进行合并
        if (strats[key]) {
            return options[key] = strats[key](parent[key], child[key]);
        }
        // else {
        //     options[key] = child[key]// todo默认合并
        // }
        if (isObject(parent[key]) && isObject(child[key])) {
            options[key] = { ...parent[key], ...child[key] } // 儿子和父亲都有的话,整体合并
        } else {
            if (child[key]) {
                options[key] = child[key]; //儿子有的,用儿子的;
            } else {
                options[key] = parent[key];//儿子没有的,用父亲的;
            }
        }
    }
    return options;
}
2
3
4
5
6
7
8
9
10
11
12
13
14
15
16
17
18
19
20
21
22
23
24
25
26
27
28
29
30
31
32
33
34
35
36
37
38
39
40
41
42
43
# 中介者模式
中介者是一个行为设计模式,通过提供一个统一的接口让系统的不同部分进行通信。=> vuex
# defineProterty和proxy的对比
点击查看
# 比较
Object.defineProperty 接收三个参数:对象,属性名,配置对象; 这里使用的是 Object.defineProperty,这是 Vue 2.0 进行双向数据绑定的写法。在 Vue 3.0 中,它使用 Proxy 进行数据劫持。
1.defineProterty是es5的标准,proxy是es6的标准;
2.proxy可以监听到数组索引赋值,改变数组长度的变化;
3.proxy是监听对象,不用深层遍历,defineProterty是监听属性;
4.利用defineProterty实现双向数据绑定(vue2.x采用的核心)
5.利用proxy实现双向数据绑定(vue3.x会采用)
# Proxy 的优势如下:
- Proxy 可以直接监听对象而非属性;【1】
- Proxy 可以直接监听数组的变化;【1】
- Proxy 有多达 13 种拦截方法,不限于 apply、ownKeys、deleteProperty、has 等等Object.defineProperty 不具备的;
- Proxy 返回的是一个新对象,我们可以只操作新的对象达到目的,而 Object.defineProperty 只能遍历对象属性直接修改;【1】
- Proxy 作为新标准将受到浏览器厂商重点持续的性能优化,也就是传说中的新标准的性能红利;
# Object.defineProperty 的优势如下:
- 兼容性好,支持 IE9,而 Proxy 的存在浏览器兼容性问题,而且无法用 polyfill 磨平,因此 Vue 的作者才声明需要等到下个大版本( 3.0 )才能用 Proxy 重写。
# 为什么 Vue 3.0 中使用 Proxy
- Vue 中使用 Object.defineProperty 进行双向数据绑定时,告知使用者是可以监听数组的,但是只是监听了数组的 push()、pop()、unshift()、shift()、splice()、sort()、reverse() 这7种方法,其他数组的属性检测不到。【PPUSSSR】
- Object.defineProperty 只能劫持对象的属性,因此对每个对象的属性进行遍历时,如果属性值也是对象需要深度遍历,那么就比较麻烦了,所以在比较 Proxy 能完整劫持对象的对比下,选择 Proxy。
- 为什么 Proxy 在 Vue 2.0 编写的时候出来了,尤大却没有用上去?因为当时 es6 环境不够成熟,兼容性不好,尤其是这个属性无法用 polyfill 来兼容。(polyfill 是一个 js 库,专门用来处理 js 的兼容性问题-js 修补器)因此 Vue 的作者才声明需要等到下个大版本( 3.0 )才能用 Proxy 重写。
# vue中常见性能优化
点击查看
# 优化角度分类
- 编码优化
- 加载性能优化
- 打包优化
- 缓存压缩优化
- 用户体验优化
SEO优化
# 编码优化
- 不要将所有的数据放在data中,data中的数据都会增加getter和setter,会收集对应的watcher;
vue在v-for时给每项元素绑定事件需要用事件代理;SPA页面采用keep-alive缓存组件;- 拆分组件(提高复用性、增加代码的可维护性、减少不必要的渲染);
v-if当值为false时内部指令不会执行,具有阻断功能,很多情况下使用v-if替代v-show;key确保唯一性(默认vue采用就地复用策略);- 长列表只显示的话,
Object.freeze冻结数据; - 合理使用路由懒加载,异步组件;
- 数据持久化的问题(防抖,节流);
- 尽量采用runtime运行时版本;
# 加载性能优化TODO
- 第三方模块按需导入(
babel-plugin-component); - 滚动到可视区域动态加载(
vue-virtual-scroll-list);始终加载上中下屏; - 图片懒加载(
vue-lazyload);
# 打包优化
- 使用
cdn的方式加载第三方模块; - 多线程打包
happypack; splitChunks抽离公共文件;sourceMap生成;优化 SourceMap- Webpack 对图片进行压缩
- 减少 ES6 转为 ES5 的冗余代码
- 模板预编译
- 提取组件的 CSS
- 构建结果输出分析
- Vue 项目的编译优化
# 缓存压缩优化
- 客户端缓存、服务端缓存;
- 服务端
gzip压缩; - CDN 的使用
- 使用 Chrome Performance 查找性能瓶颈
# 用户体验优化
- 骨架屏
app-skeleton; - app壳
app-shell; - service worker
pwa;
# SEO优化
- 预渲染插件
prerender-spa-plugin; - 服务器渲染
ssr;
# 谈谈Vue3和Vue2的区别?
# 谈谈
Vue3你知道有哪些改进?
点击查看
vue3采用了TS来编写;,vue2对TypeScript支持不友好(所有属性都放在了this对象上,难以推倒组件的数据类型)- 大量的
API挂载在Vue对象的原型上,难以实现TreeShaking。 - 架构层面对跨平台
dom渲染开发支持不友好 - 支持
CompositionAPI。受ReactHook启发 vue3中响应式数据原理改成proxy;vdom的对比算法更新,只更新vdom的绑定了动态数据的部分;- 对虚拟DOM进行了重写、对模板的编译进行了优化操作...
# 谈一下你对vuex的个人理解
# 简述
Vuex工作原理
点击查看
# 核心答案:
vuex是专门为vue提供的全局状态管理系统,用于多个组件中数据共享、数据缓存等。(无法持久化、内部核心原理是通过创造一个全局实例 new Vue)
核心方法: replaceState、subscribe、registerModule、namespace(modules)
# 衍生的问题
#
action和mutation的区别
action异步操作,可以获取数据调用mutation提交最终数据;【store.dispatch】mutation同步更新数据,(内部会进行示范为异步方式更新数据检测);【store.commit】/* 使能严格模式 */ function enableStrictMode(store) { store._vm.$watch( function () { return this._data.$$state; }, () => { if (process.env.NODE_ENV !== "production") { /* 检测store中的_committing的值,如果是true代表不是通过mutation的方法修改的 */ assert( store._committing, `Do not mutate vuex store state outside mutation handlers.` ); } }, { deep: true, sync: true } ); }1
2
3
4
5
6
7
8
9
10
11
12
13
14
15
16
17
18
# vue-router有几种钩子函数?
点击查看
具体是什么及执行流程是怎样的?
# 核心答案:
路由钩子的执行流程, 钩子函数种类有:全局守卫、路由守卫、组件守卫;
Vue导航守卫(路由生命周期)分类【要点】
参数: 有to(去的那个路由)、from(离开的路由)、**next(一定要用这个函数才能去到下一个路由,如果不用就拦截)**最常用就这几种。
全局导航钩子 ; 确保要调用
next方法,否则钩子就不会被 resolved。router.beforeEach(to,from,next),作用:跳转前进行判断拦截。【常用】
router.beforeResolve;在 2.5.0+ 你可以用
router.beforeResolve注册一个全局守卫。这和router.beforeEach类似,区别是在导航被确认之前,同时在所有组件内守卫和异步路由组件被解析之后,解析守卫就被调用。router.afterEach【常用】
router.afterEach(() => {
  NProgress.done()
})
1
2
3
单独路由独享组件
- beforeEnter
组件内的钩子
- beforeRouteEnter
- beforeRouteUpdate
- beforeRouteLeave
# 完整的导航解析流程:
runQueue
- ①导航被触发。
- ②在失活的组件里调用
beforeRouteLeave守卫。 - ③调用全局的
beforeEach守卫。 - ④在重用的组件里调用
beforeRouteUpdate守卫 (2.2+)。 - ⑤在路由配置里调用
beforeEnter。 - ⑥解析异步路由组件。
- ⑦在被激活的组件里调用
beforeRouteEnter。 - ⑧调用全局的
beforeResolve守卫 (2.5+)。 - ⑨导航被确认。
- ⑩调用全局的
afterEach钩子。 - ⑪触发 DOM 更新。
- ⑫调用
beforeRouteEnter守卫中传给 next 的回调函数,创建好的组件实例会作为回调函数的参数传入。
# vue-router三种模式的区别?
点击查看
结合 Vue 的异步组件 (opens new window)和 Webpack 的代码分割功能 (opens new window),轻松实现路由组件的懒加载。
# 核心答案:
# abstract模式
abstract 不涉及和浏览器地址的相关记录。流程跟hash模式一样,通过数组维护模拟浏览器的历史记录栈 服务端下使用。使用一个不依赖于浏览器的浏览器历史虚拟管理后台;
# hash模式
hash+hashChange兼容性好但是不美观
- 监听
hashchange window.location.hash,window.location.replace
# history模式
historyApi+popState+pushState/replaceState虽然美观,但是刷新会出现404需要后端进行配置;
- 监听
popstate; window.location.pathname,history.pushState({},null,'/x'),history.replaceState;- pushState 和 repalceState 两个 API 来操作实现 URL 的变化;
- 可以使用 popstate 事件来监听 url 的变化,从而对页面进行跳转(渲染) history.pushState() 或 history.replaceState() 不会触发 popstate 事件,需要手动触发页面跳转(渲染)
location / {
  try_files $uri $uri/ /index.html;
}
2
3
使用webpack-dev-server的里的historyApiFallback属性来支持HTML5 History Mode。
# 总括
hash模式和history模式都是通过window.addEvevtListenter()方法监听 hashchange和popState进行相应路由的操作。可以通过back、foward、go等方法访问浏览器的历史记录栈,进行各种跳转。
而abstract模式是自己维护一个模拟的浏览器历史记录栈的数组。
# 相关链接
http://www.zhufengpeixun.com/jg-vue/vue-apply/
