 vue源码分析
# 项目结构
# 掌握源码目录的结构
# 整个目录结构
.circleci持续集成benchmarks性能评测dist输出目录examples案例flowflow声明文件packagesvue中的包scripts工程化src源码目录test测试相关typests声明文件
# 源码的目录结构
为了直观的查看目录我们可以通过tree命令来查看src目录下的文件夹。先大概对源码的结构有一个大体的认识。
├─compiler       # 编译的相关逻辑
│  ├─codegen
│  ├─directives
│  └─parser
├─core           # vue核心代码
│  ├─components  # vue中的内置组件 keep-alive
│  ├─global-api  # vue中的全局api
│  ├─instance    # vue中的核心逻辑
│  ├─observer    # vue中的响应式原理
│  ├─util
│  └─vdom        # vue中的虚拟dom模块
├─platforms      # 平台代码
│  ├─web	     # web逻辑 - vue
│  │  ├─compiler
│  │  ├─runtime
│  │  ├─server
│  │  └─util
│  └─weex        # weex逻辑 - app
│      ├─compiler
│      ├─runtime
│      └─util
├─server         # 服务端渲染模块
├─sfc            # 用于编译.vue文件
└─shared         # 共享的方法和常量
2
3
4
5
6
7
8
9
10
11
12
13
14
15
16
17
18
19
20
21
22
23
24
到这里可能你只能看的懂文件夹的组成,还无法知道代码是如何运行的,so~ 你需要通过
package.json来查找代码是如何被打包的!
# 打包流程
"build": "node scripts/build.js",
"build:ssr": "npm run build -- web-runtime-cjs,web-server-renderer",
"build:weex": "npm run build -- weex",
2
3
核心是使用node执行
scripts/build.js,通过传递参数来实现不同的打包结果,这里的--代表后面的内容是参数。
build.js
既然是打包,那我们肯定要找到打包的入口点,所以这里的关键就是查找打包的入口!
// 1.获取不同的打包的配置
let builds = require('./config').getAllBuilds()

// 2.根据执行打包时的参数进行过滤
if (process.argv[2]) {
  const filters = process.argv[2].split(',')
  builds = builds.filter(b => {
    return filters.some(f => b.output.file.indexOf(f) > -1 || b._name.indexOf(f) > -1)
  })
} else {
  // 默认不打包weex相关代码
  builds = builds.filter(b => {
    return b.output.file.indexOf('weex') === -1
  })
}
// 3.进行打包
build(builds)
2
3
4
5
6
7
8
9
10
11
12
13
14
15
16
17
不同的打包配置指的是:
web/weex不同的平台这里我们不关注
weex,web指代的就是我们常用的vueRuntime only/Runtime + compiler是否带编译模块带有
compiler的会将模板转化成render函数CommonJS/es/umd打包出不同模块规范umd模块是整合了CommonJS和AMD两个模块定义规范的方法,当不支持时两种模块时会将其添加到全局变量中
打包入口
# 入口
src/platforms/web/entry-runtime.js
src/platforms/web/entry-runtime-with-compiler.js
2
我们可以通过打包的配置找到我们需要的入口,这两个区别在于是否涵盖
compiler逻辑,我们在开发时一般使用的是entry-runtime,可以减小vue的体积,但是同样在开发时也不能再使用template,.vue文件中的template是通过vue-loader来进行编译的,和我们所说的compiler无关哈。
new Vue({
	template:`<div></div>`
})
2
3
这样的template必须要使用带compiler的入口才能进行模板的解析
# 导出包格式
vue构建之后的文件
| UMD | CommonJS | ES Module | |
|---|---|---|---|
| Full | vue.js | vue.common.js | vue.esm.js |
| Runtime-only | vue.runtime.js | vue.runtime.common.js | vue.runtime.esm.js |
表格中的术语解释:
- Full:包含编译器和运行时的全部功能。
- Runtime-only:仅包含运行时。
- UMD:可通过
<script>标签引入直接在浏览器中使用,Vue 会暴露一个全局变量window.Vue。同时适配require.js这种 AMD 系统的使用。 - CommonJS:适配
const Vue = require('vue')这种 node 式的模块系统。 - ES Module:适配
import Vue from 'vue'这种 es6 提供的模块系统。
如果render和template都不存在,那么此时就是挂载 DOM 元素的 HTML 会被提取出来用作模板,此时,必须使用 Runtime + Compiler 构建的 Vue 库。
# 入口分析
# 步骤总括
Vue的构造函数
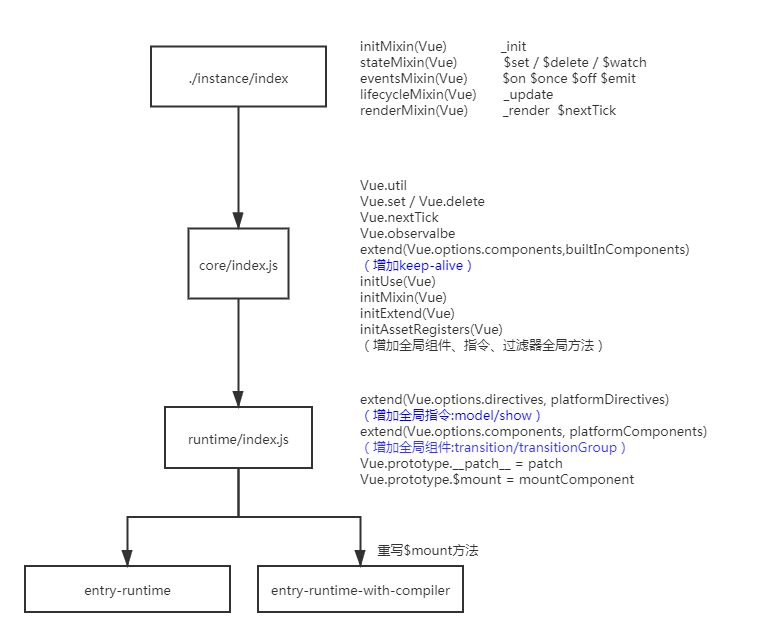
web/entry-runtime-with-compiler重写$mount方法web/runtime/index.jspatch 全局组件和指令 (扩展的$mount); 扩展$mount方法及平台对应的代码core/indexinitGlobalAPI初始化全局的api; 增加全局API方法instance/index核心的构造函数; 真正的Vue的构造函数,并在Vue的原型上扩展方法
# web/entry-runtime-with-compiler
多了编译及重写挂载;
我们观察这两个入口的文件不难发现他们都引入了
runtime/index.js带有
compiler的文件仅仅是对$mount方法进行了重写,增添了将template变成render函数的功能
import Vue from './runtime/index' //    1.引入运行时代码
const mount = Vue.prototype.$mount; //  2.获取runtime中的$mount方法
Vue.prototype.$mount = function (el,hydrating) { // 3. 重写$mount方法
  el = el && query(el)
  const options = this.$options
  if (!options.render) { // 4.没有render方法就进行编译操作
    let template = options.template
    if(template){ // 5.将模板编译成函数
        const { render, staticRenderFns } = compileToFunctions(template, {
            outputSourceRange: process.env.NODE_ENV !== 'production',
            shouldDecodeNewlines,
            shouldDecodeNewlinesForHref,
            delimiters: options.delimiters,
            comments: options.comments
        }, this)
        options.render = render // 6.将render函数放到options中
    }
    // todo...
  }
  return mount.call(this, el, hydrating) // 7.进行挂载操作
}
export default Vue
2
3
4
5
6
7
8
9
10
11
12
13
14
15
16
17
18
19
20
21
22
# web/runtime/index
初始化挂载及暴露相关方法, 主要时多了挂载处理;
import { patch } from './patch' // patch补丁方法
import platformDirectives from './directives/index'
import platformComponents from './components/index'

// install platform specific utils
Vue.config.mustUseProp = mustUseProp
Vue.config.isReservedTag = isReservedTag
Vue.config.isReservedAttr = isReservedAttr
Vue.config.getTagNamespace = getTagNamespace
Vue.config.isUnknownElement = isUnknownElement // 增加了变量 Vue.config

// install platform runtime directives & components
extend(Vue.options.directives, platformDirectives) // v-show v-model
extend(Vue.options.components, platformComponents) // transition transition-grop 动画组件

// install platform patch function
Vue.prototype.__patch__ = inBrowser ? patch : noop // __patch__ 更新 初始化渲染的patch方法

// public mount method  原始挂载处理;在entry-runtime-with-compiler中有重写
Vue.prototype.$mount = function (
  el?: string | Element,
  hydrating?: boolean
): Component {
  el = el && inBrowser ? query(el) : undefined
  // 组件的挂载操作
  return mountComponent(this, el, hydrating)
}

export default Vue
2
3
4
5
6
7
8
9
10
11
12
13
14
15
16
17
18
19
20
21
22
23
24
25
26
27
28
29
# core/index
核心初始化全局API
import Vue from './instance/index'
import { initGlobalAPI } from './global-api/index'
import { isServerRendering } from 'core/util/env'
import { FunctionalRenderContext } from 'core/vdom/create-functional-component'

initGlobalAPI(Vue); // 初始化全局的api方法

// web/entry-runtime-with-compiler 重写$mount方法
// web/runtime/index.js  __patch__ 全局组件和指令 (扩展的$mount)
// core/index  initGlobalAPI初始化全局的api
// instance/index  核心的构造函数

export default Vue
2
3
4
5
6
7
8
9
10
11
12
13
# instance/index
核心各种初始化
import { initMixin } from './init'
import { stateMixin } from './state'
import { renderMixin } from './render'
import { eventsMixin } from './events'
import { lifecycleMixin } from './lifecycle'
import { warn } from '../util/index'

function Vue (options) { // Vue的构造函数
  this._init(options)
}
// 给Vue的原型上添加方法
initMixin(Vue) // Vue.prototype._init
stateMixin(Vue) //$set $delte $watch
eventsMixin(Vue) // $on $emit $once $off
lifecycleMixin(Vue) //  Vue.prototype._update
renderMixin(Vue) // Vue.prototype._render

export default Vue
2
3
4
5
6
7
8
9
10
11
12
13
14
15
16
17
18
# 调试源码
方法:通过vue inspect导出vue中使用webpack配置信息;
vue inspect > config.js, 查看配置找到人就可以断点vue库中的查看;
# 剖析全局API
这里需要大家掌握Vue的基本应用,对Vue的全局API有一定的掌握
# Vue.util
// exposed util methods.
// NOTE: these are not considered part of the public API - avoid relying on
// them unless you are aware of the risk.
Vue.util = {
    warn,
    extend,
    mergeOptions,
    defineReactive
}
2
3
4
5
6
7
8
9
暴露的工具方法。这些方法不被视为公共API的一部分,除非你知道里面的风险,否则避免使用。(这个util是Vue内部的工具方法,可能会发生变动),例如:在Vue.router中就使用了这个工具方法
extend
export * from 'shared/util'
/**
 * Mix properties into target object.
 */
export function extend (to: Object, _from: ?Object): Object {
  for (const key in _from) {
    to[key] = _from[key]
  }
  return to
}
2
3
4
5
6
7
8
9
mergeOptions
export * from './options'
export function mergeOptions (
  parent: Object,
  child: Object,
  vm?: Component
): Object {
  if (process.env.NODE_ENV !== 'production') {
    checkComponents(child)
  }

  if (typeof child === 'function') {
    child = child.options
  }

  normalizeProps(child, vm)
  normalizeInject(child, vm)
  normalizeDirectives(child)

  // Apply extends and mixins on the child options,
  // but only if it is a raw options object that isn't
  // the result of another mergeOptions call.
  // Only merged options has the _base property.
  if (!child._base) {
    if (child.extends) { // 1 个
      parent = mergeOptions(parent, child.extends, vm)
    }
    if (child.mixins) { // 多个
      for (let i = 0, l = child.mixins.length; i < l; i++) {
        parent = mergeOptions(parent, child.mixins[i], vm)
      }
    }
  }

  const options = {}
  let key
  for (key in parent) {
    mergeField(key)
  }
  for (key in child) {
    if (!hasOwn(parent, key)) {
      mergeField(key)
    }
  }
  function mergeField (key) {
    const strat = strats[key] || defaultStrat // 各种各样的合并策略
    options[key] = strat(parent[key], child[key], vm, key)
  }
  return options
}
2
3
4
5
6
7
8
9
10
11
12
13
14
15
16
17
18
19
20
21
22
23
24
25
26
27
28
29
30
31
32
33
34
35
36
37
38
39
40
41
42
43
44
45
46
47
48
defineReactive
export { defineReactive } from '../observer/index'
export function defineReactive(
  obj: Object,
  key: string,
  val: any,
  customSetter?: ?Function,
  shallow?: boolean
) {
  const dep = new Dep() // 每个属性都增加一个dep 收集依赖

  const property = Object.getOwnPropertyDescriptor(obj, key)

  // Object.freeze()
  // 数据必须支持 可配置 Object.freeze
  if (property && property.configurable === false) {
    return
  }

  // cater for pre-defined getter/setters
  const getter = property && property.get
  const setter = property && property.set
  if ((!getter || setter) && arguments.length === 2) {
    val = obj[key]
  }

  let childOb = !shallow && observe(val) // 递归观测每一项
  Object.defineProperty(obj, key, {
    enumerable: true,
    configurable: true,
    get: function reactiveGetter() {
      const value = getter ? getter.call(obj) : val
      if (Dep.target) {
        dep.depend()
        if (childOb) {
          childOb.dep.depend() // 数组依赖收集
          if (Array.isArray(value)) {
            // 数组套数组情况 会做一个递归的收集
            // {{arr}}  arr:[[[]]]  [].push
            dependArray(value)
          }
        }
      }
      return value
    },
    set: function reactiveSetter(newVal) {
      const value = getter ? getter.call(obj) : val
      /* eslint-disable no-self-compare */
      if (newVal === value || (newVal !== newVal && value !== value)) {
        return
      }
      /* eslint-enable no-self-compare */
      if (process.env.NODE_ENV !== 'production' && customSetter) {
        customSetter()
      }
      // #7981: for accessor properties without setter
      if (getter && !setter) return
      if (setter) {
        setter.call(obj, newVal)
      } else {
        val = newVal
      }
      childOb = !shallow && observe(newVal)
      dep.notify()
    }
  })
}
2
3
4
5
6
7
8
9
10
11
12
13
14
15
16
17
18
19
20
21
22
23
24
25
26
27
28
29
30
31
32
33
34
35
36
37
38
39
40
41
42
43
44
45
46
47
48
49
50
51
52
53
54
55
56
57
58
59
60
61
62
63
64
65
# Vue.set / Vue.delete
set方法新增响应式数据;
Vue的缺陷:新增之前不存在的属性不会发生视图更新,修改数组索引不会发生视图更新 (解决方案就是通过$set方法,数组通过splice进行更新视图,对象则手动通知)
export function set (target: Array<any> | Object, key: any, val: any): any {
  // 1.是开发环境 target 没定义或者是基础类型则报错
  if (process.env.NODE_ENV !== 'production' &&
    (isUndef(target) || isPrimitive(target))
  ) {
    warn(`Cannot set reactive property on undefined, null, or primitive value: ${(target: any)}`)
  }
  // 2.如果是数组 Vue.set(array,1,100); 调用我们重写的splice方法 (这样可以更新视图)
  if (Array.isArray(target) && isValidArrayIndex(key)) {
    target.length = Math.max(target.length, key)
    target.splice(key, 1, val)
    return val
  }
  // 3.如果是对象本身的属性,则直接添加即可
  if (key in target && !(key in Object.prototype)) {
    target[key] = val
    return val
  }
  const ob = (target: any).__ob__
  // 4.如果是Vue实例 或 根数据data时 报错
  if (target._isVue || (ob && ob.vmCount)) {
    process.env.NODE_ENV !== 'production' && warn(
      'Avoid adding reactive properties to a Vue instance or its root $data ' +
      'at runtime - declare it upfront in the data option.'
    )
    return val
  }
  // 5.如果不是响应式的也不需要将其定义成响应式属性
  if (!ob) {
    target[key] = val
    return val
  }
  // 6.将属性定义成响应式的
  defineReactive(ob.value, key, val)
  ob.dep.notify() // 7.通知视图更新
  return val
}
2
3
4
5
6
7
8
9
10
11
12
13
14
15
16
17
18
19
20
21
22
23
24
25
26
27
28
29
30
31
32
33
34
35
36
37
del
export function del (target: Array<any> | Object, key: any) {
  if (process.env.NODE_ENV !== 'production' &&
    (isUndef(target) || isPrimitive(target))
  ) {
    warn(`Cannot delete reactive property on undefined, null, or primitive value: ${(target: any)}`)
  }
  // 1.如果是数组依旧调用splice方法
  if (Array.isArray(target) && isValidArrayIndex(key)) {
    target.splice(key, 1)
    return
  }
  const ob = (target: any).__ob__
  if (target._isVue || (ob && ob.vmCount)) {
    process.env.NODE_ENV !== 'production' && warn(
      'Avoid deleting properties on a Vue instance or its root $data ' +
      '- just set it to null.'
    )
    return
  }
  // 2.如果本身就没有这个属性什么都不做
  if (!hasOwn(target, key)) {
    return
  }
  // 3.删除这个属性
  delete target[key]
  if (!ob) {
    return
  }
  // 4.通知更新
  ob.dep.notify()
}
2
3
4
5
6
7
8
9
10
11
12
13
14
15
16
17
18
19
20
21
22
23
24
25
26
27
28
29
30
31
# Vue.nextTick
export * from './next-tick'
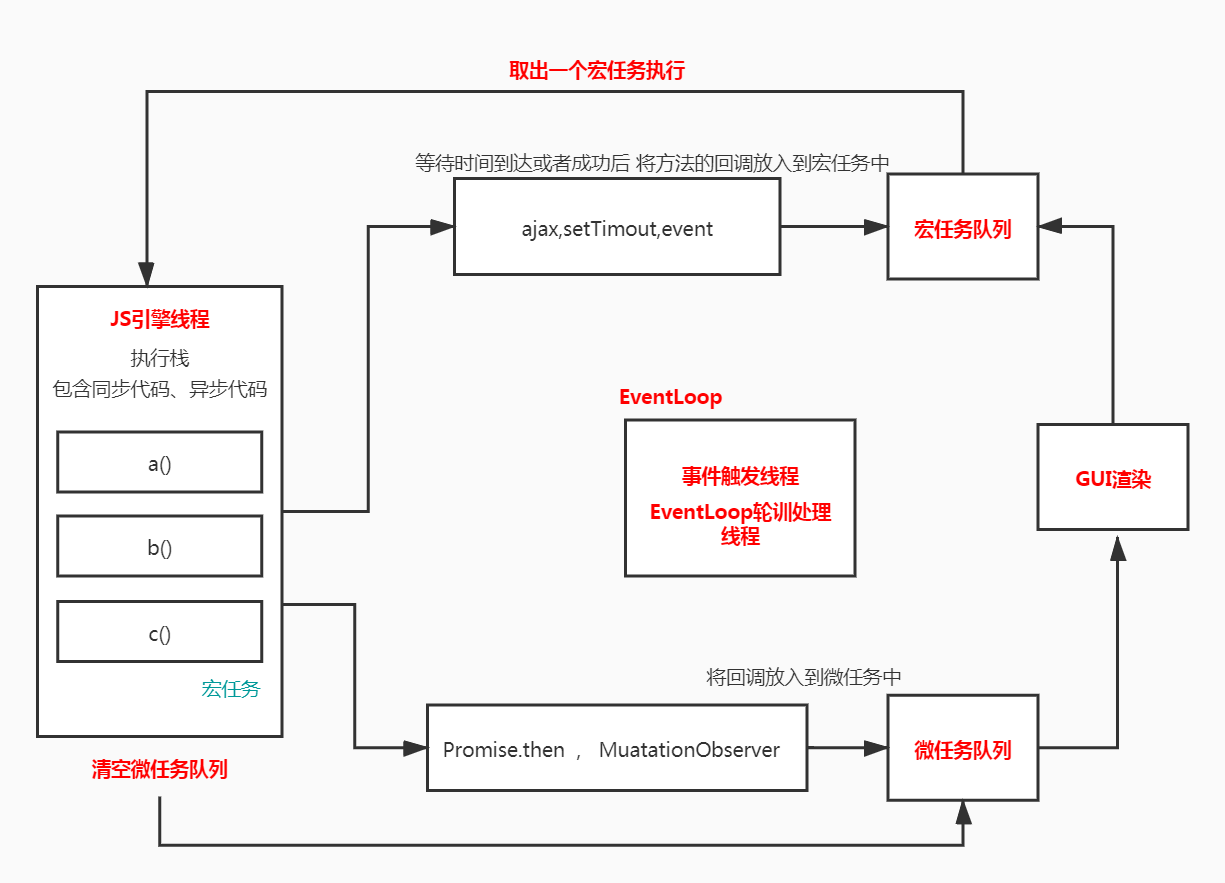
不难看出nextTick原理就是将回调函数存入到一个队列中,最后异步的清空这个队列
const callbacks = []; // 存放nextTick回调
let pending = false;
function flushCallbacks () { // 清空队列
  pending = false
  const copies = callbacks.slice(0)
  callbacks.length = 0
  for (let i = 0; i < copies.length; i++) {
    copies[i]()
  }
}
let timerFunc
export function nextTick (cb?: Function, ctx?: Object) {
  let _resolve
  callbacks.push(() => {
    if (cb) {
      try {
        // 1.将回调函数存入到callbacks中
        cb.call(ctx)
      } catch (e) {
        handleError(e, ctx, 'nextTick')
      }
    } else if (_resolve) {
      _resolve(ctx)
    }
  })
  if (!pending) {
    pending = true
    // 2.异步刷新队列
    timerFunc();
  }
  // 3.支持promise写法
  if (!cb && typeof Promise !== 'undefined') {
    return new Promise(resolve => {
      _resolve = resolve
    })
  }
}
2
3
4
5
6
7
8
9
10
11
12
13
14
15
16
17
18
19
20
21
22
23
24
25
26
27
28
29
30
31
32
33
34
35
36
37
timerFunc
顺序:PMSS;采用EventLoop中的微任务和宏任务,先采用微任务并按照优先级优雅降级的方式实现异步刷新
// 1.默认先使用Promise 因为mutationObserver有bug可能不工作
if (typeof Promise !== 'undefined' && isNative(Promise)) {
  const p = Promise.resolve()
  timerFunc = () => {
    p.then(flushCallbacks)
    // 解决队列不刷新问题
    if (isIOS) setTimeout(noop)
  }
  isUsingMicroTask = true
// 2.使用MutationObserver
} else if (!isIE && typeof MutationObserver !== 'undefined' && (
  isNative(MutationObserver) ||

  MutationObserver.toString() === '[object MutationObserverConstructor]'
)) {
  let counter = 1
  const observer = new MutationObserver(flushCallbacks)
  const textNode = document.createTextNode(String(counter))
  observer.observe(textNode, {
    characterData: true
  })
  timerFunc = () => {
    counter = (counter + 1) % 2
    textNode.data = String(counter)
  }
  isUsingMicroTask = true
// 3.使用 setImmediate
} else if (typeof setImmediate !== 'undefined' && isNative(setImmediate)) {
  timerFunc = () => {
    setImmediate(flushCallbacks)
  }
// 4.使用setTimeout
} else {
  timerFunc = () => {
    setTimeout(flushCallbacks, 0)
  }
}
2
3
4
5
6
7
8
9
10
11
12
13
14
15
16
17
18
19
20
21
22
23
24
25
26
27
28
29
30
31
32
33
34
35
36
37
# Vue.observable
2.6新增的方法,将对象进行观测,并返回观测后的对象。可以用来做全局变量,实现数据共享; 其实跟defineReactive类似;
  // 2.6 explicit observable API
  Vue.observable = <T>(obj: T): T => {// 小型的vuex
    observe(obj) // Vue.observable => defineReactive(obj)  proxy
    return obj
  }
2
3
4
5
# Vue.options
存放全局的组件、指令、过滤器的一个对象,及拥有_base属性保存Vue的构造函数
ASSET_TYPES.forEach(type => {
    Vue.options[type + 's'] = Object.create(null)
})
Vue.options._base = Vue
extend(Vue.options.components, builtInComponents) // 内置了 keep-alive,抽象组件
2
3
4
5
# Vue.use
Vue.use 主要的作用就是调用插件的install方法,并将Vue作为第一个参数传入,这样做的好处是可以避免我们编写插件时需要依赖Vue导致版本问题。
initUse(Vue)

Vue.use = function (plugin: Function | Object) {
    const installedPlugins = (this._installedPlugins || (this._installedPlugins = []))
    // 1.如果安装过这个插件直接跳出
    if (installedPlugins.indexOf(plugin) > -1) {
      return this
    }
    // 2.获取参数并在参数中增加Vue的构造函数
    const args = toArray(arguments, 1)
    args.unshift(this)
    // 3.执行install方法
    if (typeof plugin.install === 'function') {
      plugin.install.apply(plugin, args)
    } else if (typeof plugin === 'function') {
      plugin.apply(null, args)
    }
    // 4.记录安装的插件
    installedPlugins.push(plugin)
    return this
}
2
3
4
5
6
7
8
9
10
11
12
13
14
15
16
17
18
19
20
21
# Vue.mixin
全局混合方法,可以用来提取公共方法及状态等.
//initMixin(Vue) // Vue.mixin  混合全局的方法
Vue.mixin = function (mixin: Object) {
    this.options = mergeOptions(this.options, mixin)
    return this
}
2
3
4
5
Vue对不同的属性做了不同的合并策略
可以通过查看
strats这个对象来了解不同的合并策略。;跟上面utils中引用的同一样的方法;
export function mergeOptions (
  parent: Object,
  child: Object,
  vm?: Component
): Object {
  // 1.组件先将自己的extends和mixin与父属性合并
  if (!child._base) {
    if (child.extends) {
      parent = mergeOptions(parent, child.extends, vm)
    }
    if (child.mixins) {
      for (let i = 0, l = child.mixins.length; i < l; i++) {
        parent = mergeOptions(parent, child.mixins[i], vm)
      }
    }
  }
  // 2.再用之前合并后的结果,与自身的属性进行合并
  const options = {}
  let key
  for (key in parent) {
    mergeField(key)
  }
  for (key in child) {
    if (!hasOwn(parent, key)) {
      mergeField(key)
    }
  }
  function mergeField (key) {
    // 3.采用不同的合并策略
    const strat = strats[key] || defaultStrat;
    options[key] = strat(parent[key], child[key], vm, key)
  }
  return options
}
2
3
4
5
6
7
8
9
10
11
12
13
14
15
16
17
18
19
20
21
22
23
24
25
26
27
28
29
30
31
32
33
34
# Vue.extend
Vue中非常核心的一个方法,可以通过传入的对象获取这个对象的构造函数,后续在组件初始化过程中会用到此方法
extend创建的是 Vue 构造器,我们可以自己实例化并且将其挂载在任意的元素上;
其实这个Vue.extend做的事情很简单,就是继承 Vue,正如定义中说的那样,创建一个子类;
因为继承了 Vue 的原型,这里的_init就是 Vue 原型上的_init方法,你可以在源码目录下src/core/instance/init.js中找到它:
  const Sub = function VueComponent (options) { // 核心就是返回子类
      this._init(options)
    }
    Sub.prototype = Object.create(Super.prototype) // 继承父类
    Sub.prototype.constructor = Sub
    Sub.cid = cid++
    // 子组件的选项和Vue.options进行合并
    Sub.options = mergeOptions(
      Super.options,
      extendOptions
    )
    Sub['super'] = Super

    // For props and computed properties, we define the proxy getters on
    // the Vue instances at extension time, on the extended prototype. This
    // avoids Object.defineProperty calls for each instance created.
    if (Sub.options.props) { // Vue.extend({prpops})
      initProps(Sub)
    }
    if (Sub.options.computed) {
      initComputed(Sub)
    }

    // allow further extension/mixin/plugin usage
    Sub.extend = Super.extend
    Sub.mixin = Super.mixin
    Sub.use = Super.use

    // create asset registers, so extended classes
    // can have their private assets too.
    ASSET_TYPES.forEach(function (type) {
      Sub[type] = Super[type]
    })
    // 把自己放到自己身上 递归组件可以找到自己的原因
    // enable recursive self-lookup
    if (name) { // 自己可以调用子 递归组件
      Sub.options.components[name] = Sub
    }

    // keep a reference to the super options at extension time.
    // later at instantiation we can check if Super's options have
    // been updated.
    Sub.superOptions = Super.options
    Sub.extendOptions = extendOptions
    Sub.sealedOptions = extend({}, Sub.options)

    // cache constructor
    cachedCtors[SuperId] = Sub // 增加构造函数的缓存
    return Sub
  }
}
2
3
4
5
6
7
8
9
10
11
12
13
14
15
16
17
18
19
20
21
22
23
24
25
26
27
28
29
30
31
32
33
34
35
36
37
38
39
40
41
42
43
44
45
46
47
48
49
50
51
# Vue.component/directive/filter
初始化全局的api,Vue.component、Vue.directive、Vue.filter,这里仅仅是格式化用户传入的内容,将其绑定在Vue.options选项上
可以看到directive,默认有{ bind: definition, update: definition }
sy-lb\vue\lb\core\global-api\extend.js
initAssetRegisters(Vue)

ASSET_TYPES.forEach(type => {
    Vue[type] = function (
      id: string,
      definition: Function | Object
    ): Function | Object | void {
      if (!definition) {
        return this.options[type + 's'][id]
      } else {
        /* istanbul ignore if */
        if (process.env.NODE_ENV !== 'production' && type === 'component') {
          validateComponentName(id)
        }
        if (type === 'component' && isPlainObject(definition)) {
          definition.name = definition.name || id
          definition = this.options._base.extend(definition)
        }
        if (type === 'directive' && typeof definition === 'function') {
          definition = { bind: definition, update: definition }
        }
        this.options[type + 's'][id] = definition; // 将指令、过滤器、组件 绑定在Vue.options上

        // 备注:全局组件、指令过滤器其实就是定义在 Vue.options中,这样创建子组件时都会和Vue.options进行合并,所以子组件可以拿到全局的定义
        return definition
      }
    }
})
2
3
4
5
6
7
8
9
10
11
12
13
14
15
16
17
18
19
20
21
22
23
24
25
26
27
28
# 剖析执行流程
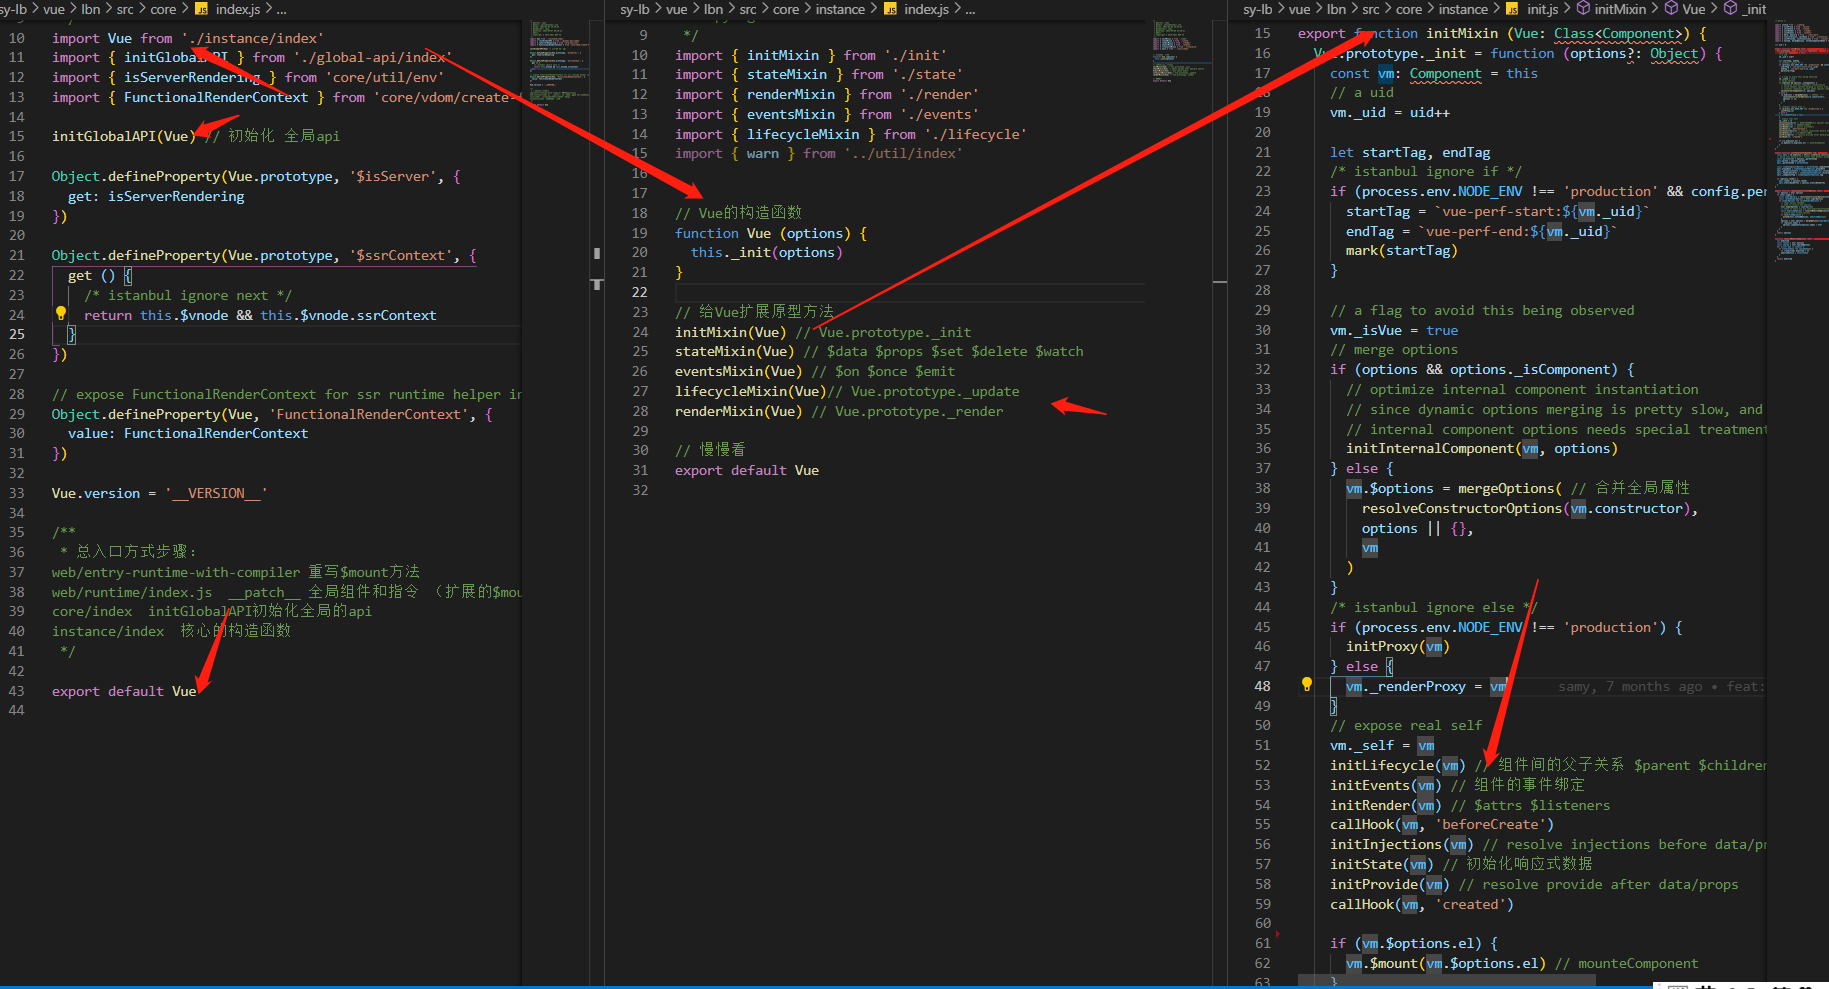
# Vue的初始化
instance/index,后的initMixin方法;
通过Vue的_init方法,我们可以看到内部又包含了很多初始化的过程
export function initMixin (Vue: Class<Component>) {
  Vue.prototype._init = function (options?: Object) {
    const vm: Component = this
    // 1.每个vue的实例上都有一个唯一的属性_uid
    vm._uid = uid++
    // 2.表示是Vue的实例
    vm._isVue = true

    // 3.选项合并策略
    if (options && options._isComponent) {
      initInternalComponent(vm, options)
    } else {
      vm.$options = mergeOptions(
        resolveConstructorOptions(vm.constructor),
        options || {},
        vm
      )
    }
    vm._self = vm
    // 4.进行初始化操作
    initLifecycle(vm)
    initEvents(vm)
    initRender(vm)
    callHook(vm, 'beforeCreate')
    initInjections(vm)
    initState(vm)
    initProvide(vm)
    callHook(vm, 'created')

    // 5.如果有el就开始进行挂载
    if (vm.$options.el) {
      vm.$mount(vm.$options.el)
    }
  }
}
2
3
4
5
6
7
8
9
10
11
12
13
14
15
16
17
18
19
20
21
22
23
24
25
26
27
28
29
30
31
32
33
34
35
# _init中的初始化
这个代码写的真是一目了然,我们先看看每个方法"大概"干了什么事,切记不要死追到底!
initLifecycle(vm) // 初始化组件间的父子关系
initEvents(vm)    // 更新组件的事件
initRender(vm)    // 初始化_c方法
initInjections(vm)// 初始化inject
initState(vm)     // 初始化状态
initProvide(vm)   // 初始化provide
2
3
4
5
6
# 挂载流程
instance/init.js--->runtime/index.js--->instancelifecycle.js
// 1.如果有el就开始挂载 [instance/init.js]
if (vm.$options.el) {
    vm.$mount(vm.$options.el)
}

// 2.组件的挂载 [runtime/index.js]
Vue.prototype.$mount = function (el,hydrating){
  el = el && inBrowser ? query(el) : undefined
  return mountComponent(this, el, hydrating);
}

// 3.创建渲染watcher进行渲染 [instancelifecycle.js]
export function mountComponent (vm,el,hydrating) {
  vm.$el = el
  let updateComponent
  updateComponent = () => {
      vm._update(vm._render(), hydrating)
  }
  new Watcher(vm, updateComponent, noop, { // 创建渲染Watcher
    before () {
      if (vm._isMounted && !vm._isDestroyed) {
        callHook(vm, 'beforeUpdate')
      }
    }
  }, true /* isRenderWatcher */)
  return vm
}
2
3
4
5
6
7
8
9
10
11
12
13
14
15
16
17
18
19
20
21
22
23
24
25
26
27
# 剖析响应式变化原理
# 数据劫持
在上节中我们已经知道,vue在哪里做了状态的初始化(initState)、
这里又进行了细化和拆分,对不同的属性做了不同的初始化操作,原来我们常用的api都在这里做的初始化~
export function initState (vm: Component) {
  vm._watchers = []
  const opts = vm.$options
  if (opts.props) initProps(vm, opts.props)
  if (opts.methods) initMethods(vm, opts.methods)
  if (opts.data) {
    initData(vm)
  } else {
    observe(vm._data = {}, true /* asRootData */)
  }
  if (opts.computed) initComputed(vm, opts.computed)
  if (opts.watch && opts.watch !== nativeWatch) {
    initWatch(vm, opts.watch)
  }
}
2
3
4
5
6
7
8
9
10
11
12
13
14
15
# 数据的初始化
这里我们先关心数据是如何进行初始化操作的
这里主要是检测属性是否被重复声明,并对属性进行观测
function initData (vm: Component) {
  let data = vm.$options.data
  data = vm._data = typeof data === 'function'
    ? getData(data, vm)
    : data || {}
  // 1.数据不是对象则发生异常
  if (!isPlainObject(data)) {
    data = {}
    process.env.NODE_ENV !== 'production' && warn(
      'data functions should return an object:\n' +
      'https://vuejs.org/v2/guide/components.html#data-Must-Be-a-Function',
      vm
    )
  }
  const keys = Object.keys(data)
  const props = vm.$options.props
  const methods = vm.$options.methods
  let i = keys.length
  // 2.校验数据是否在method中已经声明过
  while (i--) {
    const key = keys[i]
    if (process.env.NODE_ENV !== 'production') {
      if (methods && hasOwn(methods, key)) {
        warn(
          `Method "${key}" has already been defined as a data property.`,
          vm
        )
      }
    }
    // 3.校验数据是否在属性中已经声明过
    if (props && hasOwn(props, key)) {
      process.env.NODE_ENV !== 'production' && warn(
        `The data property "${key}" is already declared as a prop. ` +
        `Use prop default value instead.`,
        vm
      )
    } else if (!isReserved(key)) {
      // 4.将_data代理到实例上
      proxy(vm, `_data`, key)
    }
  }
  // 5.观测数据
  observe(data, true /* asRootData */)
}
2
3
4
5
6
7
8
9
10
11
12
13
14
15
16
17
18
19
20
21
22
23
24
25
26
27
28
29
30
31
32
33
34
35
36
37
38
39
40
41
42
43
44
# 观测数据
只观测对象数据类型,已经观测的不在进行观测,不能扩展的属性不进行观测。
export function observe (value: any, asRootData: ?boolean): Observer | void {
  // 1.如果不是对象直接return
  if (!isObject(value) || value instanceof VNode) {
    return
  }
  let ob: Observer | void
  // 2.如果已经观测过则直接返回上次观测的实例
  if (hasOwn(value, '__ob__') && value.__ob__ instanceof Observer) { //
    ob = value.__ob__
  } else if (
    shouldObserve &&
    !isServerRendering() &&
    (Array.isArray(value) || isPlainObject(value)) &&
    Object.isExtensible(value) &&
    !value._isVue
  ) {
  // 3.如果可以观测就进行观测
    ob = new Observer(value)
  }
  // 4.如果是根数据  vmCount标注为1
  if (asRootData && ob) {
    ob.vmCount++
  }
  return ob
}
2
3
4
5
6
7
8
9
10
11
12
13
14
15
16
17
18
19
20
21
22
23
24
25
这里要区分对象和数组,如果是数组不能使用Object.defineProperty会造成性能浪费,所以采用重写可以更改数组本身的方法的方式。
export class Observer {
  constructor (value: any) {
    this.value = value
    this.dep = new Dep()
    this.vmCount = 0
    def(value, '__ob__', this)
    // 1.数组的话重写数组原型方法
    if (Array.isArray(value)) {
      if (hasProto) {
        protoAugment(value, arrayMethods)
      } else {
        copyAugment(value, arrayMethods, arrayKeys)
      }
      // 2.观测数组中是对象类型的数据
      this.observeArray(value)
    } else {
      // 3.对象的话使用defineProperty重新定义属性
      this.walk(value)
    }
  }

  walk (obj: Object) {
    const keys = Object.keys(obj)
    for (let i = 0; i < keys.length; i++) {
      defineReactive(obj, keys[i])
    }
  }

  observeArray (items: Array<any>) {
    for (let i = 0, l = items.length; i < l; i++) {
      observe(items[i])
    }
  }
}
2
3
4
5
6
7
8
9
10
11
12
13
14
15
16
17
18
19
20
21
22
23
24
25
26
27
28
29
30
31
32
33
34
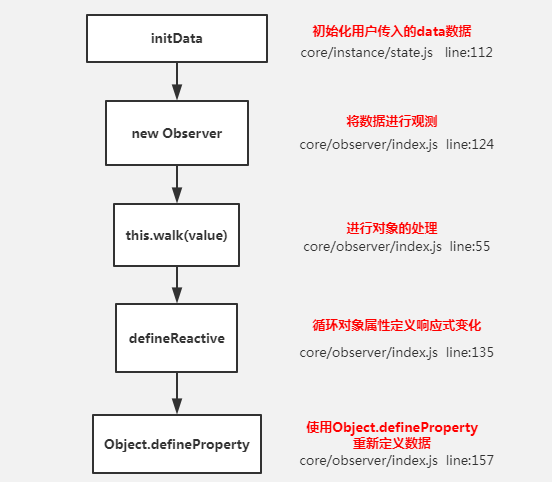
# 对象的观测
对象的观测就是将所有属性使用defineProperty进行重新定义
对象的属性劫持已经烂大街了,非常简单就是通过
defineProperty来实现的,如果你还不会那得好好反思一下了。这里提一下:想减少观测可以使用Object.freeze冻结对象
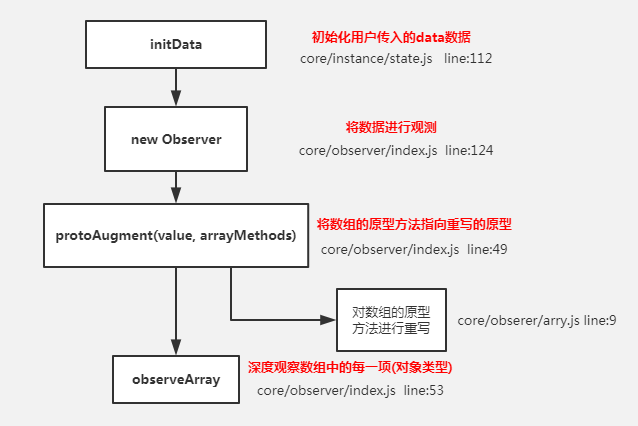
# 数组的观测
数组的观测就是通过重写原型方法来实现的
export const arrayMethods = Object.create(arrayProto)
const methodsToPatch = [
  'push',
  'pop',
  'shift',
  'unshift',
  'splice',
  'sort',
  'reverse'
]
methodsToPatch.forEach(function (method) {
  // cache original method
  const original = arrayProto[method]
  def(arrayMethods, method, function mutator (...args) {
    const result = original.apply(this, args)
    const ob = this.__ob__
    let inserted
    switch (method) {
      case 'push':
      case 'unshift':
        inserted = args
        break
      case 'splice':
        inserted = args.slice(2)
        break
    }
    // 对新增的属性再次进行观测
    if (inserted) ob.observeArray(inserted)
    return result
  })
})
2
3
4
5
6
7
8
9
10
11
12
13
14
15
16
17
18
19
20
21
22
23
24
25
26
27
28
29
30
31
这里我们所谓的数据观测就是当数据变化时我们可以知道,像对象更改时可以出发
set方法,像数组调用push方法可以触发我们自己写的push
# 依赖收集
这里我们要回想一下vue的渲染过程是通过渲染watcher来实现的;
在我们创建
watcher时,会对变量进行取值
let updateComponent = updateComponent = () => {
      vm._update(vm._render(), hydrating)
}
new Watcher(vm, updateComponent, noop, {}, true /* isRenderWatcher */)
2
3
4
# 对象依赖收集
对于对象而言,取值就会触发get方法,我们可以在defineProperty的get中进行依赖收集,在set中通知watcher进行更新操作
class Watcher {
  constructor (
    vm: Component,
    expOrFn: string | Function, // updateComponent
    cb: Function,
    options?: ?Object,
    isRenderWatcher?: boolean
  ) {
    this.vm = vm
    if (isRenderWatcher) {
      vm._watcher = this
    }
    this.cb = cb
    this.id = ++uid // uid for batching
    this.active = true
    this.dirty = this.lazy // for lazy watchers
    this.deps = []
    this.newDeps = []
    this.depIds = new Set()
    this.newDepIds = new Set()
    this.expression = process.env.NODE_ENV !== 'production'
      ? expOrFn.toString()
      : ''
    // 将updateComponent 放到this.getter上
    this.getter = expOrFn
    this.value = this.lazy
      ? undefined
      : this.get() // 执行get方法
  }
  get () {
    pushTarget(this)  // Dep.target = 渲染watcher
    let value
    const vm = this.vm
    try {
      value = this.getter.call(vm, vm) // 开始取值 那么在get方法中就可以获取到这个全局变量Dep.target
    } catch (e) {
      if (this.user) {
        handleError(e, vm, `getter for watcher "${this.expression}"`)
      } else {
        throw e
      }
    } finally {
      // "touch" every property so they are all tracked as
      // dependencies for deep watching
      if (this.deep) {
        traverse(value)
      }
      popTarget() // 结束后进行清理操作
      this.cleanupDeps()
    }
    return value
  }
}
2
3
4
5
6
7
8
9
10
11
12
13
14
15
16
17
18
19
20
21
22
23
24
25
26
27
28
29
30
31
32
33
34
35
36
37
38
39
40
41
42
43
44
45
46
47
48
49
50
51
52
53
渲染watcher,默认会调用get方法也就是我们传入的updateComponent方法,在调用此方法前先将watcher存到全局中,这样再取值时可以获取到这个watcher。
const dep = new Dep()
get: function reactiveGetter () {
    const value = getter ? getter.call(obj) : val
    if (Dep.target) { // 如果有watcher 将dep和watcher对应起来
        dep.depend()
    }
    return value
}
set: function reactiveSetter (newVal) {
    dep.notify();    // 当属性更新时通知dep中的所有watcher进行更新操作
}
2
3
4
5
6
7
8
9
10
11
# 数组的依赖收集
let childOb = !shallow && observe(val)
get: function reactiveGetter () {
      const value = getter ? getter.call(obj) : val
      if (Dep.target) {
        dep.depend()
        if (childOb) { // 如果值也是个对象的话,对这个值进行依赖收集
          childOb.dep.depend()
          if (Array.isArray(value)) { // 如果是数组对数组中的内容继续进行依赖收集
            dependArray(value)
          }
        }
      }
      return value
}
// 调用数组方法时进行watcher的更新操作
methodsToPatch.forEach(function (method) {
    ob.dep.notify()
})
2
3
4
5
6
7
8
9
10
11
12
13
14
15
16
17
18
这里的watcher和dep的关系是多对多的关系,一个属性一个dep,每个dep里存放着多个watcher,同时watcher也会记住对应的dep。
export default class Dep {
  constructor () {
    this.id = uid++
    this.subs = []
  }
  addSub (sub: Watcher) {
    this.subs.push(sub)
  }

  depend () {
    if (Dep.target) {
      Dep.target.addDep(this) // 让watcher记住自己
    }
  }

  notify () {
    const subs = this.subs.slice()
    for (let i = 0, l = subs.length; i < l; i++) {
      subs[i].update() // 让存储的watcher依次调用更新方法
    }
  }
}
2
3
4
5
6
7
8
9
10
11
12
13
14
15
16
17
18
19
20
21
22
class Watcher {
  constructor (
    vm: Component,
    expOrFn: string | Function, // updateComponent
    cb: Function,
    options?: ?Object,
    isRenderWatcher?: boolean
  ) {
    this.deps = []
    this.newDeps = []
    this.depIds = new Set()
    this.newDepIds = new Set()
    this.expression = process.env.NODE_ENV !== 'production'
      ? expOrFn.toString()
      : ''
    // 1.将updateComponent 放到this.getter上
    this.getter = expOrFn
    this.value = this.lazy
      ? undefined
    // 2.执行get方法
      : this.get()
  }
  addDep (dep: Dep) {
        const id = dep.id
        if (!this.newDepIds.has(id)) {
            this.newDepIds.add(id)
            this.newDeps.push(dep)
            if (!this.depIds.has(id)) {
                // 3.让dep记录watcher
                dep.addSub(this)
            }
        }
  }
  update () {
      queueWatcher(this)
  }
}
2
3
4
5
6
7
8
9
10
11
12
13
14
15
16
17
18
19
20
21
22
23
24
25
26
27
28
29
30
31
32
33
34
35
36
37
watcher中会进行虑重操作,实现watcher和dep互相记忆
# 异步更新【要点】
为了防止多次更改同一个属性或者多次修改不同属性(他们依赖的watcher相同) 会导致频繁更新渲染
export function queueWatcher (watcher: Watcher) {
  const id = watcher.id
  // 1.判断watcher是否已经存放了
  if (has[id] == null) {
    has[id] = true
  // 2.将watcher存放到队列中
    queue.push(watcher)
    // queue the flush
    if (!waiting) {
      waiting = true
      nextTick(flushSchedulerQueue) // 在下一队列中清空queue
    }
  }
}
2
3
4
5
6
7
8
9
10
11
12
13
14
对相同watcher进行过滤操作,当同步的更改状态完毕时再去更新watcher
# 相关链接
http://www.zhufengpeixun.com/jg-vue/vue-analyse/note-3.html
