 monorepo-lerna-yarn的实践
# 背景
对于维护过多个package的同学来说,都会遇到一个选择题,**这些package是放在一个仓库里维护还是放在多个仓库里单独维护,**数量较少的时候,多个仓库维护不会有太大问题,但是当package数量逐渐增多时,一些问题逐渐暴露出来:
- package之间相互依赖,开发人员需要在本地手动执行
npm link,维护版本号的更替。 - issue难以统一追踪,管理,因为其分散在独立的repo里。
- 每一个package都包含独立的
node_modules,而且大部分都包含babel,webpack等开发时依赖,安装耗时冗余并且占用过多空间。
# 简介
# lerna
Lerna 是一个管理多个 npm 模块的工具,是 Babel 自己用来维护自己的 Monorepo 并开源出的一个项目。优化维护多包的工作流,解决多个包互相依赖,且发布需要手动维护多个包的问题。
Lerna 现在已经被很多著名的项目组织使用,如:Babel, React, Vue, Angular, Ember, Meteor, Jest 。
开启 yarn workspaces: yarn config set workspaces-experimental true
# 管理包
有2种模式 fixed 和 independent。
Fixed/Locked mode 这是默认的模式,Fixed 模式下所有的包共用一个版本号,这个版本号保存在 lerna.json 的 version 字段里面。所以当你运行 lerna publish,修改过的包会自动更新 package.json 里的 version 并发布到 npm,未修改的包则不会更新。还有一个问题值得注意,当 lerna.json 的 version 做了主版本号的改动时,所有的包都会更新版本并发布。
注意:如果你的主版本号是 0,所有的修改都会当成是 breaking,表示做了不向下兼容的大改动,这会导致所有包的版本都会更新。
Independent mode lerna init --independent 用来初始化一个 independent 模式的项目,你也可以手动修改 lerna.json 里的 version 为 independent 使用该模式。
independent 模式允许每个包自行更新版本号,当你运行 lerna publish 时,需要逐个选择修改过的包的版本。
# 常用命令
➜  mono-lerna-starter git:(main) lerna -h
Usage: lerna <command> [options]

Commands:
  lerna add <pkg> [globs..]  Add a single dependency to matched packages
  lerna bootstrap            Link local packages together and install remaining package dependencies
  lerna changed              List local packages that have changed since the last tagged release
                                                                                               [aliases: updated]
  lerna clean                Remove the node_modules directory from all packages
  lerna create <name> [loc]  Create a new lerna-managed package
  lerna diff [pkgName]       Diff all packages or a single package since the last release
  lerna exec [cmd] [args..]  Execute an arbitrary command in each package
  lerna import <dir>         Import a package into the monorepo with commit history
  lerna info                 Prints debugging information about the local environment
  lerna init                 Create a new Lerna repo or upgrade an existing repo to the current version of Lerna.
  lerna link                 Symlink together all packages that are dependencies of each other
  lerna list                 List local packages                                            [aliases: ls, la, ll]
  lerna publish [bump]       Publish packages in the current project.
  lerna run <script>         Run an npm script in each package that contains that script
  lerna version [bump]       Bump version of packages changed since the last release.

Global Options:
  --loglevel       What level of logs to report.                                         [string] [default: info]
  --concurrency    How many processes to use when lerna parallelizes tasks.                 [number] [default: 4]
  --reject-cycles  Fail if a cycle is detected among dependencies.                                      [boolean]
  --no-progress    Disable progress bars. (Always off in CI)                                            [boolean]
  --no-sort        Do not sort packages topologically (dependencies before dependents).                 [boolean]
  --max-buffer     Set max-buffer (in bytes) for subcommand execution                                    [number]
  -h, --help       Show help                                                                            [boolean]
  -v, --version    Show version number                                                                  [boolean]

When a command fails, all logs are written to lerna-debug.log in the current working directory.

For more information, find our manual at https://github.com/lerna/lerna
2
3
4
5
6
7
8
9
10
11
12
13
14
15
16
17
18
19
20
21
22
23
24
25
26
27
28
29
30
31
32
33
34
lerna init
创建一个新的 lerna 仓库或更新已有仓库为新版本的 lerna,其中的选项 --independent/-i 用来生成 independent 模式的项目。
--independent/-i – 使用独立的 版本控制模式。
lerna bootstrap
此命令会做以下几个事情:
- npm install 为所有的包安装依赖。
- 为互相依赖的包创建软链接。
- 在所有 bootstrap 包(不包括
command.bootstrap.ignore中忽略的包)中执行npm run prepublish(如果传了参数--ignore-prepublish将跳过此步骤)。 - 在所有 bootstrap 包(不包括
command.bootstrap.ignore中忽略的包)中执行npm run prepare。
lerna publish
发布所有修改过的包,会在终端提示(prompt)选择一个新版本,并会更新所有改动到 Git 和 npm.
为已经更新过的软件包创建一个新版本。提示 输入新版本号并更新 git 和 npm 上的所有软件包。
参数
--npm-tag [tagname]— 使用给定的 npm dist-tag (默认为 latest)发布到 npm。--canary/-c– 创建一个 canary 版本。--skip-git– 不要运行任何 git 命令。--force-publish [packages]— 强制发布 指定的一个或多个软件包(以逗号分隔)或使用*表示所有软件包(对于修改过的软件包跳过 git diff 检查)。
lerna run [script]
在所有包中执行特定的 npm script (opens new window)。"build": "lerna run --stream --sort build"
lerna exec [script]
lerna exec -- babel src -d dist --config-file ../../babel.config.js
lerna changed
检查自上次发布以来哪些软件包被修改过。
lerna diff [package?]
列出所有或某个软件包自上次发布以来的修改情况。
lerna ls
列出当前仓库中的所有公共包(public packages),private: true 的包不会列出。
lerna import
将本地路径 <pathToRepo> 中的软件包导入(import) packages/<directory-name>中并提交 commit。
# monorepo
# 简介
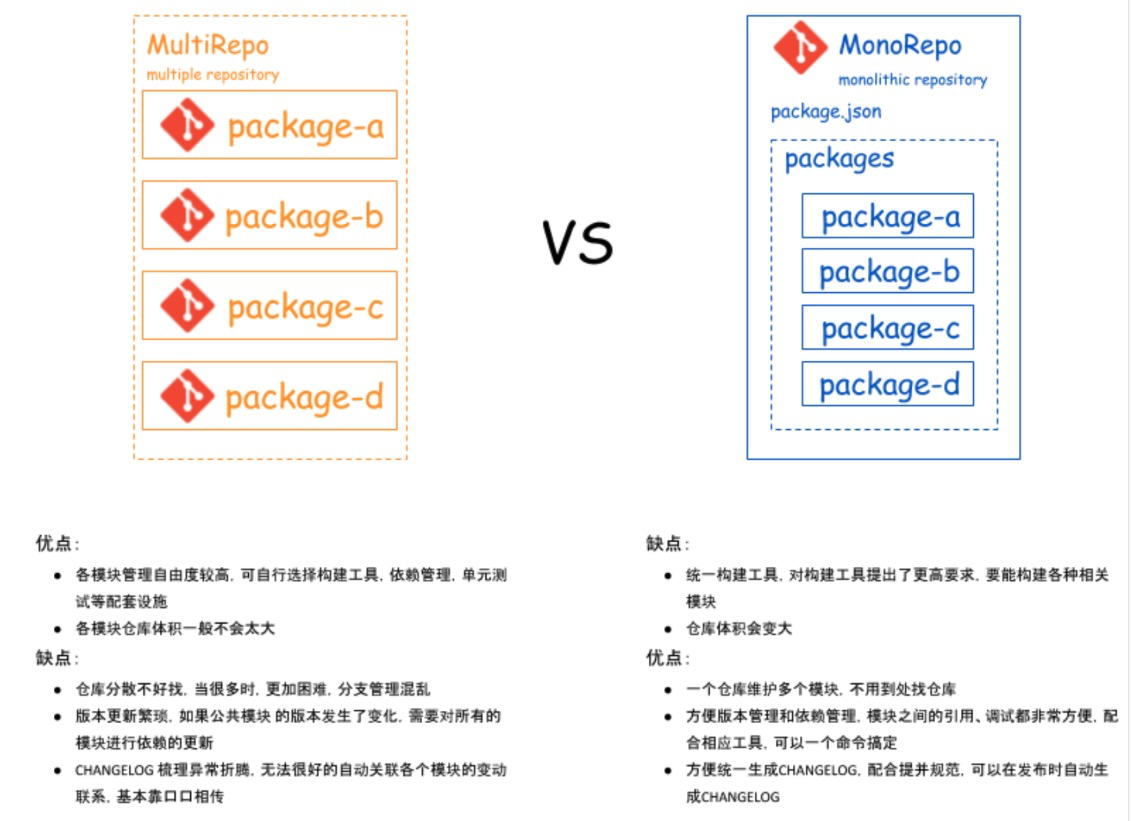
monorepo 是指一种把多个项目的源代码放在同一个代码仓库里面管理的一种方法。与 monorepo 相对的是 multirepo,它的思想是按模块分成多个仓库。当前有很多流行的开源项目使用 monorepo 管理代码,如 Babel (opens new window)、Vue3.0 (opens new window)。
monorepo 最主要的好处是统一的工作流和Code Sharing。比如我想看一个 pacakge 的代码、了解某段逻辑,不需要找它的 repo,直接就在当前 repo;当某个需求要修改多个 pacakge 时,不需要分别到各自的 repo 进行修改、测试、发版或者 npm link,直接在当前 repo 修改,统一测试、统一发版。只要搭建一套脚手架,就能管理(构建、测试、发布)多个 package。
# multirepo/monorepo比较
一图胜千言:
# 开发
mono repo
✅ 只需在一个仓库中开发,编码会相当方便。
✅ 代码复用高,方便进行代码重构。
❌ 项目如果变的很庞大,那么 git clone、安装依赖、构建都会是一件耗时的事情。
multi repo
✅ 仓库体积小,模块划分清晰。
❌ 多仓库来回切换(编辑器及命令行),项目一多真的得晕。如果仓库之间存在依赖,还得各种
npm link。❌ 不利于代码复用。
# 工程配置
mono repo
✅ 工程统一标准化
multi repo
❌ 各个团队可能各自有一套标准,新建一个仓库又得重新配置一遍工程及 CI / CD 等内容。
# 依赖管理
mono repo
✅ 共同依赖可以提取至 root,版本控制更加容易,依赖管理会变的方便。
multi repo
❌ 依赖重复安装,多个依赖可能在多个仓库中存在不同的版本,
npm link时不同项目的依赖可能会存在冲突问题。# 代码管理
mono repo
❌ 代码全在一个仓库,项目一大,几个 G 的话,用 Git 管理会存在问题。
multi repo
✅ 各个团队可以控制代码权限,也几乎不会有项目太大的问题。
# 部署
这部分两者其实都存在问题。
multi repo 的话,如果各个包之间不存在依赖关系倒没事,一旦存在依赖关系的话,开发者就需要在不同的仓库按照依赖先后顺序去修改版本及进行部署。
而对于 mono repo 来说,有工具链支持的话,部署会很方便,但是没有工具链的话,存在的问题一样蛋疼,认识到 mono repo 在一些痛点上还是解决得很不错的,这也是很多开源项目采用它的原因。但是实际上当我们引入 mono repo 架构以后,又会带来一大堆新的问题,无非市面上的工具链帮我们解决了大部分问题,比如 lerna; 可参考文章 (opens new window)
# lerna操作实践
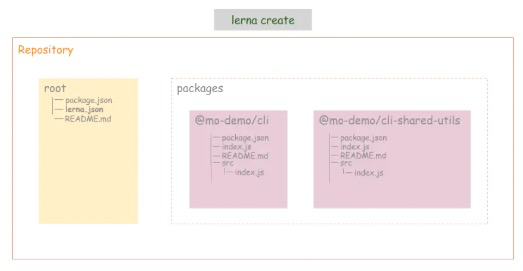
lerna不负责构建,测试等任务,它提出了一种集中管理package的目录模式,提供了一套自动化管理程序
# 初始化
npm i -g lerna
mkdir mono-lerna-starter && cd mono-lerna-starter && lerna init

lerna create @mo-demo/cli
lerna create @mo-demo/cli-shared-utils
2
3
4
5
注意,添加 private: true 是防止工作区根目录被发布到 npm,workspaces 是一个数组,其中包含所有“工作空间”的路径,也可支持通配符,如 "workspaces": ["packages/*"]。
# 增加模块依赖
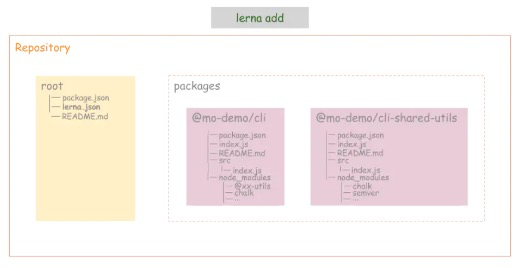
分别给相应的 package 增加依赖模块
lerna add chalk #为所有 package 增加 chalk 模块
lerna add semver --scope @mo-demo/cli-shared-utils #为 @mo-demo/cli-shared-utils 增加 semver 模块
lerna add @mo-demo/cli-shared-utils --scope @mo-demo/cli #增加内部模块之间的依赖

lerna add lodash --scope=house #将lodash增添到House的dependencies属性里
lerna add window --scope=house #将Window添加到House的依赖里
2
3
4
5
6
其他示范:
此示例中我们设定 ui 依赖 core:
lerna add bdp-core --scope=bdp-ui
执行完后 bdp-ui 会增加新的 dependencies:
{
  "name": "bdp-ui",
  "version": "1.0.0",
  "main": "index.js",
  "license": "MIT",
  "dependencies": {
    "bdp-core": "^1.0.0"
  }
}
2
3
4
5
6
7
8
9
然后就可以在 ui 中使用 core:
import myCore from 'bdp-core'
这里是通过软链接到
bdp-core/目录,并不是使用从 npm 下载的包。所以,在core中的修改可以实时地在ui中反映。
# 依赖包及清除管理
在 lerna add 时也发现了,为某个 package 安装的包被放到了这个 package 目录下的 node_modules 目录下。这样对于多个 package 都依赖的包,会被多个 package 安装多次,并且每个 package 下都维护 node_modules ,也不清爽。于是我们使用 --hoist 来把每个 package 下的依赖包都提升到工程根目录,来降低安装以及管理的成本。
lerna bootstrap --hoist
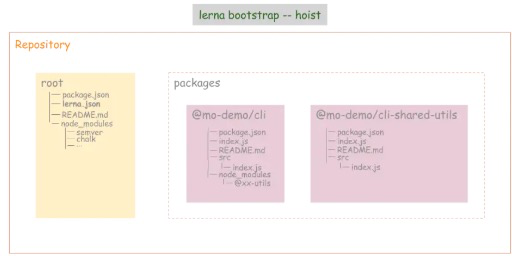
为了省去每次都输入 --hoist 参数的麻烦,可以在 lerna.json 配置:
{
  "packages": [
    "packages/*"
  ],
  "command": {
    "bootstrap": {
      "hoist": true
    }
  },
  "version": "0.0.1-alpha.0"
}
2
3
4
5
6
7
8
9
10
11
配置好后,对于之前依赖包已经被安装到各个 package 下的情况,我们只需要清理一下安装的依赖即可:
lerna clean
然后执行 lerna bootstrap 即可看到 package 的依赖都被安装到根目录下的 node_modules 中了
lerna bootstrap
2.0版本后,不用这样设置,会报错提示;
lerna ERR! EWORKSPACES --hoist is not supported with --npm-client=yarn, use yarn workspaces instead
官方引用 (opens new window), 单独设置useWorkspaces即可;
# 移除依赖
如果你想要移除一个被所有包依赖的公共包,可以这样操作:
lerna exec -- yarn remove lodash
# lerna exec -- yarn remove lodash --network-timeout=1000000 # 如果提示网络有问题用此命令
2
lerna exec -- <command> [..args]表示在所有包中执行该 command.
# 发布自动生成日志
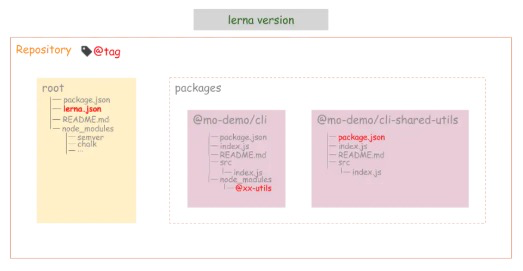
有了之前的规范提交,自动生成日志便水到渠成了。再详细看下 lerna publish 时做了哪些事情:
lerna version 更新版本
- 找出从上一个版本发布以来有过变更的 package
- 提示开发者确定要发布的版本号
- 将所有更新过的的 package 中的package.json的version字段更新
- 将依赖更新过的 package 的 包中的依赖版本号更新
- 更新 lerna.json 中的 version 字段
- 提交上述修改,并打一个 tag
- 推送到 git 仓库
# 升级及发布
lerna updated
lerna publish
2
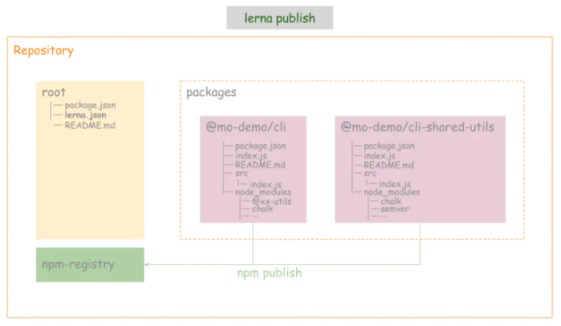
这里的 lerna publish 会做以下几件事情:
- 让你选择如何更新版本,是 major、minor 或是 beta。
- 更新版本到有改动的包,即修改
package.json的version。 - 如果有某些包依赖刚才更新的包,自动更新
dependencies的版本号。 - 把改动提交到 git 并生成以版本号命名的 git commit 和 tag。
- 发布刚才改动的并且是 public 的包到 npm。
CHANGELOG 很明显是和 version 一一对应的,所以需要在 lerna version 中想办法,查看 lerna version 命令的详细说明后,会看到一个配置参数 --conventional-commits。没错,只要我们按规范提交后,在 lerna version 的过程中会便会自动生成当前这个版本的 CHANGELOG。为了方便,不用每次输入参数,可以配置在 lerna.json中,如下:
{
  "packages": [
    "packages/*"
  ],
  "command": {
    "bootstrap": {
      "hoist": true
    },
    "version": {
      "conventionalCommits": true
    }
  },
  "ignoreChanges": [
    "**/*.md"
  ],
  "version": "0.0.1-alpha.1"
}
2
3
4
5
6
7
8
9
10
11
12
13
14
15
16
17
实际 lerna version很少直接使用,因为它包含在 lerna publish 中了,直接使用 lerna publish就好;
Lerna 在管理 package 的版本号上,提供了两种模式供选择 Fixed or Independent。默认是 Fixed,更多细节,以及 Lerna 的更多玩法,请参考官网文档 (opens new window)
# 编译、压缩、调试
采用 Monorepo 结构的项目,各个 package 的结构最好保持统一。
根据目前的项目状况,设计如下:
- 各 package 入口统一为 index.js
- 各 package 源码入口统一为 src/index.js
- 各 package 编译入口统一为 dist/index.js
- 各 package 统一使用 ES6 语法、使用 Babel 编译、压缩并输出到 dist
- 各 package 发布时只发布 dist 目录,不发布 src 目录
- 各 package 注入 LOCAL_DEBUG 环境变量, 在index.js 中区分是调试还是发布环境,调试环境 ruquire(./src/index.js) 保证所有源码可调试。发布环境 ruquire(./dist/index.js) 保证所有源码不被发布。
脚本封装
"i": "lerna bootstrap",
"u": "lerna clean",
"p": "npm run b && lerna publish",
"b": "lerna exec -- babel src -d dist --config-file ../../babel.config.js"
2
3
4
# 安装依赖
yarn add -D @babel/cli @babel/core @babel/preset-env  # 使用 Babel 必备 详见官网用法
yarn add -D @babel/node                               # 用于调试 因为用了 import&export 等 ES6 的语法
yarn add -D babel-preset-minify                       # 用于压缩代码
yarn add  -W -D @babel/cli @babel/core @babel/preset-env @babel/node  babel-preset-minify
2
3
4
# 增加 Babel 配置
// 根目录新建 babel.config.js
module.exports = function (api) {
  api.cache(true)
  const presets = [
    [
      '@babel/env',
      {
        targets: {
          node: '8.9'
        }
      }
    ]
  ]
  // 非本地调试模式才压缩代码,不然调试看不到实际变量名
  if (!process.env['LOCAL_DEBUG']) {
    presets.push([
      'minify'
    ])
  }
  const plugins = []
  return {
    presets,
    plugins,
    ignore: ['node_modules']
  }
}
2
3
4
5
6
7
8
9
10
11
12
13
14
15
16
17
18
19
20
21
22
23
24
25
26
# 修改各 package 的代码
// @mo-demo/cli/index.js
if (process.env.LOCAL_DEBUG) {
  require('./src/index')                        // 如果是调试模式,加载src中的源码
} else {
  require('./dist/index')                       // dist会发到npm
}

// @mo-demo/cli/src/index.js
import { log } from '@mo-demo/cli-shared-utils'  // 从 utils 模块引入依赖并使用 log 函数
log('cli/index.js as cli entry exec!')

// @mo-demo/cli/package.json
{
  "main": "index.js",
  "files": [
    "dist"                                       // 发布 dist
  ]
}

// @mo-demo/cli-shared-utils/index.js
if (process.env.LOCAL_DEBUG) {
  module.exports = require('./src/index')        // 如果是调试模式,加载src中的源码
} else {
  module.exports = require('./dist/index')       // dist会发到npm
}

// @mo-demo/cli-shared-utils/src/index.js
const log = function (str) {
  console.log(str)
}
export {                                         //导出 log 接口
  log
}

// @mo-demo/cli-shared-utils/package.json
{
  "main": "index.js",
  "files": [
    "dist"
  ]
}
2
3
4
5
6
7
8
9
10
11
12
13
14
15
16
17
18
19
20
21
22
23
24
25
26
27
28
29
30
31
32
33
34
35
36
37
38
39
40
41
修改发布的脚本
npm run b 用来对各 pacakge 执行 babel 的编译,从 src 目录输出出 dist 目录,使用根目录的配置文件 babel.config.js。
npm run p 用来取代 lerna publish,在 publish 前先执行 npm run b来编译。
其它常用的 lerna 命令也添加到 scripts 中来,方便使用。
// 工程根目录 package.json
 "scripts": {
   "c": "git-cz",
   "i": "lerna bootstrap",
   "u": "lerna clean",
   "p": "npm run b && lerna publish",
   "b": "lerna exec -- babel src -d dist --config-file ../../babel.config.js"
 }
2
3
4
5
6
7
8
# 调试
我们使用vscode自带的调试功能调试,也可以使用 Node + Chrome 调试,看开发者习惯。
增加如下调试配置文件:
// .vscode/launch.json
{
    "version": "0.2.0",
    "configurations": [
        {
            "type": "node",
            "request": "launch",
            "name": "debug cli",
            "runtimeExecutable": "${workspaceRoot}/node_modules/.bin/babel-node",
            "runtimeArgs": [
                "${workspaceRoot}/packages/cli/src/index.js"
            ],
            "env": {
                "LOCAL_DEBUG": "true"
            },
            "console": "integratedTerminal"
        }
    ]
}
2
3
4
5
6
7
8
9
10
11
12
13
14
15
16
17
18
19
# yarn2.x操作实践
# 创建项目
新建项目&&安装lerna&& 初始化lerna
mkdir mono-lerna-starter && cd mono-lerna-starter && yarn init -y && yarn add -D lerna && lerna init
# 初始化子项目
lerna create ui-app -y
lerna create ui-lib -y
2
# 关联依赖
内部关联及外部安装包
yarn workspace ui-app add ui-lib # 低版本的话要指定版本号
#lerna add bdp-core --scope=bdp-ui

yarn workspace ui-lib add lodash
yarn workspace ui-lib remove lodash

yarn workspace ui-lib add @types/lodash -D
2
3
4
5
6
7
将typescript设置为root的开发依赖
一般root只包含一些开发工具依赖如webpack,babel,typescript等
yarn add -W -D typescript jest
lerna add lodash
yarn add eslint --dev -W # -W 选项显式指明在 workspace 的根目录执行,避免在根目录误操作 yarn。
2
3
# 执行命令
root中配置脚本
  "scripts": {
    "build": "lerna run --stream --sort build",
    "clean": "yarn workspaces run clean",
    "test": "yarn workspaces run test",
    "release": "standard-version",
    "commit": "git-cz",
    "version": "lerna version --conventional-commits "
  },
2
3
4
5
6
7
8
依赖types设置
  "main": "lib/index.js",
  "types": "lib/index.d.ts",
2
构建
yarn clean
yarn build
2
# multi/mono操作比较
# 搭建环境
- 普通项目:clone下来后通过yarn install,即可搭建完项目,有时需要配合postinstall hooks,来进行自动编译,或者其他设置。
- monorepo: 各个库之间存在依赖,如A依赖于B,因此我们通常需要将B link到A的node_module里,一旦仓库很多的话,手动的管理这些link操作负担很大,因此需要自动化的link操作,按照拓扑排序将各个依赖进行link
解决方式:通过使用workspace,yarn install会自动的帮忙解决安装和link问题
yarn install # 等价于 lerna bootstrap --npm-client yarn --use-workspaces
# 清理环境
在依赖乱掉或者工程混乱的情况下,清理依赖
- 普通项目: 直接删除node_modules以及编译后的产物。
- monorepo: 不仅需要删除root的node_modules的编译产物还需要删除各个package里的node_modules以及编译产物
解决方式:使用lerna clean来删除所有的node_modules,使用yarn workspaces run clean来执行所有package的清理工作
lerna clean # 清理所有的node_modules
yarn workspaces run clean # 执行所有package的clean操作
2
# 安装|删除依赖
- 普通项目: 通过yarn add和yarn remove即可简单姐解决依赖库的安装和删除问题
- monorepo: 一般分为三种场景
- 给某个package安装依赖:yarn workspace packageB add packageA 将packageA作为packageB的依赖进行安装
- 给所有的package安装依赖: 使用yarn workspaces add lodash 给所有的package安装依赖
- 给root 安装依赖:一般的公用的开发工具都是安装在root里,如typescript,我们使用yarn add -W -D typescript来给root安装依赖
对应的三种场景删除依赖如下
yarn workspace packageB remove packageA
yarn workspace packageB remove lodash
yarn workspaces remove lodash
yarn remove -W -D typescript
2
3
4
# 项目构建
- 普通项目:建立一个build的npm script,使用yarn build即可完成项目构建
- monorepo:区别于普通项目之处在于各个package之间存在相互依赖,如packageB只有在packageA构建完之后才能进行构建,否则就会出错,这实际上要求我们以一种拓扑排序的规则进行构建。
我们可以自己构建拓扑排序规则,很不幸的是yarn的workspace暂时并未支持按照拓扑排序规则执行命令,虽然该 rfc已经被accepted,但是尚未实现, 幸运的是lerna支持按照拓扑排序规则执行命令, --sort参数可以控制以拓扑排序规则执行命令
lerna run --stream --sort build
# 版本升级及发包
项目测试完成后,就涉及到版本发布,版本发布一般涉及到如下一些步骤
- 条件验证: 如验证测试是否通过,是否存在未提交的代码,是否在主分支上进行版本发布操作
- version_bump:发版的时候需要更新版本号,这时候如何更新版本号就是个问题,一般大家都会遵循 semVer语义,
- 生成changelog: 为了方便查看每个package每个版本解决了哪些功能,我们需要给每个package都生成一份changelog方便用户查看各个版本的功能变化。
- 生成git tag:为了方便后续回滚问题及问题排查通常需要给每个版本创建一个git tag
- git 发布版本:每次发版我们都需要单独生成一个commit记录来标记milestone
- 发布npm包:发布完git后我们还需要将更新的版本发布到npm上,以便外部用户使用
我们发现手动的执行这些操作是很麻烦的且及其容易出错,幸运的是lerna可以帮助我们解决这些问题
yarn官方并不打算支持发布流程,只是想做好包管理工具,因此这部分还是需要通过lerna支持
lerna提供了publish和version来支持版本的升级和发布, publish的功能可以即包含version的工作,也可以单纯的只做发布操作。
# 完善的测试用例
monorepo项目:测试有两种方式
- 使用统一的jest测试配置这样方便全局的跑jest即可,好处是可以方便统计所有代码的测试覆盖率,坏处是如果package比较异构(如小程序,前端,node 服务端等),统一的测试配置不太好编写
- 每个package单独支持test命令,使用yarn workspace run test,坏处是不好统一收集所有代码的测试覆盖率
如果采用jest编写测试用例,支持typescript的话,需要初始化配置jest.config.js:
module.exports = {
  preset: 'ts-jest',
  moduleFileExtensions: ['ts'],
  testEnvironment: 'node'
}
2
3
4
5
# 操作实践
# 提交规范
详见 ,下面是简单设置提交规范的流程;
添加conventional-commit支持
lerna的version_bump和changelog生成都依赖于conventional-commit,因此需要保证commit-msg符合规范。
添加@commitlint/cli和@commitlint/config-conventional以及husky
yarn add -W -D @commitlint/cli @commitlint/conventional-commit lint-staged husky
配置commitlint ; commmitlint.config.js
module.exports = {
  extends: [
    "@commitlint/config-conventional"
  ]
};
2
3
4
5
配置commit-msg的hooks
  "husky": {
    "hooks": {
      "commit-msg": "commitlint -E HUSKY_GIT_PARAMS"
    }
  }
2
3
4
5
添加git-cz,支持commit-msg提示
yarn add -W -D commitizen cz-conventional-changelog
配置commitizen并添加commit为npm script
"scripts": {
   commit: "git-cz"
 },
 "config": {
    "commitizen": {
      "path": "cz-conventional-changelog"
    }
  }
2
3
4
5
6
7
8
这样后续commit,就可以使用yarn commit进行commit
# 发布
修改发布到私服配置; 可在 lerna.json设置,不用在子系统中设置;
  "publishConfig": {
    "registry": "http://172.21.64.25:7373/"
  },
2
3
开发测试通过后,每隔一段时间即可发版,我们使用lerna version来做发版; 配置发版的message;lerna publish --skip-git --no-verify-access
  {
  "packages": ["packages/*"],
  "version": "independent",
  "npmClient": "yarn",
  "useWorkspaces": true,
  "command": {
    "publish": {
      //"registry": "https://npm.pkg.github.com" //github
      "registry":"http://172.21.64.25:7373/", //内网私有服务器
      "ignoreChanges": ["*.md"], // md文件更新,不触发版本变动
      "verifyAccess": false, // 内网发包需开启
      "verifyRegistry": false, // 内网发包需开启
      "message": "chore: publish" // 修改默认的publish的commit msg
    }
  }
}
2
3
4
5
6
7
8
9
10
11
12
13
14
15
16
配置发版的策略,我们积极convention-commit来发版
{
  "scripts":
  {
    version: "lerna version --conventional-commits" ## 生成changelog文件以及根据commit来进行版本变动
  }
}
2
3
4
5
6
yarn run version # 不要使用 yarn version,yarn version 是yarn自动的命令不是npm script
这个会提示用户输入版本,如果不想这个提示可以关闭
{
  "scripts":
  {
     version: "lerna version --conventional-commits --yes" ## 生成changelog文件以及根据commit来进行版本变动,不提示用户输入版本
  }
}
2
3
4
5
6
发版成功后既可以发包,使用lerna publish即可发包
lerna publish
# 最后的配置
lerna.json
{
  "packages": ["packages/*"],
  "version": "independent",
  "npmClient": "yarn",
  "useWorkspaces": true,
  "command": {
   # "bootstrap": {
   #   "hoist": true
   #},
    "version": {
      "conventionalCommits": true
    },
    "publish": {
      "ignoreChanges": ["*.md"],
      "verifyAccess": true,
      "verifyRegistry": true,
      "message": "chore: publish"
    }
  }
}
2
3
4
5
6
7
8
9
10
11
12
13
14
15
16
17
18
19
20
说明:
version: 当前仓库的版本。npmClient: 使用的 npm 客户端,默认是 "npm",可选值还有 "yarn"。command.publish.ignoreChanges: 是个数组,在这个数组里面的文件变动,不会触发版本更新。command.publish.message: 自定义发布新版本时的 git commit 信息。command.publish.registry: 设置私有仓库,默认是发布到npmjs.org。command.bootstrap.ignore: 设置在这里的目录将不会参与lerna bootstrap。command.bootstrap.npmClientArgs: 执行lerna bootstrap时会将此数组的所有值当作参数传给npm install。command.bootstrap.scope: 限制lerna bootstrap在哪些包起作用。packages: 用以指明所有包的路径。
pkg.json
{
  "name": "mono-lerna-starter",
  "version": "0.1.0",
  "private": true,
  "workspaces": [
    "packages/*"
  ],
  "scripts": {
    "build": "lerna run --stream --sort build",
    "clean": "yarn workspaces run clean",
    "test": "yarn workspaces run test",
    "release": "standard-version",
    "commit": "git-cz",
    "version": "lerna version --conventional-commits "
  },
  "publishConfig": {
    "registry": "http://172.21.64.25:7373/"
  },
  "config": {
    "commitizen": {
      "path": "./node_modules/cz-lerna-changelog"
    }
  },
  "commitlint": {
    "extends": [
      "@commitlint/config-conventional"
    ]
  },
  "husky": {
    "hooks": {
      "pre-commit1": "lint-staged",
      "commit-msg": "commitlint -E HUSKY_GIT_PARAMS"
    }
  },
  "lint-staged": {
    "**/*.{js,ts,tsx,json,jsx}": [
      "eslint --fix",
      "git add"
    ]
  },
  "devDependencies": {
    "@commitlint/cli": "^11.0.0",
    "@commitlint/config-conventional": "^11.0.0",
    "@types/jest": "^26.0.20",
    "@typescript-eslint/eslint-plugin": "^4.14.2",
    "commitizen": "^4.2.3",
    "cz-conventional-changelog": "^3.3.0",
    "cz-lerna-changelog": "^2.0.3",
    "husky": "^4.3.8",
    "jest": "^26.6.3",
    "lerna": "^3.22.1",
    "lint-staged": "^10.5.3",
    "standard": "^16.0.3",
    "typescript": "^4.1.3"
  }
}
2
3
4
5
6
7
8
9
10
11
12
13
14
15
16
17
18
19
20
21
22
23
24
25
26
27
28
29
30
31
32
33
34
35
36
37
38
39
40
41
42
43
44
45
46
47
48
49
50
51
52
53
54
55
56
# BDP-UI实践
初始化
nrm use bdp
mkdir bdp-ui
lerna init
lerna create @bdp/icon -y
lerna create @bdp/theme -y
lerna create @bdp/ui -y
lerna create @bdp/core -y

lerna add @bdp/icon @bdp/theme @bdp/core --scope @bdp/ui
lerna add react umi antd --scope @bdp/ui
lerna add classnames prop-types --scope @bdp/ui

cd packages/ui
2
3
4
5
6
7
8
9
10
11
12
13
后修改版本号,描述及入口文件;
# 参考文档
https://classic.yarnpkg.com/blog/2017/08/02/introducing-workspaces/
https://juejin.cn/post/6844903918279852046
https://mp.weixin.qq.com/s/NlOn7er0ixY1HO40dq5Gag
https://juejin.cn/post/6950082433647640612
