 微前端实践使用
# 微前端
# 定义及优势
微前端架构具备以下几个核心价值:
技术栈无关 主框架不限制接入应用的技术栈,微应用具备完全自主权
独立开发、独立部署 微应用仓库独立,前后端可独立开发,部署完成后主框架自动完成同步更新
增量升级
在面对各种复杂场景时,我们通常很难对一个已经存在的系统做全量的技术栈升级或重构,而微前端是一种非常好的实施渐进式重构的手段和策略
独立运行时 每个微应用之间状态隔离,运行时状态不共享
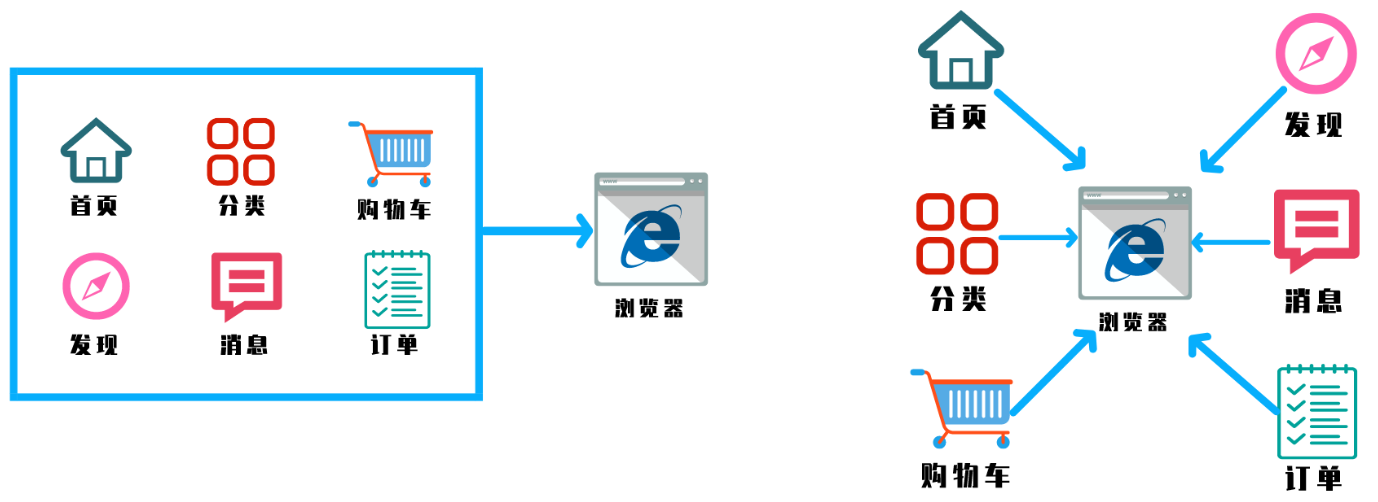
微前端就是将不同的功能按照不同的维度拆分成多个子应用。通过主应用来加载这些子应用。
微前端的核心在于拆, 拆完后在合;
好处:
将一个应用划分成若干个子应用,将子应用打包成一个个的lib。当路径切换时加载不同的子应用。这样每个子应用都是独立的,技术栈也不用做限制了!从而解决了前端协同开发问题;集成多技术栈
图示:

singleSpa与qiankun及iframe:
2018年 Single-SPA诞生了, single-spa是一个用于前端微服务化的JavaScript前端解决方案 (本身没有处理样式隔离,js执行隔离) 实现了路由劫持和应用加载;
2019年 qiankun基于Single-SPA, 提供了更加开箱即用的 API (single-spa + sandbox + import-html-entry) 做到了,技术栈无关、并且接入简单(像iframe一样简单);
总结:子应用可以独立构建,运行时动态加载,主子应用完全解耦,技术栈无关,靠的是协议接入(子应用必须导出 bootstrap、mount、unmount方法)
- 如果使用
iframe,iframe中的子应用切换路由时用户刷新页面就尴尬了。
应用通信:
- 基于URL来进行数据传递,但是传递消息能力弱
- 基于
CustomEvent实现通信 - 基于props主子应用间通信
- 使用全局变量、
Redux进行通信
公共依赖:
CDN- externalswebpack联邦模块(webpack5)
# singleSpa
single-spa 一个基于JavaScript的 微前端 框架,可以用于构建可共存的微前端应用,每个前端应用都可以用自己的框架编写,完美支持 Vue React Angular。可以实现 服务注册 事件监听 子父组件通信 等功能。用于 父项目 集成子项目使用;
single-spa-vue 是提供给使用vue子项目使用的npm包。可以快速和sigle-spa父项目集成,并提供了一些比较便携的api。
# 优缺点
- singleSpa 缺陷 不够灵活 不能动态加载js文件
- 样式不隔离 没有js沙箱的机制;
# 2个常用的api
singleSpa.registerApplication:这是注册子项目的方法。参数如下:
- appName: 子项目名称
- applicationOrLoadingFn: 子项目注册函数,用户需要返回 single-spa 的生命周期对象。后面我们会介绍single-spa的生命周期机制
- activityFn: 回调函数入参
location对象,可以写自定义匹配路由加载规则。
singleSpa.start:这是启动函数。
# 实践
以主子vue的版本来示例;
# 宿主程序【基座】
- 注册
registerApplication - 启动
start
# 主应用搭建
App.vue将子应用挂载到id="vue"标签中;
<template>
  <div id="app">
     <router-link to="/vue">加载vue应用</router-link>
     <!--子应用加载的位置-->
     <div id="vue"></div>
  </div>
</template>
<style>
</style>
2
3
4
5
6
7
8
9
main.js
import Vue from 'vue'
import App from './App.vue'
import router from './router'
import {registerApplication,start} from 'single-spa';
Vue.config.productionTip = false

//加载已知的固定远程压缩文件;不是很灵活。可以参考后面的manifest.json实现;
async function loadScript(url){
  return new Promise((resolve,reject)=>{
    let script = document.createElement('script');
    script.src = url;
    script.onload = resolve;
    script.onerror = reject;
    document.head.appendChild(script);
  })
}

registerApplication('child-vue',
  async ()=>{
      console.log('load')
      await loadScript(`http://localhost:10001/js/chunk-vendors.js`);
      await loadScript(`http://localhost:10001/js/app.js`)
      return window.singleVue; // bootstrap mount unmount
  },
  // 在子应用中设置的router对应上;
  location => location.pathname.startsWith('/vue'), // 用户切换到/vue 的路径下,需要加载刚才定义子子应用
)
start();

new Vue({
  router,
  render: h => h(App)
}).$mount('#app')
2
3
4
5
6
7
8
9
10
11
12
13
14
15
16
17
18
19
20
21
22
23
24
25
26
27
28
29
30
31
32
33
# 子程序
# 构建子应用
- 协议规则;botstrap mount unmount;这三个得暴露出去给父容器用;
- 动态设置子应用
publicPath;__webpack_public_path__ - 设置路由模式为history, 及配置子路由基础路径;
- 需要父应用加载子应用,将子应用打包成一个个的lib去给父应用使用
umd模式;【将子模块打包成类库】
vue create spa-vue
npm install single-spa-vue
2
main.js botstrap mount unmount暴露出去
import Vue from 'vue'
import App from './App.vue'
import router from './router'
import singleSpaVue from 'single-spa-vue';

Vue.config.productionTip = false
const appOptions = {
    el:'#vue', // 挂载到父应用中的id为vue的标签中
    router,
    render: h => h(App)
}
const vueLifeCycle = singleSpaVue({
  Vue,
  appOptions
})
//动态设置子应用publicPath
// 如果是父应用引用时;设置__webpack_public_path__
if(window.singleSpaNavigate){
  __webpack_public_path__ = 'http://localhost:10000/'
}else{
  delete appOptions.el;
  new Vue(appOptions).$mount('#app');
}

// 协议接入;定好了协议 父应用会调用这些方法
export const bootstrap = vueLifeCycle.bootstrap;
export const mount = vueLifeCycle.mount;
export const unmount = vueLifeCycle.unmount;
export default vueLifeCycle;
2
3
4
5
6
7
8
9
10
11
12
13
14
15
16
17
18
19
20
21
22
23
24
25
26
27
28
29
# 路由加载方式
router/index.js
const router = new VueRouter({
  mode: 'history',
  base: '/vue',//注意这里设置路由加载方式;跟父容器中设置location对应上;
  routes
})
2
3
4
5
# 配置库打包
vue.config.js设置兼容放在父容器中,也可以设置单独运行;
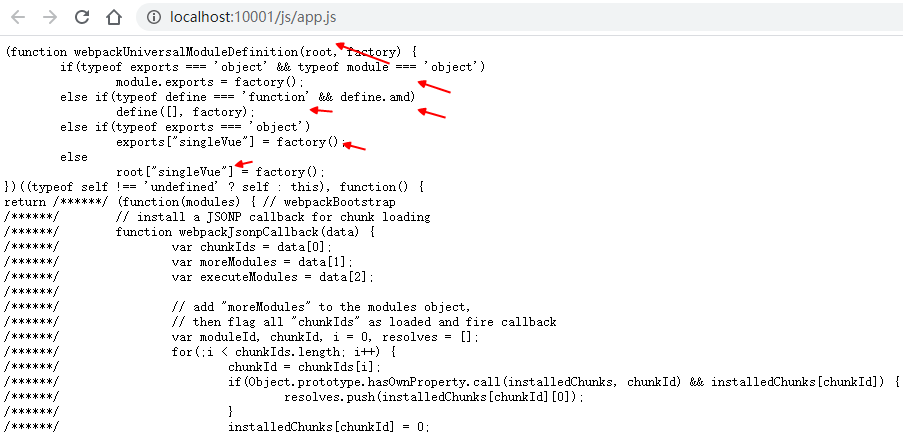
注意要以UMD方式库,导出;这样就可以挂载到window上;
挂载示例:window.singleVue.bootstrap/mount /umount
module.exports = {
    configureWebpack:{
        output:{
            library:'singleVue',
            libraryTarget:'umd'
        },
        devServer:{
            port:10000
        }
    }
}
2
3
4
5
6
7
8
9
10
11
查看
http://localhost:8080
http://localhost:8080/vue //父容器
http://localhost:10001
http://localhost:10001/vue/about //子系统内部跳转
2
3
4

# 要点
- vue-cli 与 single-spa 集成;
- 远程加载服务;
- manifest 自动加载需要的 JS 【要点】;
- 也可以借助第三方库
loadjs加载远程文件;
- 也可以借助第三方库
- namespace 样式隔离【要点】;
- 兼容性问题解决;
- 各框架的挂载确保;
# 主容器加载封装
single-spa-config.js封装加载,优化动态远程加载js;
远程加载实现原理:
创建一个
script标签,等script加载后,返回script加载到window上面的对象。
manifest 自动加载 bundle和chunk.vendor【要点】
让子项目使用
stats-webpack-plugin插件,每次打包后都输出一个 只包含重要信息的manifest.json文件。父项目先ajax 请求 这个json文件,从中读取出需要加载的js目录,然后同步加载。首先ajax到
manifest.json文件,解构出里面的entrypointspublicPath字段,遍历出真实的js路径,然后按照顺序加载。
要注册一个子服务,需要一次性加载2个JS文件。如果需要加载的JS更多,甚至生产环境的 bundle 有唯一hash, 那我们还能写死文件名和列表;
import * as singleSpa from "single-spa"; //导入single-spa
import axios from "axios";

// runScript:一个promise同步方法。可以代替创建一个script标签,然后加载服务
const runScript = async (url) => {
  return new Promise((resolve, reject) => {
    const script = document.createElement("script");
    script.src = url;
    script.onload = resolve;
    script.onerror = reject;
    const firstScript = document.getElementsByTagName("script")[0];
    firstScript.parentNode.insertBefore(script, firstScript);
    //document.head.appendChild(script);
  });
};

// getManifest:远程加载manifest.json 文件,解析需要加载的js; 【要点方法】
const getManifest = (url, bundle) =>
  new Promise(async (resolve) => {
    const { data } = await axios.get(url);
    const { entrypoints, publicPath } = data;
    const assets = entrypoints[bundle].assets;
    for (let i = 0; i < assets.length; i++) {
      await runScript(publicPath + assets[i]).then(() => {
        if (i === assets.length - 1) {
          resolve();
        }
      });
    }
  });

//注册微前端服务
singleSpa.registerApplication(
  "singleDemo",
  async () => {
    // 注册用函数,return 一个singleSpa 模块对象,模块对象来自于要加载的js导出
    // 如果这个函数不需要在线引入,只需要本地引入一块加载:
    // () => import('xxx/main.js')
    let singleVue = null;
    await getManifest("http://127.0.0.1:3000/manifest.json", "app").then(() => {
      singleVue = window.singleVue;
    });
    return singleVue;
  },
  (location) => location.pathname.startsWith("/vue") // 配置微前端模块前缀
);

singleSpa.registerApplication(
  "reactApp",
  async () => {
    await runScript("http://localhost:3001/static/js/main.js");
    return window.reactApp;
  },
  (location) => location.pathname.startsWith("/react")
);

singleSpa.registerApplication(
  "angular-app",
  async () => {
    await runScript("http://localhost:3002/inline.bundle.js");
    await runScript("http://localhost:3002/polyfills.bundle.js");
    await runScript("http://localhost:3002/styles.bundle.js");
    await runScript("http://localhost:3002/vendor.bundle.js");
    await runScript("http://localhost:3002/main.bundle.js");
    return window.angularApp;
  },
  (location) => location.pathname.startsWith("/angular")
);

singleSpa.start(); // 启动
2
3
4
5
6
7
8
9
10
11
12
13
14
15
16
17
18
19
20
21
22
23
24
25
26
27
28
29
30
31
32
33
34
35
36
37
38
39
40
41
42
43
44
45
46
47
48
49
50
51
52
53
54
55
56
57
58
59
60
61
62
63
64
65
66
67
68
69
70
# 样式隔离
样式隔离这块,使用postcss的一个插件:postcss-selector-namespace。 把项目里的所有css都会添加一个类名前缀。这样就可以实现命名空间隔离。
- 1:)安装插件:
npm install postcss-selector-namespace --save -d项目目录下新建postcss.config.js,使用插件:在父项目要挂载的区块,添加我们的命名空间; [在子项目中使用]
module.exports = {
  plugins: {
    'postcss-selector-namespace': {//给所有css添加统一前缀,然后父项目添加命名空间
      namespace(css) {
    if (css.includes('element-variables.scss')) return '';//element-ui的样式不需要添加命名空间
        return '.single-spa-vue' // 返回要添加的类名
      }
    },
  }
}
2
3
4
5
6
7
8
9
10
2:) wepback设置, css在所有环境下,都不单独打包为文件。这样是为了保证最小引入(只引入js)
  css: {
    extract: false,
  },
1
2
33:)在
public/index.html里面添加命名空间,否则会丢失样式。<div class="single-spa-vue"> <div id="app"></div> </div>1
2
3
# 子项目的库文件动态计算
stats-webpack-plugin; 在主容器通过 getManifest("http://127.0.0.1:3000/manifest.json", "app")去加载子容器在线的js文件;
const StatsPlugin = require("stats-webpack-plugin");

const config = {
  output: {
    library: "singleVue",
    libraryTarget: "window",
  },
  plugins: [
    //await getManifest("http://127.0.0.1:3000/manifest.json", "app").then(() => {
    //  singleVue = window.singleVue;
    //});
    new StatsPlugin("manifest.json", {
      chunkModules: false,
      entrypoints: true,
      source: false,
      chunks: false,
      modules: false,
      assets: false,
      children: false,
      exclude: [/node_modules/],
    }),
  ],
};
module.exports = config;

const webpackConfig = require("./webpack.config");
module.exports = {
  //
  publicPath: "//localhost:3000/", //不推荐这种方式;写死;推荐最上面子项目动态修改的方式;
  // css在所有环境下,都不单独打包为文件。这样是为了保证最小引入(只引入js)
  css: {
    extract: false,
  },
  configureWebpack: webpackConfig,
  devServer: {
    contentBase: "./",
    compress: true,
  },
};

// 子项目设置history,base设置为父项目的一级路由。
const router = new VueRouter({
  base: '/vue/',
  // mode: 'history',
  routes
})
2
3
4
5
6
7
8
9
10
11
12
13
14
15
16
17
18
19
20
21
22
23
24
25
26
27
28
29
30
31
32
33
34
35
36
37
38
39
40
41
42
43
44
45
46
# 独立运行
single-spa 有个属性,叫做 window.singleSpaNavigate。如果为true,代表就是single-spa模式。如果false,就可以独立渲染。
const appOptions = {
    el:'#vue', // 挂载到父应用中的id为vue的标签中
    router,
    render: h => h(App)
}
const vueLifeCycle = singleSpaVue({
  Vue,
  appOptions
})
// 如果是父应用引用我
if(window.singleSpaNavigate){
  __webpack_public_path__ = 'http://localhost:10001/'
}else{
  delete appOptions.el;
  new Vue(appOptions).$mount('#app'); //重新手动挂载
}

// 协议接入 我定好了协议 父应用会调用这些方法
export const bootstrap = vueLifeCycle.bootstrap;
export const mount = vueLifeCycle.mount;
export const unmount = vueLifeCycle.unmount;
2
3
4
5
6
7
8
9
10
11
12
13
14
15
16
17
18
19
20
21
# vue 和 react/angular 挂载的区别
- Vue 2.x的dom挂载,采取的是 覆盖Dom挂载 的方式。例如,组件要挂载到
#app上,那么它会用组件覆盖掉#app元素。 - 但是React/Angular不同,它们的挂载方式是在目标挂载元素的内部
添加元素,而不是直接覆盖掉。 例如组件要挂载到#app上,那么他会在#app内部挂载组件,#app还存在。
这样就造成了一个问题,当从 vue子项目 => react项目 => vue子项目时,就会找不到要挂载的dom元素,从而抛出错误。
解决这个问题的方案是,让 vue项目组件的根元素类名/ID名和要挂载的元素一致 就可以。
例如我们要挂载到 #vue 这个dom上,那么子项目内部的app.vue,最顶部的dom元素id名也应该叫 #vue。
<template>
  <div id="vue">
    <div id="nav">
      <router-link to="/">Home</router-link> |
      <router-link to="/about">About</router-link>
    </div>
    <router-view/>
  </div>
</template>
2
3
4
5
6
7
8
9
# quankun
# 定义
quankun基于single-spa的;
# 实践
以主vue,子vue/ react 的版本来示例;
# 宿主程序【基座】
# 主应用编写
<el-menu :router="true" mode="horizontal">
    <el-menu-item index="/">首页</el-menu-item>
    <el-menu-item index="/vue">vue应用</el-menu-item>
    <el-menu-item index="/react">react应用</el-menu-item>
</el-menu>
<router-view v-show="$route.name"></router-view>
<div v-show="!$route.name" id="vue"></div>
<div v-show="!$route.name" id="react"></div>
2
3
4
5
6
7
8
# 注册子应用
- 注册
registerApplication; (子应用必须支持跨域)fetch - 启动
start; prefetch: false, // 取消预加载
import { registerMicroApps, start } from "qiankun";
const apps = [
  {
    name: "vueApp", // 应用的名字
    entry: "//localhost:10000", // 默认会加载这个html 解析里面的js 动态的执行 (子应用必须支持跨域)fetch
    container: "#vue", // 容器名
    activeRule: "/vue", // 激活的路径
    props: { a: 1 },
  },
  {
    name: "reactApp",
    entry: "//localhost:20000", // 默认会加载这个html 解析里面的js 动态的执行 (子应用必须支持跨域)fetch
    container: "#react",
    activeRule: "/react",
  },
];
registerMicroApps(apps); // 注册应用
start({
  prefetch: false, // 取消预加载
}); // 开启

new Vue({
  router,
  render: (h) => h(App),
}).$mount("#app");
2
3
4
5
6
7
8
9
10
11
12
13
14
15
16
17
18
19
20
21
22
23
24
25
# 父子应用传值通信
- 通过设置props传递参数;主应用设置
props: { a: 1 },在子应用中打印;

基础api实现; 监听state状态变化;
主应用:
import { initGlobalState, MicroAppStateActions } from 'qiankun';
// 初始化 state
const actions: MicroAppStateActions = initGlobalState(state);
actions.onGlobalStateChange((state, prev) => {
  console.log(state, prev);// state: 变更后的状态; prev 变更前的状态
});
actions.setGlobalState(state);
actions.offGlobalStateChange();
1
2
3
4
5
6
7
8微应用:
// 从生命周期 mount 中获取通信方法,使用方式和 master 一致
export function mount(props) {
  props.onGlobalStateChange((state, prev) => {
    console.log(state, prev);// state: 变更后的状态; prev 变更前的状态
  });
  props.setGlobalState(state);
}
1
2
3
4
5
6
7
路由设置
<template>
  <div>
  <el-menu :router="true" mode="horizontal">
      <!--基座中可以放自己的路由-->
      <el-menu-item index="/">Home</el-menu-item>
       <!--引用其他子应用-->
      <el-menu-item index="/vue">vue应用</el-menu-item>
      <el-menu-item index="/react">react应用</el-menu-item>
  </el-menu>
    <router-view ></router-view>
    <div id="vue"></div>
    <div id="react"></div>
  </div>
</template>
2
3
4
5
6
7
8
9
10
11
12
13
14
# 子程序【vue/react】
- 协议规则;botstrap mount unmount;这三个得暴露出去给父容器用;
- 动态设置子应用
publicPath;__webpack_public_path__ - 设置路由模式为history, 及配置子路由基础路径;
- 需要父应用加载子应用,将子应用打包成一个个的lib去给父应用使用
umd模式;【将子模块打包成类库】 - 配置子应用得设置跨域处理;
"Access-Control-Allow-Origin": "*"
vue中的处理:
跟sigleSpa类似,区别就是标识框架的标识变了;还得设置支持跨域处理;
react中的处理:
重写
react中的webpack配置文件 (config-overrides.js)
# **子vue应用 **
main.js
let instance = null;
function render(props) {
  instance = new Vue({
    router,
    render: (h) => h(App),
  }).$mount("#app"); // 这里是挂载到自己的html中  基座会拿到这个挂载后的html将其插入进去
}

if (window.__POWERED_BY_QIANKUN__) {
  __webpack_public_path__ = window.__INJECTED_PUBLIC_PATH_BY_QIANKUN__; // 动态添加publicPath
} else {
  render(); // 默认独立运行
}

// 子组件的协议;可以通过props传值
export async function bootstrap(props) {}
export async function mount(props) {
  console.log(props);
  render(props);
}
export async function unmount(props) {
  instance.$destroy();
}
2
3
4
5
6
7
8
9
10
11
12
13
14
15
16
17
18
19
20
21
22
23
路由设置 router/index.js
import Vue from "vue";
import VueRouter from "vue-router";
import Home from "../views/Home.vue";
Vue.use(VueRouter);
const routes = [
  {
    path: "/",
    name: "Home",
    component: Home,
  },
  {
    path: "/about",
    name: "About",
    // route level code-splitting
    // this generates a separate chunk (about.[hash].js) for this route
    // which is lazy-loaded when the route is visited.
    component: () =>
      import(/* webpackChunkName: "about" */ "../views/About.vue"),
  },
];
const router = new VueRouter({
  mode: "history",
  base: "/vue", //process.env.BASE_URL
  routes,
});
export default router;
2
3
4
5
6
7
8
9
10
11
12
13
14
15
16
17
18
19
20
21
22
23
24
25
26
打包配置vue.config.js
module.exports = {
  devServer: {
    port: 10001,
    headers: {
      "Access-Control-Allow-Origin": "*",
    },
  },
  configureWebpack: {
    output: {
      library: "vueApp",
      libraryTarget: "umd",
    },
  },
};
2
3
4
5
6
7
8
9
10
11
12
13
14
# 子react应用
index.js
import React from "react";
import ReactDOM from "react-dom";
import "./index.css";
import App from "./App";

function render() {
  ReactDOM.render(
    <React.StrictMode>
      <App />
    </React.StrictMode>,
    document.getElementById("root")
  );
}
if (!window.__POWERED_BY_QIANKUN__) {
  render();
}
export async function bootstrap() {}
export async function mount() {
  render();
}
export async function unmount() {
  ReactDOM.unmountComponentAtNode(document.getElementById("root"));
}
2
3
4
5
6
7
8
9
10
11
12
13
14
15
16
17
18
19
20
21
22
23
打包配置 config-overrides.js; 重写react中的webpack配置文件 (config-overrides.js)
module.exports = {
  webpack: (config) => {
    config.output.library = "reactApp";
    config.output.libraryTarget = "umd";
    config.output.publicPath = "http://localhost:20000/";
    return config;
  },
  devServer: (configFunction) => {
    return function (proxy, allowedHost) {
      const config = configFunction(proxy, allowedHost);
      config.headers = {
        "Access-Control-Allow-Origin": "*",
      };
      return config;
    };
  },
};
2
3
4
5
6
7
8
9
10
11
12
13
14
15
16
17
配置.env文件
PORT=20000
WDS_SOCKET_PORT=20000
2
React路由配置
import { BrowserRouter, Route, Link } from "react-router-dom"
const BASE_NAME = window.__POWERED_BY_QIANKUN__ ? "/react" : "";
function App() {
  return (
    <BrowserRouter basename={BASE_NAME}>
      <Link to="/">首页</Link>
      <Link to="/about">关于</Link>
      <Route path="/" exact render={() => <h1>hello home</h1>}></Route>
      <Route path="/about" render={() => <h1>hello about</h1>}></Route>
    </BrowserRouter>
  );
}
2
3
4
5
6
7
8
9
10
11
12
启动脚本修改
  "scripts": {
    "start": "react-app-rewired start",
    "build": "react-app-rewired build",
    "test": "react-app-rewired test",
    "eject": "react-app-rewired eject"
  },
2
3
4
5
6
# 相关链接
https://zh-hans.single-spa.js.org/docs/getting-started-overview
https://qiankun.umijs.org/zh/guide
https://zh-hans.single-spa.js.org/docs/getting-started-overview
