 axios分析及实践
# Axios简介
Axios (opens new window) 是一个基于 Promise 的 HTTP 客户端,拥有以下特性:
- 支持 Promise API;
- 能够拦截请求和响应;
- 能够转换请求和响应数据;
- 客户端支持防御 CSRF (opens new window) 攻击;
- 同时支持浏览器和 Node.js 环境;
- 能够取消请求及自动转换 JSON 数据。
在浏览器端 Axios 支持大多数主流的浏览器,比如 Chrome、Firefox、Safari 和 IE 11。此外,Axios 还拥有自己的生态:

(数据来源 —— github.com/axios/axios… (opens new window)
简单介绍完 Axios,我们来分析一下它提供的一个核心功能 —— 拦截器。
# HTTP 拦截器的设计与实现
# 拦截器简介
对于大多数 SPA 应用程序来说, 通常会使用 token 进行用户的身份认证。这就要求在认证通过后,我们需要在每个请求上都携带认证信息。针对这个需求,为了避免为每个请求单独处理,我们可以通过封装统一的 request 函数来为每个请求统一添加 token 信息。
但后期如果需要为某些 GET 请求设置缓存时间或者控制某些请求的调用频率的话,我们就需要不断修改 request 函数来扩展对应的功能。此时,如果在考虑对响应进行统一处理的话,我们的 request 函数将变得越来越庞大,也越来越难维护。那么对于这个问题,该如何解决呢?Axios 为我们提供了解决方案 —— 拦截器。
Axios (opens new window) 是一个基于 Promise 的 HTTP 客户端,而 HTTP 协议是基于请求和响应:

所以 Axios 提供了请求拦截器和响应拦截器来分别处理请求和响应,它们的作用如下:
- 请求拦截器:该类拦截器的作用是在请求发送前统一执行某些操作,比如在请求头中添加 token 字段。
- 响应拦截器:该类拦截器的作用是在接收到服务器响应后统一执行某些操作,比如发现响应状态码为 401 时,自动跳转到登录页。
在 Axios 中设置拦截器很简单,通过 axios.interceptors.request 和 axios.interceptors.response 对象提供的 use 方法,就可以分别设置请求拦截器和响应拦截器:
// 添加请求拦截器
axios.interceptors.request.use(function (config) {
  config.headers.token = 'added by interceptor';
  return config;
});

// 添加响应拦截器
axios.interceptors.response.use(function (data) {
  data.data = data.data + ' - modified by interceptor';
  return data;
});
2
3
4
5
6
7
8
9
10
11
那么拦截器是如何工作的呢?在看具体的代码之前,我们先来分析一下它的设计思路。Axios 的作用是用于发送 HTTP 请求,而请求拦截器和响应拦截器的本质都是一个实现特定功能的函数。
我们可以按照功能把发送 HTTP 请求拆解成不同类型的子任务,比如有用于处理请求配置对象的子任务,用于发送 HTTP 请求的子任务和用于处理响应对象的子任务。当我们按照指定的顺序来执行这些子任务时,就可以完成一次完整的 HTTP 请求。
了解完这些,接下来我们将从 任务注册、任务编排和任务调度 三个方面来分析 Axios 拦截器的实现。
# 任务注册
通过前面拦截器的使用示例,我们已经知道如何注册请求拦截器和响应拦截器,其中请求拦截器用于处理请求配置对象的子任务,而响应拦截器用于处理响应对象的子任务。要搞清楚任务是如何注册的,就需要了解 axios 和 axios.interceptors 对象。
// lib/axios.js
function createInstance(defaultConfig) {
  var context = new Axios(defaultConfig);
  var instance = bind(Axios.prototype.request, context);

  // Copy axios.prototype to instance
  utils.extend(instance, Axios.prototype, context);
  // Copy context to instance
  utils.extend(instance, context);
  return instance;
}

// Create the default instance to be exported
var axios = createInstance(defaults);
2
3
4
5
6
7
8
9
10
11
12
13
14
在 Axios 的源码中,我们找到了 axios 对象的定义,很明显默认的 axios 实例是通过 createInstance 方法创建的,该方法最终返回的是 Axios.prototype.request 函数对象。同时,我们发现了 Axios 的构造函数:
// lib/core/Axios.js
function Axios(instanceConfig) {
  this.defaults = instanceConfig;
  this.interceptors = {
    request: new InterceptorManager(),
    response: new InterceptorManager()
  };
}
2
3
4
5
6
7
8
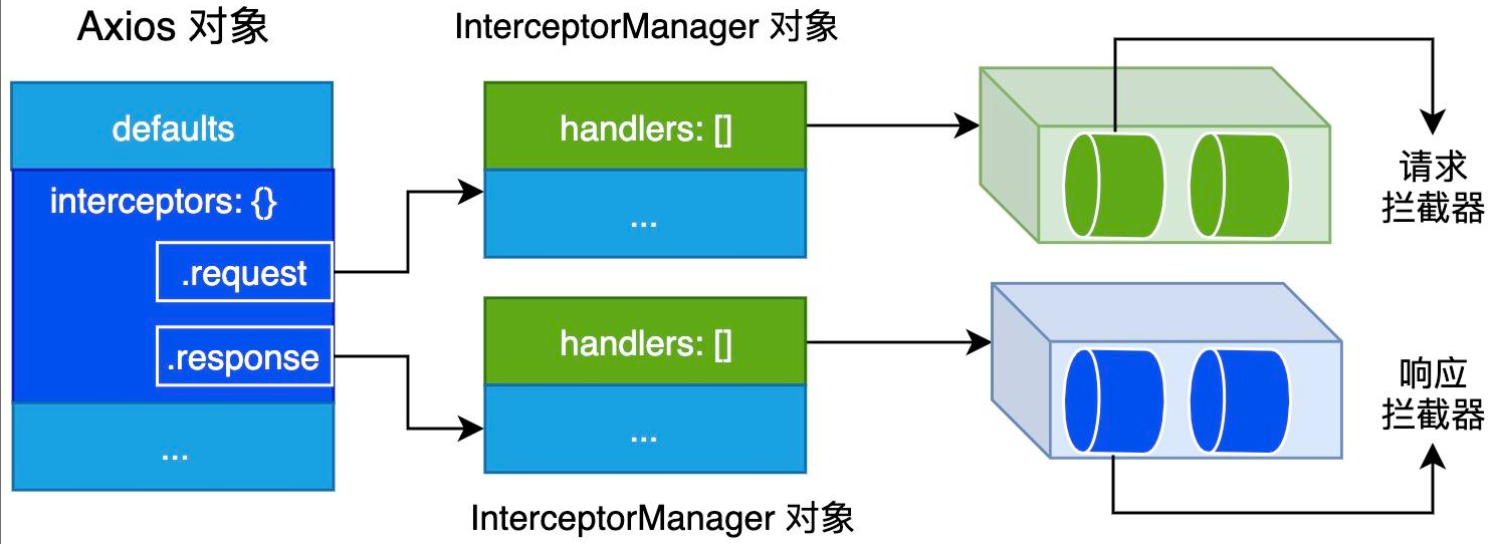
在构造函数中,我们找到了 axios.interceptors 对象的定义,也知道了 interceptors.request 和 interceptors.response 对象都是 InterceptorManager 类的实例。因此接下来,进一步分析 InterceptorManager 构造函数及相关的 use 方法就可以知道任务是如何注册的:
// lib/core/InterceptorManager.js
function InterceptorManager() {
  this.handlers = [];
}

InterceptorManager.prototype.use = function use(fulfilled, rejected) {
  this.handlers.push({
    fulfilled: fulfilled,
    rejected: rejected
  });
  // 返回当前的索引,用于移除已注册的拦截器
  return this.handlers.length - 1;
};
2
3
4
5
6
7
8
9
10
11
12
13
通过观察 use 方法,我们可知注册的拦截器都会被保存到 InterceptorManager 对象的 handlers 属性中。下面我们用一张图来总结一下 Axios 对象与 InterceptorManager 对象的内部结构与关系:
# 任务编排
现在我们已经知道如何注册拦截器任务,但仅仅注册任务是不够,我们还需要对已注册的任务进行编排,这样才能确保任务的执行顺序。这里我们把完成一次完整的 HTTP 请求分为处理请求配置对象、发起 HTTP 请求和处理响应对象 3 个阶段。
接下来我们来看一下 Axios 如何发请求的:
axios({
  url: '/hello',
  method: 'get',
}).then(res =>{
  console.log('axios res: ', res)
  console.log('axios res.data: ', res.data)
})
2
3
4
5
6
7
通过前面的分析,我们已经知道 axios 对象对应的是 Axios.prototype.request 函数对象,该函数的具体实现如下:
// lib/core/Axios.js
Axios.prototype.request = function request(config) {
  config = mergeConfig(this.defaults, config);

  // 省略部分代码
  var chain = [dispatchRequest, undefined];
  var promise = Promise.resolve(config);

  // 任务编排
  this.interceptors.request.forEach(function unshiftRequestInterceptors(interceptor) {
    chain.unshift(interceptor.fulfilled, interceptor.rejected);
  });

  this.interceptors.response.forEach(function pushResponseInterceptors(interceptor) {
    chain.push(interceptor.fulfilled, interceptor.rejected);
  });

  // 任务调度
  while (chain.length) {
    promise = promise.then(chain.shift(), chain.shift());
  }

  return promise;
};
2
3
4
5
6
7
8
9
10
11
12
13
14
15
16
17
18
19
20
21
22
23
24
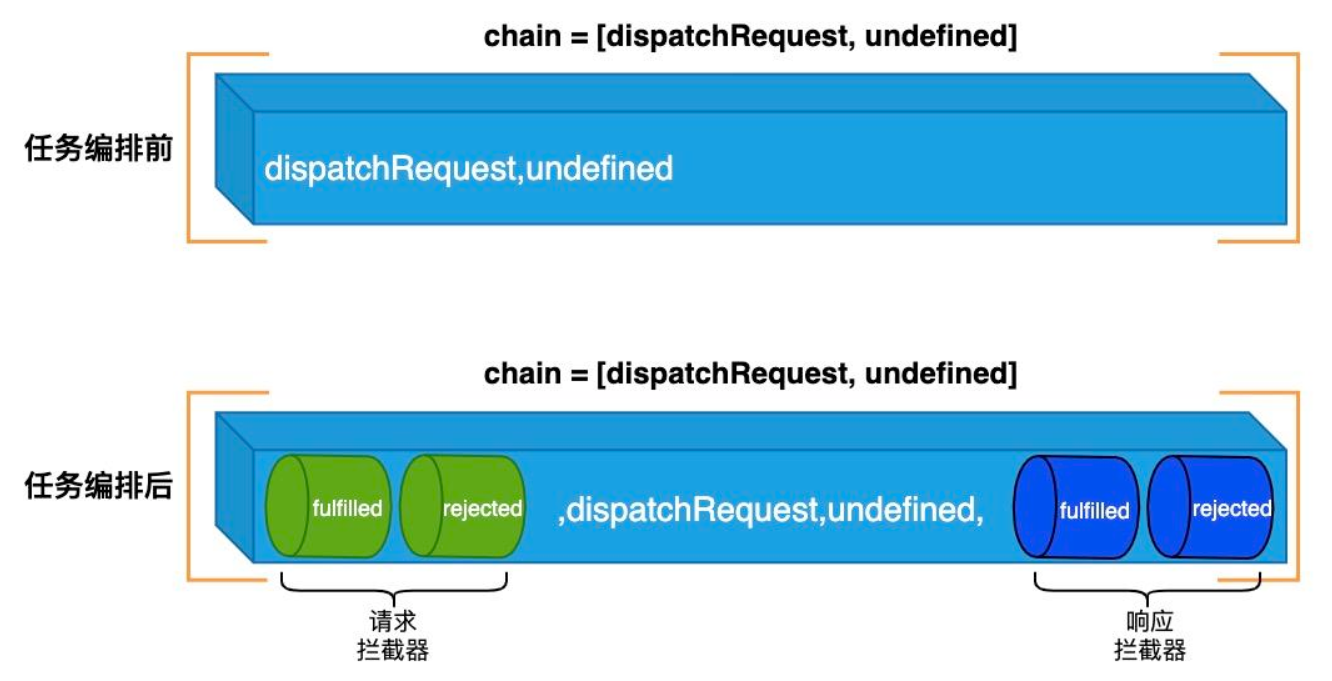
任务编排的代码比较简单,我们来看一下任务编排前和任务编排后的对比图:
# 任务调度
任务编排完成后,要发起 HTTP 请求,我们还需要按编排后的顺序执行任务调度。在 Axios 中具体的调度方式很简单,具体如下所示:
 // lib/core/Axios.js
Axios.prototype.request = function request(config) {
  // 省略部分代码
  var promise = Promise.resolve(config);
  while (chain.length) {
    promise = promise.then(chain.shift(), chain.shift());
  }
}
2
3
4
5
6
7
8
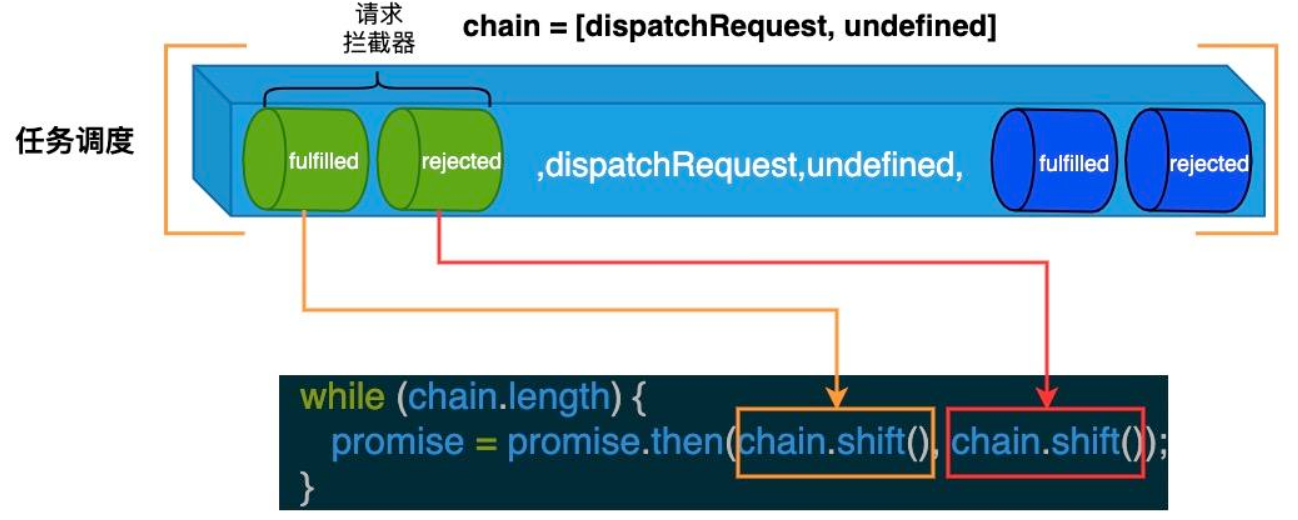
因为 chain 是数组,所以通过 while 语句我们就可以不断地取出设置的任务,然后组装成 Promise 调用链从而实现任务调度,对应的处理流程如下图所示:
下面我们来回顾一下 Axios 拦截器完整的使用流程:
// 添加请求拦截器 —— 处理请求配置对象
axios.interceptors.request.use(function (config) {
  config.headers.token = 'added by interceptor';
  return config;
});

// 添加响应拦截器 —— 处理响应对象
axios.interceptors.response.use(function (data) {
  data.data = data.data + ' - modified by interceptor';
  return data;
});

axios({
  url: '/hello',
  method: 'get',
}).then(res =>{
  console.log('axios res.data: ', res.data)
})
2
3
4
5
6
7
8
9
10
11
12
13
14
15
16
17
18
介绍完 Axios 的拦截器,我们来总结一下它的优点。Axios 通过提供拦截器机制,让开发者可以很容易在请求的生命周期中自定义不同的处理逻辑。此外,也可以通过拦截器机制来灵活地扩展 Axios 的功能,比如 Axios 生态中列举的 axios-response-logger (opens new window) 和 axios-debug-log (opens new window) 这两个库。
参考 Axios 拦截器的设计模型,我们就可以抽出以下通用的任务处理模型:

# HTTP 适配器的设计与实现
# 默认 HTTP 适配器
Axios 同时支持浏览器和 Node.js 环境,对于浏览器环境来说,我们可以通过 XMLHttpRequest 或 fetch API 来发送 HTTP 请求,而对于 Node.js 环境来说,我们可以通过 Node.js 内置的 http 或 https 模块来发送 HTTP 请求。
为了支持不同的环境,Axios 引入了适配器。在 HTTP 拦截器设计部分,我们看到了一个 dispatchRequest 方法,该方法用于发送 HTTP 请求,它的具体实现如下所示:
// lib/core/dispatchRequest.js
module.exports = function dispatchRequest(config) {
  // 省略部分代码
  var adapter = config.adapter || defaults.adapter;

  return adapter(config).then(function onAdapterResolution(response) {
    // 省略部分代码
    return response;
  }, function onAdapterRejection(reason) {
    // 省略部分代码
    return Promise.reject(reason);
  });
};
2
3
4
5
6
7
8
9
10
11
12
13
通过查看以上的 dispatchRequest 方法,我们可知 Axios 支持自定义适配器,同时也提供了默认的适配器。对于大多数场景,我们并不需要自定义适配器,而是直接使用默认的适配器。因此,默认的适配器就会包含浏览器和 Node.js 环境的适配代码,其具体的适配逻辑如下所示:
// lib/defaults.js
var defaults = {
  adapter: getDefaultAdapter(),
  xsrfCookieName: 'XSRF-TOKEN',
  xsrfHeaderName: 'X-XSRF-TOKEN',
  //...
}

function getDefaultAdapter() {
  var adapter;
  if (typeof XMLHttpRequest !== 'undefined') {
    // For browsers use XHR adapter
    adapter = require('./adapters/xhr');
  } else if (typeof process !== 'undefined' &&
    Object.prototype.toString.call(process) === '[object process]') {
    // For node use HTTP adapter
    adapter = require('./adapters/http');
  }
  return adapter;
}
2
3
4
5
6
7
8
9
10
11
12
13
14
15
16
17
18
19
20
在 getDefaultAdapter 方法中,首先通过平台中特定的对象来区分不同的平台,然后再导入不同的适配器,具体的代码比较简单,这里就不展开介绍。
# 自定义适配器
其实除了默认的适配器外,我们还可以自定义适配器。那么如何自定义适配器呢?这里我们可以参考 Axios 提供的示例:
var settle = require('./../core/settle');
module.exports = function myAdapter(config) {
  // 当前时机点:
  //  - config配置对象已经与默认的请求配置合并
  //  - 请求转换器已经运行
  //  - 请求拦截器已经运行

  // 使用提供的config配置对象发起请求
  // 根据响应对象处理Promise的状态
  return new Promise(function(resolve, reject) {
    var response = {
      data: responseData,
      status: request.status,
      statusText: request.statusText,
      headers: responseHeaders,
      config: config,
      request: request
    };

    settle(resolve, reject, response);
    // 此后:
    //  - 响应转换器将会运行
    //  - 响应拦截器将会运行
  });
}
2
3
4
5
6
7
8
9
10
11
12
13
14
15
16
17
18
19
20
21
22
23
24
25
在以上示例中,我们主要关注转换器、拦截器的运行时机点和适配器的基本要求。比如当调用自定义适配器之后,需要返回 Promise 对象。这是因为 Axios 内部是通过 Promise 链式调用来完成请求调度,不清楚的小伙伴可以重新阅读 “拦截器的设计与实现” 部分的内容。
现在我们已经知道如何自定义适配器了,那么自定义适配器有什么用呢?在 Axios 生态中,发现了 axios-mock-adapter (opens new window) 这个库,该库通过自定义适配器,让开发者可以轻松地模拟请求。对应的使用示例如下所示:
var axios = require("axios");
var MockAdapter = require("axios-mock-adapter");

// 在默认的Axios实例上设置mock适配器
var mock = new MockAdapter(axios);

// 模拟 GET /users 请求
mock.onGet("/users").reply(200, {
  users: [{ id: 1, name: "John Smith" }],
});

axios.get("/users").then(function (response) {
  console.log(response.data);
});
2
3
4
5
6
7
8
9
10
11
12
13
14
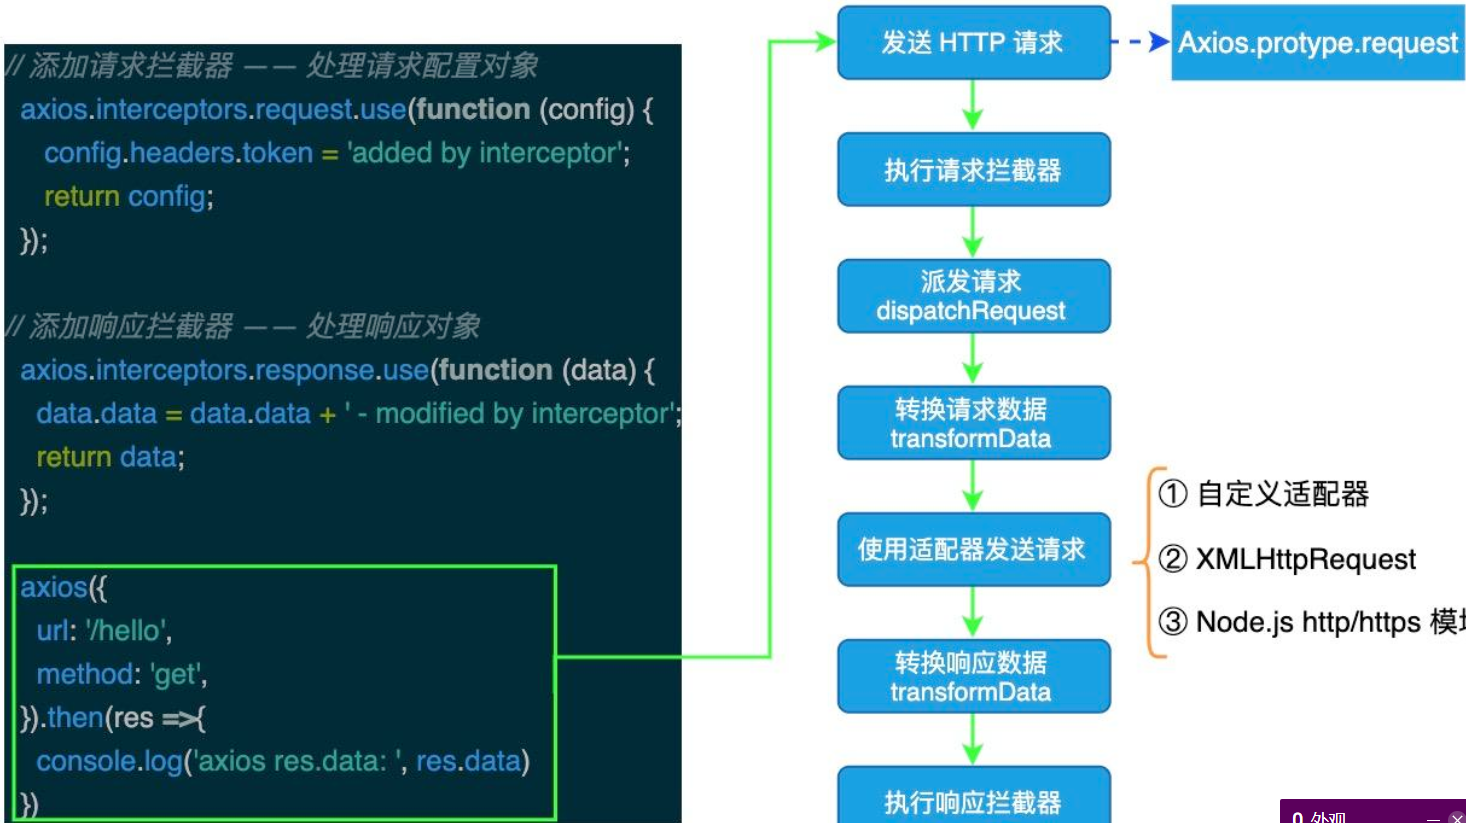
对 MockAdapter 感兴趣的小伙伴,可以自行了解一下 axios-mock-adapter (opens new window) 这个库。到这里我们已经介绍了 Axios 的拦截器与适配器,下面用一张图来总结一下 Axios 使用请求拦截器和响应拦截器后,请求的处理流程:
# 实现取消重复请求
# 实现
Axios (opens new window) 是一个基于 Promise 的 HTTP 客户端,同时支持浏览器和 Node.js 环境。它是一个优秀的 HTTP 客户端,被广泛地应用在大量的 Web 项目中。对于浏览器环境来说,Axios 底层是利用 XMLHttpRequest (opens new window) 对象来发起 HTTP 请求。如果要取消请求的话,我们可以通过调用 XMLHttpRequest (opens new window) 对象上的 abort 方法来取消请求:
let xhr = new XMLHttpRequest();
xhr.open("GET", "https://developer.mozilla.org/", true);
xhr.send();
setTimeout(() => xhr.abort(), 300);
2
3
4
而对于 Axios 来说,我们可以通过 Axios 内部提供的 CancelToken 来取消请求:
const CancelToken = axios.CancelToken;
const source = CancelToken.source();

axios.post('/user/12345', {
  name: 'samy'
}, {
  cancelToken: source.token
})
source.cancel('Operation canceled by the user.'); // 取消请求,参数是可选的
2
3
4
5
6
7
8
9
此外,你也可以通过调用 CancelToken 的构造函数来创建 CancelToken,具体如下所示:
const CancelToken = axios.CancelToken;
let cancel;

axios.get('/user/12345', {
  cancelToken: new CancelToken(function executor(c) {
    cancel = c;
  })
});

cancel(); // 取消请求
2
3
4
5
6
7
8
9
10
# 取消总体流程
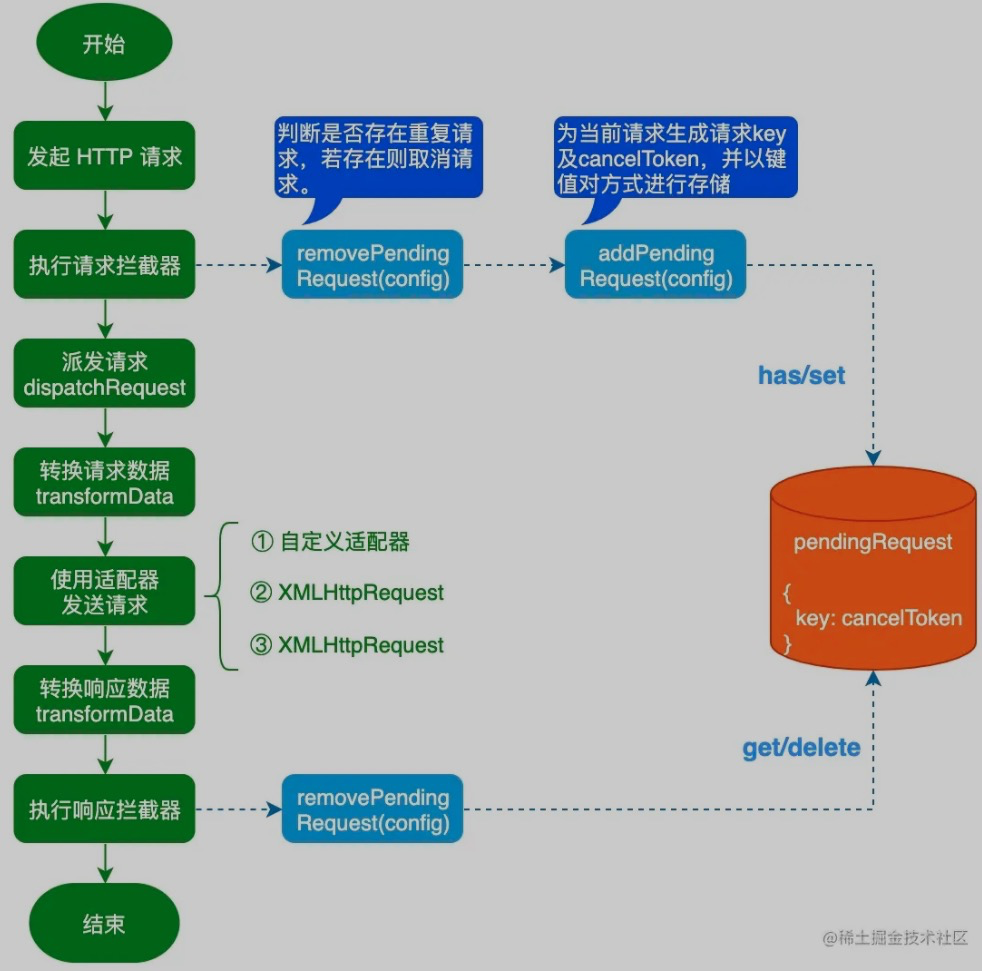
# CancelToken工作原理
在前面的示例中,我们是通过调用 CancelToken 构造函数来创建 CancelToken 对象:
new axios.CancelToken((cancel) => {
  if (!pendingRequest.has(requestKey)) {
    pendingRequest.set(requestKey, cancel);
  }
})
2
3
4
5
所以接下来,我们来分析 CancelToken 构造函数,该函数被定义在 lib/cancel/CancelToken.js 文件中:
// lib/cancel/CancelToken.js
function CancelToken(executor) {
  if (typeof executor !== 'function') {
    throw new TypeError('executor must be a function.');
  }

  var resolvePromise;
  this.promise = new Promise(function promiseExecutor(resolve) {
    resolvePromise = resolve;
  });

  var token = this;
  executor(function cancel(message) { // 设置cancel对象
    if (token.reason) {
      return; // Cancellation has already been requested
    }
    token.reason = new Cancel(message);
    resolvePromise(token.reason);
  });
}
2
3
4
5
6
7
8
9
10
11
12
13
14
15
16
17
18
19
20
由以上代码可知,cancel 对象是一个函数,当我们调用该函数后,会创建 Cancel 对象并调用 resolvePromise 方法。该方法执行后,CancelToken 对象上 promise 属性所指向的 promise 对象的状态将变为 resolved。那么这样做的目的是什么呢?这里我们从 lib/adapters/xhr.js 文件中找到了答案:
// lib/adapters/xhr.js
if (config.cancelToken) {
  config.cancelToken.promise.then(function onCanceled(cancel) {
    if (!request) { return; }
    request.abort(); // 取消请求
    reject(cancel);
    request = null;
  });
}
2
3
4
5
6
7
8
9
看完上述的内容,可能有的小伙伴还不是很能理解 CancelToken 的工作原理,所以又画了一张图来帮助大家理解 CancelToken 的工作原理:
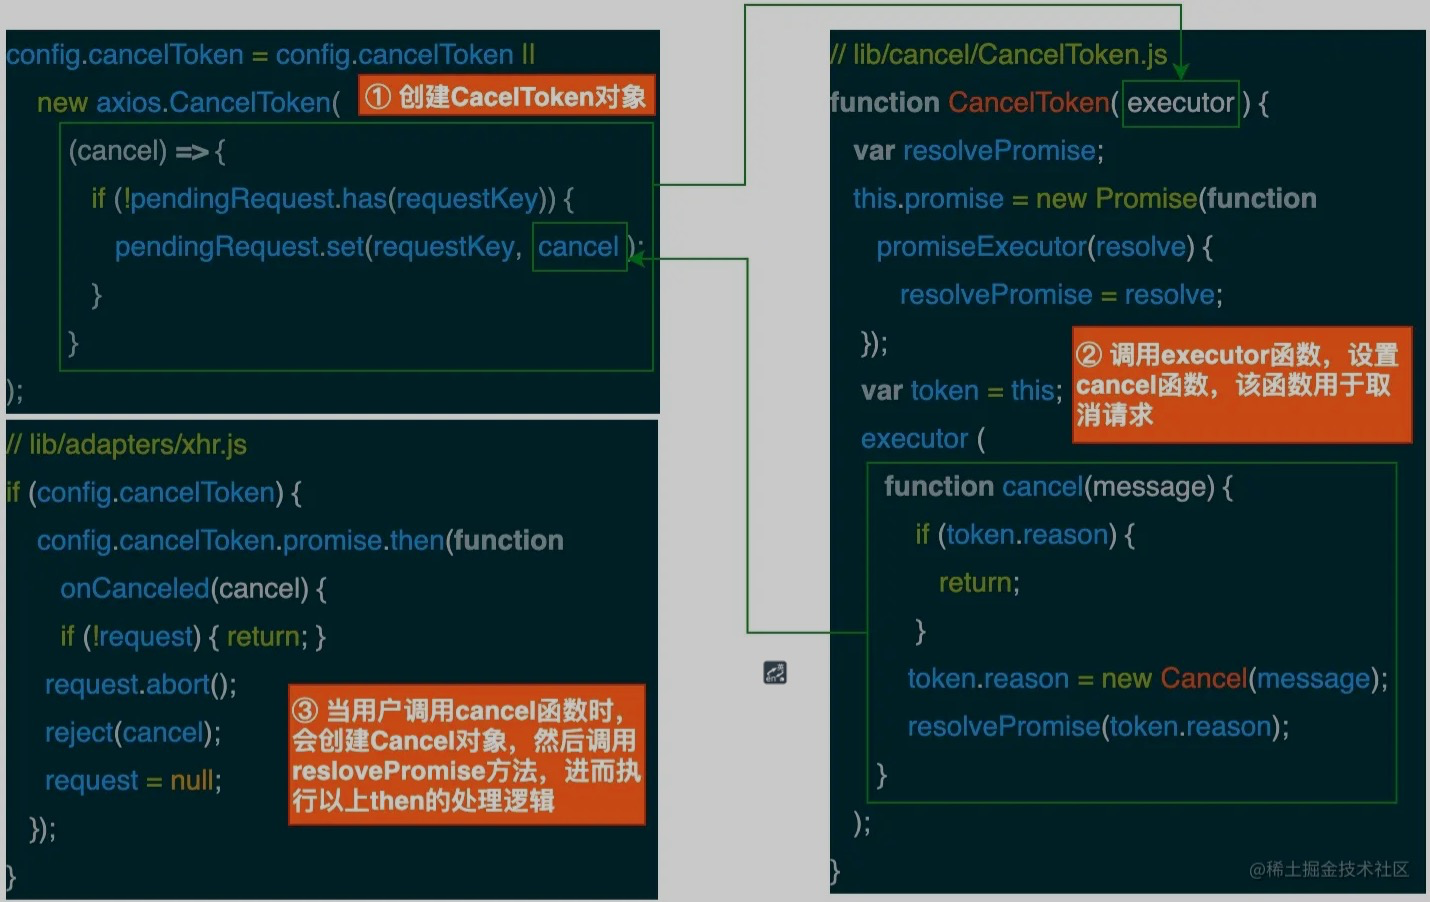
# 分析判断重复请求
当请求方式、请求 URL 地址和请求参数都一样时,我们就可以认为请求是一样的。因此在每次发起请求时,我们就可以根据当前请求的请求方式、请求 URL 地址和请求参数来生成一个唯一的 key,同时为每个请求创建一个专属的 CancelToken,然后把 key 和 cancel 函数以键值对的形式保存到 Map 对象中,使用 Map 的好处是可以快速的判断是否有重复的请求:
import qs from 'qs'

const pendingRequest = new Map();
// GET -> params;POST -> data
const requestKey = [method, url, qs.stringify(params), qs.stringify(data)].join('&');
const cancelToken = new CancelToken(function executor(cancel) {
  if(!pendingRequest.has(requestKey)){
    pendingRequest.set(requestKey, cancel);
  }
})
2
3
4
5
6
7
8
9
10
当出现重复请求的时候,我们就可以使用 cancel 函数来取消前面已经发出的请求,在取消请求之后,我们还需要把取消的请求从 pendingRequest 中移除。
# 分析取消重复请求【要点】
因为我们需要对所有的请求都进行处理,所以我们**可以考虑使用 Axios 的拦截器机制来实现取消重复请求的功能。**Axios 为开发者提供了请求拦截器和响应拦截器,它们的作用如下:
- 请求拦截器:该类拦截器的作用是在请求发送前统一执行某些操作,比如在请求头中添加 token 字段。
- 响应拦截器:该类拦截器的作用是在接收到服务器响应后统一执行某些操作,比如发现响应状态码为 401 时,自动跳转到登录页。
# 定义辅助函数
在配置请求拦截器和响应拦截器前,先来定义 3 个辅助函数:
generateReqKey:用于根据当前请求的信息,生成请求 Key;
function generateReqKey(config) {
  const { method, url, params, data } = config;
  return [method, url, Qs.stringify(params), Qs.stringify(data)].join("&");
}
2
3
4
addPendingRequest:用于把当前请求信息添加到pendingRequest对象中;
const pendingRequest = new Map();
function addPendingRequest(config) {
  const requestKey = generateReqKey(config);
  config.cancelToken = config.cancelToken || new axios.CancelToken((cancel) => {
    if (!pendingRequest.has(requestKey)) {
       pendingRequest.set(requestKey, cancel); //把cancel存储起来;在remove时调用;
    }
  });
}
2
3
4
5
6
7
8
9
removePendingRequest:检查是否存在重复请求,若存在则取消已发的请求。
function removePendingRequest(config) {
  const requestKey = generateReqKey(config);
  if (pendingRequest.has(requestKey)) {
     const cancelToken = pendingRequest.get(requestKey);
     cancelToken(); //cancelToken(requestKey);
     pendingRequest.delete(requestKey);
  }
}
2
3
4
5
6
7
8
创建好 generateReqKey、addPendingRequest 和 removePendingRequest 函数之后,我们就可以设置请求拦截器和响应拦截器了。
# 设置请求拦截器
- removePendingRequest
- addPendingRequest
axios.interceptors.request.use(
  function (config) {
    removePendingRequest(config); // 检查是否存在重复请求,若存在则取消已发的请求
    addPendingRequest(config); // 把当前请求信息添加到pendingRequest对象中
    return config;
  },
  (error) => {
     return Promise.reject(error);
  }
);
2
3
4
5
6
7
8
9
10
# 设置响应拦截器
axios.interceptors.response.use(
  (response) => {
     removePendingRequest(response.config); // 从pendingRequest对象中移除请求
     return response;
   },
   (error) => {
      removePendingRequest(error.config || {}); // 从pendingRequest对象中移除请求
      if (axios.isCancel(error)) {
        console.log("已取消的重复请求:" + error.message);
      } else {
        // 添加异常处理
      }
      return Promise.reject(error);
   }
);
2
3
4
5
6
7
8
9
10
11
12
13
14
15
# 完整案例
<!DOCTYPE html>
<html lang="zh-cn">
  <head>
    <meta charset="UTF-8" />
    <meta http-equiv="X-UA-Compatible" content="IE=edge" />
    <meta name="viewport" content="width=device-width, initial-scale=1.0" />
    <title>Axios 取消重复请求示例</title>
    <script src="https://cdn.bootcdn.net/ajax/libs/qs/6.9.6/qs.min.js"></script>
    <script src="https://cdn.bootcdn.net/ajax/libs/axios/0.21.1/axios.min.js"></script>
  </head>
  <body>
    <h3>Axios 取消重复请求示例</h3>
    <button onclick="sendRequest()">发起请求</button>
    <script>
      const pendingRequest = new Map();

      function generateReqKey(config) {
        const { method, url, params, data } = config;
        return [method, url, Qs.stringify(params), Qs.stringify(data)].join(
          "&"
        );
      }

      function addPendingRequest(config) {
        const requestKey = generateReqKey(config);
        config.cancelToken =
          config.cancelToken ||
          new axios.CancelToken((cancel) => {
            if (!pendingRequest.has(requestKey)) {
              pendingRequest.set(requestKey, cancel);
            }
          });
      }

      function removePendingRequest(config) {
        const requestKey = generateReqKey(config);
        if (pendingRequest.has(requestKey)) {
          const cancel = pendingRequest.get(requestKey);
          cancel(requestKey);
          pendingRequest.delete(requestKey);
        }
      }

      axios.interceptors.request.use(
        function (config) {
          removePendingRequest(config); // 检查是否存在重复请求,若存在则取消已发的请求
          addPendingRequest(config); // 把当前请求添加到pendingRequest对象中
          return config;
        },
        (error) => {
          return Promise.reject(error);
        }
      );

      axios.interceptors.response.use(
        (response) => {
          removePendingRequest(response.config); // 从pendingRequest对象中移除请求
          return response;
        },
        (error) => {
          removePendingRequest(error.config || {}); // 从pendingRequest对象中移除请求
          if (axios.isCancel(error)) {
            console.log("已取消的重复请求:" + error.message);
          } else {
            // 添加异常处理
          }
          return Promise.reject(error);
        }
      );

      async function sendRequest() {
        console.dir(pendingRequest);
        const response = await axios.get(
          "https://jsonplaceholder.typicode.com/todos/1"
          //   "https://localhost:3000/todos/1"
        );
        console.log(response.data);
      }
    </script>
  </body>
</html>
2
3
4
5
6
7
8
9
10
11
12
13
14
15
16
17
18
19
20
21
22
23
24
25
26
27
28
29
30
31
32
33
34
35
36
37
38
39
40
41
42
43
44
45
46
47
48
49
50
51
52
53
54
55
56
57
58
59
60
61
62
63
64
65
66
67
68
69
70
71
72
73
74
75
76
77
78
79
80
81
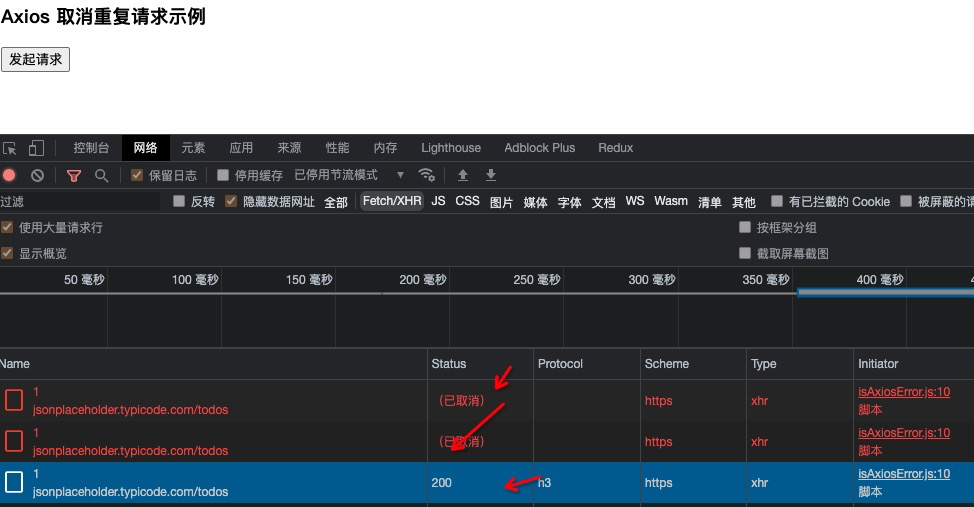
# 实现缓存请求数据
# 流程
上图中蓝色部分的工作流程,就是本文的重点;
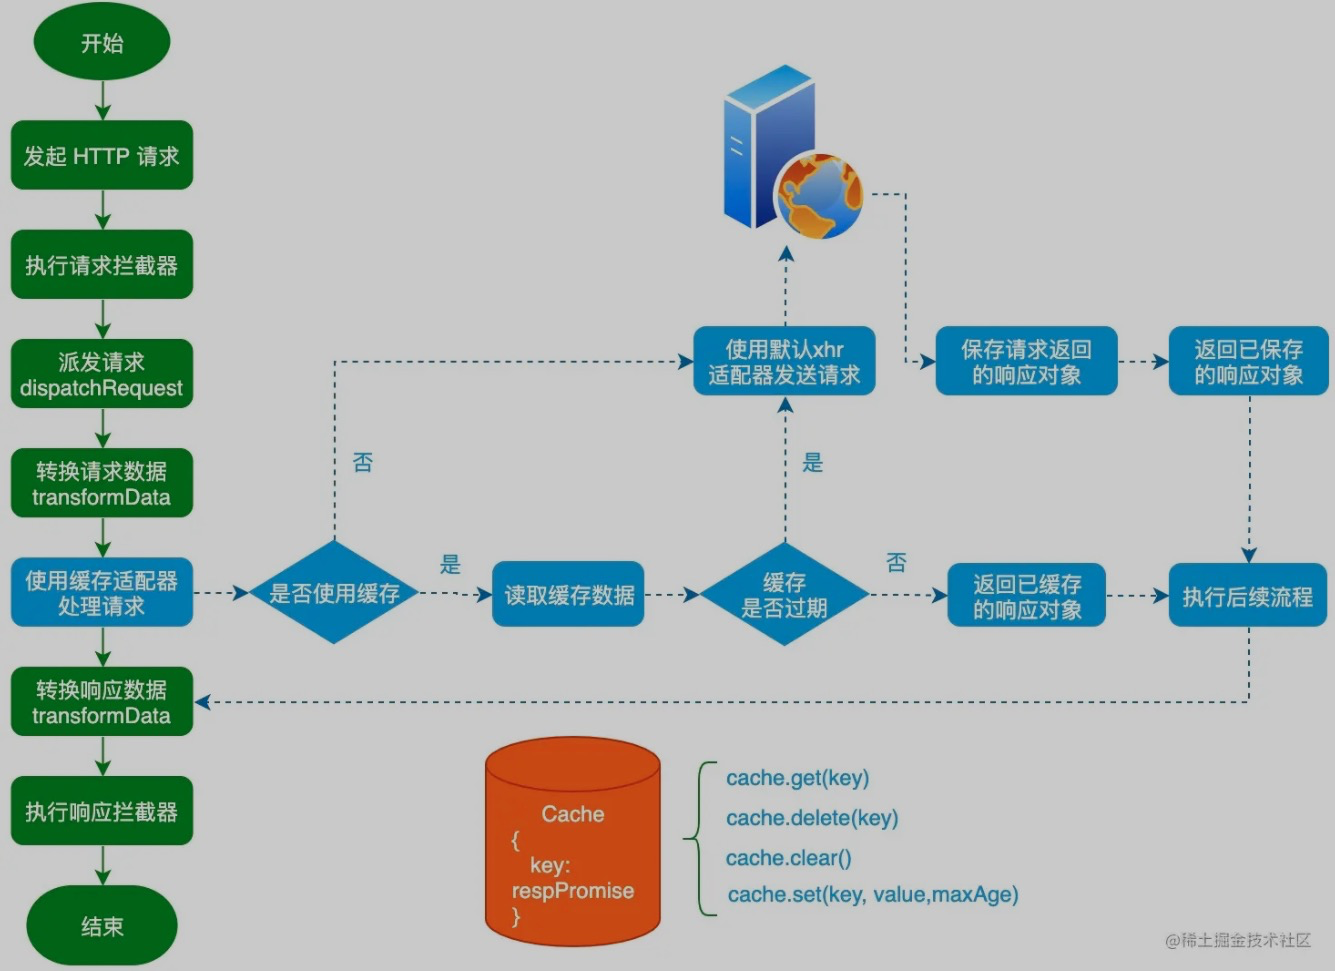
设计缓存的 API:
- get(key):从缓存中获取指定
key对应的值; - delete(key):从缓存中删除指定
key对应的值; - clear():清空已缓存的数据;
- set(key, value, maxAge):保存键值对,同时支持设置缓存的最大时间,即
maxAge单位为毫秒。
基于上述的缓存 API,我们可以实现一个简单的缓存功能,具体代码如下所示:
const MemoryCache = {
  data: {},
  set(key, value, maxAge) { // 保存数据
    this.data[key] = {
      maxAge: maxAge || 0,
      value,
      now: Date.now(),
     };
  },
  get(key) { // 从缓存中获取指定 key 对应的值。
    const cachedItem = this.data[key];
    if (!cachedItem) return null;
    const isExpired = Date.now() - cachedItem.now > cachedItem.maxAge;
    isExpired && this.delete(key);
    return isExpired ? null : cachedItem.value;
  },
  delete(key) { // 从缓存中删除指定 key 对应的值。
    return delete this.data[key];
  },
  clear() { // 清空已缓存的数据。
    this.data = {};
  },
};
2
3
4
5
6
7
8
9
10
11
12
13
14
15
16
17
18
19
20
21
22
23
其实除了自定义缓存对象之外,你也可以使用成熟的第三方库,比如 lru-cache (opens new window)。
LRU 缓存淘汰算法就是一种常用策略。LRU 的全称是 Least Recently Used,也就是说我们认为最近使用过的数据应该是是「有用的」,很久都没用过的数据应该是无用的,内存满了就优先删那些很久没用过的数据。
# 增强默认适配器
# 引入
Axios 引入了适配器,使得它可以同时支持浏览器和 Node.js 环境。对于浏览器环境来说,它通过封装 XMLHttpRequest API 来发送 HTTP 请求,而对于 Node.js 环境来说,它通过封装 Node.js 内置的 http 和 https 模块来发送 HTTP 请求。
# 内部原理
在介绍如何增强默认适配器之前,我们先来回顾一下 Axios 完整请求的流程:
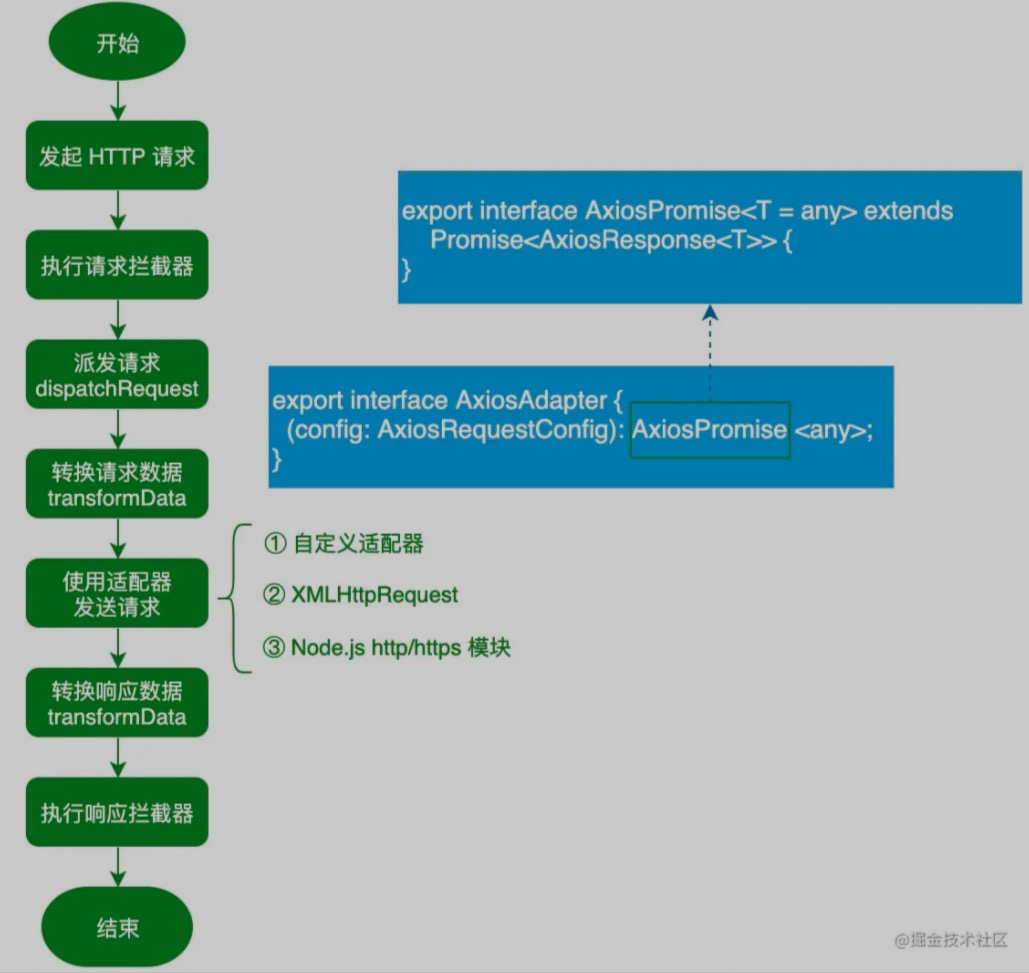
了解完 Axios 完整请求的流程之后,我们再来看一下 Axios 内置的 xhrAdapter 适配器,它被定义在 lib/adapters/xhr.js 文件中:
// lib/adapters/xhr.js
module.exports = function xhrAdapter(config) {
  return new Promise(function dispatchXhrRequest(resolve, reject) {
    var requestData = config.data;
    var requestHeaders = config.headers;

    var request = new XMLHttpRequest();
    // 省略大部分代码
    var fullPath = buildFullPath(config.baseURL, config.url);
    request.open(config.method.toUpperCase(), buildURL(fullPath, config.params, config.paramsSerializer), true);
    // Set the request timeout in MS
    request.timeout = config.timeout;

    // Listen for ready state
    request.onreadystatechange = function handleLoad() { ... }

    // Send the request
    request.send(requestData);
  });
};
2
3
4
5
6
7
8
9
10
11
12
13
14
15
16
17
18
19
20
很明显 xhrAdapter 适配器是一个函数对象,它接收一个 config 参数并返回一个 Promise 对象。而在 xhrAdapter 适配器内部,最终会使用 XMLHttpRequest API 来发送 HTTP 请求。为了实现缓存请求数据的功能,我们就可以考虑通过高阶函数来增强 xhrAdapter 适配器的功能。
# 实现方案
定义 generateReqKey 函数
在增强 xhrAdapter 适配器之前,我们先来定义一个 generateReqKey 函数,该函数用于根据当前请求的信息,生成请求 Key;
function generateReqKey(config) {
  const { method, url, params, data } = config;
  return [method, url, Qs.stringify(params), Qs.stringify(data)].join("&");
}
2
3
4
通过 generateReqKey 函数生成的请求 key,将作为缓存项的 key,而对应的 value 就是默认 xhrAdapter 适配器返回的 Promise 对象。
定义 isCacheLike 函数
isCacheLike 函数用于判断传入的 cache 参数是否实现了前面定义的 Cache API,利用该函数,我们允许用户为每个请求自定义 Cache 对象。
function isCacheLike(cache) {
	return !!(cache.set && cache.get && cache.delete && cache.clear
		&& typeof cache.get === 'function' && typeof cache.set === 'function'
    && typeof cache.delete === 'function' && typeof cache.clear === 'function'
  );
}
2
3
4
5
6
# 定义cacheAdapterEnhancer 函数
为了让用户能够更灵活地控制数据缓存的功能,我们定义了一个 cacheAdapterEnhancer 函数,该函数支持两个参数:
- adapter:预增强的 Axios 适配器对象;
- options:缓存配置对象,该对象支持 4 个属性,分别用于配置不同的功能:
- maxAge:全局设置缓存的最大时间;
- enabledByDefault:是否启用缓存,默认为 true;
- cacheFlag:缓存标志,用于配置请求 config 对象上的缓存属性;
- defaultCache:用于设置使用的缓存对象。
了解完 cacheAdapterEnhancer 函数的参数之后,我们来看一下该函数的具体实现:
function cacheAdapterEnhancer(adapter, options) {
  const { maxAge, enabledByDefault = true,
    cacheFlag = "cache", defaultCache = MemoryCache,
  } = options;

  return (config) => {
    const { url, method, params, forceUpdate } = config;
    let useCache = config[cacheFlag] !== undefined && config[cacheFlag] !== null
        ? config[cacheFlag]
        : enabledByDefault;
      if (method === "get" && useCache) {
        const cache = isCacheLike(useCache) ? useCache : defaultCache;
        let requestKey = generateReqKey(config);  // 生成请求Key
        let responsePromise = cache.get(requestKey); // 从缓存中获取请求key对应的响应对象
        if (!responsePromise || forceUpdate) { // 缓存未命中/失效或强制更新时,则重新请求数据
           responsePromise = (async () => {
             try {
               return await adapter(config);  // 使用默认的xhrAdapter发送请求
             } catch (reason) {
                 cache.delete(requestKey);
                 throw reason;
                }
           })();
           cache.set(requestKey, responsePromise, maxAge);  // 保存请求返回的响应对象
           return responsePromise; // 返回已保存的响应对象
       }
       return responsePromise;
     }
     return adapter(config); // 使用默认的xhrAdapter发送请求
   };
}
2
3
4
5
6
7
8
9
10
11
12
13
14
15
16
17
18
19
20
21
22
23
24
25
26
27
28
29
30
31
以上的代码并不会复杂,核心的处理逻辑如下图所示:
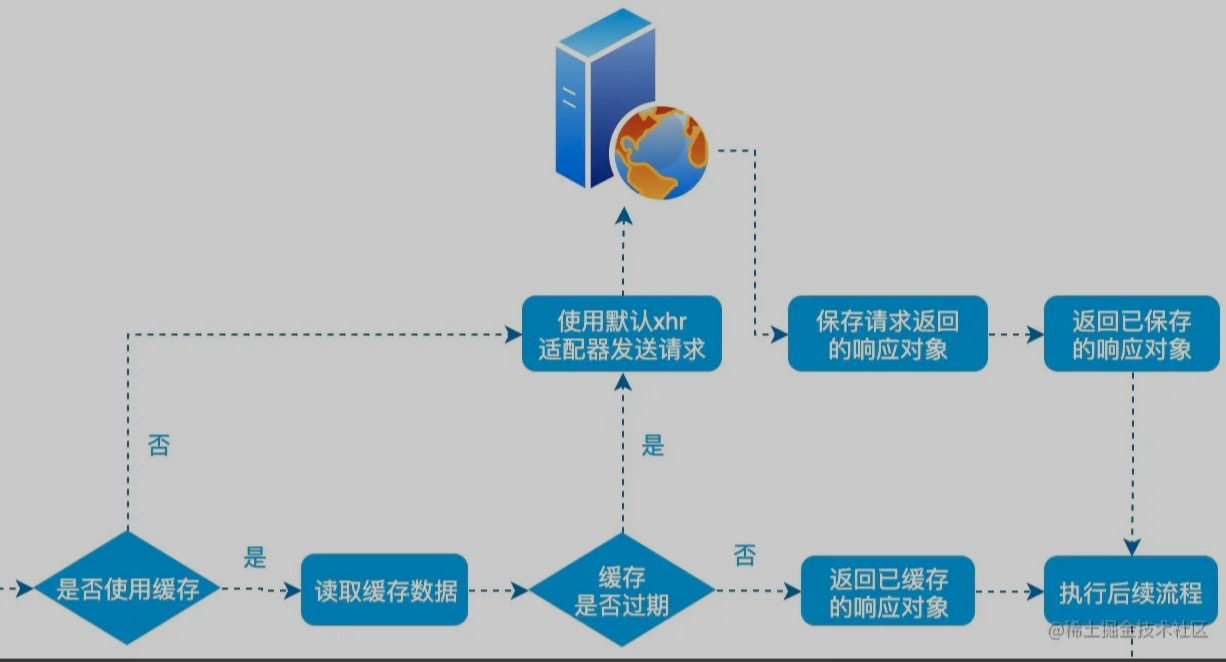
# 使用cacheAdapterEnhancer 函数
创建 Axios 对象并配置 adapter 选项
const http = axios.create({
  baseURL: "https://jsonplaceholder.typicode.com",
  adapter: cacheAdapterEnhancer(axios.defaults.adapter, {
    enabledByDefault: false, // 默认禁用缓存
    maxAge: 5000, // 缓存时间为5s
  }),
});
2
3
4
5
6
7
使用 http 对象发送请求
// 使用缓存
async function requestWithCache() {
  const response = await http.get("/todos/1", { cache: true });
  console.dir(response);
}

// 不使用缓存
async function requestWithoutCache() {
  const response = await http.get("/todos/1", { cache: false });
  console.dir(response);
}
2
3
4
5
6
7
8
9
10
11
其实 cache 属性除了支持布尔值之外,我们可以配置实现 Cache API 的缓存对象,具体的使用示例如下所示:
const customCache = { get() {/*...*/}, set() {/*...*/}, delete() {/*...*/}, clear() {/*...*/}};

async function requestForceUpdate() {
  const response = await http.get("/todos/1", {
    cache: customCache,
    forceUpdate: true,
  });
  console.dir(response);
}
2
3
4
5
6
7
8
9
好了,如何通过增强 xhrAdapter 适配器来实现 Axios 缓存请求数据的功能已经介绍完了。由于完整的示例代码内容比较多,就不放具体的代码了。感兴趣的小伙伴,可以访问以下地址浏览示例代码。
# 完整示范
<!DOCTYPE html>
<html lang="zh-cn">
  <head>
    <meta charset="UTF-8" />
    <meta http-equiv="X-UA-Compatible" content="IE=edge" />
    <meta name="viewport" content="width=device-width, initial-scale=1.0" />
    <title>Axios 缓存请求数据示例</title>
    <script src="https://cdn.bootcdn.net/ajax/libs/qs/6.9.6/qs.min.js"></script>
    <script src="https://cdn.bootcdn.net/ajax/libs/axios/0.21.1/axios.min.js"></script>
  </head>
  <body>
    <h3>Axios 缓存请求数据示例</h3>
    <button onclick="requestWithCache()">使用缓存</button>
    <button onclick="requestWithoutCache()">不使用缓存</button>
    <script>
      const MemoryCache = {
        data: {},
        set(key, value, maxAge) {
          this.data[key] = {
            maxAge: maxAge || 0,
            value,
            now: Date.now(),
          };
        },
        get(key) {
          const cachedItem = this.data[key];
          if (!cachedItem) return null;
          const isExpired = Date.now() - cachedItem.now > cachedItem.maxAge;
          isExpired && this.delete(key);
          return isExpired ? null : cachedItem.value;
        },
        delete(key) {
          return delete this.data[key];
        },
        clear() {
          this.data = {};
        },
      };

      function generateReqKey(config) {
        const { method, url, params, data } = config;
        return [method, url, Qs.stringify(params), Qs.stringify(data)].join(
          "&"
        );
      }

      function isCacheLike(cache) {
        return !!(
          cache.set &&
          cache.get &&
          cache.delete &&
          cache.clear &&
          typeof cache.get === "function" &&
          typeof cache.set === "function" &&
          typeof cache.delete === "function" &&
          typeof cache.clear === "function"
        );
      }

      function cacheAdapterEnhancer(adapter, options) {
        const {
          maxAge,
          enabledByDefault = true,
          cacheFlag = "cache",
          defaultCache = MemoryCache,
        } = options;
        return (config) => {
          const { url, method, params, forceUpdate } = config;
          let useCache =
            config[cacheFlag] !== undefined && config[cacheFlag] !== null
              ? config[cacheFlag]
              : enabledByDefault;
          if (method === "get" && useCache) {
            const cache = isCacheLike(useCache) ? useCache : defaultCache;
            let requestKey = generateReqKey(config);
            let responsePromise = cache.get(requestKey);
            if (!responsePromise || forceUpdate) {
              responsePromise = (async () => {
                try {
                  return await adapter(config);
                } catch (reason) {
                  cache.delete(requestKey);
                  throw reason;
                }
              })();
              cache.set(requestKey, responsePromise, maxAge);
              return responsePromise;
            }
            return responsePromise;
          }
          return adapter(config);
        };
      }

      const http = axios.create({
        baseURL: "https://jsonplaceholder.typicode.com",
        adapter: cacheAdapterEnhancer(axios.defaults.adapter, {
          enabledByDefault: false,
          maxAge: 5000, //设置5s内有效
        }),
      });

      async function requestWithCache() {
        const response = await http.get("/todos/1", { cache: true });
        console.dir(response);
      }

      async function requestWithoutCache() {
        const response = await http.get("/todos/1", { cache: false });
        console.dir(response);
      }
    </script>
  </body>
</html>
2
3
4
5
6
7
8
9
10
11
12
13
14
15
16
17
18
19
20
21
22
23
24
25
26
27
28
29
30
31
32
33
34
35
36
37
38
39
40
41
42
43
44
45
46
47
48
49
50
51
52
53
54
55
56
57
58
59
60
61
62
63
64
65
66
67
68
69
70
71
72
73
74
75
76
77
78
79
80
81
82
83
84
85
86
87
88
89
90
91
92
93
94
95
96
97
98
99
100
101
102
103
104
105
106
107
108
109
110
111
112
113
114
# 实现请求重试
# 请求重试的方案
Axios 提供了 请求拦截器和响应拦截器 来分别处理请求和响应,它们的作用如下:
- 请求拦截器:该类拦截器的作用是在请求发送前统一执行某些操作,比如在请求头中添加 token 字段。
- 响应拦截器:该类拦截器的作用是在接收到服务器响应后统一执行某些操作,比如发现响应状态码为 401 时,自动跳转到登录页。
在 Axios 中设置拦截器很简单,通过 axios.interceptors.request 和 axios.interceptors.response 对象提供的 use 方法,就可以分别设置请求拦截器和响应拦截器:
export interface AxiosInstance {
  interceptors: {
    request: AxiosInterceptorManager<AxiosRequestConfig>;
    response: AxiosInterceptorManager<AxiosResponse>;
  };
}

export interface AxiosInterceptorManager<V> {
  use(onFulfilled?: (value: V) => V | Promise<V>,
    onRejected?: (error: any) => any): number;
  eject(id: number): void;
}
2
3
4
5
6
7
8
9
10
11
12
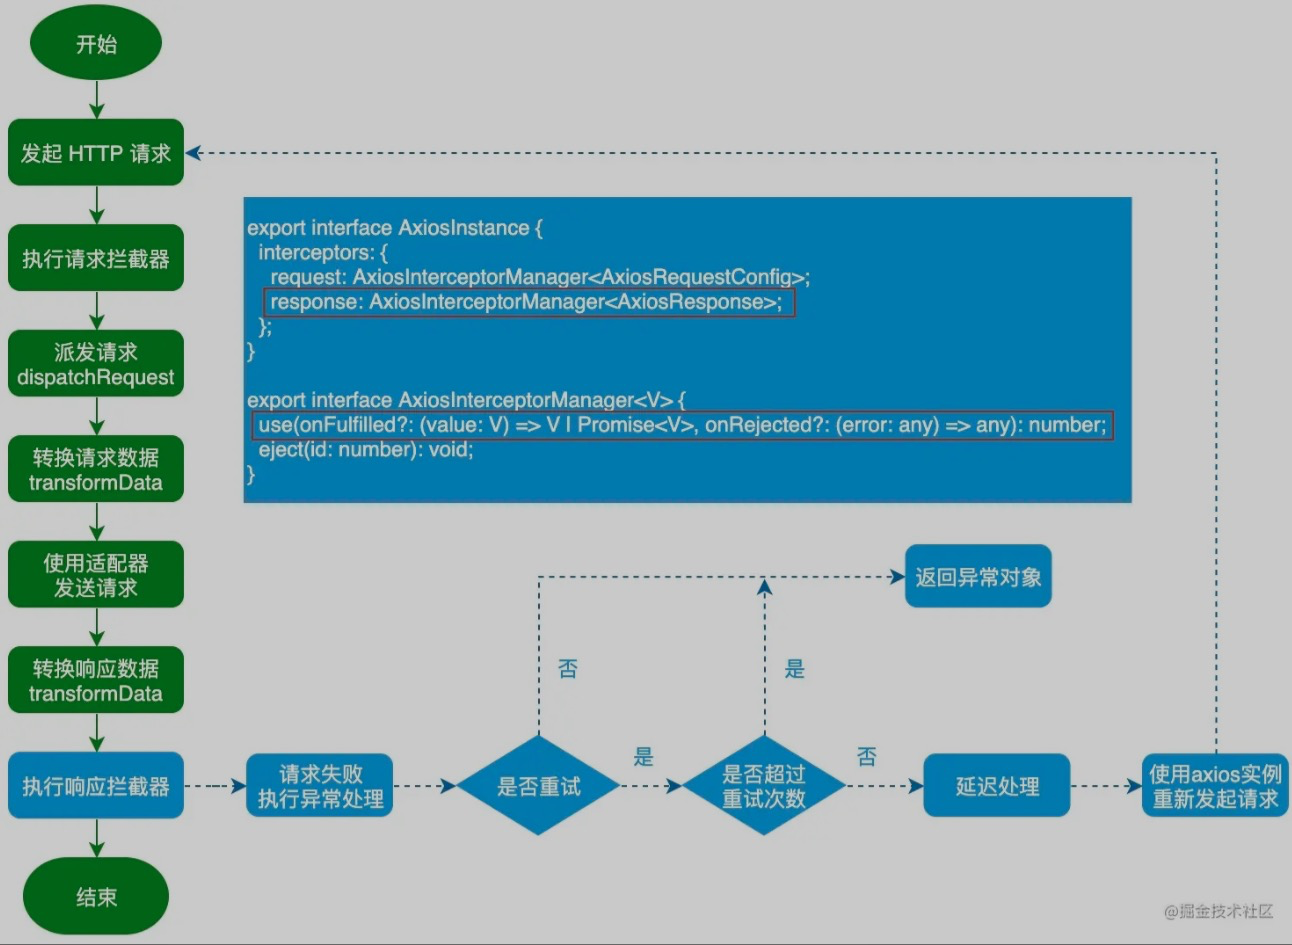
对于请求重试的功能来说,我们希望让用户不仅能够设置重试次数,而且可以设置重试延时时间。当请求失败的时候,若该请求的配置对象配置了重试次数,而 Axios 就会重新发起请求进行重试操作。为了能够全局进行请求重试,接下来我们在响应拦截器上来实现请求重试功能,具体代码如下所示:
axios.interceptors.response.use(null, (err) => {
  let config = err.config;
  if (!config || !config.retryTimes) return Promise.reject(err);
  const { __retryCount = 0, retryDelay = 300, retryTimes } = config;
  // 在请求对象上设置重试次数
  config.__retryCount = __retryCount;
  // 判断是否超过了重试次数
  if (__retryCount >= retryTimes) {
    return Promise.reject(err);
  }
  // 增加重试次数
  config.__retryCount++;
  // 延时处理
  const delay = new Promise((resolve) => {
    setTimeout(() => {
      resolve();
    }, retryDelay);
  });
  // 重新发起请求
  return delay.then(function () {
    return axios(config);
  });
});
2
3
4
5
6
7
8
9
10
11
12
13
14
15
16
17
18
19
20
21
22
23
以上的代码并不会复杂,对应的处理流程如下图所示:
# 实现重试的方案
Axios 引入了适配器,使得它可以同时支持浏览器和 Node.js 环境。对于浏览器环境来说,它通过封装 XMLHttpRequest API 来发送 HTTP 请求,而对于 Node.js 环境来说,它通过封装 Node.js 内置的 http 和 https 模块来发送 HTTP 请求。
通过增强默认的 Axios 适配器,来实现缓存请求数据的功能。同样,采用类似的思路,我们也可以通过增强默认的 Axios 适配器来实现请求重试的功能。详见上面的缓存请求数据中的[增强默认适配器]
# 定义retryAdapterEnhancer 函数
为了让用户能够更灵活地控制请求重试的功能,我们定义了一个 retryAdapterEnhancer 函数,该函数支持两个参数:
- adapter:预增强的 Axios 适配器对象;
- options:缓存配置对象,该对象支持 2 个属性,分别用于配置不同的功能:
- times:全局设置请求重试的次数;
- delay:全局设置请求延迟的时间,单位是 ms。
了解完 retryAdapterEnhancer 函数的参数之后,我们来看一下该函数的具体实现:
function retryAdapterEnhancer(adapter, options) {
  const { times = 0, delay = 300 } = options;

  return async (config) => {
    const { retryTimes = times, retryDelay = delay } = config;
    let __retryCount = 0;
    const request = async () => {
      try {
        return await adapter(config);
      } catch (err) {
        // 判断是否进行重试
        if (!retryTimes || __retryCount >= retryTimes) {
          return Promise.reject(err);
        }
        __retryCount++; // 增加重试次数
        // 延时处理
        const delay = new Promise((resolve) => {
          setTimeout(() => {
            resolve();
          }, retryDelay);
         });
         // 重新发起请求
         return delay.then(() => {
           return request();
         });
        }
      };
   return request();
  };
}
2
3
4
5
6
7
8
9
10
11
12
13
14
15
16
17
18
19
20
21
22
23
24
25
26
27
28
29
30
以上的代码并不会复杂,核心的处理逻辑如下图所示:

# 使用retryAdapterEnhancer 函数
创建 Axios 对象并配置 adapter 选项
const http = axios.create({
  baseURL: "http://localhost:3000/",
  adapter: retryAdapterEnhancer(axios.defaults.adapter, {
    retryDelay: 1000,
  }),
});
2
3
4
5
6
使用 http 对象发送请求
// 请求失败不重试
function requestWithoutRetry() {
  http.get("/users");
}

// 请求失败重试
function requestWithRetry() {
  http.get("/users", { retryTimes: 2 }); //这里总的调用了三次
}
2
3
4
5
6
7
8
9
好了,如何通过增强 xhrAdapter 适配器来实现 Axios 请求重试的功能已经介绍完了。由于完整的示例代码内容比较多,就不放具体的代码了。感兴趣的小伙伴,可以访问以下地址浏览示例代码。
# 完整案例
<!DOCTYPE html>
<html lang="zh-cn">
  <head>
    <meta charset="UTF-8" />
    <meta http-equiv="X-UA-Compatible" content="IE=edge" />
    <meta name="viewport" content="width=device-width, initial-scale=1.0" />
    <title>Axios 请求重试示例(适配器)</title>
    <script src="https://cdn.bootcdn.net/ajax/libs/axios/0.21.1/axios.min.js"></script>
  </head>
  <body>
    <h3>Axios 请求重试示例(适配器)</h3>
    <button onclick="requestWithoutRetry()">请求失败不重试</button>
    <button onclick="requestWithRetry()">请求失败重试</button>
    <script>
      function retryAdapterEnhancer(adapter, options) {
        const { times = 0, delay = 300 } = options;
        return async (config) => {
          const { retryTimes = times, retryDelay = delay } = config;
          let __retryCount = 0;
          const request = async () => {
            try {
              return await adapter(config);
            } catch (err) {
              if (!retryTimes || __retryCount >= retryTimes) {
                return Promise.reject(err);
              }
              __retryCount++;
              // 延时处理
              const delay = new Promise((resolve) => {
                setTimeout(() => {
                  resolve();
                }, retryDelay);
              });
              // 重新发起请求
              return delay.then(() => {
                return request();
              });
            }
          };
          return request();
        };
      }

      const http = axios.create({
        baseURL: "http://localhost:3000/",
        adapter: retryAdapterEnhancer(axios.defaults.adapter, {
          retryDelay: 1000,
        }),
      });

      function requestWithoutRetry() {
        http.get("/users");
      }

      function requestWithRetry() {
        http.get("/users", { retryTimes: 2 });//这里总的调用了三次
      }
    </script>
  </body>
</html>
2
3
4
5
6
7
8
9
10
11
12
13
14
15
16
17
18
19
20
21
22
23
24
25
26
27
28
29
30
31
32
33
34
35
36
37
38
39
40
41
42
43
44
45
46
47
48
49
50
51
52
53
54
55
56
57
58
59
60
# 限制并发请求【要点】
# 背景
假设有一种场景,用户需要同时上传1000张图片,每张图片都需要单独发送post请求,但是浏览器或服务器会对并发请求数进行限制,如果前端一次发送的请求超出限制可能会报错。所以需要对前端并发请求数进行限制。这里把异步任务封装成Promise。
# 流程
- 调用器,将异步任务函数和它的参数传入;
- 任务队列的消费区,利用Promise的finally方法,在异步任务结束后,取出下一个任务执行;
# 实现
/**
 * 封装axios并发请求数
 */
export default class LimitPromise {
  private _max: number;
  private _count: number;
  private _taskQueue: any[];

  constructor(max: number) {
    // 异步任务“并发”上限
    this._max = max || 6;
    // 当前正在执行的任务数量
    this._count = 0;
    // 等待执行的任务队列
    this._taskQueue = [];
  }

  /**
   * 调用器,将异步任务函数和它的参数传入
   * @param caller 异步任务函数,它必须是async函数或者返回Promise的函数
   * @param args 异步任务函数的参数列表
   * @returns {Promise<unknown>} 返回一个Promise
   */
  call(caller: (...arg: any[]) => any) {
    return new Promise((resolve, reject) => {
      const task = this._createTask(caller, resolve, reject);
      if (this._count >= this._max) {
        this._taskQueue.push(task);
      } else {
        task();
      }
    });
  }

  /**
   * 创建一个任务
   * @param caller 实际执行的函数
   * @param args 执行函数的参数
   * @param resolve
   * @param reject
   * @returns {Function} 返回一个任务函数
   * @private
   */
  _createTask(
    caller: (...arg: any[]) => any,
    resolve: (value: any | PromiseLike<any>) => void,
    reject: (reason?: any) => void
  ) {
    return () => {
      // 实际上是在这里调用了异步任务,并将异步任务的返回(resolve和reject)抛给了上层
      caller()
        .then(resolve)
        .catch(reject)
        .finally(() => {
          // 任务队列的消费区,利用Promise的finally方法,在异步任务结束后,取出下一个任务执行
          this._count--;
          if (this._taskQueue.length) {
            const task = this._taskQueue.shift();
            task();
          }
        });
      this._count++;
    };
  }
}
2
3
4
5
6
7
8
9
10
11
12
13
14
15
16
17
18
19
20
21
22
23
24
25
26
27
28
29
30
31
32
33
34
35
36
37
38
39
40
41
42
43
44
45
46
47
48
49
50
51
52
53
54
55
56
57
58
59
60
61
62
63
64
65
在axios配置文件使用封装的LimitPromise 类封装post方法:
import LimitPromise from './limitReq';
import axios, { AxiosRequestConfig } from 'axios';

const limtReq = new LimitPromise(6);
export const limitPost = (
  url: string,
  data?: any,
  config?: AxiosRequestConfig,
  resolve?: (value: any | PromiseLike<any>) => void,
  reject?: (reason?: any) => void
) =>
  limtReq
    .call(() => axios.post(url, data, config))
    .then(resolve)
    .catch(reject);
2
3
4
5
6
7
8
9
10
11
12
13
14
15
(需要其它方法如get、put等可根据上面封装) 接下来直接将原来的axios.post请求改为limitPost即可。
# CSRF 防御
# CSRF 简介
跨站请求伪造(Cross-site request forgery),通常缩写为 CSRF 或者 XSRF, 是一种挟制用户在当前已登录的 Web 应用程序上执行非本意的操作的攻击方法。
跨站请求攻击,简单地说,是攻击者通过一些技术手段欺骗用户的浏览器去访问一个自己曾经认证过的网站并运行一些操作(如发邮件,发消息,甚至财产操作如转账和购买商品)。由于浏览器曾经认证过,所以被访问的网站会认为是真正的用户操作而去运行。
为了让小伙伴更好地理解上述的内容,画了一张跨站请求攻击示例图:
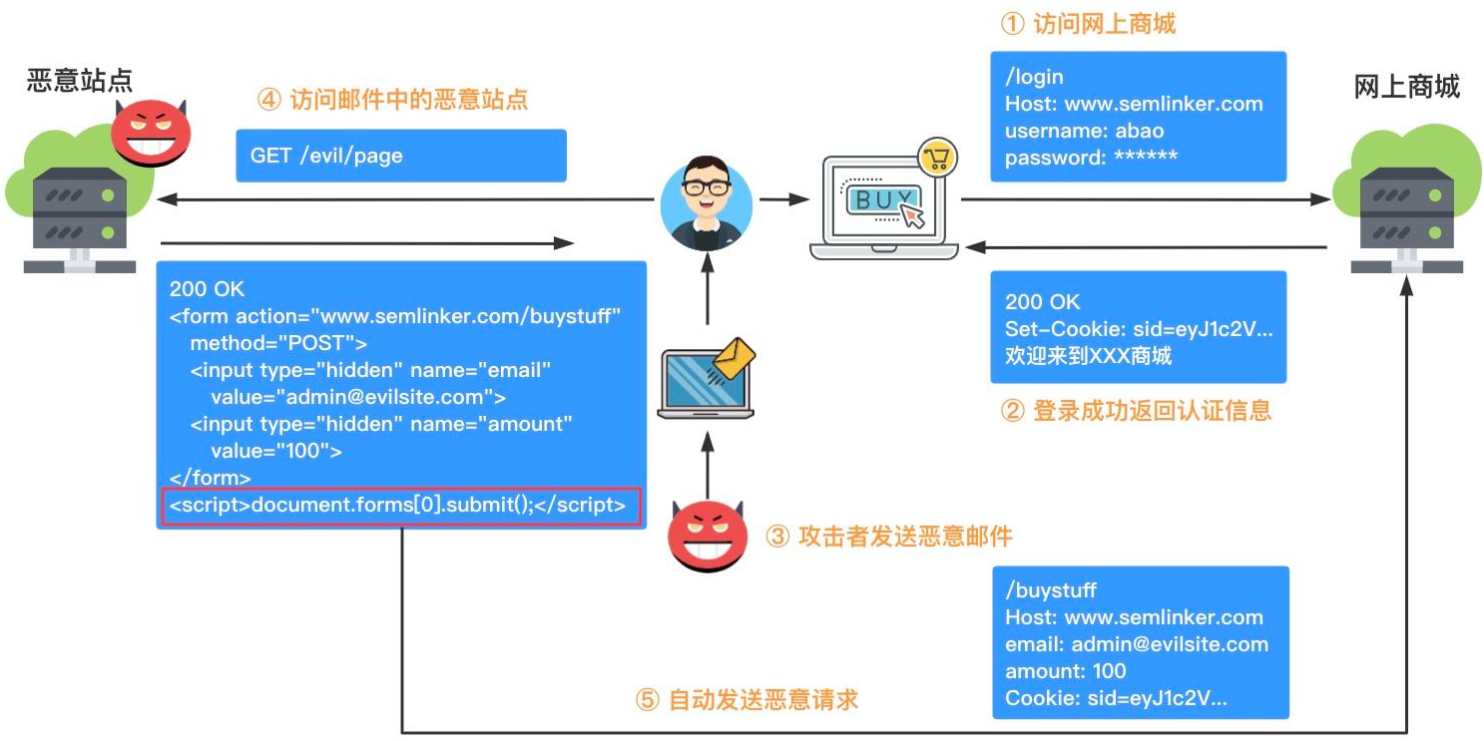
在上图中攻击者利用了 Web 中用户身份验证的一个漏洞:简单的身份验证只能保证请求发自某个用户的浏览器,却不能保证请求本身是用户自愿发出的。既然存在以上的漏洞,那么我们应该怎么进行防御呢?接下来我们来介绍一些常见的 CSRF 防御措施。
# CSRF 防御措施
# 检查 Referer 字段
HTTP 头中有一个 Referer (opens new window) 字段,这个字段用以标明请求来源于哪个地址。在处理敏感数据请求时,通常来说,Referer 字段应和请求的地址位于同一域名下。
以示例中商城操作为例,Referer 字段地址通常应该是商城所在的网页地址,应该也位于 www.samy.com (opens new window) 之下。而如果是 CSRF 攻击传来的请求,Referer 字段会是包含恶意网址的地址,不会位于 www.samy.com (opens new window) 之下,这时候服务器就能识别出恶意的访问。
这种办法简单易行,仅需要在关键访问处增加一步校验。但这种办法也有其局限性,因其完全依赖浏览器发送正确的 Referer 字段。虽然 HTTP 协议对此字段的内容有明确的规定,但并无法保证来访的浏览器的具体实现,亦无法保证浏览器没有安全漏洞影响到此字段。并且也存在攻击者攻击某些浏览器,篡改其 Referer 字段的可能。
# 同步表单 CSRF 校验
CSRF 攻击之所以能够成功,是因为服务器无法区分正常请求和攻击请求。针对这个问题我们可以要求所有的用户请求都携带一个 CSRF 攻击者无法获取到的 token。对于 CSRF 示例图中的表单攻击,我们可以使用 同步表单 CSRF 校验 的防御措施。
同步表单 CSRF 校验 就是在返回页面时将 token 渲染到页面上,在 form 表单提交的时候通过隐藏域或者作为查询参数把 CSRF token 提交到服务器。比如,在同步渲染页面时,在表单请求中增加一个 _csrf 的查询参数,这样当用户在提交这个表单的时候就会将 CSRF token 提交上来:
<form method="POST" action="/upload?_csrf={{由服务端生成}}" enctype="multipart/form-data">
  用户名: <input name="name" />
  选择头像: <input name="file" type="file" />
  <button type="submit">提交</button>
</form>
2
3
4
5
# 双重 Cookie 防御
双重 Cookie 防御 就是将 token 设置在 Cookie 中,在提交(POST、PUT、PATCH、DELETE)等请求时提交 Cookie,并通过请求头或请求体带上 Cookie 中已设置的 token,服务端接收到请求后,再进行对比校验。
下面我们以 jQuery 为例,来看一下如何设置 CSRF token:
let csrfToken = Cookies.get('csrfToken');

function csrfSafeMethod(method) {
  // 以下HTTP方法不需要进行CSRF防护
  return (/^(GET|HEAD|OPTIONS|TRACE)$/.test(method));
}

$.ajaxSetup({
  beforeSend: function(xhr, settings) {
    if (!csrfSafeMethod(settings.type) && !this.crossDomain) {
      xhr.setRequestHeader('x-csrf-token', csrfToken);
      // xhr.setRequestHeader('X-XSRF-TOKEN', csrfToken);
    }
  },
});
2
3
4
5
6
7
8
9
10
11
12
13
14
15
介绍完 CSRF 攻击的方式和防御手段,最后我们来看一下 Axios 是如何防御 CSRF 攻击的。
# Axios CSRF 防御
Axios 提供了 xsrfCookieName 和 xsrfHeaderName 两个属性来分别设置 CSRF 的 Cookie 名称和 HTTP 请求头的名称,它们的默认值如下所示:
// lib/defaults.js
var defaults = {
  adapter: getDefaultAdapter(),

  // 省略部分代码
  xsrfCookieName: 'XSRF-TOKEN',
  xsrfHeaderName: 'X-XSRF-TOKEN',
};
2
3
4
5
6
7
8
前面我们已经知道在不同的平台中,Axios 使用不同的适配器来发送 HTTP 请求,这里我们以浏览器平台为例,来看一下 Axios 如何防御 CSRF 攻击:
// lib/adapters/xhr.js
module.exports = function xhrAdapter(config) {
  return new Promise(function dispatchXhrRequest(resolve, reject) {
    var requestHeaders = config.headers;

    var request = new XMLHttpRequest();
    // 省略部分代码

    // 添加xsrf头部
    if (utils.isStandardBrowserEnv()) {
      var xsrfValue = (config.withCredentials || isURLSameOrigin(fullPath)) && config.xsrfCookieName ?
        cookies.read(config.xsrfCookieName) :
        undefined;

      if (xsrfValue) {
        requestHeaders[config.xsrfHeaderName] = xsrfValue;
      }
    }

    request.send(requestData);
  });
};
2
3
4
5
6
7
8
9
10
11
12
13
14
15
16
17
18
19
20
21
22
看完以上的代码,相信小伙伴们就已经知道答案了,原来 Axios 内部是使用 双重 Cookie 防御 的方案来防御 CSRF 攻击。好的,到这里本文的主要内容都已经介绍完了,其实 Axios 项目还有一些值得我们借鉴的地方,比如 CancelToken 的设计、异常处理机制等,感兴趣的小伙伴可以自行学习一下。
# 封装axios【要点】
# 常用封装点
- 环境区分
- 请求头信息
- 请求类型
- 请求超时时间
- timeout: 3000
- 允许携带cookie
- withCredentials: true
- 响应结果处理
- 登录校验失败
- 无权限
- 成功
- ...
vue.config.js
const targetApi1 = process.env.NODE_ENV === 'development' ? "http://www.kaifa1.com" : "http://www.ceshi1.com"
const targetApi2 = process.env.NODE_ENV === 'development' ? "http://www.kaifa2.com" : "http://www.ceshi2.com"
module.exports = {
    devServer: {
        proxy: {
            '/api1': {
                target: targetApi1,
                changeOrigin: true,
                pathRewrite: {
                    '/api1': ""
                }
            },
            '/api2': {
                target: targetApi2,
                changeOrigin: true,
                pathRewrite: {
                    '/api2': ""
                }
            },
        }
    }
}
2
3
4
5
6
7
8
9
10
11
12
13
14
15
16
17
18
19
20
21
22
src/utils/https.js
import axios from 'axios'
import qs from 'qs'
import { debounce } from './debounce'

//请求头类型;常见以下三种
const contentTypes = {
  json: 'application/json; charset=utf-8',
  urlencoded: 'application/x-www-form-urlencoded; charset=utf-8',
  multipart: 'multipart/form-data',
}

function toastMsg() {
  Object.keys(errorMsgObj).map((item) => {
    Message.error(item)
    delete errorMsgObj[item]
  })
}

let errorMsgObj = {}

const defaultOptions = {
  withCredentials: true, // 允许把cookie传递到后台
  timeout: 15000,
  headers: {
    Accept: 'application/json',
    'Content-Type': contentTypes.json,
  },
}

export const callApi = ({
  url,
  data = {},
  method = 'get',
  options = {},
  //和上面的contentTypes对应上;
  //当contentType === urlencoded时,qs.stringify(data)
  contentType = 'json', // json || urlencoded || multipart
  prefixUrl = 'api',
}) => {
  if (!url) {
    const error = new Error('请传入url')
    return Promise.reject(error)
  }
  const fullUrl = `/${prefixUrl}/${url}`

  const newOptions = {
    ...defaultOptions,
    ...options,
    headers: {
      'Content-Type':
        (options.headers && options.headers['Content-Type']) ||
        contentTypes[contentType],
    },
    method,
  }
  if (method === 'get') {
    newOptions.params = data
  }

  if (method !== 'get' && method !== 'head') {
    newOptions.data = data
    if (data instanceof FormData) {
      //注意下这里的头设置,不使用缓存;
      newOptions.headers = {
        'x-requested-with': 'XMLHttpRequest',
        'cache-control': 'no-cache',
      }
    } else if (newOptions.headers['Content-Type'] === contentTypes.urlencoded) {
      newOptions.data = qs.stringify(data)
    } else {
      Object.keys(data).forEach((item) => {
        if (
          data[item] === null ||
          data[item] === undefined ||
          data[item] === ''
        ) {
          delete data[item]
        }
      })
      // 没有必要,因为axios会将JavaScript对象序列化为JSON
      // newOptions.data = JSON.stringify(data);
    }
  }

  axios.interceptors.request.use((request) => {
    // 移除起始部分 / 所有请求url走相对路径
    request.url = request.url.replace(/^\//, '')
    return request
  })

  return axios({
    url: fullUrl,
    ...newOptions,
  })
    .then((response) => {
      const { data } = response
      if (data.code === 'xxx') {
        // 与服务端约定
        // 登录校验失败
      } else if (data.code === 'xxx') {
        // 与服务端约定
        // 无权限
        router.replace({ path: '/403' })
      } else if (data.code === 'xxx') {
        // 与服务端约定
        return Promise.resolve(data)
      } else {
        const { message } = data
        if (!errorMsgObj[message]) {
          errorMsgObj[message] = message
        }
        setTimeout(debounce(toastMsg, 1000, true), 1000)
        return Promise.reject(data)
      }
    })
    .catch((error) => {
      if (error.response) {
        const { data } = error.response
        const resCode = data.status
        const resMsg = data.message || '服务异常'
        // if (resCode === 401) { // 与服务端约定
        //     // 登录校验失败
        // } else if (data.code === 403) { // 与服务端约定
        //     // 无权限
        //     router.replace({ path: '/403' })
        // }
        if (!errorMsgObj[resMsg]) {
          errorMsgObj[resMsg] = resMsg
        }
        setTimeout(debounce(toastMsg, 1000, true), 1000)
        const err = { code: resCode, respMsg: resMsg }
        return Promise.reject(err)
      } else {
        const err = { type: 'canceled', respMsg: '数据请求超时' }
        return Promise.reject(err)
      }
    })
}
2
3
4
5
6
7
8
9
10
11
12
13
14
15
16
17
18
19
20
21
22
23
24
25
26
27
28
29
30
31
32
33
34
35
36
37
38
39
40
41
42
43
44
45
46
47
48
49
50
51
52
53
54
55
56
57
58
59
60
61
62
63
64
65
66
67
68
69
70
71
72
73
74
75
76
77
78
79
80
81
82
83
84
85
86
87
88
89
90
91
92
93
94
95
96
97
98
99
100
101
102
103
104
105
106
107
108
109
110
111
112
113
114
115
116
117
118
119
120
121
122
123
124
125
126
127
128
129
130
131
132
133
134
135
136
137
138
src/utils/debounce.js
// src/utils/debounce.js
export const debounce = (func, timeout, immediate) => {
  let timer

  return function () {
    let context = this
    let args = arguments

    if (timer) clearTimeout(timer)
    if (immediate) {
      var callNow = !timer
      timer = setTimeout(() => {
        timer = null
      }, timeout)
      if (callNow) func.apply(context, args)
    } else {
      timer = setTimeout(function () {
        func.apply(context, args)
      }, timeout)
    }
  }
}
2
3
4
5
6
7
8
9
10
11
12
13
14
15
16
17
18
19
20
21
22
# 简单调用
axios('http://www.kaifa.com/data', {
  // 配置代码
  method: 'GET',
  timeout: 3000,
  withCredentials: true,
  headers: {
    'Content-Type': 'application/json'
  },
  // 其他请求配置...
})
.then((data) => {
  // todo: 真正业务逻辑代码
  console.log(data);
}, (err) => {
  // 错误处理代码
  if (err.response.status === 401) {
  // handle authorization error
  }
  if (err.response.status === 403) {
  // handle server forbidden error
  }
  // 其他错误处理.....
  console.log(err);
});
2
3
4
5
6
7
8
9
10
11
12
13
14
15
16
17
18
19
20
21
22
23
24
25
// src/service/index.js
import { callApi } from '@/utils/https';

export const delFile = (params) => callApi({
  url: `file/delete?systemName=${params.systemName}&menuId=${params.menuId}&appSign=${params.appSign}`,
  option: {
    method: 'get',
  },
});

// 或者
export const delFile = (params) => callApi({
  url: 'file/delete',
  option: {
    method: 'get',
    params
  },
});
2
3
4
5
6
7
8
9
10
11
12
13
14
15
16
17
18
# 参考资源
- Github - axios (opens new window)
- 维基百科 - 跨站请求伪造 (opens new window)
- Egg - 安全威胁 CSRF 的防范 (opens new window)
- https://juejin.cn/post/6955610207036801031
- https://juejin.cn/post/6973812686584807432
