 jenkins前端构建部署
# 手动打包脚本
sudo chmod +x build.sh
sudo chmod +x replace.sh
1
2
2
打包脚本 build.sh
#!/bin/bash
if [ $# -eq 0 ]  # 脚本必须传入参数。
then
    echo "Please invoke this script with one or more command-line arguments."
    exit $E_NO_ARGS
fi
datetime=$(date "+%Y%m%d%H%M%S")
envName=$1
echo "======代码库同步中==={$envName}===="
git pull
cd node
echo "======克隆{$envName}现场中===请检测版本号!!!===="
npm run clone env=$envName
cd ..
echo "======代码安装依赖中======"
npm install
echo "======dist_{$envName}生成中======"
npm run build env=$envName
echo "===great===dist_{$envName}压缩中======"
zip -rqo dist-$envName-${datetime}.zip dist/
echo "===great===dist-zip压缩打包完成======"
1
2
3
4
5
6
7
8
9
10
11
12
13
14
15
16
17
18
19
20
21
2
3
4
5
6
7
8
9
10
11
12
13
14
15
16
17
18
19
20
21
替换脚本replace.sh
确保有相应的目录:deploy/fe/ deploy/fe-bak/
#!/bin/bash
datetime=$(date "+%Y%m%d%H%M%S")
unzip dist-autorun*.zip
mv dist AAportal
echo "===great===本地资源包解压完成======"
chmod 777 -R AAportal
zip -rqo /var/www/html/AAportal-${datetime}.zip /var/www/html/AAportal/
echo "===great===ng路径下备份上版本资源包完成======"
rm -rf /var/www/html/AAportalAAportal/
cp -R AAportal/ /var/www/html/
nginx -s reload
echo "===great===ng资源包替换完成======"
mv dist-autorun*.zip ../fe-bak
rm -rf AAportal
echo "===great===备份及移除不必要资源完成======"
1
2
3
4
5
6
7
8
9
10
11
12
13
14
15
2
3
4
5
6
7
8
9
10
11
12
13
14
15
# JKS配合SSH自动构建
# 基本配置

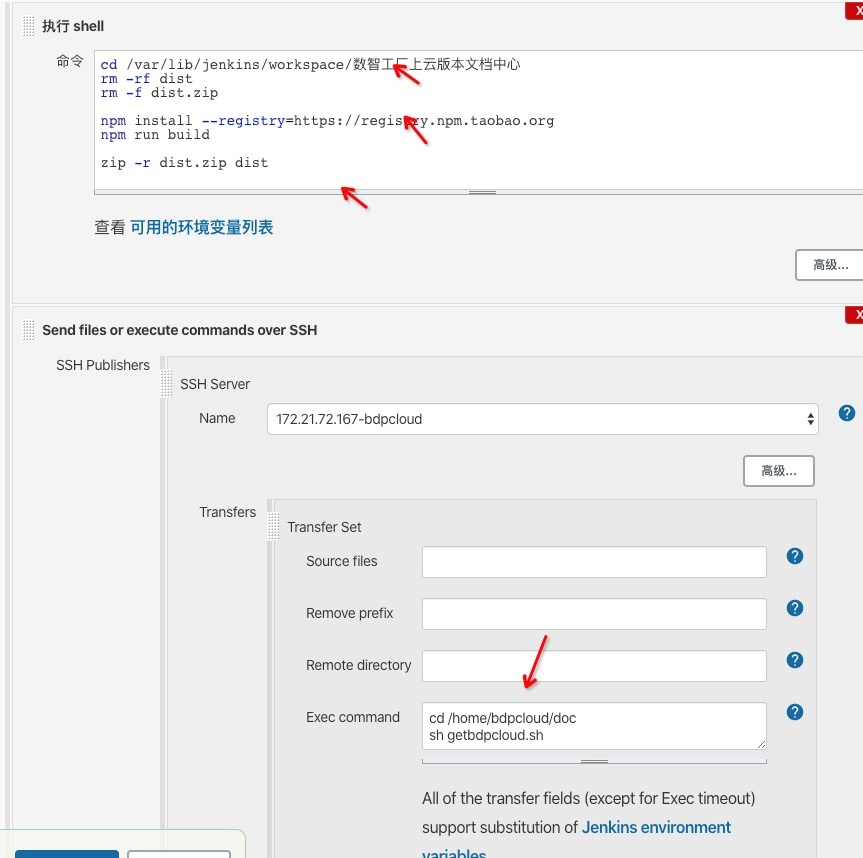
getDoc.sh
sleep 1
ftp  -niv  <<!
open  10.45.47.x
user  jkuser  jkjkxxx
binary
cd  /var/lib/jenkins/workspace/数智工厂上云版本文档中心
lcd  /home/bdpcloud/doc
prompt
get  dist.zip
close
bye
!
sleep 2
pwd
ls -la

/usr/bin/unzip dist.zip
rm -rf bdpcloud-doc
mv dist bdpcloud-doc
rm -f dist.zip
echo "解压成功"
1
2
3
4
5
6
7
8
9
10
11
12
13
14
15
16
17
18
19
20
21
2
3
4
5
6
7
8
9
10
11
12
13
14
15
16
17
18
19
20
21
nginx配置
server {
  listen 8888;
  server_name localhost;
  location / {
    root /home/bdpcloud/doc/bdpcloud-doc;
    index  index.html index.htm;
  }
}
1
2
3
4
5
6
7
8
2
3
4
5
6
7
8
# 其他配置

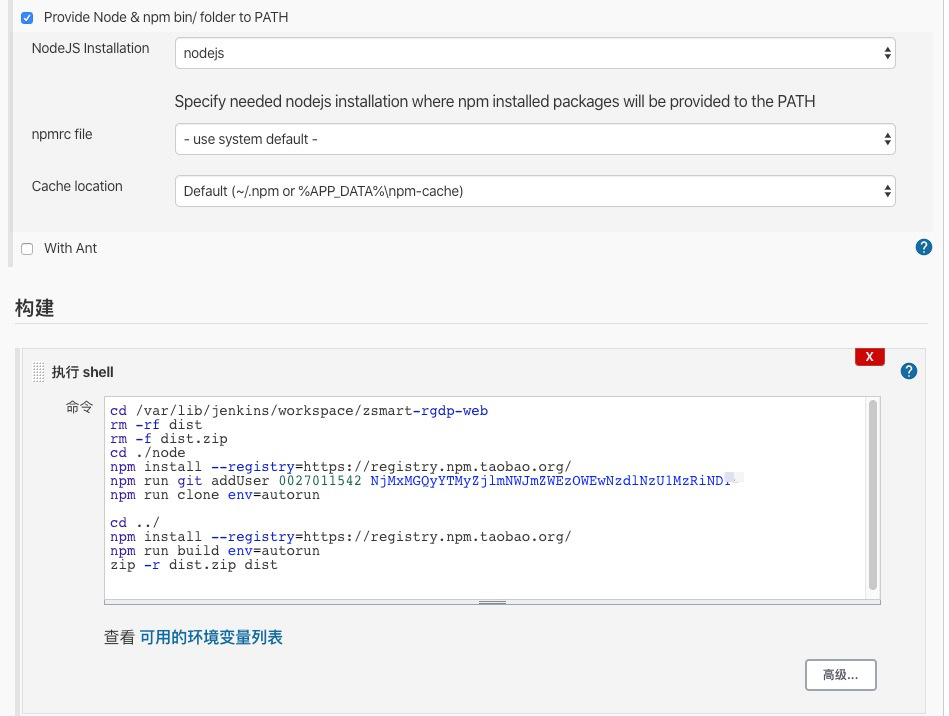
cd /var/lib/jenkins/workspace/zsmart-rgdp-web
rm -rf dist
rm -f dist.zip
cd ./node
npm install --registry=https://registry.npm.taobao.org/
npm run git addUser 00270xxx NjMxMGQyYTMyZjlmNWJmZWEzOWEwNzdlNzU1MzRiNDY=xxx
npm run clone env=autorun
cd ../
npm install --registry=https://registry.npm.taobao.org/
npm run build env=autorun
zip -r dist.zip dist
1
2
3
4
5
6
7
8
9
10
11
2
3
4
5
6
7
8
9
10
11
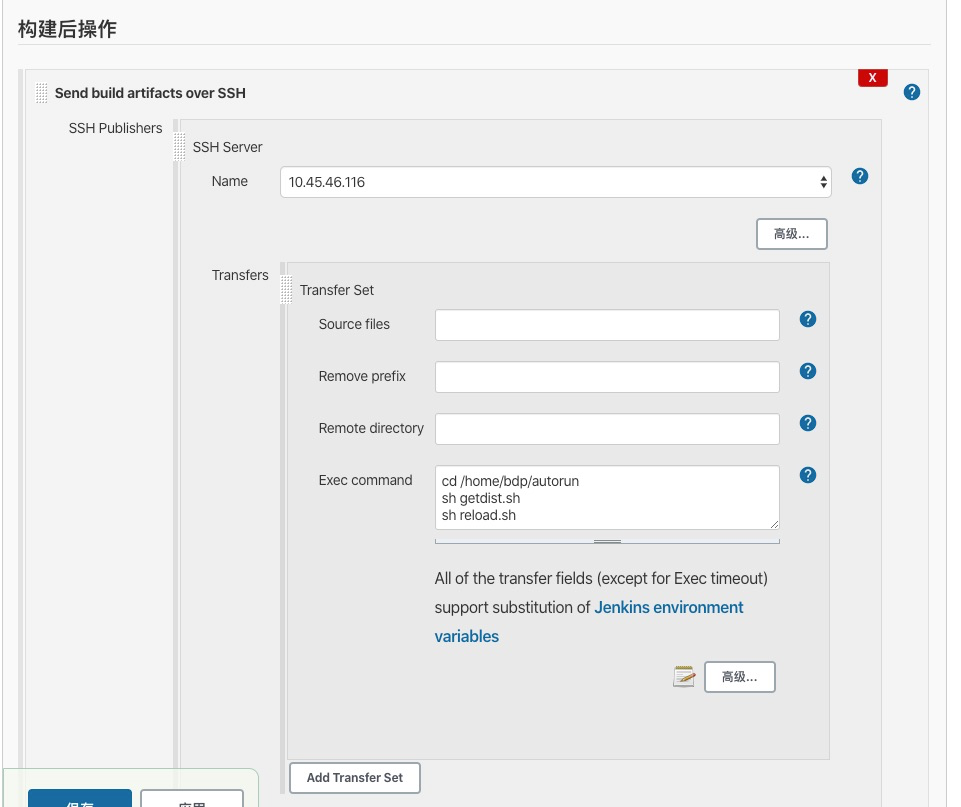
cd /home/bdp/autorun
sh getdist.sh
sh reload.sh
1
2
3
2
3

default.conf
// root /home/bdp/autorun/AAportal; //su - && chmod 755 /home/bdp/autorun/
server {
    listen       9001;
    server_name  localhost;
    large_client_header_buffers 4 16k; #header大小
    client_max_body_size 300m; #上传文件大小限制
    client_body_buffer_size 128k; #缓冲区大小
    proxy_connect_timeout 600; #设置与upstream server的连接超时时间
    proxy_read_timeout 600; #设置与代理服务器的读超时时间
    proxy_send_timeout 600; #发送请求给upstream服务器的超时时间
    underscores_in_headers on; #header允许使用带'_'的参数
    # 统一门户前端
    location / {
       root   /home/bdp/autorun/AAportal;
       #root  /var/www/html/AAportal;
       index  index.html index.htm;
       try_files $uri $uri/ /index.html;
     }
   location /aiFactoryServer {
            proxy_pass http://10.45.46.11xx:000/aiFactoryServer;
            proxy_set_header Host $host;
            proxy_set_header X-Real-IP $remote_addr;
            proxy_set_header REMOTE-HOST $remote_addr;
            proxy_set_header X-Forwarded-For $proxy_add_x_forwarded_for;
        }
    #巡检工具本地测试
   location /autorunweb {
            proxy_pass http://10.45.46.116:8082/autorunweb;
            proxy_set_header Host $host;
            proxy_set_header X-Real-IP $remote_addr;
            proxy_set_header REMOTE-HOST $remote_addr;
            proxy_set_header X-Forwarded-For $proxy_add_x_forwarded_for;
        }
   #charset koi8-r;
   #access_log  /var/log/nginx/host.access.log  main;
   # location / {
   #     root   /usr/share/nginx/html;
   #     index  index.html index.htm;
   # }
    #error_page  404              /404.html;
    # redirect server error pages to the static page /50x.html
    #
    error_page   500 502 503 504  /50x.html;
    location = /50x.html {
        root   /usr/share/nginx/html;
    }
    # proxy the PHP scripts to Apache listening on 127.0.0.1:80
    #
    #location ~ \.php$ {
    #    proxy_pass   http://127.0.0.1;
    #}
    # pass the PHP scripts to FastCGI server listening on 127.0.0.1:9000
    #
    #location ~ \.php$ {
    #    root           html;
    #    fastcgi_pass   127.0.0.1:9000;
    #    fastcgi_index  index.php;
    #    fastcgi_param  SCRIPT_FILENAME  /scripts$fastcgi_script_name;
    #    include        fastcgi_params;
    #}
    # deny access to .htaccess files, if Apache's document root
    # concurs with nginx's one
    #
    #location ~ /\.ht {
    #    deny  all;
    #}
}
1
2
3
4
5
6
7
8
9
10
11
12
13
14
15
16
17
18
19
20
21
22
23
24
25
26
27
28
29
30
31
32
33
34
35
36
37
38
39
40
41
42
43
44
45
46
47
48
49
50
51
52
53
54
55
56
57
58
59
60
61
62
63
64
65
66
2
3
4
5
6
7
8
9
10
11
12
13
14
15
16
17
18
19
20
21
22
23
24
25
26
27
28
29
30
31
32
33
34
35
36
37
38
39
40
41
42
43
44
45
46
47
48
49
50
51
52
53
54
55
56
57
58
59
60
61
62
63
64
65
66
**getdist.sh **
可以和下面脚本合并在一起;参考上面面的方式;
#!/bin/sh
mv dist.zip backweb/dist`date +%Y%m%d%H%M%S`.zip
sleep 1
ftp  -niv  <<!
open  10.45.47.8
user  jkuser jkjk123x
binary
cd  /var/lib/jenkins/workspace/zsmart-rgdp-web
prompt
get  dist.zip
close
bye
!
sleep 2
1
2
3
4
5
6
7
8
9
10
11
12
13
14
2
3
4
5
6
7
8
9
10
11
12
13
14
reload.sh
#!/bin/bash
rm -rf AAportal
sleep 1
/usr/bin/unzip dist.zip
mv dist AAportal
1
2
3
4
5
2
3
4
5
# 构建碰到的问题
# 前端项目编译时内存溢出问题的原因及解决方案
FATAL ERROR: CALL_AND_RETRY_LAST Allocation failed - process out of memory。并且打包速度相当慢,估计项目过大了
解决方案一:通过 package.json 中的 "build" 加大内存; 或者加载jks上;
set NODE_ENV=production && node --max_old_space_size=5120 && npm run build env=release
zip -r dist.zip dist
1
2
2
代码中设置;
"scripts": {
    "dev": "node build/dev-server.js",
    "start": "node build/dev-server.js",
    "build": "set NODE_ENV=production && node --max_old_space_size=5120 build/build.js",
    "e2e": "node test/e2e/runner.js",
    "test": "npm run e2e"
  },
1
2
3
4
5
6
7
8
2
3
4
5
6
7
8
解决方案二:使用 increase-memory-limit 插件,增加node服务器内存限制
/* package.json 文件 */
"devDependencies": {
    "increase-memory-limit": "^1.0.6",
},
  /* 添加 fix-memory-limit */
"scripts": {
    "fix-memory-limit": "cross-env LIMIT=8096 increase-memory-limit"
  }
1
2
3
4
5
6
7
8
2
3
4
5
6
7
8
- 新增依赖包
npm install --save-dev increase-memory-limit,或者重新npm install全量更新 - 执行
npm run fix-memory-limit(只需执行一次即可) - 重启项目即可
上次更新: 2022/04/15, 05:41:30
