 npm发布及私服搭建
# 版本发布
# 作用域scope管理发布包
经常有看到@xxx/yyy类型的开源npm包,原因是包名称难免会有重名,如果已经有人在 npm 上注册该包名,再次 npm publish 同名包时会告知发布失败,这时可以通过 scope 作用域来解决
定义作用域包
修改package.json中包名称:
{
   "name": "@username/project-name"
}
1
2
3需要注意的是,如果是发布到官方registry,scope一定要是自己注册的用户名,而如果是发布到自己的npm私服,scope可以不是用户名
发布作用域包
作用域模块默认发布是私有的
发布到官方registry时,直接
npm publish会报错,原因是只有付费用户才能发布私有 scope 包,免费用户只能发布公用包,因此需要添加access=public参数;发布到自己的npm私服时,不加access=public参数也可以发布npm publish --access=public1使用作用域包
npm install @username/project-name
var projectName = require('@username/project-name')
1
2
# 发布
# 常用发布步骤
1. Login
npm adduser --registry http://172.21.64.25:7373
2. Publish
npm publish --registry http://172.21.64.25:7373
3. Refresh this page.
2
3
4
5
npm adduser
#npm config set registry http://localhost:8081/repository/group-npm/
#或者设置npm; .npmrc
npm login
npm publish
2
3
4
5
# 发布到github上的步骤
// Step 1: Use `publishConfig` option in your package.json
"publishConfig": { "registry": "https://npm.pkg.github.com/" }
// Step 2: Authenticate
$ npm login --registry=https://npm.pkg.github.com/

// Step 3: Publish
$ npm publish
2
3
4
5
6
7
"name": "@samy/rat-widget",
"repository":"https://github.com/samy/rat-widget",
"publishConfig": {
  "registry": "https://npm.pkg.github.com/samy"
}
2
3
4
5
# 发布与撤销包
在项目根目录下运行$ npm publish发布新包。
运行$ npm unpublish 包名 --force撤销发布包。
  "scripts": {
    "c": "babel src -d lib",
    "w": "npm run c -- -watch",
    "start": "npm run w",
    "b": "npm publish",
    "bc": "npm --force unpublish rat-cli"
  }
2
3
4
5
6
7
# 私服搭建
# 需求与背景
# 需求
- 公司开发环境与外网隔绝,需要搭建内网私有npm库,确保私密性
- 确保npm服务快速、稳定,减少开发人员和CI服务器的重复下载量并提高下载速度
- 控制npm模块质量和安全,对于下载、发布npm包有对应的权限管理
# 当下流行的解决方案
# 使用 Nexus 搭建 npm 私服
Nexus仓库管理平台支持范围广泛,可用于maven、npm等仓库。
# 使用 verdaccio搭建 npm 私服【推荐】
verdaccio是一个零配置的私有的带缓存功能的npm包管理工具。
sinopia 在15年的时候就停止更新了,继而由 verdaccio (opens new window) 提供更新升级,两者用法基本上都是一致的。对于企业级的应用来说,技术选型时请慎重选择sinopia,建议选择verdaccio。
# 使用cnpm+cnpmjs.org搭建
sinopia的优点是配置简单,对环境依赖少(仅 node 就够了),并且支持windows系统下运行。,sinopia比较适合个人搭建在本地作为 npm 缓存,这样,安装过的包会直接从缓存中获取,加快安装速度。对于企业级的应用来说,就需要另外一个解决方案了:cnpm (opens new window) + cnpmjs.org (opens new window)
# 两种解决方案的对比
# Nexus&verdaccio比较
- 都缓存了从proxy仓库下载过的包,没有同步整个proxy仓库的包。
- 存储方式:nexus使用blob store,sinopia直接保存包文件到storage目录。
- nexus管理界面可以清缓存;verdaccio貌似没有命令和工具,但是可以删除通过删除storage目录下包目录的方式清除缓存。
- 使用nexus时,
发布包和安装、卸载包需要设置不同的registry,而Sinopia一直用同一个就可以。 - nexus管理页面上展示了更多的包信息,相比而言sinopia也就是nodejs风格的包主页上信息较少。
- verdaccio更适合前端工程,优点是配置简单,对环境依赖少(仅node就够了),并且支持在windows系统下运行;nexus支持仓库种类最多,是用户群体最大的一个仓库平台,maven、docker、npm、gradle均支持,java需要maven仓库、android需要gradle仓库、运维需要docker仓库,前端需要npm仓库,如果公司已有nexus平台管理这些仓库,接入新的仓库会较方便。
- verdaccio的权限管理比较弱,对用户权限,发布权限,下载权限控制不是很得心应手
以上的情况并没有考虑在遇到一些黑客攻击的情况下,所以为了尽量保证代码的安全,可以在前端加一层 Nginx 然后配置 SSH 公钥来作为双层验证。
- 以上nginx相关配置,可以参考下面的cnpm中nginx配置设置;
- 防火墙端口开放,可以参考下面verdaccio中iptables的设置;
# 搭建过程
# 使用Nexus
# docker安装方式
docker pull sonatype/nexus3
# docker volume create --name nexus-data
docker run  --restart=always -d -p 8081:8081 --name nexus -v /data/nexus:/nexus-data sonatype/nexus3
2
3
# 源码安装方式
# 下载解压
官方下载链接](help.sonatype.com/repomanager… (opens new window)),执行:
$ wget https://download.sonatype.com/nexus/3/latest-unix.tar.gz #下载
$ sudo mv latest-unix.tar.gz /opt/nexus3.tar.gz #移动到 /opt 目录
$ sudo tar -xzvf nexus3.tar.gz #解压
1
2
3注意运行Nexus需要Java 8 运行时环境(JRE),请自行安装。
# 创建运行用户
单独创建一个 nexus 用户用来运行
# 创建用户、指定用户目录、授权
$ sudo useradd -d /home/nexus -m nexus
$ sudo chown -R nexus:nexus /home/nexus
$ sudo chown -R nexus:nexus /opt/nexus-3.15.2-01
$ sudo chown -R nexus:nexus /opt/sonatype-work/
1
2
3
4
5修改运行用户配置项:修改 /opt/nexus-3.15.2-01/bin 目录下的配置文件nexus.rc为
run_as_user="nexus"# 运行
修改端口指8073并开放iptables防火墙,对
/opt/sonatype-work/nexus3/etc/nexus.properties文件进行修改:# Jetty section application-port=8073 application-host=0.0.0.0 # nexus-args=${jetty.etc}/jetty.xml,${jetty.etc}/jetty-http.xml,${jetty.etc}/jetty-requestlog.xml # nexus-context-path=/ # Nexus section # nexus-edition=nexus-pro-edition # nexus-features=\ # nexus-pro-feature1
2
3
4启动服务,以下为nexus服务命令:
$ sudo service nexus start # 启动 nexus 服务
$ sudo service nexus restart # 重启 nexus 服务
$ sudo service nexus stop # 停止 nexus 服务
$ sudo service nexus status # 查看 nexus 服务状态
1
2
3
4查看日志检查服务状态:
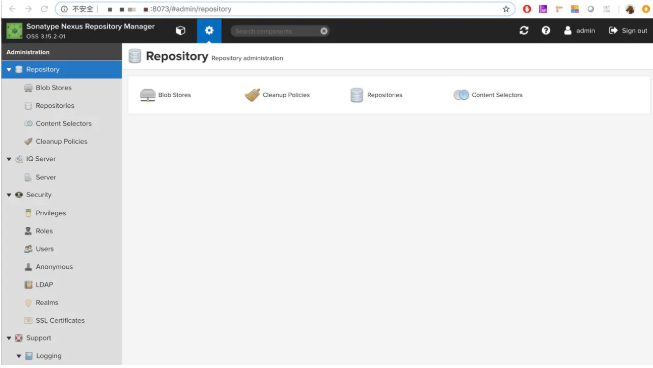
$ tail -f /opt/sonatype-work/nexus3/log/nexus.log1至此,nexus 服务已搭建完毕!可使用默认账号admin/admin123 登录ip:8073后对npm仓库进行管理

# 仓库管理
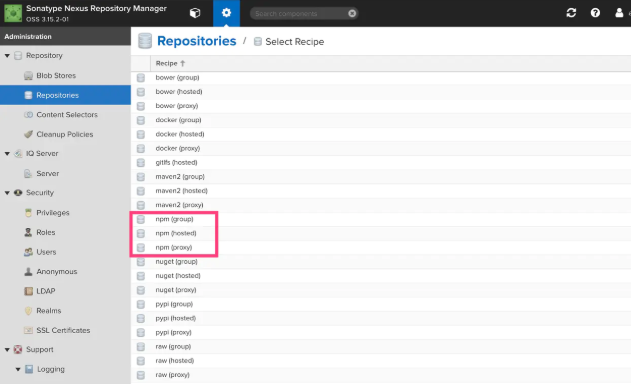
创建仓库,npm 仓库有三种,这三种我们都需要创建

npm(proxy) - 代理npm仓库
将公共 npm 服务器的资源代理缓存,减少重复下载,加快开发人员和CI服务器的下载速度。
创建时需填写Name(
npm-external)和Remote Storage(公有库地址,填写官方或淘宝镜像,https://registry.npmjs.org/)。该仓库地址为:
http://ip:8073/repository/npm-external/npm(hosted) - 私有npm仓库
用于 上传自己的npm包 以及第三方npm包。
创建时只需填写Name(
npm-internal)。该仓库地址为:
http://ip:8073/repository/npm-internal/请注意:发布包时请将registry设为该地址。
npm(group) - npm仓库组
用于将多个内部或外部 npm 仓库统一为一个 npm仓库。可以新建一个npm仓库组将 上面两个刚刚创建的两个 npm 仓库都添加进去。这样可以通过这个 npm仓库组,既可以访问 公有npm仓库 又可以访问自己的 私有npm仓库。
创建时需填写Name(
npm-all),然后选择需要添加到组里的 其他 npm 仓库(npm-external和npm-internal)。该仓库地址为:
http://ip:8073/repository/npm-all/请注意:安装包以及卸载包时请将registry设为该地址。
# 用户管理
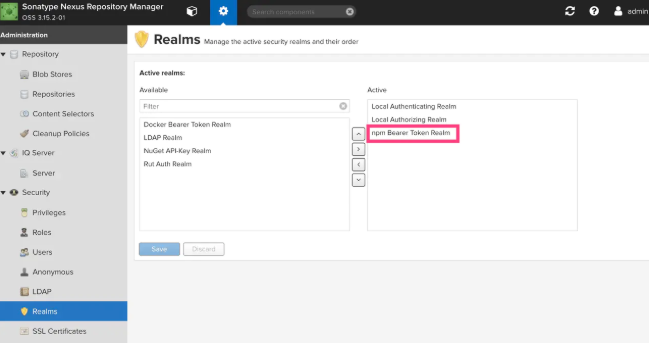
将包发布到nexus npm仓库需要设置一下 Nexus Repository Manager 的权限。否则无法登陆到我们的私服。在Security->Realms栏目里,将
npm Bearer Token Realm选入Active。
之后我们需要在Security->Users栏目里添加用户,只有这样添加的用户才可以发布包。经测试,在客户端使用
npm adduser创建的用户没有发布权限。
Docker方式安装:
- 下载
docker pull sonatype/nexus3 - 运行
docker run -d -p 8081:8081 sonatype/nexus3 - 打开 http://localhost:8081/
- 用户名为
admin;find / -name 'admin.password'cat 上面那个文件就可以看到密码
# 使用verdaccio
verdaccio是nodejs 创建的轻量的私有npm proxy registry,froked于sinopia@1.4.0 ,是一个开源的npm私有库的搭建工具,可以搭建一套属于自己公司的npm仓库。
- 与
yarn、npm和pnmp100%兼容 - 提供的Docker和Kubernetes支持,很容易安装和使用
- 发布的包是私有和配置访问权限
- verdaccio是需要缓存所有相关项,并且在本地或者私有网络下可以加速安装
后面推荐用docker方式安装,方便统一管理;
# 配置说明【要点】
config.yaml文件配置信息:https://verdaccio.org/docs/en/configuration
配置文件在/root/.config/verdaccio/config.yaml,相关配置字段意义在文件中都有注释
# path to a directory with all packages
storage: /home/{user}/.local/share/verdaccio/storage # 库存路径,需要考虑磁盘空间
# 包含所有包的目录路径,npm私服包的存放目录以及缓存地址
storage: ./storage #设置全路径,或者相对路径;
# 包含plugins的目录路径,默认插件的文件位置,一般只对docker部署有关系
plugins: ./plugins

web: # 自定义web项,即浏览器访问页面
  title: Verdaccio
  # comment out to disable gravatar support 注释掉gravatar禁止使用
  # gravatar: false
  # by default packages are ordercer ascendant (asc|desc)  默认的packages是准备好的两个选择
  # sort_packages: asc
  # convert your UI to the dark side  用户界面是黑夜模式
  # darkMode: true
  # translate your registry, api i18n not available yet  看看下你的注册表,i18n api还不能使用
# i18n:
# list of the available translations 查看可以使用的注册列表的地址:https://github.com/verdaccio/ui/tree/master/i18n/translations
#   web: en-US

auth:
  htpasswd:
    file: ./htpasswd # 添加用户(npm adduser)后自动创建,保存用户信息,可以初始化用户
   # Maximum amount of users allowed to register, defaults to "+inf".允许注册的最大用户数量,可以是无穷大
    # You can set this to -1 to disable registration. 你可以设置-1去禁止用户通过 npm adduser 去注册
    # max_users: 1000  #默认注册人数最大数量是1000

uplinks: # 可以配置多个上游地址,后面packages中的proxy指定用哪个
  npmjs:
    # url: https://registry.npmjs.org/
    url: https://registry.npm.taobao.org/ # 更改此上游地址
    agent_options:  #代理的配置项
      keepAlive: true
      maxSockets: 40
      maxFreeSockets: 10
# 包的权限管理,$all为所有人,$authenticated为通过验证人
 # 分布和安装两种权限,值可以特指某几人
packages:
  '@*/*': # 跟package.json中的name属性进行匹配 # 一种是@/表示某下面所属的某项目,关键字匹配
    # scoped packages   配置权限管理
    access: $all # 表示哪一类用户可以对匹配的项目进行安装(install)和查看包的信息
    publish: $authenticated # 表示哪一类用户可以对匹配的项目进行发布(publish)
    unpublish: $authenticated # 表示哪一类用户可以对匹配的项目进行卸载(publish)
    # proxy: npmjs # 这里的值是对应于 uplinks 的名称,如果本地不存在,允许去对应的uplinks去拉取

  '**': # 另一种是*匹配项目名称(名称在package.json中有定义)
    # allow all users (including non-authenticated users) to read and
    # publish all packages
    # 允许所有用户(包括未经身份验证的用户)读取和发布所有包
    # you can specify usernames/groupnames (depending on your auth plugin) 您可以指定用户名/组织名称(取决于验证身份的插件)
    # and three keywords: "$all", "$anonymous", "$authenticated" 三个关键字:所有的,匿名的,验证过的  也可以使用具体的用户名或者组织名称(公司私有的名字)和配置的用户表 htpasswd 有关
    access: $all
    # allow all known users to publish/publish packages 允许所有用户去发布包
    # (anyone can register by default, remember?)  任何人都可以默认注册
    publish: $authenticated
    unpublish: $authenticated

    # if package is not available locally, proxy requests to 'npmjs' registry 如果包不允许在本机使用,可以用proxy请求npmjs注册表的代理
    proxy: npmjs

# You can specify HTTP/1.1 server keep alive timeout in seconds for incoming connections. 传入的指定连接的HTTP/1.1服务器保持活跃状态直到超时,以秒为单位
# A value of 0 makes the http server behave similarly to Node.js versions prior to 8.0.0, which did not have a keep-alive timeout.  值为0的时候的服务表现行为和8.0.0之前版本的nodejs链接的时候没有保持活跃状态导致超时
# WORKAROUND: Through given configuration you can workaround following issue  解决办法:通过已知的配置,你可以解决这些问题: https://github.com/verdaccio/verdaccio/issues/301. Set to 0 in case 60 is not enough.  如果60不够的话可以设置为0
server:
  keepAliveTimeout: 60

middlewares:
  audit:
    enabled: true

logs:
  - {type: stdout, format: pretty, level: http}
  #- {type: file, path: verdaccio.log, level: info}
#experiments: 实验性的
#  # support for npm token command  支持npm的token令牌
#  token: false
#  # support for the new v1 search endpoint, functional by incomplete read more on ticket 1732
#  search: false
#  # disable writing body size to logs, read more on ticket 1912
#  bytesin_off: false

# This affect the web and api (not developed yet) 这些会影响web和api(尚未开发的功能)
#i18n:
#web: en-US

#默认是没有的,只能在本机访问,添加后可以通过外网访问
listen: 0.0.0.0:4873 # 设置监听地址,0.0.0.0匹配本机地址
2
3
4
5
6
7
8
9
10
11
12
13
14
15
16
17
18
19
20
21
22
23
24
25
26
27
28
29
30
31
32
33
34
35
36
37
38
39
40
41
42
43
44
45
46
47
48
49
50
51
52
53
54
55
56
57
58
59
60
61
62
63
64
65
66
67
68
69
70
71
72
73
74
75
76
77
78
79
80
81
82
83
84
85
86
87
# 私有库的权限管理
因为verdaccio默认是人人都可以注册的,所以需要先将注册窗口关闭
auth:
  htpasswd:
    file: ./htpasswd
    max_users: -1 # 此配置项可以关闭注册功能
2
3
4
verdaccio 的认证是基于 verdaccio-htpasswd (opens new window), 可以通过官方提供的工具来生成 htaccesstools (opens new window),将生成的段字符串添加到 htpasswd 中即可,这样的话就可以登录npm私有库
之后就需要修改verdaccio文件下的config.yaml的配置:针对不同的包来设置access,publish,unpublish对应的权限组,因为htpasswd是默认的鉴权插件,所以只能写入相应的用户名,all,authenticated,$anonymous
auth:
  htpasswd:
    file: ./htpasswd
    max_users: -1 #此配置项可以关闭注册功能
    duGroup:
    #这里可以自定义用户组
    demoPublish: [xiaoming, xiaohong, xiaoli]
    demoUnpublish: [xiaojun, xiaoming]
    testPublish: [xiaoming,xiaojun]
 packages:
        '@demo/*':
            access: $all
            #针对不同的包,可以指定不同的用户组来满足权限控制
            publish: demoPublish
            unpublish: demoUnpublish
            proxy: npmjs
     'test':
            access: $all
            publish: testPublish
            unpublish: demoUnpublish
            proxy: npmjs
2
3
4
5
6
7
8
9
10
11
12
13
14
15
16
17
18
19
20
21
或者通过安装htpasswd-for-sinopia (opens new window)工具来添加账号
 npm install htpasswd-for-sinopia -g
 sinopia-adduser   #在 htpasswd 目录执行
2
为其他登录的用户生成用户名和密码,之后将用户名和密码写入verdaccio文件夹下的htpasswd文件中,然后就跟上文是一样的步骤。
# 源码方式安装
# 服务器上安装node
Node 官网已经把 linux 下载版本更改为已编译好的版本了,可以直接下载解压后使用,下载链接 (opens new window)
$ wget https://nodejs.org/dist/v11.9.0/node-v11.9.0-linux-x64.tar.gz   #下载
$ tar xf node-v11.9.0-linux-x64.tar.gz       #解压
$ cd node-v11.9.0-linux-x64/                 #进入解压目录
$ ./bin/node -v                              #执行node命令 查看版本
v11.9.0
1
2
3
4
5使用ln命令设置软链接到/usr/local/bin目录,/usr/local/bin是给用户放置自己的可执行程序的地方:
ln -s /usr/local/node-v11.9.0-linux-x64/bin/npm   /usr/local/bin/
ln -s /usr/local/node-v11.9.0-linux-x64/bin/node   /usr/local/bin/
1
2# 服务器上安装verdaccio
使用默认npmjs.org registry,在服务器上安装verdaccio:
$ npm install -g verdaccio
$ verdaccio
-bash: verdaccio: command not found #测试verdaccio命令,此时会报找不到命令
找不到命令,原因在于环境变量没设置,修改/etc/profile文件,在末尾添加以下内容:

```bash
export NODE_HOME=/usr/local/node-v11.9.0-linux-x64  #Node所在路径
export PATH=$NODE_HOME/bin:$PATH
2
3
4
5
6
执行命令 source /etc/profile使生效,再次运行verdaccio:
$ verdaccio doesn't need superuser privileges. Don't run it under root.
 warn  --- config file  - /root/.config/verdaccio/config.yaml
 warn  --- http address - http://localhost:4873/
2
3
修改iptables设置,开放4873端口:
$ iptables -I INPUT 4 -p tcp -m state --state NEW -m tcp --dport 4873  -j ACCEPT        #允许 4873  端口
$ service iptables save                         #保存 iptables  规则
2
【坑1】访问虚拟机的npm仓库地址被拒绝
除了开放iptables的4873端口外,还需要在sinopia的配置文件末尾加上:
listen: 0.0.0.0:4873
重新启动
$ Sinopia doesn't need superuser privileges. Don't run it under root.
 warn  --- config file  - /root/.config/verdaccio/config.yaml
 warn  --- http address - http://0.0.0.0:4873/
2
3
这样我们就能通过自己虚拟机的ip:4873访问了
# 使用守护进程启动(pm2)
安装:npm install -g pm2 启动:pm2 start verdaccio
# 用户管理
配置文件中关于鉴权的默认配置为:
auth:
  htpasswd:
    file: ./htpasswd   //保存用户的账号密码等信息
    # Maximum amount of users allowed to register, defaults to "+inf".
    # You can set this to -1 to disable registration.
    max_users: 1000  //默认为1000,改为-1后,禁止注册
1
2
3
4
5
6添加用户的方法:在客户端终端运行
npm adduser --registry http://xxxxx:4873/,设置相应的用户名、密码、邮箱后即可登录、发布包。如果将配置项max_users设为-1,表示禁用 npm adduser 命令来创建用户,需手动在htpasswd文件中添加用户信息来初始化用户。
# npm方式安装
npm install -g verdaccio  #npm下载
yarn global add verdaccio  #yarn下载  用yarn下载的时候 verdaccio运行不起来的时候请换成npm下载
#或者nrm切换下源地址  要是报权限错误的话,请选择cmd<以管理员身份运行>在输入一次
#或者在cmd输入下面的命令:--unsafe-perm添加上是为了防止报 gyp ERR! permission denied 的权限问题
npm install -g verdaccio --unsafe-perm
verdaccio

#命令行工具
verdaccio --listen 4000 --config ~./config.yaml

npm install -g pm2 #安装pm2
pm2 start verdaccio #启动verdaccio  status为online即为成功
2
3
4
5
6
7
8
9
10
11
12
# Docker方式安装【推荐】
1: 拉取镜像
一般倾向于指定版本; 提供的Docker镜像版本 : https://hub.docker.com/r/verdaccio/verdaccio/tags/
docker pull verdaccio/verdaccio:4
2: 资源外挂映射
docker run --restart=always -d  --name verdaccio4.7.2 \
                     -p 7373:4873 \
           -v /data/verdaccio/conf:/verdaccio/conf \
           -v /data/verdaccio/storage:/verdaccio/storage \
           -v /data/verdaccio/plugins:/verdaccio/plugins \
           -v /data/verdaccio/node_modules:/opt/verdaccio/node_modules \
           verdaccio/verdaccio:4.7.2
2
3
4
5
6
7
可能会出现的问题:
# adduser command Error :'verdaccio/conf/htpasswd' permission denied
处理:sudo chown 10001:65533 htpasswd
因为verdaccio容器内的verdaccio用户无法对宿主机进行写入操作,所以还需执行
cd conf
touch htpasswd
sudo chown 10001:65533 ~/docker/verdaccio/conf/htpasswd
sudo chown -R 10001:65533 ~/docker/verdaccio/storage
2
3
4
也可以固定用户:
1.直接添加用户
npm adduser --registry http://localhost:4873
输入username password 以及邮箱即可
2.在注册用户文件中添加用户
使用htpasswd生成器为htpasswd文件创建密码。http://www.htaccesstools.com/htpasswd-generator
然后复制出来 打开 ~/docker/verdaccio/conf/htpasswd 粘贴进去
相关config.yaml
- https://verdaccio.org/docs/en/docker.html
- https://github.com/verdaccio/verdaccio/blob/master/conf/docker.yaml
# path to a directory with all packages
storage: /verdaccio/storage
auth:
  htpasswd:
    file: ./htpasswd # setting
#    max_users: -1

#security:
#  api:
#    jwt:
#      sign:
#        expiresIn: 60d
#        notBefore: 1
#  web:
#    sign:
#      expiresIn: 7d

uplinks:
  npmjs:
    url: https://registry.taobao.org/ # https://registry.npmjs.org/
     agent_options:  #代理的配置项
      keepAlive: true
      maxSockets: 40
      maxFreeSockets: 10

packages:
  '@*/*':
    access: $authenticated
    publish: $authenticated
    proxy: npmjs

  '**':
    access: $authenticated
    publish: $authenticated
    proxy: npmjs

server:
  keepAliveTimeout: 60

middlewares:
  audit:
    enabled: true
logs:
  - {type: stdout, format: pretty, level: trace}
  #- {type: file, path: verdaccio.log, level: info}

#i18n:
#web: en-US
2
3
4
5
6
7
8
9
10
11
12
13
14
15
16
17
18
19
20
21
22
23
24
25
26
27
28
29
30
31
32
33
34
35
36
37
38
39
40
41
42
43
44
45
46
47
48
# Using docker-compose
- Get the latest version of docker-compose (opens new window).
- Build and run the container:
docker-compose up -d --build
You can set the port to use (for both container and host) by prefixing the above command with VERDACCIO_PORT=5000.
version: '3.1'

services:
  verdaccio:
    image: verdaccio/verdaccio
    container_name: "verdaccio"
    networks:
      - node-network
    environment:
      - VERDACCIO_PORT=4873
    ports:
      - "4873:4873"
    volumes:
      - "./storage:/verdaccio/storage"
      - "./config:/verdaccio/conf"
      - "./plugins:/verdaccio/plugins"
networks:
  node-network:
    driver: bridge
2
3
4
5
6
7
8
9
10
11
12
13
14
15
16
17
18
19
查看容器日志:docker logs --tail 20 verdaccio
EACCES: permission denied, open '/verdaccio/conf/htpasswd'
根据官方文档和文末的最后一篇文章得知,docker 容器中的 uid 和 gid 和宿主机是共享的,只不过没有具体的名称,而容器内 verdaccio 使用的 uid 为 10001,gid 为 65533,
所以在宿主机改一下 htpasswd 文件的权限:sudo chown 10001:65533 htpasswd
同理,storage 目录是 verdaccio 存放包数据的目录,也需要修改一下权限:sudo chown -R 10001:65533 storage
sudo chown 10001:65533 htpasswd
sudo chown -R 10001:65533 storage
2
然后再试一下添加用户/发布包,就成功;
# 使用cnpm+cnpmjs.org
sinopia 的优点是配置简单,对环境依赖少(仅 node 就够了),并且支持 windows 系统下运行。
但它也有缺点,主要是以下几点:
- 权限管理比较弱,对用户权限,发布权限,下载权限控制不是很得心应手;
- 缓存优化不足,经常会在安装共有包的时候处于挂起状态;
- 不能做官方仓库的镜像。
所以,sinopia 比较适合个人搭建在本地作为 npm 缓存,这样,安装过的包会直接从缓存中获取,加快安装速度。
对于企业级的应用来说,就需要另外一个解决方案了:cnpm (opens new window) + cnpmjs.org (opens new window)
环境依赖:
- node (opens new window) >= 4.3.1
- linux(不支持 windows)
- 数据库(mysql (opens new window), sqlite (opens new window), MariaDB, PostgreSQL)
安装
$ npm install -g cnpm
$ npm install -g cnpmjs.org
2
配置
配置文件位于 ~/.cnpmjs.org/config.json 中
{
  "debug": false, // 是否启动 debug 模式
  "enableCluster": true, // 是否启用 cluster 模式
  "mysqlServers": [ // 数据库配置,以 mysql 为例
    {
      "host": "host",
      "port": 3306,
      "user": "user",
      "password": "password"
    }
  ],
  "mysqlDatabase": "cnpmjs", // 数据库名
  "enablePrivate": true, // 是否启用私有化,这样只有定义在 `admins` 中的用户才能发布
  "admins": { // 管理员配置,可以配置多个
    "senntyou": "yessz@foxmail.com"
  },
  "syncModel": "exist", // 同步模式
  "scopes": [ // 包前缀,如果不是以这个前缀命名的包将不能发布,可以配置多个
    "@test"
  ],
  "registryHost": "http://your.company.npm.registry.com", // 对应的 npm registry 地址
  "sourceNpmRegistry": "https://registry.npm.taobao.org" // 找不到的包,会上游到哪里去找
}
2
3
4
5
6
7
8
9
10
11
12
13
14
15
16
17
18
19
20
21
22
23
更多配置参考 cnpmjs.org config (opens new window)
设置 cnpm registry 属性
$ cnpm config set registry http://your.company.npm.registry.com
运行
cnpmjs.org start
运行的时候将会开启两个端口:7001(registry),7002(web)。
7001(registry)
用来在命令行发布,下载包等对用的远程 registry 地址。比如一些比较常用的 registry 地址:
npm: https://registry.npmjs.org/ npm 官方仓库地址cnpm: http://r.cnpmjs.org/ cnpmjs.org 官方仓库地址taobao: https://registry.npm.taobao.org/ 淘宝 NPM 镜像
用 nginx (opens new window) 配置 url 地址到 7001 端口:
server {
    listen 80;
    listen [::]:80;
    server_name your.company.npm.registry.com;
    location / {
        proxy_set_header X-Forwarded-For $proxy_add_x_forwarded_for;
        proxy_set_header X-Forwarded-Proto $scheme;
        proxy_set_header X-Real-IP $remote_addr;
        proxy_set_header Host $http_host;
        proxy_pass http://127.0.0.1:7001;
    }
    location ~ /.well-known {
        allow all;
    }
    client_max_body_size 50m;
}
2
3
4
5
6
7
8
9
10
11
12
13
14
15
16
重启 nginx,现在可以通过 http://your.company.npm.registry.com 去发布私有包到这个仓库里(如果没有其他问题的话)。
7002(web)
用来在 web 端查看仓库信息,搜索包,包信息等。比如一些比较常用的地址:
用 nginx (opens new window) 配置 url 地址到 7002 端口:
server {
    listen 80;
    listen [::]:80;
    server_name your.company.npm.com;
    location / {
        proxy_set_header X-Forwarded-For $proxy_add_x_forwarded_for;
        proxy_set_header X-Forwarded-Proto $scheme;
        proxy_set_header X-Real-IP $remote_addr;
        proxy_set_header Host $http_host;
        proxy_pass http://127.0.0.1:7002;
    }
    location ~ /.well-known {
        allow all;
    }
    client_max_body_size 50m;
}
2
3
4
5
6
7
8
9
10
11
12
13
14
15
16
重启 nginx,现在你就可以通过 http://your.company.npm.com 访问仓库web页面了(如果没有其他问题的话)。
永久运行
如果仅通过 cnpmjs.org start 运行,一旦关闭终端,程序就会停止运行。推荐使用 screen 命令开启永久运行,可以通过 Linux screen (opens new window) 了解下这个命令的用法。
$ screen -S cnpmjs # 创建一个名为 cnpmjs 的窗口
$ cnpmjs.org start # 运行程序
Ctrl+a+d # 按Ctrl+a,然后再按d,离开当前窗口,而程序不会终止
$ screen -r cnpmjs # 重新进入 cnpmjs 的窗口,做更多的操作
2
3
4
# 配置 nginx
为了npm私有服务器安全,要服务器上再加一层ngx代理;
如果 nginx 直接安装在宿主机,直接新建配置文件填入以下内容即可:
server {
  listen 80;
  server_name your.npm-server.com;
  location / {
    proxy_pass              http://127.0.0.1:4873/;
    proxy_set_header        Host $host;
  }
}
2
3
4
5
6
7
8
# 迁移
由于笔者是从 Verdaccio@3.0 升级到 4.3,所以将原服务器上的 config.yaml、htpasswd 和 storage 文件夹 scp 过去,然后修改一下权限即可。
scp config.yaml user@remoteServer:/path/to/config.yaml
scp htpasswd user@remoteServer:/path/to/htpasswd
scp -r storage user@remoteServer:/path/to/storage
2
3
同时迁移后注意修改 config.yaml 中的 htpasswd 和 storage 路径。
# 客户端使用
# 发布/安装/卸载组件
npm adduser --registry http://localhost:4873      #添加功能,无账号的添加完毕直接包
npm login --registry=http://localhost:4873        #登录功能,有账号的话可以直接使用这个
npm publish --registry http://localhost:4873      #发布包
2
3
或者用后面的nrm管理源后再操作;
nrm add company http://localhost:4873  #company可以换任意名称  url地址  添加功能
nrm use company       #使用company的源地址

#这样的话简单了结,不用手动输入registry
npm addUser
npm login
npm publish

npm install npm-test  #要是没有切换的话,请手动添加 --registry=http://localhost:4873
npm unpublish npm-test --force  #删除发布的包
2
3
4
5
6
7
8
9
10
# 设置 npm registry 属性
npm config set registry http://{服务器ip}:4873/
npm config set registry http://localhost:8081/repository/group-npm/
2
推荐使用 nrm (opens new window) 来快速切换 npm registry 配置。
# 使用 nrm 管理registry
$npm install -g nrm

$ nrm ls
* npm ---- https://registry.npmjs.org/
  cnpm --- http://r.cnpmjs.org/
  taobao - https://registry.npm.taobao.org/
  nj ----- https://registry.nodejitsu.com/
  rednpm - http://registry.mirror.cqupt.edu.cn/
  npmMirror  https://skimdb.npmjs.com/registry/
  edunpm - http://registry.enpmjs.org/

$ nrm add bdp http://XXXXXX:4873 # 添加私服的npm镜像地址
$ nrm use bdp # 使用私服的镜像地址
2
3
4
5
6
7
8
9
10
11
12
13
# 相关链接
https://verdaccio.org/docs/zh-CN/installation
