 verdaccio详细设置
# 定义
官网: https://www.verdaccio.org/ A lightweight private npm proxy registry
一个轻量级的npm中心代理仓库!采用node实现的
简单点说,就是npm私有部署仓库,类似npm官方付费的私有仓.
实践
包括基础组件库和业务组的库, 迁移到集群私有库后,跑了一个半月,还没有宕过一次.
# 部署版本
详细见npm发布及私有服务器搭建;
部署方式
- npm全局方式安装;
- 源码方式安装;
- docker方式安装;
- docker-compose方式安装;
采用docker自己部署(用的是v4.6.x),方便后续滚动更新.
配置文件及模块缓存目录是从外部映射进去,维护比较弹性
外网访问是通过nginx代理,内网集群是通过安全组策略授权.
1: 拉取镜像
一般倾向于指定版本; 提供的Docker镜像版本 : https://hub.docker.com/r/verdaccio/verdaccio/tags/
docker pull verdaccio/verdaccio:4
2: 资源外挂映射
docker run -d  --name verdaccio4.7.2 \
                     -p 4873:4873 \
           -v /data/verdaccio/conf:/verdaccio/conf \
           -v /data/verdaccio/storage:/verdaccio/storage \
           -v /data/verdaccio/plugins:/verdaccio/plugins \
           -v /data/verdaccio/node_modules:/opt/verdaccio/node_modules \
           verdaccio/verdaccio:4.7.2
2
3
4
5
6
7
# 配置设置
verdaccio配置主要集中在一个配置文件,
config.yaml
# 基础配置(默认语言,logo替换,排序)
web:
  # WebUI is enabled as default, if you want disable it, just uncomment this line
  enable: true
  title: #网站首页进入的正文标题
  logo: #这里可以给定一个远程连接的图片,注释掉就采用默认的
  # comment out to disable gravatar support
  gravatar: true
  # by default packages are ordercer ascendant (asc|desc)
  # sort_packages: asc  # 包的排序
  # darkMode: true # 黑暗模式
  # scope: "@scope"

# translate your registry, api i18n not available yet
i18n:
# list of the available translations https://github.com/verdaccio/ui/tree/master/i18n/translations
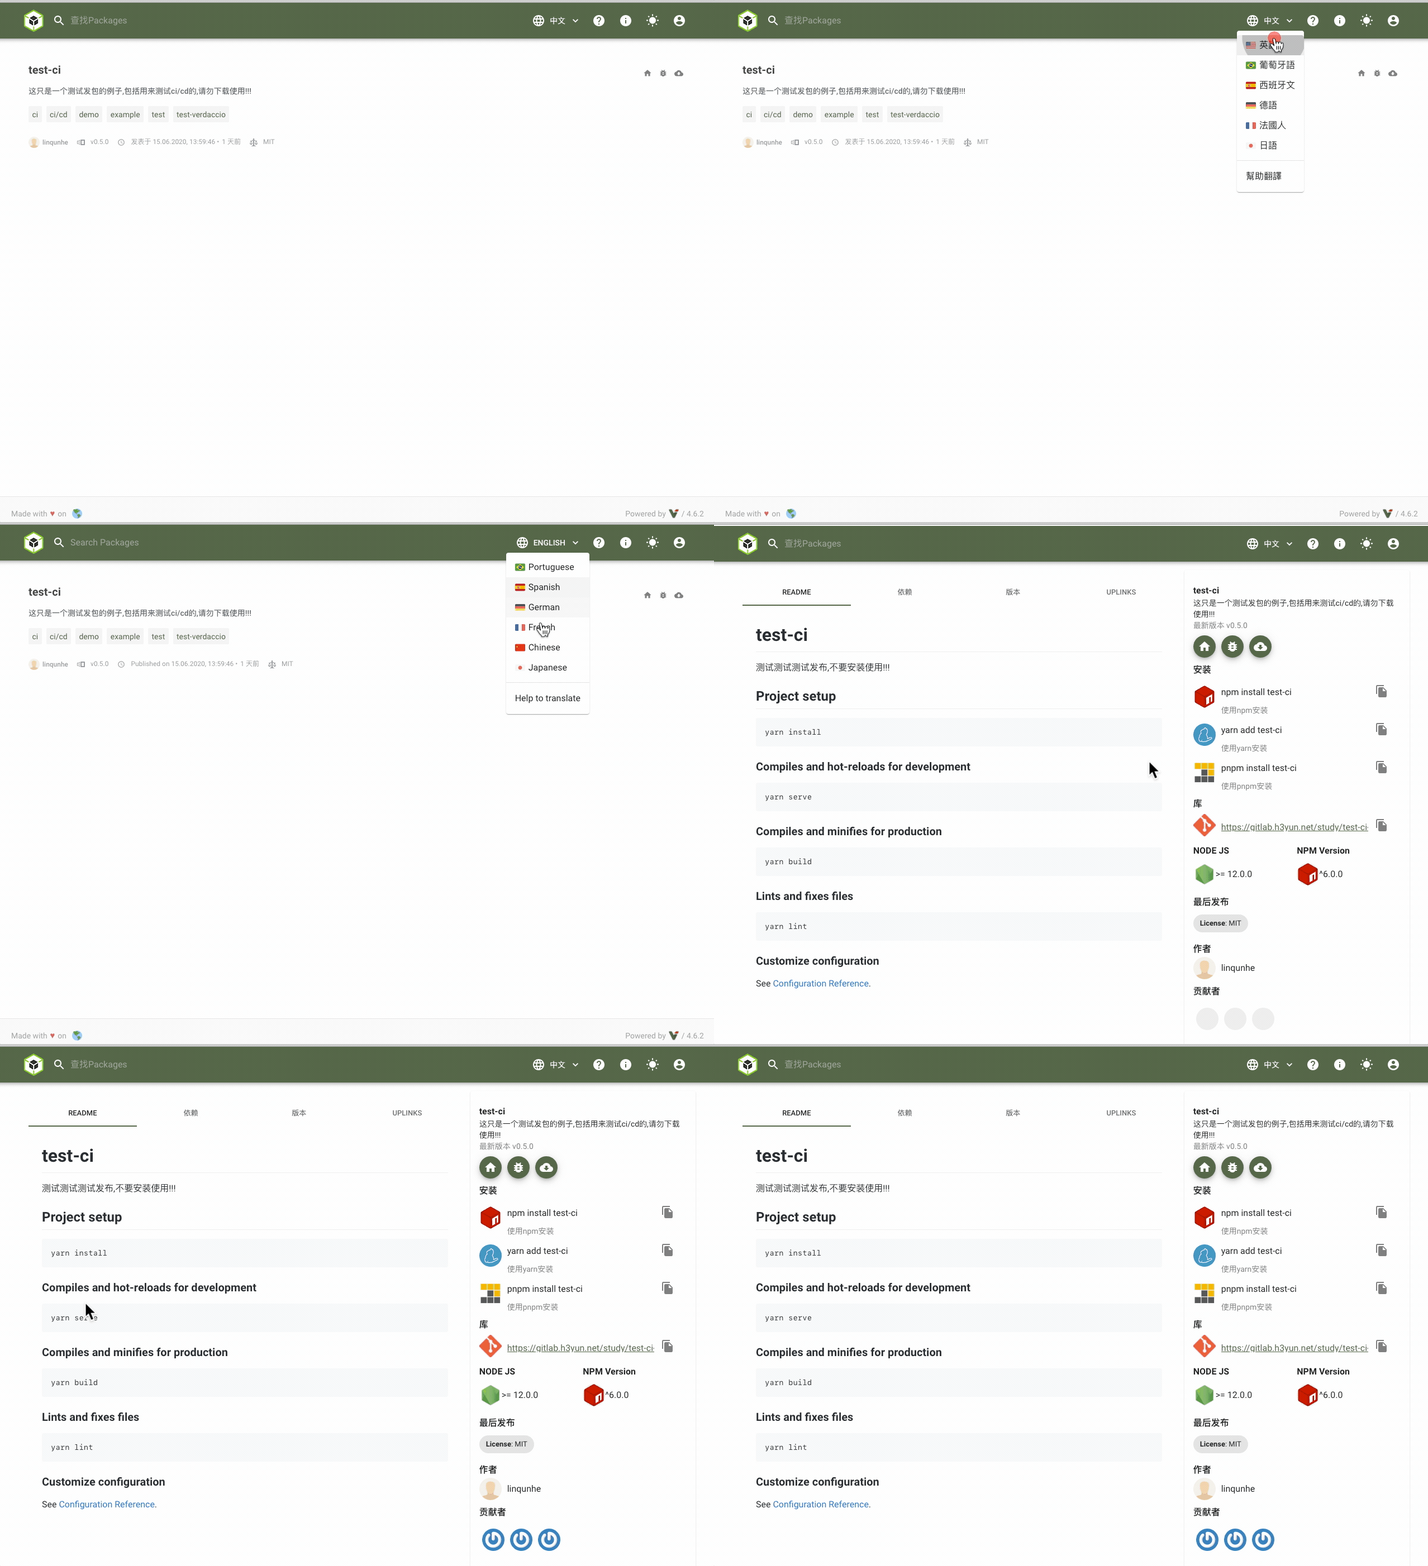
  web: zh-CN # 默认是en-US,我们改为默认中文
2
3
4
5
6
7
8
9
10
11
12
13
14
15
16
# 常用配置详解
storage: ./storage
auth:
htpasswd:
   file: /.htpasswd
uplinks:
npmjs:
   url: http://registry.npmjs.org/
packages:
'@*/*':
   access: $all
   publish: $authenticated
'*':
   access: $all
   publish: $authenticated
   proxy: npmjs
logs:
- {type: stdout, format: pretty, level: http}
listen: 0.0.0.0:4873
http_proxy: http://代理服务器ip:8080
https_proxy: http://代理服务器ip:8080
2
3
4
5
6
7
8
9
10
11
12
13
14
15
16
17
18
19
20
storage: 仓库保存的地址,publish时仓库保存的地址。
auth: htpasswd file:账号密码的文件地址,初始化时不存在,可指定需要手工创建。 max_users:默认1000,为允许用户注册的数量。 为-1时,不允许用户通过npm adduser注册。 但是,当为-1时,可以通过直接编写htpasswd file内容的方式添加用户。
语法:用户名:{SHA}哈希加密的字符=:autocreated 时间
加密算法:SHA1哈稀之后再转换成 Base64 输出就好
uplinks: 配置上游的npm服务器,主要用于请求的仓库不存在时到上游服务器去拉取。
packages: 配置模块。access访问下载权限,publish包的发布权限。
格式如下:
scope:
权限:操作
scope:两种模式
- 一种是 @/ 表示某下属的某项目
- 另一种是 * 匹配项目名称(名称在package.json中有定义)
权限:
- l access: 表示哪一类用户可以对匹配的项目进行安装(install)
- l publish: 表示哪一类用户可以对匹配的项目进行发布(publish)
- l proxy: 如其名,这里的值是对应于 uplinks 的名称,如果本地不存在,允许去对应的uplinks去取。
操作:
l $all 表示所有人(已注册、未注册)都可以执行对应的操作
l $authenticated 表示只有通过验证的人(已注册)可以执行对应操作,注意,任何人都可以去注册账户。
l $anonymous 表示只有匿名者可以进行对应操作(通常无用)
l 或者也可以指定对应于之前我们配置的用户表 htpasswd 中的一个或多个用户,这样就明确地指定哪些用户可以执行匹配的操作
听端口和主机名。
- localhost:4873 #默认
- 0.0.0.0:4873 #在所有网卡监听
代理
#http_proxy: http://something.local/  #http代理
#https_proxy: https://something.local/  #https代理
#no_proxy: localhost,127.0.0.1  #不适用代理的iP
2
3
# 常规的配置说明【要点】
配置文件一般在home/{user}/.config/verdaccio/config.yaml,把{user}替换成你的主机用户名。
简单说明如下(注意与实际配置对比参看):
- storage: 设置托管或缓存包的存放目录
- auth: 权限控制
  - htpasswd: 启用 htpasswd 插件管理权限
  - file: 制定 htpasswd 文件路径,htpasswd 中存储者用户名和加密过的秘钥
  - max\*users: 最多允许注册用户数

- uplinks: 设置外部仓储,如果 verdaccio 找不到请求的包(非 verdaccio 托管),就会查找外部仓储。常见的有
  - {name}: 外部仓储名称
    - url: 访问路径
    - timeout: 超时
    - maxage: 默认值 2m,2m 钟内不会就同样的请求访问外部仓储
    - fail\*timeout: 如果外部访问失败,在多长时间内不回重试
    - headers: 添加自定义 http 头当外部仓储访问请求中,例如 authorization: "Basic YourBase64EncodedCredentials=="
    - cache: 是否启用缓存,默认启用。

      # 常用仓储有
      npmjs:
        url: https://registry.npmjs.org
      yarnjs:
        url: https://registry.yarnpkg.com
      cnpmjs:
        url: https://registry.npm.taobao.org

- packages: 包访问或发布控制
  - {regexp}: 包名匹配正则。
    - access: 访问控制,可选值有
      - \$all(用户不限制),
      - \$anonymous(用户不限制),
      - \$authenticated(所有登录用户),
        username( 用户名,需指定具体用户,可指定多个用户,用户间空格隔开,如 secret super-secret-area ultra-secret-area)。
    - publish: 发布控制,
    - proxy: 代理控制,设置的值必选现在 uplinks 中定义。

    # 常用的包名正则有:

    \*\*            # 匹配任意包
    @\*/\_          # 匹配任意 scope 包
    @npmuser/\_     # 匹配 scope 为 npmuser 的包
    npmuser-\*      # 匹配包名有 npmuser- 前缀的包

    # 包名正则规范通 gitignore 一致,verdaccio 内部使用 minimatch 实现的,如果需要书写更复杂的正则,可以参考 [minimatch](https://www.npmjs.com/package/minimatch/) 文档。

- web: 前端展示页面控制
  - title: 设置页面标题
  - logo: 指定 logo 图片文件路径

- publish: 发布包是的全局配置
  - allow_offline: 在外部仓储离线时是否允许发布。在发布包是 verdaccio 会检查依赖包有效性,这个过程中需要访问外部仓储。

- url_prefix: 设置资源文件路径前缀。默认不需要设置,但如果使用 nginx 代理并改写了请求路径,就需要指定了。
  - listen: 设置服务运行地址端口,默认为 http://localhost:4873
    支持的配置有:
    localhost:4873              # default value
    http://localhost:4873       # same thing
    0.0.0.0:4873                # listen on all addresses (INADDR_ANY)
    https://example.org:4873    # if you want to use https
    [::1]:4873                  # ipv6
    unix:/tmp/verdaccio.sock    # unix socket

- https: HTTPS 证书配置
  - key: path/to/server.key
  - cert: path/to/server.crt
  - ca: path/to/server.pem

- log: 日志控制
  - type: file, stdout, stderr, 其中 stdout 需要同时指定 path
  - level: trace | debug | info | http (default) | warn | error | fatal
  - format: json | pretty | pretty-timestamped

- http_proxy: 设置以 http 形式访问外部仓储时使用的代理
- https_proxy: 设置以 https 形式访问外部仓储时使用的代理
- no_proxy: 不使用代理的请求路径
- max_body_size: 请求时上传的 json 允许的最大值

- notify: 当有包发布成功时,verdaccio 会发送通知。通知实际上是一次 http 请求。支持配置多套通知
  - method: 请求方法 GET,POST 等 HTTP Method
  - packagePattern: 包匹配正则, 这儿为 js 正则,仅当发布的包名匹配正则时才发送通知
  - packagePatternFlags: js 正则标志位,如 i 忽略大小写
  - headers: 自定义请求头
  - endpoint: 请求地址
  - content: handlebar 格式 html 模板,可以使用变量详见 Package Metadata
2
3
4
5
6
7
8
9
10
11
12
13
14
15
16
17
18
19
20
21
22
23
24
25
26
27
28
29
30
31
32
33
34
35
36
37
38
39
40
41
42
43
44
45
46
47
48
49
50
51
52
53
54
55
56
57
58
59
60
61
62
63
64
65
66
67
68
69
70
71
72
73
74
75
76
77
78
79
80
81
# 开启搜索
当我们私有 npm 库存在很多包的时候,我们想要查找某个包就会有些麻烦。而 Verdaccio 是支持搜索功能的,它是由 search 控制的,默认为 false,所以这里我们需要开启它:search: true
开启之后,我们就可以在私有 npm 库的页面上的搜索栏进行正常的搜索操作。
# 权限把控
packages:
  '@*/*':
    access: $all
    publish: $authenticated
    unpublish: $authenticated
    proxy: npmjs
  '**':
    access: $all
    publish: $authenticated
    unpublish: $authenticated
    proxy: npmjs
2
3
4
5
6
7
8
9
10
11
这 3 个参数的含义:
access 控制包的访问权限
publish 控制包的发布权限
unpublish 控制包的删除权限
packages:
  '@*/*':
    access: $authenticated
    publish: $authenticated
    unpublish: $authenticated
    proxy: npmjs
  '**':
    access: $authenticated
    publish: $authenticated
    unpublish: $authenticated
    proxy: npmjs
2
3
4
5
6
7
8
9
10
11
# 账号机制及授权
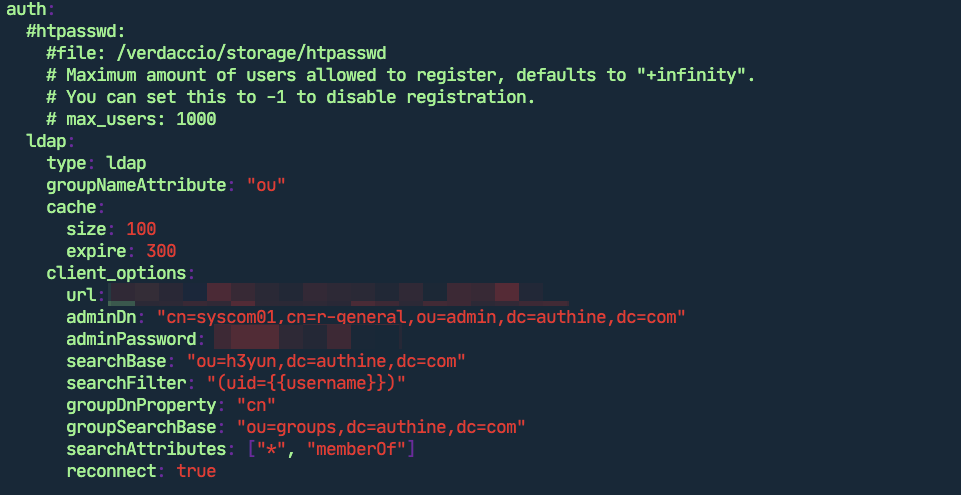
因公司内部使用,所以走ldap是必然的. verdaccio支持插件机制,这里我们用了这个插件:
verdaccio-ldap (opens new window) : 这个插件基本满足账号的打通! 授权机制也是通过ldap插件给定某个组,
对应的资源发包和撤回权限采用授权组即可.当然也可以特定到某个用户! 如图

# 上游链的配置
因为我们目前有两个集群, 不可能搭了新的,就放弃之前的. 那之前的私有仓资源如何可以通过这个私有仓访问, 主要配置uplinks来实现. Verdaccio Uplinks 文档 (opens new window)

uplinks:
  npmjs:
    url: https://registry.npmjs.org/
    timeout: 10s
  yarn:
    url: https://registry.yarnpkg.com/
    timeout: 10s
  taobao:
    url: https://registry.npm.taobao.org/
    timeout: 10s
  server2:
    url: http://mirror.local.net/
    timeout: 100ms
  server3:
    url: http://mirror2.local.net:9000/
  baduplink:
    url: http://localhost:55666/
2
3
4
5
6
7
8
9
10
11
12
13
14
15
16
17
# 包安装索引资源顺序
通过这个仓库安装资源有顺序的,是依次之上往下检索!! 值得一提的是: **proxy没必要同时代理多个公网的源,会非常慢!!!!因为会轮询去找资源!! ** Verdaccio 包访问文档 (opens new window)
packages:
  '@h3/*': # 若是@h3开头的包优先检索
    access: $all #谁可以访问
    publish: samy jira # 谁可以发布(可以授权个人用户或者组,比如我们这里是我还有我们jira的所有用户)
    unpublish: samy # 谁可以撤包!!就会把包从私有仓下架!!!而非npm那样只打deprecated标记位
    proxy: nexus-zh # 这里就是关联上游链了,uplinks,支持多个上游链

  '**': # 最终索引的地方,是不是很像路由的概念,
    # allow all users (including non-authenticated users) to read and
    # publish all packages
    #
    # you can specify usernames/groupnames (depending on your auth plugin)
    # and three keywords: "$all", "$aonymous", "$authenticated"
    access: $all

    # allow all known users to publish/publish packagesnonymous
    # (anyone can register by default, remember?)
    publish: $authenticated
    unpublish: $authenticated

    # if package is not available locally, proxy requests to 'npmjs' registry
    proxy: taobao  nexus-zh # 公网包我们优先从淘宝镜像源上拉取,之后查询我们nexus之前的私有包
2
3
4
5
6
7
8
9
10
11
12
13
14
15
16
17
18
19
20
21
22
# 项目资源安装服务端错误500
比如: error: internal erver error
请依次排除以下三点
代理的上游链互相引用,请保持单一!
本地缓存异常
安装区域先清空缓存
npm cache clear -f再安装终极大法(慎用)
清空verdaccio的模块缓存目录,这样所有依赖会重新梳理(已经发布的私有包注意备份)
# 效果图字段展示
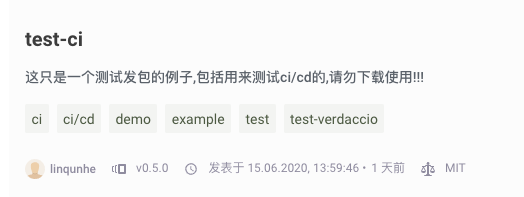
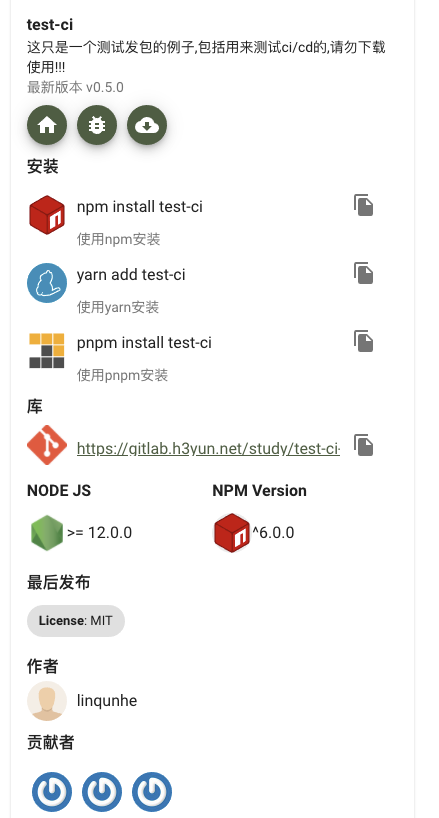
主要是读取package.json的标准字段来实现的,代码的部分数据做了脱敏; json里面加了些注释
{
  "name": "test-ci",
  "version": "0.5.0",
  "description":"这只是一个测试发包的例子,包括用来测试ci/cd的,请勿下载使用!!!", # 包描述
  "scripts": {
    "serve": "vue-cli-service serve",
    "build": "vue-cli-service build",
    "lint": "vue-cli-service lint",
    "jk2dt": "jk2dt"
  },
  "keywords": [ # 给别人检索的关键字
    "test",
    "test-verdaccio",
    "ci",
    "ci/cd",
    "demo",
    "example"
  ],
  "author": "samy", # 作者
  "contributors": [ # 贡献者
    {
      "name": "xxx",
      "email": "xxxm"
    },
    {
      "name": "xx2",
      "email": "xx2@xxx.com"
    }
  ],
  "dependencies": { # 核心依赖
    "core-js": "^3.6.5",
    "vue": "^2.6.11"
  },
  "devDependencies": { # 开发依赖
    "@h3/jenkins-2-dingtalk": "^1.7.10",
    "@vue/cli-plugin-babel": "~4.4.0",
    "@vue/cli-plugin-eslint": "~4.4.0",
    "@vue/cli-service": "~4.4.0",
    "babel-eslint": "^10.1.0",
    "eslint": "^6.7.2",
    "eslint-plugin-vue": "^6.2.2",
    "vue-template-compiler": "^2.6.11"
  },
  "eslintConfig": {
    "root": true,
    "env": {
      "node": true
    },
    "extends": [
      "plugin:vue/essential",
      "eslint:recommended"
    ],
    "parserOptions": {
      "parser": "babel-eslint"
    },
    "rules": {}
  },
  "browserslist": [
    "> 1%",
    "last 2 versions",
    "not dead"
  ],
  "peerDependencies": { # 引用的关联依赖,不会强制安装,缺失会警告
    "@h3/antd-vue": ">=1.4.10",
    "lodash": ">=4.17.15",
    "vue": ">=2.6.11",
    "vue-template-compiler": ">=2.6.11"
  },
  "bugs": { # 对应code  repo的issue
    "url": "httxxxxk/issues",
    "email":"cxxx"
  },
  "engines": { # 可以告知该报依赖什么node版本乃至什么版本的npm
    "node": ">= 12.0.0",
    "npm" : "^6.0.0"
  },
  "repository": { # code repo
    "type": "git",
    "url": "httpxxxx-hook.git"
  },
  "publishConfig": { # 指定发布域,就是指向私有仓
    "registry": "http://xxx"
  },
  "homepage": "httxxxxdy/test-ci-hook#readme",
  "license": "MIT"
}
2
3
4
5
6
7
8
9
10
11
12
13
14
15
16
17
18
19
20
21
22
23
24
25
26
27
28
29
30
31
32
33
34
35
36
37
38
39
40
41
42
43
44
45
46
47
48
49
50
51
52
53
54
55
56
57
58
59
60
61
62
63
64
65
66
67
68
69
70
71
72
73
74
75
76
77
78
79
80
81
82
83
84
85
86
# 发布推送
# 包发布推送到钉钉群
Verdaccio Notifications文档 (opens new window)
Verdaccio支持webhook方式推送发包信息(在npm publish的时候触发)
| 参数 | 类型 | 必填 | 支持 | 默认值 | 描述 |
|---|---|---|---|---|---|
| method | string | No | all | 请求方法post还是... | |
| packagePattern | string | No | all | 匹配在哪些包发布的时候触发消息推送钩子 | |
| packagePatternFlags | string | No | all | js 正则标志位,如i忽略大小写 | |
| headers | array/object | Yes | all | http headers,不用多说 | |
| endpoint | string | Yes | all | webhook发送端点 | |
| content | string | Yes | all | 可以出粗暴的理解为http的body,支持 Handlebar (opens new window) 表达式 |
# 注意缩进
notify:
  'test-dingtalk':
     method: POST
     headers: [{'Content-Type': 'application/json;charset=utf-8'}]
     endpoint: https://oapi.dingtalk.com/robot/send?access_token=xx1e1
     content: '{ "msgtype": "text","at": { "isAtAll": false }, "text": {"content":"New package published: `{{ name }}{{#each versions}} v{{version}}{{/each}}`"}}'
2
3
4
5
6
7
notify:
  'dingtalk':
    method: POST
    headers: [{'Content-Type': 'application/json;charset=utf-8'}]
    endpoint: https://oapi.dingtalk.com/robot/send?access_token=****, # 钉钉机器人的 webhook
    content: '{"color":"green","message":"新的包发布了: * {{ name }}*","notify":true,"message_format":"text"}'
2
3
4
5
6
其中,
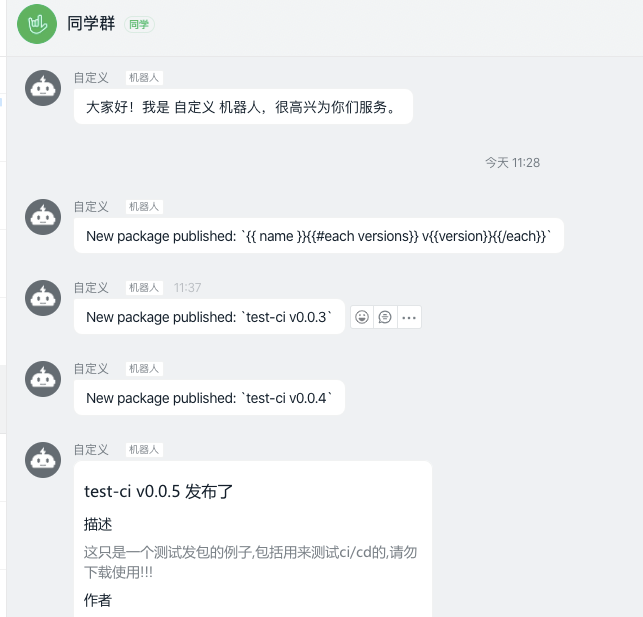
method和headers分别表示请求的方法和实体的类型。endpoint表示请求的Webhook地址。content则表示获取发布信息的基础模版,- 模版中
message的值会是钉钉群的机器人发送的消息内容(name表示发布的包名)。
比如钉钉支持的几种格式,只要拼凑对应的格式就能正常推送!!
# 订制包裹推送告警卡片(高级)
以上包发布的告警行为可以更加单一;通过图片丰富下卡片通知样式;
设置
规格很简单,就是把一个接口转为yaml的写法,唯一需要注意的就是换行符这些; 这里对接的是钉钉机器人,内容规格根据你用的webhook提供商调整!
notify:
'frontend-dingtalk':
method: POST
headers: [{'Content-Type': 'application/json;charset=utf-8'}]
endpoint: https://oapi.dingtalk.com/robot/send?access_token=09df4720bxxxx
content: '{"msgtype": "markdown","at": { "isAtAll": true },"markdown":{"title":"FBI WARNING!您有新的包裹,请注意查收!","text": "\n\n#### 包名: {{ name }} -> ([更多信息](http://npm.bdp.net:4873/-/web/detail/{{name}}))\n {{#if description}} > {{ description }}{{/if}} \n\n{{#if dist-tags.latest }}稳定版(latest):**{{ name }}@{{ dist-tags.latest }}**{{/if}} \n\n{{#if dist-tags.dev }}开发版(dev):**{{ name }}@{{ dist-tags.dev }}**{{/if}} \n\n{{#if dist-tags.alpha }}alpha版本:**{{ name }}@{{ dist-tags.alpha }}**{{/if}} \n\n{{#if dist-tags.alpha }}next版本:**{{ name }}@{{ dist-tags.next }}**{{/if}}\n\n发布人:**{{ publisher.name }}** \n\n 欢迎各位大佬使用,有问题请及时反馈,谢谢! \n\n "} }'
# packagePatternFlags: i
# packagePattern: ^@bdp-shared\/*$
2
3
4
5
6
7
8
效果
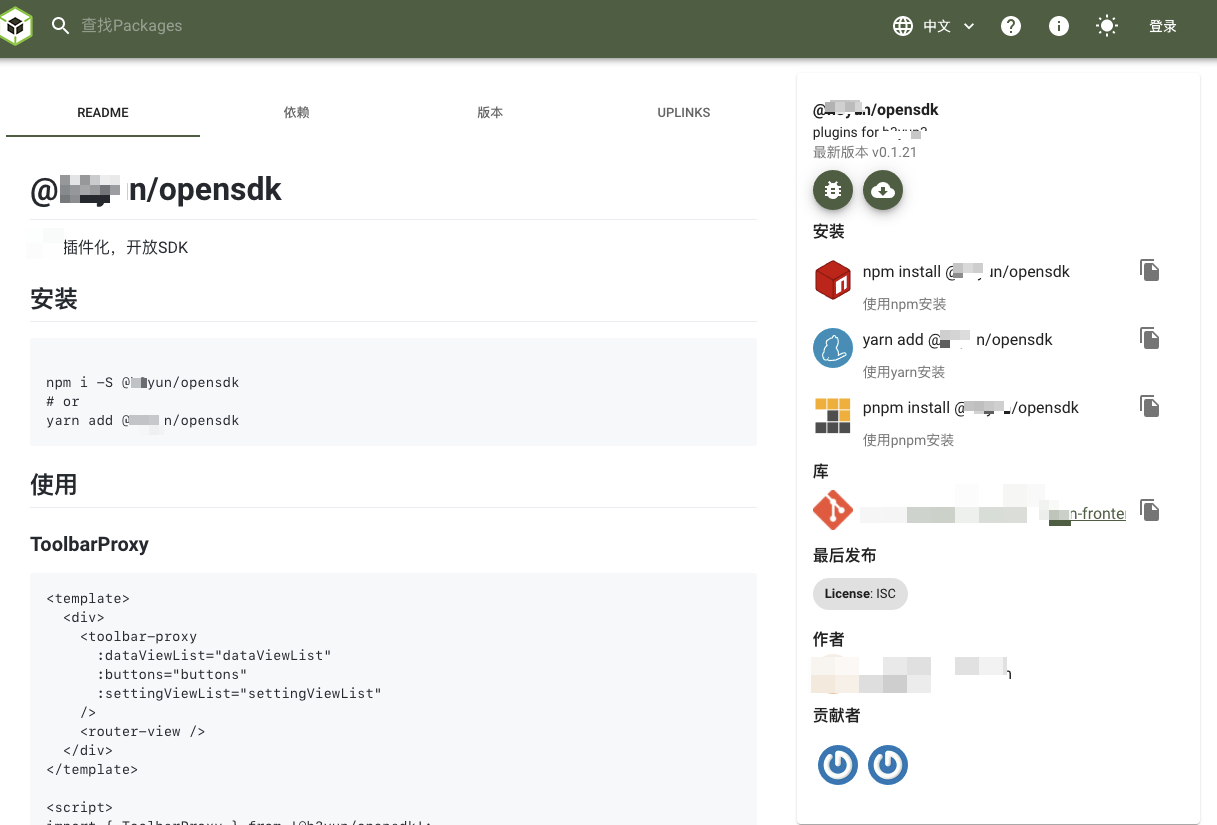
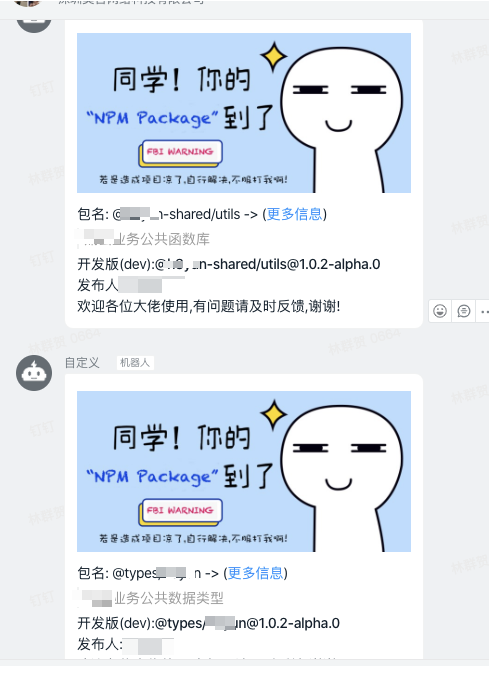
# 总体效果图
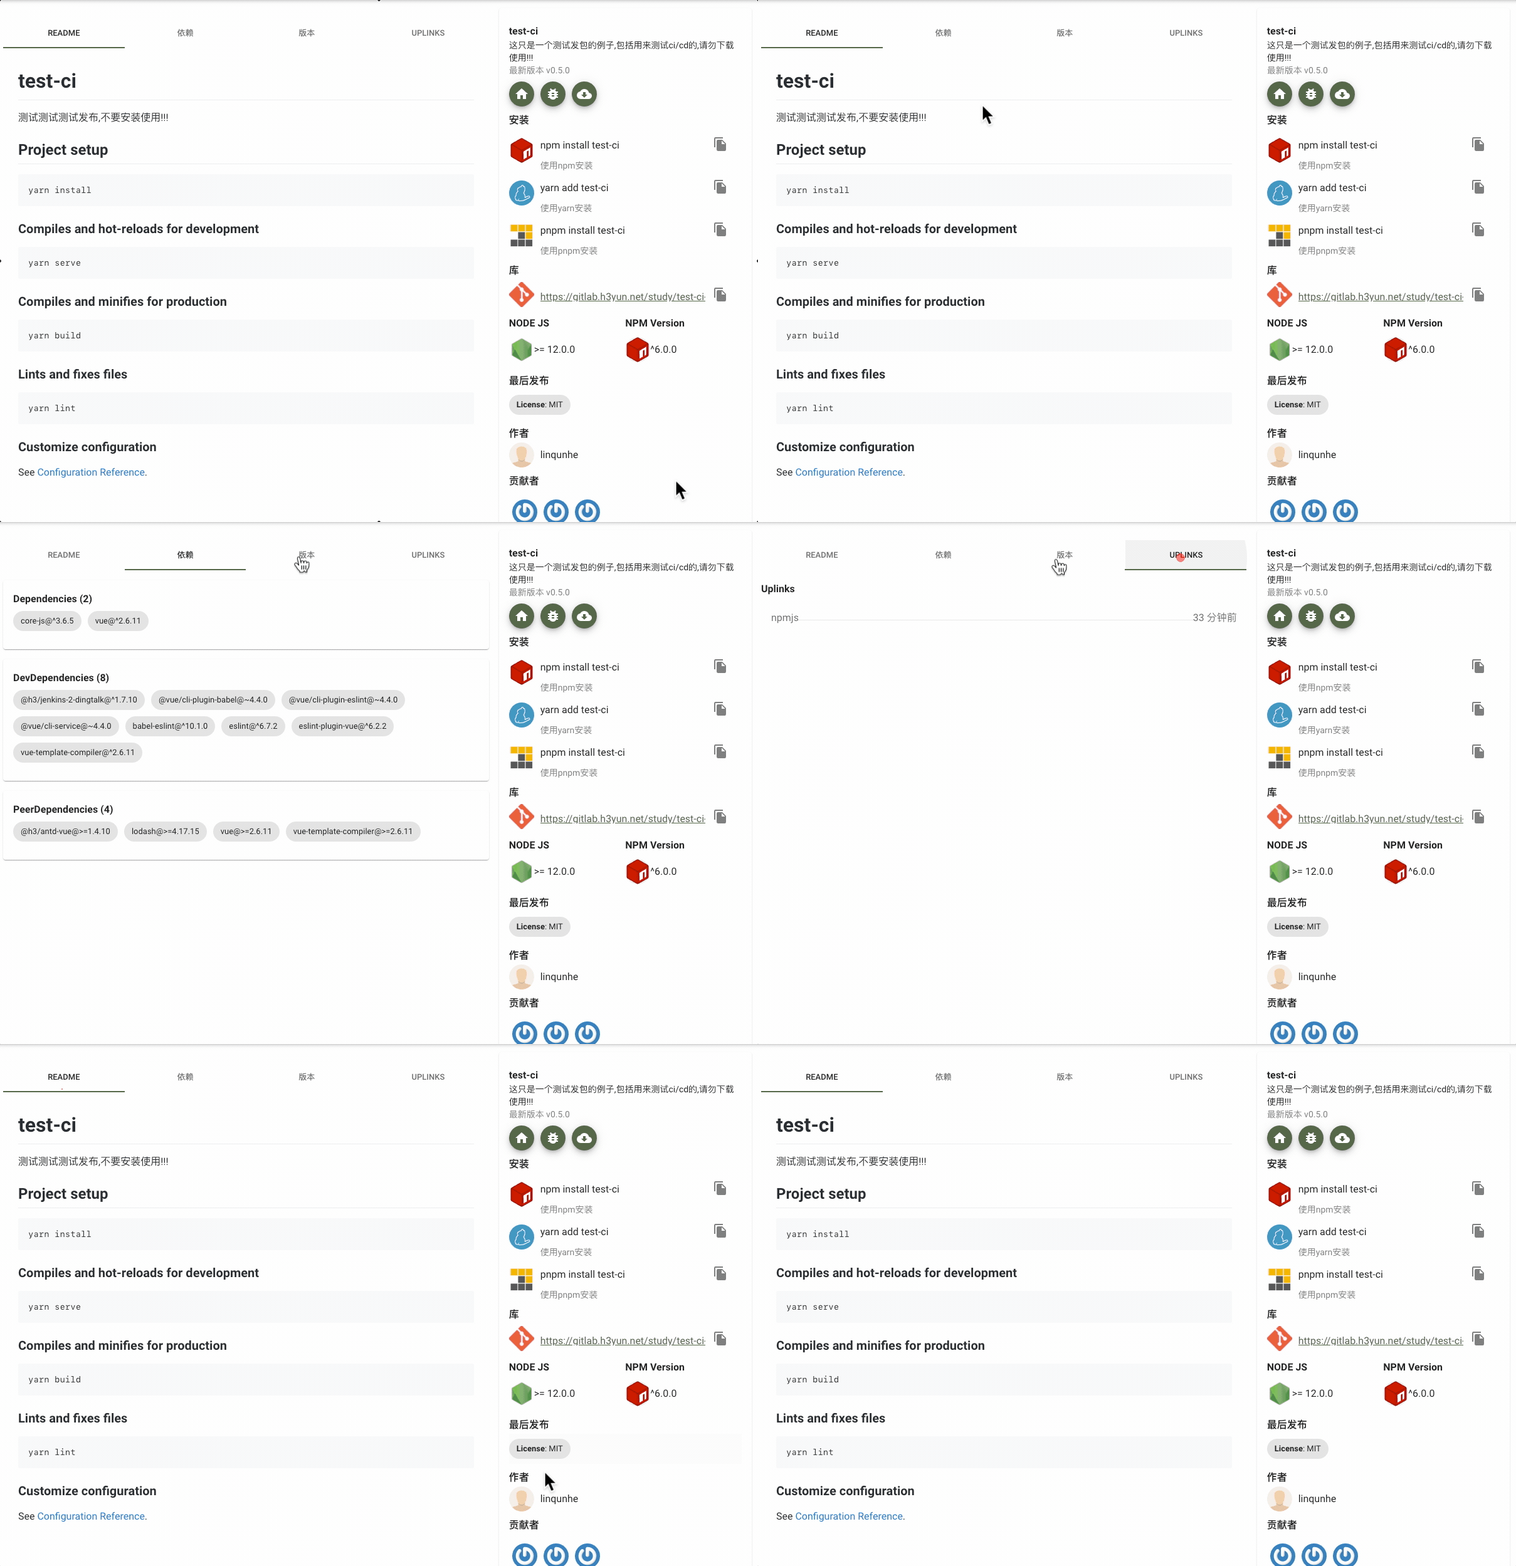
- 总体来说对前端人员比较友好,很多信息很直观.
- 包括依赖,发布仓库,代码反馈,node版本等等
# 相关链接
https://verdaccio.org/docs/zh-CN/notifications
