 js函数
js函数
# 定义方式
每个函数实际上都是一个 Function 对象,即: (function(){}).constructor === Function
函数是头等对象/一等公民
- 函数可以像任何其他对象一样具有属性和方法
- 可以赋值给变量(
函数表达式) - 可以作为参数传递给函数(
高阶函数) - 可以作为另一个函数的返回值(
闭包)
定义函数的方式有 3 种:
- 1:function命令(通过function关键字);
function fn() {} - 2:函数表达式(匿名函数); ===> 简写 箭头函数;
var fn = function() {}var fn = () => {} - 3:Function构造函数;
new Function(str)声明的对象是在函数创建时解析的,故比较低效
function getSum(){}//ES5
function (){}//匿名函数
()=>{}//ES6, 如果{}内容只有一行{}和return关键字可省

var sum=function(){}//ES5
let sum=()=>{}//ES6, 如果{}内容只有一行{}和return关键字可省
//将匿名函数分配给变量并将其作为参数传递给另一个函数;
//一个匿名函数可以分配给一个变量,它也可以作为参数传递给另一个函数

const sum = new Function('a', 'b' , 'return a + b')
2
3
4
5
6
7
8
9
10
比较:
1.函数声明有预解析,而且函数声明的优先级高于变量;
2.使用Function构造函数定义函数的方式是一个函数表达式, 这种方式会导致解析两次代码,影响性能。第一次解析常规的JavaScript代码,第二次解析传入构造函数的字符串;
# 函数的声明、表达式的区别
主要区别在
- 函数声明被提升到了
函数定义(可以在函数声明之前使用) - 函数表达式要根据定义的方式进行判断
- 通过
var定义:有变量声明提升,但是相比函数声明要低; - 通过
let 和 const定义:没有变量提升
- 通过
# 函数的length
//案例五
console.log(123['toString'].length + 123) // 124
//答案:123是数字,数字本质是new Number(),数字本身没有toString方法,则沿着__proto__去function Number()的prototype上找,找到toString方法,toString方法的length是1,1 + 123 = 124,至于为什么length是1
2
3
想考Number原型上的toString方法,但是我卡在了toString函数的length是多少这个难题上;
普通参数:
function fn1 () {}
function fn2 (name) {}
function fn3 (name, age) {}

console.log(fn1.length) // 0
console.log(fn2.length) // 1
console.log(fn3.length) // 2
2
3
4
5
6
7
默认参数:
function fn1 (name) {}
function fn2 (name = 'samy') {}
function fn3 (name, age = 22) {}
function fn4 (name, age = 22, gender) {}
function fn5(name = 'samy', age, gender) { }

console.log(fn1.length) // 1
console.log(fn2.length) // 0
console.log(fn3.length) // 1
console.log(fn4.length) // 1
console.log(fn5.length) // 0
2
3
4
5
6
7
8
9
10
11
剩余参数
在函数的形参中,还有剩余参数这个东西,那如果具有剩余参数,会是怎么算呢?
function fn1(name, ...args) {}
console.log(fn1.length) // 1
2
可以看出,剩余参数是不算进length的计算之中的
# 变量、函数提升
由于存在函数名的提升,所以在条件语句中声明函数,可能是无效的,这是非常容易出错的地方。
详细见【es6之变量,扩展,symbol,set,map,proxy,reflect及class】的详细使用;
# 属性、方法、参数
函数的length属性与实际传入的参数个数无关,只反映函数预期传入的参数个数。
function add(n1, n2){arguments[1] = 10;}
此时读取n2和arguments[1]并不会访问相同的内存空间,他们的内存空间是独立的,但他们的值保持同步
# 函数方法
parseInt(string,radix):返回转换成整数的值;返回值只有两种可能,不是一个十进制整数,就是NaN;
parseFloat(string):返回转换成浮点型的值;
# 参数
在参数传递方式上,有所不同:
- 函数的参数如果是
简单类型,会将一个值类型的数值副本传到函数内部,函数内部不影响函数外部传递的参数变量 - 如果是一个参数是
引用类型,会将引用类型的地址值复制给传入函数的参数,函数内部修改会影响传递
 同名参数
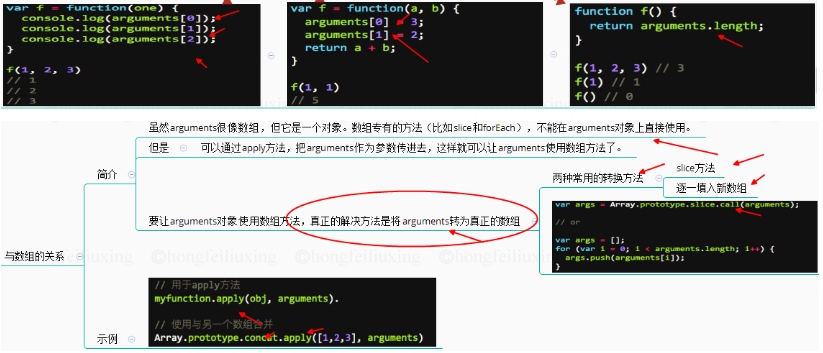
同名参数  可变参数: 可以通过arguments对象**(类数组)**实现可变参数的函数
# 传递引用
JavaScript 中只有「传递引用」而没有「引用传递」
[引用传递]实际上是 C++ 中存在的概念:&a = b 相当于给变量 b 起了一个别名 a,「引用」与「指针」最大的区别在于一旦引用被初始化,就不能改变引用的关系。
# 传递参数
1.所有的参数都是按值传递的。在向参数传递引用类型的值时【传递引用】,把这个值在内存中的地址复制给一个局部变量,因此这个局部变量的变化会反应在函数外部;
2.当在函数内部重写obj时,这个变量引用的就是一个局部对象。而这个局部对象会在函数执行完毕后立即被销毁;
# arguments对象及类数组
JS 变量
arguments表示传递给函数的参数。 使用typeof运算符,可以获得传递给函数的参数类型。
function func(x){
  console.log(typeof x, arguments.length);
}
func(); //==> "undefined", 0
func(7); //==> "number", 1
func("1", "2", "3"); //==> "string", 3 //注意这里;
2
3
4
5
6
将伪数组对象或可遍历对象转换为真数组:
// 方式一:Array.from(xxx)
let btns = document.getElementsByTagName("button")
Array.from(btns).forEach(item=>console.log(item))//将伪数组转换为数组
// 方式二:[...xxx]
function doSomething (){
  return [...arguments]
}
doSomething('a','b','c'); // ["a","b","c"]
//代替apply:`Math.max.apply(null, [x, y])` => `Math.max(...[x, y])`

// 方式三:
var _args = Array.prototype.slice.apply(arguments);
var _args = [].slice.apply(arguments);

var _args = [].slice.call(arguments);  // [...]
Array.prototype.concat.apply([1,2,3],arguments);

Array.prototype.slice.call(arguments) //arguments是类数组(伪数组)
Array.prototype.slice.apply(arguments)
Array.from(arguments)
[...arguments]

var args = []; //遍历法
for (var i = 1; i < arguments.length; i++) {
  args.push(arguments[i]);
}

var toArray = function(s){//通用函数
  try{
    return Array.prototype.slice.call(s);
  } catch(e){
    var arr = [];
    for(var i = 0,len = s.length; i < len; i++){
      //arr.push(s[i]);
      arr[i] = s[i];  //据说这样比push快
    }
    return arr;
  }
}
2
3
4
5
6
7
8
9
10
11
12
13
14
15
16
17
18
19
20
21
22
23
24
25
26
27
28
29
30
31
32
33
34
35
36
37
38
39
function test(a,b,c,d) {
  // return Array.prototype.slice.call(arguments,1); //取第一个到最后一个;
  return [].slice.call(arguments,1); //跟上面方法一样;Array.prototype等价于[]
}
console.log(test("a","b","c","d")); //[ 'b', 'c', 'd' ]
2
3
4
5
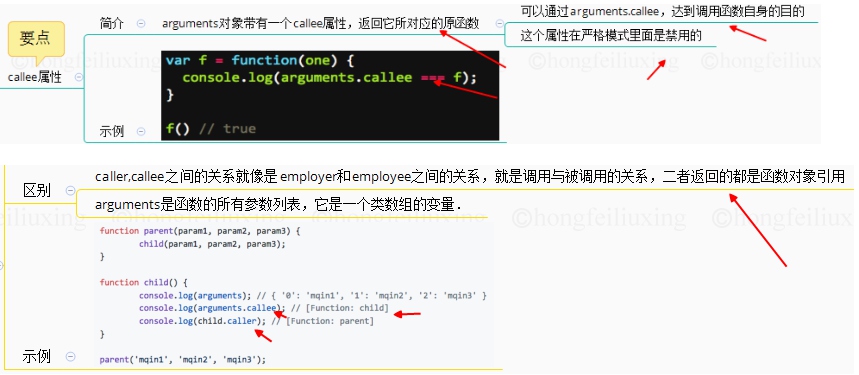
# caller, callee和arguments区别
caller(父),callee(子)之间的关系就像是employer和employee之间的关系,就是调用与被调用的关系,二者返回的都是函数对象引用
# rest/spread参数(...) ES6
返回函数多余参数
形式:以数组的形式存在,之后不能再有其他参数
作用:代替
Arguments对象length:返回没有指定默认值的参数个数但不包括
rest/spread参数
# call,apply和bind
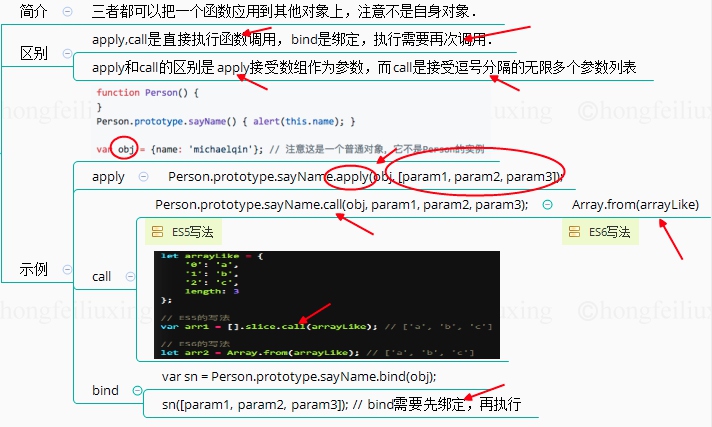
1.IE5之前不支持call和apply, bind是ES5出来的,不支持IE8及以下; 2.call和apply可以调用函数,改变this,实现继承和借用别的对象的方法;
# apply和call定义
调用方法,用一个对象替换掉另一个对象(this) ; call和apply可以用来重新定义函数的执行环境,也就是this的指向;即上下文而存在的,换句话说,就是为了改变函数体内部this的指向。
- 对象.apply(新this对象,[实参1,实参2,实参3.....])
- 对象.call(新this对象,实参1,实参2,实参3.....)
简单记忆法:A用于apply和数组/类数组,C用于call和逗号分隔。
说明:apply中, 如果argArray不是一个有效数组或不是arguments对象,那么将导致一个TypeError,如果没有提供argArray和obj任何一个参数,那么Global对象将用作obj。
# call和apply用法
function add(a, b) {
  return a + b;
}
console.log(add.call(null, 1, 2)); // 3
console.log(add.apply(null, [1, 2])); // 3

//间接调用函数,改变作用域的this值 2.劫持其他对象的方法
var foo = {
  name:"张三",
  logName:function(){
    console.log(this.name);
  }
}
var bar={
  name:"李四"
};
foo.logName.call(bar);//李四
//实质是call改变了foo的this指向为bar,并调用该函数

//两个函数实现继承
function Animal(name){
  this.name = name;
  this.showName = function(){
    console.log(this.name);
  }
}
function Cat(name){
  Animal.call(this, name);
}
var cat = new Cat("Black Cat");
cat.showName(); //Black Cat

function arrT() {//单个参数时,apply跟call的功能一致;
  var arr = Array.prototype.slice.apply(arguments)//[ 1, 2, 3 ]
  var arr2 = Array.prototype.slice.call(arguments)//[ 1, 2, 3 ]
}
arrT(1,2,3)

//为类数组(arguments和nodeList)添加数组方法push,pop
(function(){
  Array.prototype.push.call(arguments,'王五');
  console.log(arguments);//['张三','李四','王五']
})('张三','李四')
//合并数组
let arr1=[1,2,3];
let arr2=[4,5,6];
Array.prototype.push.apply(arr1,arr2); //将arr2合并到了arr1中
Math.max.apply(null,arr)//求数组最大值
Object.prototype.toString.call({})//判断字符类型

//尤其是es6 引入了 Spread operator (延展操作符) 后,即使参数是数组,可以使用 call
let params = [1,2,3,4]
xx.call(obj, ...params)
2
3
4
5
6
7
8
9
10
11
12
13
14
15
16
17
18
19
20
21
22
23
24
25
26
27
28
29
30
31
32
33
34
35
36
37
38
39
40
41
42
43
44
45
46
47
48
49
50
51
52
53
var numbers = [5, 458 , 120 , -215 ]; //这里是最形象的例子使用;
var maxInNumbers = Math.max.apply(Math, numbers), //458
var maxInNumbers = Math.max.call(Math, 5, 458, 120, -215); //458

//数组取最大值
var arr = [1, 2, 3, 4];
console.log(Math.max(...arr)); //4
console.log(Math.max.call(this, 1, 2, 3, 4))
console.log(Math.max.call(this, ...arr)); //4 【推荐】
console.log(Math.max.apply(this, arr)); //4
console.log(
  arr.reduce((prev, cur, curIndex, arr) => {
    return Math.max(prev, cur);
  }, 0)
); //4

//数组合并功能
[1,2,3,4].concat([5,6]) //[1,2,3,4,5,6]
[...[1,2,3,4],...[4,5]] //[1,2,3,4,5,6]
let arrA = [1, 2], arrB = [3, 4]
Array.prototype.push.apply(arrA, arrB))//arrA值为[1,2,3,4]
2
3
4
5
6
7
8
9
10
11
12
13
14
15
16
17
18
19
20
21
# bind
bind是function的一个函数扩展方法; bind以后代码重新绑定了func内部的this指向,返回一个函数,不会调用方法;IE5之前不支持call和apply, bind是ES5出来的,不支持IE8及以下;
通过bind改变this作用域会返回一个新的函数,这个函数不会马上执行。
// 惰性载入函数
// 函数绑定会占用更多内存,所以只在必要时使用
function bind(fn, context){
    return function(){
        return fn.apply(context, arguments); //这个设置没有完全考虑到参数;
    }
}// ES5提供了原生的绑定方法:obj.bind(this);
2
3
4
5
6
7
var name = '李四'
var foo = {
    name: "张三",
    logName: function(age) {
        console.log(this.name, age);
    }
}
var fooNew = foo.logName;
var fooNewBind = foo.logName.bind(foo);
fooNew(10)//李四,10; 注意这里的调用要点;
fooNewBind(11)//张三,11  因为bind改变了fooNewBind里面的this指向
2
3
4
5
6
7
8
9
10
11
# call,apply和bind原生实现
# call实现
前置知识点:
- 当函数以方法的形式调用时,this指向被调用的对象
- 函数的参数是值传递
- 引用类型可写
实现步骤:
- 以
myCall的第一个参数(暂命名为that)作为 被调用的对象 that上添加一个方法(方法名随意,暂命名fn)- 通过
that[fn](...args)调用方法(此时this指向为that) - 删除掉第3步添加的方法
Function.prototype.newCall = function(that, ...args) {
  if (typeof that === 'object' || typeof that === 'function') {
     that = that || window
   } else {
     that = Object.create(null)
   }
   let fn = Symbol()
   that[fn] = this //要点一;指向this
   const res = that[fn](...args)//要点二;调用函数
   delete that[fn];//delete that.fn 要点三;移除之前赋值后的,还原that数据;
   return res
 }

let person = { name: 'samy'}//使用
function sayHi(age,sex) {
  console.log(this.name, age, sex);
}
sayHi.newCall(person, 20, '男'); // samy 20 男
2
3
4
5
6
7
8
9
10
11
12
13
14
15
16
17
18
不用 Symbol判断严谨点的写法:
Function.prototype.call = function(content = window) {
    // 判断是否是underfine和null
    // if(typeof content === 'undefined' || typeof content === null){
    //     content = window
    // }
    content.fn = this;
    let args = [...arguments].slice(1);
    let result = content.fn(...args);
    delete content.fn;
    return result;
}
Function.prototype.apply = function(content = window) {
    content.fn = this;//要点;
    let result;
    if(arguments[1]) {// 判断是否有第二个参数
        result = content.fn(...arguments[1]);//因这个方式的参数是一个默认的,得切割剩下的;
    } else {
        result = content.fn();
    }
    delete content.fn;
    return result;
}
2
3
4
5
6
7
8
9
10
11
12
13
14
15
16
17
18
19
20
21
22
# apply实现
Function.prototype.newApply = function(context, parameter) {
  if (typeof context === 'object' || typeof context === 'function') {//考虑到默认设置;
    context = context || window
  } else {
    context = Object.create(null)
  }
  let fn = Symbol()
  context[fn] = this
  const res=context[fn](...parameter);
  delete context[fn] //delete context.fn
  return res
}
//使用
let person = {
    name: "samy"
};
function sayHi(age, sex) {
    console.log(this.name, age, sex);
}
sayHi.newApply(person,[ 20, '男']) //samy 20 男
2
3
4
5
6
7
8
9
10
11
12
13
14
15
16
17
18
19
20
call 和 apply 封装对比:其实核心代码是一样的, 只不过 call 需要对第二个形参解构
# bind实现
实现思路 原理:通过apply或者call方法来实现。
bind只改变this指向,不执行函数,那么可以用闭包来实现; self = this;- 具体更改
this指向的问题可以借用call实现 - 两次调用参数合并; 第一次去第二个参数+ 第二次全部参数;
//ES6的实现方式;【推荐这种简单的写法】
Function.prototype.newBind = function (context,...innerArgs) {//这原理是正确的要考虑两种参数;
  var self = this //要点一;
  return function (...finnalyArgs) {
    return self.call(context,...innerArgs,...finnalyArgs)////要点二;最简单的实现;
  }
}
//使用
let person = {
  name: 'samy'
}
function sayHi(age,sex) {
  console.log(this.name, age, sex);
}
let personSayHi = sayHi.newBind(person, 25)
personSayHi('男')

//对象bind 方法的模拟; 应用apply的实现;这个没有考虑第二次传参过来。完整的非ES6版本参考上面;
Object.prototype.bind = function (context) {
    var self = this;
    var args = [].slice.call(arguments, 1);//借助call的实现;
    return function () {
        //var allArgs = args.concat([].slice.call(arguments))
        return self.apply(context, args);
    }
}
//简单版本实现;
Function.prototype.myBind = function(that) {
  if (typeof this !== 'function') {
      throw new TypeError('Error')
  }
  const _fn = this;
  return function(...args) {
      _fn.call(that, ...args)
  }
}

//ES6以下版本的实现方式;
//如果浏览器不支持bind属性, bind函数的实现原理; 不借助ES6新语法实现;
if(Function.prototype.bind===undefined){
  Function.prototype.bind=function(obj/*,参数列表*/){
    var self = this;//留住this
    //args保存的就是提前绑定的参数列表; 取第1个参数后面的数据;这个方式参数调用的有参数形式。
    var args = Array.prototype.slice.call(arguments,1);
    return function(){
      var innerArgs = Array.prototype.slice.call(arguments);//将后传入的参数值,转为普通数组
      var allArgs = args.concat(innerArgs)//将之前绑定的参数值和新传入的参数值,拼接为完整参数之列表
      return self.apply(obj,allArgs);//调用原始函数fun,替换this为obj,传入所有参数
    }
  }
}
2
3
4
5
6
7
8
9
10
11
12
13
14
15
16
17
18
19
20
21
22
23
24
25
26
27
28
29
30
31
32
33
34
35
36
37
38
39
40
41
42
43
44
45
46
47
48
49
50
51
考虑到原型链:因为在new 一个bind过生成的新函数的时候,必须的条件是要继承原函数的原型;
Function.prototype.bind=function(obj){
    var arg=Array.prototype.slice.call(arguments,1);
    var context=this;
    var bound=function(newArg){
        arg=arg.concat(Array.prototype.slice.call(newArg));
        return context.apply(obj,arg);
    }
    //添加了这一步;
    var F=function(){}
    F.prototype=context.prototype;//这里需要一个寄生组合继承
    bound.prototype=new F();
    return bound;
}
2
3
4
5
6
7
8
9
10
11
12
13
# 三者异同
同:都是改变this指向,都可接收参数
异:bind和call是接收单个参数,apply是接收数组
# call 和 apply 的不同?
入参不同
性能差异(call比apply快很多);
原因:
.apply在运行前要对作为参数的数组进行一系列检验和深拷贝,.call则没有这些步骤
# 调用方式及this指向
# 谈谈This对象的理解
总括:比较及示例详见,ES6中详细, 跟箭头函数(=>)的比较; 箭头函数中的this是固定的,它指向定义该函数时所在的对象。始终指向其父级作用域中的this; 普通函数中的this指向函数被调用的对象,因此对于不同的调用者,this的值是不同的;
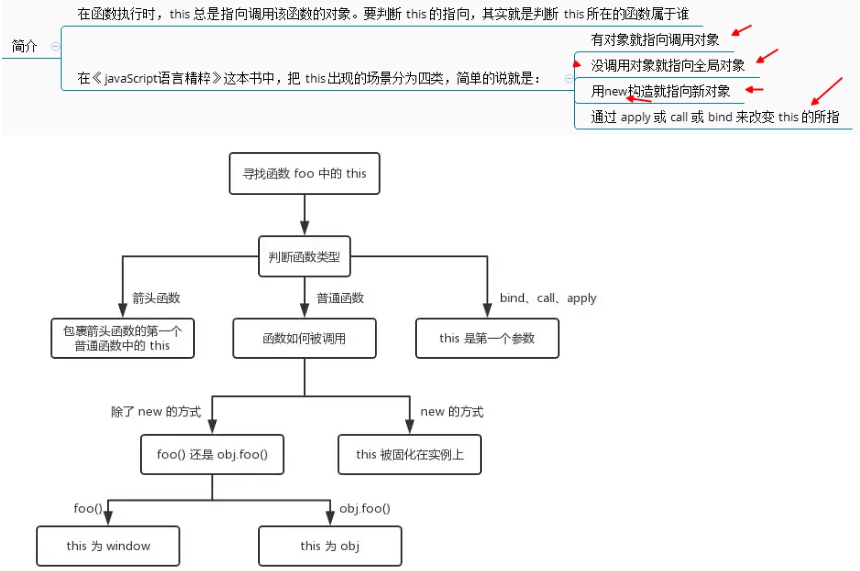
# this指向的四种情况
- 有对象就指向调用对象;
- 没有调用对象就指向全局对象;
- 用new构造就指向新对象;
- 通过applay/call/ bind来改变this的指向;
图示:
函数调用模式
包括函数名()和匿名函数调用,this指向window
方法调用
对象.方法名(),this指向对象
构造器调用
new 构造函数名(),this指向实例化的对象
间接调用
利用call和apply来实现,this就是call和apply对应的第一个参数,如果不传值或者第一个值为null,undefined时this指向window
 function getSum() {
    console.log(this) //这个属于函数名调用,this指向window
 }
 getSum()

 (function() {
    console.log(this) //匿名函数调用,this指向window
 })()

 var getSum=function() {
    console.log(this) //实际上也是函数名调用,window
 }
 getSum()

var objList = {
   name: 'methods',
   getSum: function() {
     console.log(this) //objList对象
   }
}
objList.getSum()

function Person() {
  console.log(this); //是构造函数调用,指向实例化的对象personOne
}
var personOne = new Person();

function foo() {
   console.log(this);
}
foo.apply('我是apply改变的this值');//我是apply改变的this值
foo.call('我是call改变的this值');//我是call改变的this值
2
3
4
5
6
7
8
9
10
11
12
13
14
15
16
17
18
19
20
21
22
23
24
25
26
27
28
29
30
31
32
ES6中函数的调用
箭头函数不可以当作构造函数使用,也就是不能用new命令实例化一个对象,否则会抛出一个错误 箭头函数的this是和定义时有关和调用无关 调用就是函数调用模式
(() => {
   console.log(this)//window
})()

let arrowFun = () => {
  console.log(this)//window
}
arrowFun()

let arrowObj = {
  arrFun: function() {
   (() => {
     console.log(this)//this指向的是arrowObj对象
   })()
   }
 }
 arrowObj.arrFun();
2
3
4
5
6
7
8
9
10
11
12
13
14
15
16
17
# Js作用链域
在 Javascript 中,作用域分为 全局作用域 和 函数作用域
- 全局作用域:代码在程序任何地方都能访问,window对象的内置属性都属于全局作用域
- 函数作用域:在固定的代码片段才能被访问
作用域最大的用处就是隔离变量,不同作用域下同名变量不会有冲突。
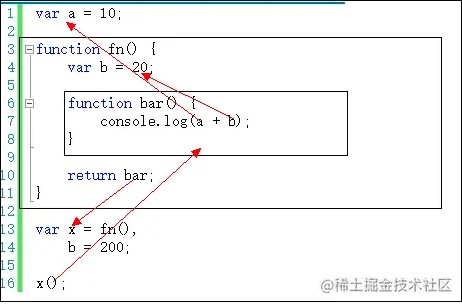
作用域链的作用是保证执行环境里有权访问的变量和函数是有序的,作用域链的变量只能向上访问,变量访问到window对象即被终止,作用域链向下访问变量是不被允许的。
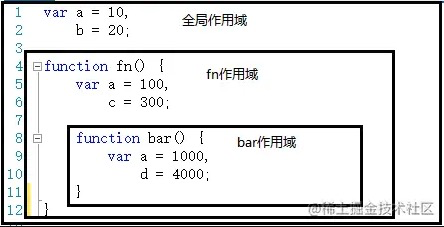
作用域有上下级关系,上下级关系的确定就看函数是在哪个作用域下创建的。如上,fn作用域下创建了bar函数,那么“fn作用域”就是“bar作用域”的上级。
示范:
var x = 10;
function fn(){
    console.log(x);
}
function show(f){
    var x = 20;
    f();    // 10
}
show(fn);
2
3
4
5
6
7
8
9
# 高阶函数
# 函数的参数是函数或返回函数
# 常见的高阶函数
像数组的map、reduce、filter这些都是高阶函数;
// 简单的高阶函数
function add(x, y, f) {
    return f(x) + f(y);
}

//用代码验证一下:
add(-5, 6, Math.abs); // 11
2
3
4
5
6
7
# 函数式编程
函数式编程是一种"编程范式"; 把运算过程尽量写成一系列嵌套的函数调用;
比如: 普通的 (1+2) *3 可以写成multiply(add(1,2), 3)
# 特点
函数是"第一等公民":函数与其他数据类型一样,处于平等地位,可以赋值给其他变量,也可以作为参数,传入另一个函数,或者作为别的函数的返回值。
只用"表达式",不用"语句":"表达式"(expression)是一个单纯的运算过程,总是有返回值;"语句"(statement)是执行某种操作,没有返回值。
没有"副作用":指的是函数内部与外部互动(最典型的情况,就是修改全局变量的值),产生运算以外的其他结果。
不修改状态:上一点已经提到,函数式编程只是返回新的值,不修改系统变量。因此,不修改变量,也是它的一个重要特点。
引用透明:引用透明(Referential transparency),指的是函数的运行不依赖于外部变量或"状态",只依赖于输入的参数,任何时候只要参数相同,引用函数所得到的返回值总是相同的。
# 偏函数
定义:指定部分参数来返回一个新的定制函数的形式; 创造了一个新函数,同时将部分参数替换成特定值。
使用场景:当我们有一个非常通用的函数,并且想要方便地获取它的特定变体,偏函数也是非常有用。
举个例子,我们拥有函数post(signature, api, data)。在调用请求方法的时候有着相同的用户签名,这里我们想要使用它的偏函数变体:post(api, data),表明该请求发送自同一用户签名。
// 我们创建了一个做 乘法运算 的函数
function mult(a, b) {
    return a * b;
};
let double = mult.bind(null, 2);
//mult.bind(null, 2) 创造了一个新函数 double,传递调用到mult函数,以null为context,2为第一个参数。其他参数等待传入。

console.log( double(3) );  // mult(2, 3) = 6;
console.log( double(4) );  // mult(2, 4) = 8;
2
3
4
5
6
7
8
9
# 柯里化
定义:只传递给函数一部分参数来调用它,让它返回一个函数去处理剩下的参数;
将函数与其参数的一个子集绑定起来后返回个新函数。柯里化后发现函数变得更灵活,更流畅,是一种简洁的实现函数委托的方式
fn(a,b,c,d)=>fn(a)(b)(c)(d)
好处:
- 1、参数复用;正则验证字符串;
- 2、延迟执行;其实
Function.prototype.bind就是科里化的实现例子
# 好处
- 1、参数复用;正则验证字符串;
- 2、延迟执行;其实
Function.prototype.bind就是科里化的实现例子
# 类似源码实现
function currying(func, args) {// ES5 的实现
    var arity = func.length;// 形参个数
    var args = args || [];// 上一次传入的参数
    return function () {
        var _args = [].slice.call(arguments); // 将参数转化为数组
        Array.prototype.unshift.apply(_args, args);// 将上次的参数与当前参数进行组合并修正传参顺序
        if(_args.length < arity) {// 如果参数不够,返回闭包函数继续收集参数
            return currying.call(null, func, _args);
        }
        return func.apply(null, _args);// 参数够了则直接执行被转化的函数
    }
}//上面主要使用的是 ES5 的语法来实现,大量的使用了 call 和 apply

function currying(func, args = []) {// ES6 的实现
    let arity = func.length;
    return function (..._args) {
        _args.unshift(...args);
        if(_args.length < arity) {
          //return (...args2) => curr(...args1, ...args2)
            return currying.call(null, func, _args);
        }
      //return func.apply(null, _args);
        return func(..._args);
    }
}

function currying(fn) {//差不多方式实现;直接把参数合并;结合偏函数处理;【推荐】
    return function curried(...args) {
        if(args.length < fn.length) {//得到一个偏函数,递归carried方法,直到获得所有参数后,直接执行
           return function(...args2) {
              return curried.apply(this, args.concat(args2));//这个合并操作要放在判断前处理;
           }
        } else {//否则 传入的实参长度 >= 初始函数形参长度 的时候,则直接执行初始函数
          return fn.apply(this, args);
        }
    }
}
2
3
4
5
6
7
8
9
10
11
12
13
14
15
16
17
18
19
20
21
22
23
24
25
26
27
28
29
30
31
32
33
34
35
36
37
示例: 最基本的柯里化拆分
function add(a, b, c) {// 原函数
    return a + b + c;
}
function addCurrying(a) {// 柯里化函数
    return function (b) {
        return function (c) {
            return a + b + c;
        }
    }
}
add(1, 2, 3); //6 //调用原函数
addCurrying(1)(2)(3) //6 //调用柯里化函数
2
3
4
5
6
7
8
9
10
11
12
示例: 很大的好处是可以帮助我们基于一个被转换函数,通过对参数的拆分实现不同功能的函数
// 正常正则验证字符串 reg.test(txt)
// 普通情况
function check(reg, txt) {
    return reg.test(txt)
}
check(/\d+/g, 'test')       //false
check(/[a-z]+/g, 'test')    //true

// Currying后
function curryingCheck(reg) {
    return function(txt) {
        return reg.test(txt)
    }
}
var hasNumber = curryingCheck(/\d+/g)
var hasLetter = curryingCheck(/[a-z]+/g)

hasNumber('test1')      // true
hasNumber('testtest')   // false
hasLetter('21212')      // false
2
3
4
5
6
7
8
9
10
11
12
13
14
15
16
17
18
19
20
延迟执行
function sayKey(key) {
  console.log(this[key])
}
const person = {
  name: 'samy',
  age: 23
}
// call不是科里化
sayKey.call(person, 'name') // 立即输出 samy
sayKey.call(person, 'age') // 立即输出 23

// bind是科里化
const say = sayKey.bind(person) // 不执行
// 想执行再执行
say('name') // samy
say('age') // 23
2
3
4
5
6
7
8
9
10
11
12
13
14
15
16
正则再应用;
// 被转换函数,用于检测传入的字符串是否符合正则表达式
function checkFun(reg, str) {
    return reg.test(str);
}

// 转换柯里化
let check = currying(checkFun);
// 产生新的功能函数
let checkPhone = check(/^1[34578]\d{9}$/);
let checkEmail = check(/^(\w)+(\.\w+)*@(\w)+((\.\w+)+)$/);
//根据一个被转换的函数通过转换变成柯里化函数,并用 _check 变量接收,以后每次调用 _check 传递不同的正则就会产生一个检测不同类型字符串的功能函数。
2
3
4
5
6
7
8
9
10
11
//自己实现currying
function currying(fn) {
    return function curried(...args) {
        if(args.length < fn.length) {//得到一个偏函数,递归carried方法,直到获得所有参数后,直接执行
           return function(...args2) {
              return curried.apply(this, args.concat(args2));//这个合并操作要放在判断前处理;
           }
        } else {//否则 传入的实参长度 >= 初始函数形参长度 的时候,则直接执行初始函数
          return fn.apply(this, args);
        }
    }
}
function sum(a, b, c) {
    return a + b + c;
}
let curriedSum = currying(sum);
// 常规调用
console.log( curriedSum(1, 2, 3) );  // 6
// 得到 curriedSum(1)的偏函数,然后用另外两个参数调用它
console.log( curriedSum(1)(2, 3) );  // 6
// 完全柯里化调用
console.log( curriedSum(1)(2)(3) );  // 6
2
3
4
5
6
7
8
9
10
11
12
13
14
15
16
17
18
19
20
21
22
// 被转换函数,按照传入的回调函数对传入的数组进行映射
function mapFun(func, array) {
    return array.map(func);
}

// 转换柯里化
let getNewArray = currying(mapFun);
// 产生新的功能函数
let createPercentArr = getNewArray(item => `${item * 100}%`);
let createDoubleArr = getNewArray(item => item * 2);

// 使用新的功能函数
let arr = [1, 2, 3, 4, 5];
let percentArr = createPercentArr(arr); // ['100%', '200%', '300%', '400%', '500%',]
let doubleArr = createDoubleArr(arr); // [2, 4, 6, 8, 10]
2
3
4
5
6
7
8
9
10
11
12
13
14
15
function add(a, b) {
  return a + b;
}
var curriedAdd = curriedSum(add);
var addFive = curriedAdd(5);
var result = [0, 1, 2, 3, 4, 5].map(addFive); // [5, 6, 7, 8, 9, 10]
console.log(result);
2
3
4
5
6
7
# 柯里化与 bind
bind的实现; 柯里化就是在bind的基础上加了个遍历循环到参数一致时,才处理;其实 bind 方法就是一个柯里化转换函数; 只是这个转换函数没有那么复杂,没有进行参数拆分,而是函数在调用的时候传入了所有的参数。
let bound = func.bind(context, arg1, arg2, ...);
// bind 方法的模拟
Object.prototype.bind = function (context) {
    var self = this;
    var args = [].slice.call(arguments, 1);
    return function () {
        return self.apply(context, args);
    }
}

var currying = function(fn) {
    var args = [].slice.call(arguments, 1); //args为["https", "www.bing.com"]
    return function() {
        var newArgs = args.concat([].slice.call(arguments));//[ 'myfile.js' ]
        //newArgs为["https", "www.bing.com", "myFile.js"]
        return fn.apply(null, newArgs);
        //相当于return simpleURL("https", "www.bing.com", "myFile.js");
    };
};
2
3
4
5
6
7
8
9
10
11
12
13
14
15
16
17
18
其实 bind 方法就是一个柯里化转换函数,将调用 bind 方法的函数进行转换,即通过闭包返回一个柯里化函数,执行该柯里化函数的时候,借用 apply 将调用 bind 的函数的执行上下文转换成了 context 并执行,只是这个转换函数没有那么复杂,没有进行参数拆分,而是函数在调用的时候传入了所有的参数。
function simpleURL(protocol, domain, path) {
    return protocol + "://" + domain + "/" + path;
}
var myURL = simpleURL.bind(null, 'http', 'www.bing.com');
myURL('myfile.js');     //http://www.bing.com/myfile.js
//站点加上SSL
var mySslURL = simpleURL.bind(null, 'https', 'www.bing.com');
mySslURL('myfile.js');  //https://www.bing.com/myfile.js
2
3
4
5
6
7
8
# 反柯里化
反柯里化的思想与柯里化正好相反,如果说
柯里化的过程是将函数拆分成功能更具体化的函数,那
反柯里化的作用则在于扩大函数的适用性,使本来作为特定对象所拥有的功能函数可以被任意对象所使用。
定义: obj.func(arg1, arg2)=>func(obj, arg1, arg2)
代码实现: 函数跟参数分离开来;
// ES5 的实现
function uncurring(fn) {
    return function () {
        var obj = [].shift.call(arguments);// 取出要执行fn方法的对象,同时从 arguments 中删除;
        return fn.apply(obj, arguments);
    }
}
// ES6 的实现
function uncurring(fn) {
    return function (...args) {
        return fn.call(...args);
    }
}
2
3
4
5
6
7
8
9
10
11
12
13
// 构造函数 F
function F() {}

// 拼接属性值的方法
F.prototype.concatProps = function () {
    let args = Array.from(arguments);// let args = [...arguments]
    return args.reduce((prev, next) => `${this[prev]}&${this[next]}`);
}

// 使用 concatProps 的对象
let obj = {
    name: "samy",
    age: 16
};
// 使用反柯里化进行转化
let concatProps = uncurring(F.prototype.concatProps);
concatProps(obj, "name", "age"); // samy&16
2
3
4
5
6
7
8
9
10
11
12
13
14
15
16
17
反柯里化还有另外一个应用,用来代替直接使用 call 和 apply,比如检测数据类型的 Object.prototype.toString 等方法,
//以往我们使用时是在这个方法后面直接调用 call 更改上下文并传参,如果项目中多处需要对不同的数据类型进行验证是很麻的,常规的解决方案是封装成一个检测数据类型的模块。
// 常规方案
function checkType2(val) {
  return Object.prototype.toString.call(val);
}
function uncurring(fn) {
  return function (...args) {
      return fn.call(...args);
  }
}
// 利用反柯里化创建检测数据类型的函数
let checkType = uncurring(Object.prototype.toString);

console.log(checkType(1)); // [object Number]
console.log(checkType("hello")); // [object String]
console.log(checkType(true)); // [object Boolean]
2
3
4
5
6
7
8
9
10
11
12
13
14
15
16
# 通过函数调用生成反柯里化函数
Function.prototype.uncurrying = function() {
  var that = this;
  return function() {
    return Function.prototype.call.apply(that, arguments);
  }
};

function F() {}
F.prototype.sayHi = function () {
    return "I'm " + this.name + ", " + this.age + " years old.";
}
// 希望 sayHi 方法被任何对象使用
sayHi = F.prototype.sayHi.uncurring();
sayHi({ name: "samy", age: 20}); // I'm samy, 20 years old.
2
3
4
5
6
7
8
9
10
11
12
13
14
# compose函数
简单的compose函数
const compose = (a , b) => c => a( b( c ) );
例子:统计单词个数
const space = (str) => str.split(' ')
const len = (arr) => arr.length

// 普通写法
console.log(len(space('i am samy'))) // 3
console.log(len(space('i am 23 year old'))) // 6
console.log(len(space('i am a author in juejin'))) // 7

// compose写法
const compose = (...fn) => value => {
  return fn.reduce((value, fn) => {
    return fn(value)
  }, value)
}
const computedWord = compose(space, len)
console.log(computedWord('i am samy')) // 3
console.log(computedWord('i am 23 year old')) // 6
console.log(computedWord('i am a author in juejin')) // 7
2
3
4
5
6
7
8
9
10
11
12
13
14
15
16
17
18
# MUL函数
MUL表示数的简单乘法。在这种技术中,将一个值作为参数传递给一个函数,而该函数将返回另一个函数,将第二个值传递给该函数,然后重复继续。例如:xyz可以表示为
const mul = x => y => z => x * y * z
console.log(mul(1)(2)(3)) // 6
2
# 特殊形式的函数
# 回调函数
回调是一个函数,它作为参数传递给另一个函数,并在其父函数完成后执行;
也是处理异步的一种方式; 异步编程进化史:callback -> promise -> generator -> async/await,事件监听,发布订阅;
优点
- 可以让在不做命名的情况下专递函数,这样可以节省全局变量;有助于提升性能
- 可以将一个函数调用操作委托给另一个函数,这样可以节省一些代码编写;

# 自调函数(IIFE)
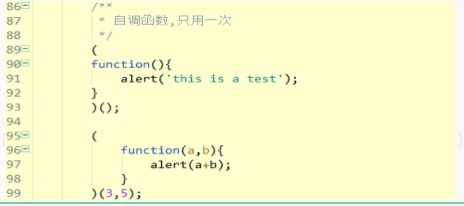
IIFE是一个立即调用的函数表达式,它在创建后立即执行;
常常使用此模式来避免污染全局命名空间,因为在IIFE中使用的所有变量(与任何其他普通函数一样)在其作用域之外都是不可见的。
优点 使用自调匿名函数不会产生任何全局变量 劣点 函数无法重复执行,适合执行一些一次性的或者初始化的任务
(function IIFE(){
    console.log( "Hello!" );
})();// "Hello!"
2
3
# void 无返回函数
const foo = void function bar() {//如果IIFE 函数有返回值,则不能使用它
    console.log('samy z')//samy z
    return 'foo';
}();
console.log(foo); // undefined
2
3
4
5
# 内部(私有)函数
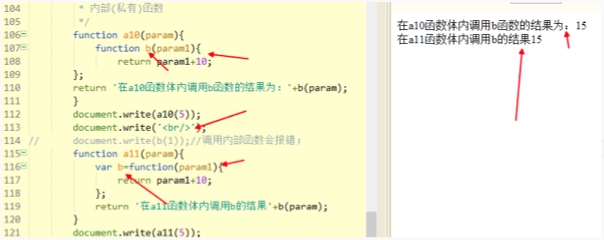
优点
- 确保全局名字空间得纯净性,防止命名冲突;
- 私有性之后我们就可以选择只将一些必要的函数暴露给外部,并保留属于自己的函数,使其不被其他应用程序所调用;
# 返回函数的函数
重写自己的函数;Js内置函数构造器创建函数

# 闭包函数
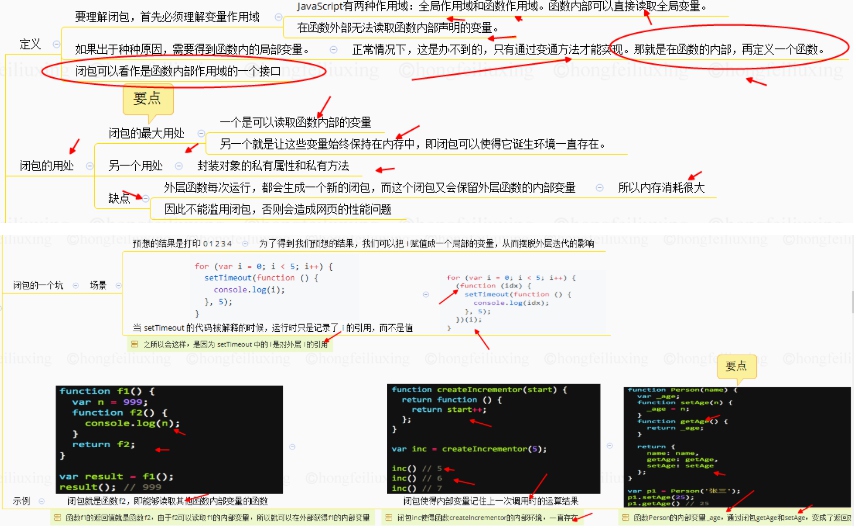
通俗的说,闭包就是作用域范围,因为js是函数作用域,所以函数就是闭包 全局函数的作用域范围就是全局,所以无须讨论.更多的应用其实是在内嵌函数,这就会涉及到内嵌作用域,或者叫作用域链. 说到内嵌,其实就是父子引用关系(父函数包含子函数,子函数因为函数作用域又引用父函数, 所以叫闭包)
闭包 一句话可以概括:闭包就是能够读取其他函数内部变量的函数,或者子函数在外调用,子函数所在的父函数的作用域不会被释放。
是函数中的函数(其他语言不能这样),里面的函数可以访问外面函数的变量,外面的变量的是这个内部函数的一部分。
- 优点:使外部能访问到局部的东西
- 缺点:使用不当容易造成内存泄漏的问题
例子:
function a () {
  let num = 0
  // 这是个闭包
  return function () {
     return ++num
  }
}
const b = a()
console.log(b()) // 1
console.log(b()) // 2
2
3
4
5
6
7
8
9
10
# 作用
使用闭包可以访问函数中的变量。可以使变量长期保存在内存中,生命周期比较长。
闭包不能滥用,否则会导致内存泄露,影响网页的性能。闭包使用完了后,要立即释放资源,将引用变量指向null。
# 缺点
- 性能考量:闭包在处理速度和内存消耗方面对性能具有负面影响(多执行了一个函数,多了一个内存指向)
- 可能内存溢出。(比如:在闭包中的
addEventListener没有被removeEventListener)
# 闭包应用场景
函数作为参数传递
函数作为返回值
通过闭包, 突破全局作用域链;迭代器中得应用;
使用传说中的设计模式
单例模式;
PS:还有一个优点:_instance 是私有的,外部不能更改(保证安全无污染/可信)
const Singleton = (function() {
    var _instance;
    return function(obj) {
        return _instance || (_instance = obj);
    }
})();
var a = new Singleton({x: 1});
var b = new Singleton({y: 2});
console.log(a === b);
2
3
4
5
6
7
8
9
- 解决
var在for+setTimeout混合场景中的BUG
因为 var 是函数作用域(原因1),而 setTimeout 是异步执行(原因2),所以:当 console.log 执行的时候 i 已经等于 6 了(BUG产生)【有个要点,也回答上】
for (var i=1; i<=5; i++) {
    setTimeout(function() {
        console.log(i);
    }, i*300 );
}//6 6 6 6 6
//例中setTimeout中的function未被任何对象调用,因此它的this指向还是window对象
2
3
4
5
6
在没有 let 和 const 的年代,常用的解决方式就是闭包
for (var i = 1; i <= 5; i++) {
    (function(j) {
        setTimeout(function() {
            console.log(j);
        }, j*300);
    })(i);
}
//通过闭包,将i的变量驻留在内存中,当输出j时,引用的是外部函数的变量值i,i的值是根据循环来的,执行setTimeout时已经确定了里面的的输出了。
2
3
4
5
6
7
8
其他方案
拆分结构:还可以将setTimeout的定义和调用分别放到不同部分
function timer(i) {
    setTimeout( console.log( i ), i*1000 );
}
for (var i=1; i<=5;i++) {
    timer(i);
}
2
3
4
5
6
let:使用es6的let来解决此问题;
for (let i=1; i<=5; i++) {
    setTimeout( function timer() {
        console.log( i );
     }, i*1000 );
}
2
3
4
5
这个例子与第一个相比,只是把var更改成了let,可是控制台的结果却是依次输出1到5。
因为for循环头部的let不仅将i绑定到for循环中,事实上它将其重新绑定到循环体的每一次迭代中,确保上一次迭代结束的值重新被赋值。setTimeout里面的function()属于一个新的域,通过var定义的变量是无法传入到这个函数执行域中的,通过使用let来声明块变量能作用于这个块,所以function就能使用i这个变量了;这个匿名函数的参数作用域和for参数的作用域不一样,是利用了这一点来完成的。这个匿名函数的作用域有点类似类的属性,是可以被内层方法使用的。
setTimeout第三个参数:
for (let i=1; i<=5; i++) {
    setTimeout( function timer() {
        console.log( i );
     }, i*1000, i );
}
2
3
4
5
这当然还是作用域的问题,但是在这里setTimeout第三个参数却把i的值给保存了下来。这种解决方法比使用闭包轻快的多。
- bind函数的类似实现原理
if(Function.prototype.bind===undefined){//**bind函数的实现原理**,如果浏览器不支持bind属性
  Function.prototype.bind=function(obj/*,参数列表*/){
    var fun=this;//留住this; //args保存的就是提前绑定的参数列表
    var args=Array.prototype.slice.call(arguments,1);//将类数组对象,转化为普通数组
    return function(){
      var allArgs=args.concat(innerArgs)//将之前绑定的参数值和新传入的参数值,拼接为完整参数之列表
      fun.apply(obj,allArgs);//调用原始函数fun,替换this为obj,传入所有参数
    }
  }
}
2
3
4
5
6
7
8
9
10
节流及防抖的使用
其他
function ones(func){//实现一个once函数,传入函数参数只执行一次
    var tag=true;
    return function(){
      if(tag==true){
        func.apply(null,arguments);
        tag=false;
      }
      return undefined
    }
}
1
2
3
4
5
6
7
8
9
10
# 原型链
对象继承属性的一个链条;
在JS里,万物皆对象。方法(Function)是对象,方法的原型(Function.prototype)是对象。
因此,它们都会具有对象共有的特点。即:对象具有属性__proto__,可称为隐式原型,一个对象的隐式原型指向构造该对象的构造函数的原型,这也保证了实例能够访问在构造函数原型中定义的属性和方法。
方法(Function) 方法这个特殊的对象,除了和其他对象一样有上述_proto_属性之外,还有自己特有的属性——原型属性(prototype),这个属性是一个指针,指向一个对象,这个对象的用途就是包含所有实例共享的属性和方法(我们把这个对象叫做原型对象)。原型对象也有一个属性,叫做constructor,这个属性包含了一个指针,指回原构造函数。
总括:对象跟方法
- 对象有属性
__proto__,指向该对象的构造函数的原型对象。 - 方法除了有属性
__proto__,还有属性prototype,prototype指向该方法的原型对象。
# __proto__和prototype的区别和关系【要点】
__proto__(隐式原型)与prototype(显式原型)
隐式原型:JavaScript中任意对象都有一个内置属性[[prototype]],在ES5之前没有标准的方法访问这个内置属性,但是大多数浏览器都支持通过__proto__来访问。ES5中有了对于这个内置属性标准的Get方法Object.getPrototypeOf() 【 Object.prototype 这个对象是个例外,它的__proto__值为null】
显式原型:每一个函数在创建之后都会拥有一个名为prototype的属性,这个属性指向函数的原型对象。
# 二者的关系
隐式原型指向创建这个对象的函数(constructor)的prototype
# 作用
- 隐式原型的作用:构成原型链,同样用于实现基于原型的继承。举个例子,当我们访问obj这个对象中的x属性时,如果在obj中找不到,那么就会沿着
__proto__依次查找。 - 显式原型的作用:用来实现基于原型的继承与属性的共享。
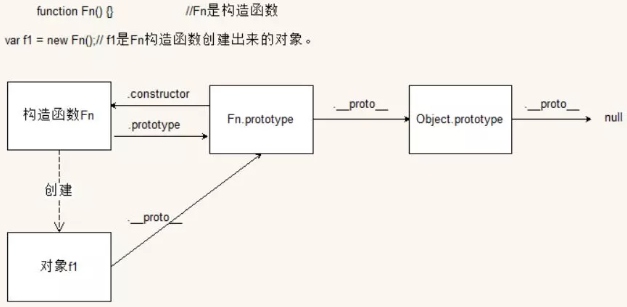
# 实例,构造函数,与原型对象的关系【要点】
# 链图
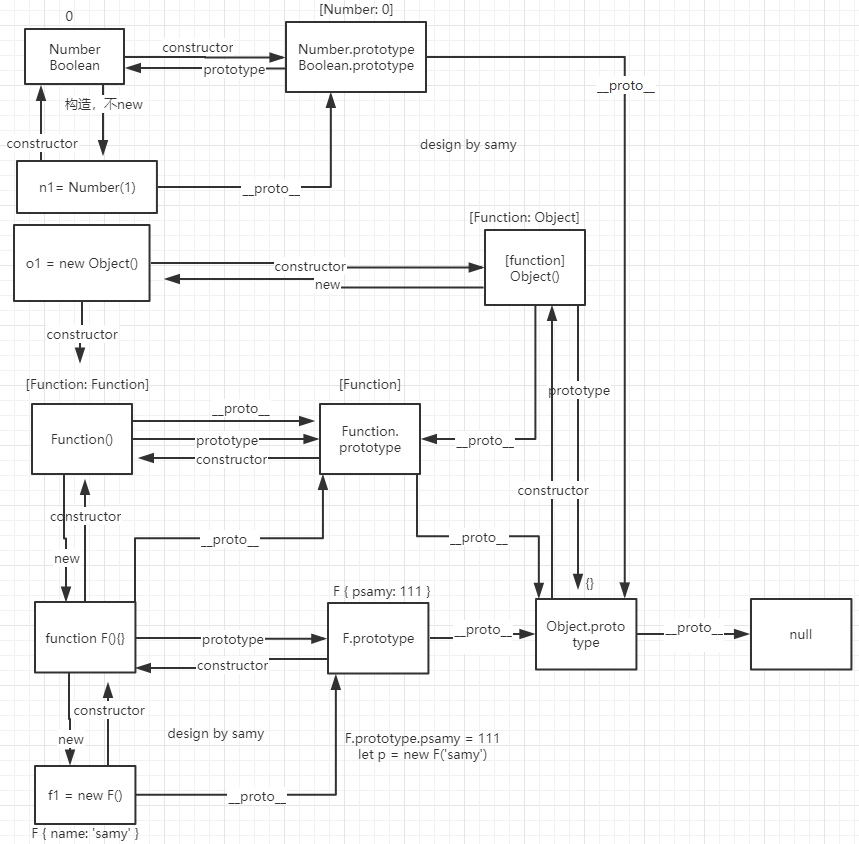
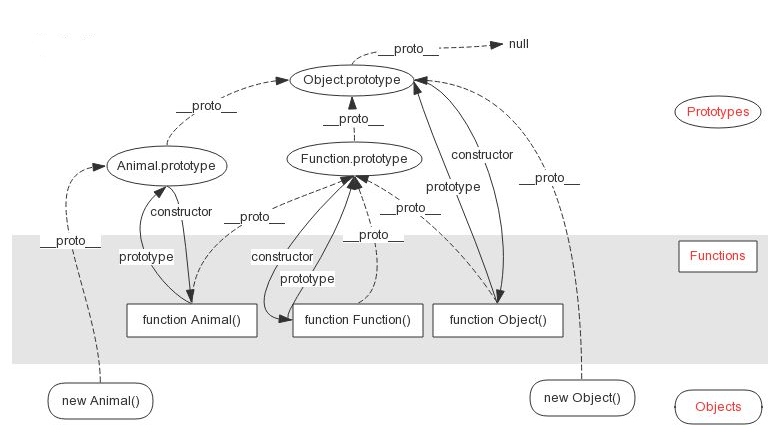
升级版本图
function Fn() {}// Fn为构造函数
var f1 = new Fn();//f1是Fn构造函数创建出来的对象
//Fn.prototype就是对象的原型 // 构造函数的prototype属性值就是对象原型。
typeof Fn.prototype===object// 构造函数的prototype属性值的类型就是对象;
Fn.prototype.constructor===Fn// 对象原型中的constructor属性指向构造函数;
//f1.__proto__就是对象原型 // 对象的__proto__属性值就是对象的原型。
Fn.prototype === f1.__proto__ //其实它们两个就是同一个对象---对象的原型。
Fn.prototype.__proto__ === Object.prototype
typeof Object.prototype === object
Object.prototype.__proto__ === null

//特殊的一种,参考完整图; 可见之前那个简化版本,少了部分;
Fn.__proto__ === Function.prototype//[Function]
Function.__proto__ === Object.prototype //false
Function.__proto__ === Function.prototype//true
2
3
4
5
6
7
8
9
10
11
12
13
14
15
注意:new跟不new的区别; constructor跟constructor()的区别;
var n1= Number(1)
console.log(n1);//1
console.log(n1.__proto__);//[Number: 0]
console.log(n1.constructor);//[Function: Number]
console.log(n1.constructor());//0

var n2= new Number(1)
console.log(n2);//[Number: 1]

console.log(typeof n1);//number
console.log(typeof n2);// object;包装对象;
//所有对象都有valueOf方法,valueOf方法对于:如果存在任意原始值,它就默认将对象转换为表示它的原始值。
console.log(n2.valueOf());//1
2
3
4
5
6
7
8
9
10
11
12
13
# 文字描述
- 对象都有
__proto__, 它是一个访问器属性,指向了不能直接访问到的内部属性[[prototype]] - 函数都有
prototype,每个实例对象的__proto__指向它的构造函数的prototype;student.__proto__ === Student.prototype
- 属性查找会在原型链上一层一层的寻找属性;
Student.prototype.__proto__ === Parent.prototype
- 层层向上直到一个对象的原型对象为
null。null没有原型,并作为这个原型链中的最后一个环节。student.__proto__.__proto__.__proto__.__proto__ === null
示例:
class Parent {}
class Student extends Parent{}

const log = console.log;

const student = new Student();
const parent = new Parent();

log(student.constructor === Student)//true
log(student.__proto__ === student.constructor.prototype)//true

log(student.__proto__ === Student.prototype)//true
log(Student.prototype.__proto__ === Parent.prototype)//true
log(Parent.prototype.__proto__ === Object.prototype)//true
log(Object.prototype.__proto__ === null)//true

log(student.__proto__.__proto__.__proto__.__proto__ === null)//true

log(Student.constructor === Function)//true
log(Student.__proto__ === Parent)//true

log(Parent.constructor === Function)//true
log(Parent.__proto__ === Object.__proto__)//true
2
3
4
5
6
7
8
9
10
11
12
13
14
15
16
17
18
19
20
21
22
23
其他案例
//案例一
var F = function() {};
Object.prototype.a = function() {
  console.log('a');
};
Function.prototype.b = function() {
  console.log('b');
}

var f = new F();
f.a(); // a
// f.b(); // f.b is not a function

F.a(); // a
F.b(); // b

//案例三
var foo = {},
    F = function(){};
Object.prototype.a = 'value a';
Function.prototype.b = 'value b';

console.log(foo.a); // value a
console.log(foo.b); // undefined

console.log(F.a); // value a
console.log(F.b); // value b

//案例二:注意先后顺序
var A = function() {};
A.prototype.n = 1;
var b = new A();
A.prototype = {
  n: 2,
  m: 3
}
var c = new A();
console.log(b.n); // 1
console.log(b.m); // undefined

console.log(c.n); // 2
console.log(c.m); // 3

//案例四
function A() {}
function B(a) {
    this.a = a;
}
function C(a) {
    if (a) {
        this.a = a;
    }
}
A.prototype.a = 1;
B.prototype.a = 1;
C.prototype.a = 1;

console.log(new A().a); // 1
console.log(new B().a); // undefined
console.log(new C(2).a); // 2

//案例五
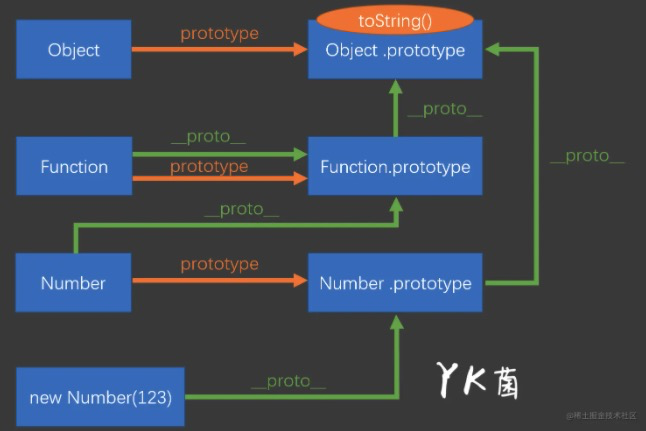
console.log(123['toString'].length + 123) // 124
//答案:123是数字,数字本质是new Number(),数字本身没有toString方法,则沿着__proto__去function Number()的prototype上找,找到toString方法,toString方法的length是1,1 + 123 = 124,至于为什么length是1
2
3
4
5
6
7
8
9
10
11
12
13
14
15
16
17
18
19
20
21
22
23
24
25
26
27
28
29
30
31
32
33
34
35
36
37
38
39
40
41
42
43
44
45
46
47
48
49
50
51
52
53
54
55
56
57
58
59
60
61
62
63
64
最后案例5图示:
# 相关说明
ps:由于
__proto__的性能问题和兼容性问题,不推荐使用(之前旧版本,现在没有问题)。
推荐
- 使用
Object.getPrototypeOf获取原型属性 - 通过
Object.setPrototypeOf修改原型属性 - 通过
Object.create()继承原型
for in 和 Object.keys 会调用原型属性
- 不调用不可枚举属性
- isPrototypeOf 和 hasOwnProperty
# 对象的原型链

说明:
- 所有的的对象最终都指向nul。
- 每个构造函数都有一个prototype属性,它是一个构造函数的原型,也是实例
__proto__的指向 - Function是一个构造函数,它拥有一个原型Function.prototype,也是new Function出实例的
__proto__的指向 - 所有的对象拥有
__proto__属性,因为Function也是一个对象,所以Function.prototype和示例对象.__proto__指向同一个对象 - 所有的function都是Function的实例,因为构造函数也是一个函数,所以Bollean、String、Array、Object的
__proto__是Function.prototype
# 重写原型链
既然原型也是对象,那可以重写这个对象
function Person() {}
Person.prototype = {
    name: 'samy',
    age: 20,
    sayHi() {
        console.log('Hi');
    }
}
var p = new Person()
Person.prototype.constructor === Person // false
p.name // undefined
2
3
4
5
6
7
8
9
10
11
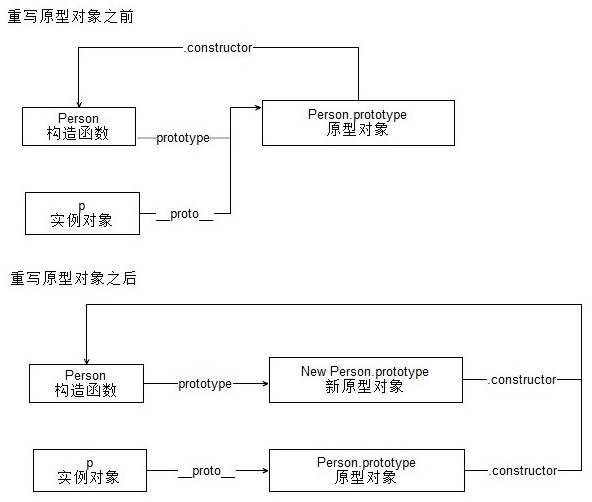
只是当我们在重写原型链的时候需要注意以下的问题:
- 在已经创建了实例的情况下重写原型,会切断现有实例与新原型之间的联系
- 重写原型对象,会导致原型对象的
constructor属性指向Object,导致原型链关系混乱,所以应该在重写原型对象的时候指定constructor(instanceof仍然会返回正确的值)
Person.prototype = {
    constructor: Person
}
2
3
注意:以这种方式重设 constructor 属性会导致它的 Enumerable 特性被设置成 true(默认为false);
图示重新流程:
# 关系判断
# instanceof
最常用的确定原型指向关系的关键字,检测的是原型,但是只能用来判断两个对象是否属于实例关系, 而不能判断一个对象实例具体属于哪种类型; 能判断是否子父孙有关系;
function Person(){}
var p = new Person();

p instanceof Person // true
p instanceof Object // true
2
3
4
5
原理
instanceof内部机制是通过判断对象的原型链中是不是能找到对应的的prototype;
  function instanceof(obj, target) {// 实现 instanceof
      obj = obj.__proto__// 获得对象的原型; 基础类型没有 `__proto__`
      while (true) {// 判断对象的类型是否等于类型的原型
        if (obj === null) {// 如果__proto__ === null 说明原型链遍历完毕
          return false
        }
        // 如果存在 obj.__proto__ === target.prototype;说明对象是该类型的实例
        if (obj === target.prototype) {
          return true
        }
        obj = obj.__proto__// 原型链上查找
      }
  }
2
3
4
5
6
7
8
9
10
11
12
13
# hasOwnProperty
通过使用 hasOwnProperty 可以确定访问的属性是来自于实例还是原型对象
function Person() {}
//Person.prototype = {
//    name: 'samy'
//}
Person.prototype.name = 'samy'
var p = new Person();
p.age = 10;

p.hasOwnProperty('age') // true
p.hasOwnProperty('name') // false
2
3
4
5
6
7
8
9
10
# 原型链的问题
由于原型链的存在,我们可以让很多实例去共享原型上面的方法和属性。但是原型链并非是十分完美的;当原型上面的属性是一个引用类型的值时,我们通过其中某一个实例对原型属性的更改,结果会反映在所有实例上面,这也是原型 共享 属性造成的最大问题; 从而引出了下面的各种继承问题;
function Person(){}
Person.prototype.arr = [1, 2, 3, 4];

var person1 = new Person();
var person2 = new Person();

person1.arr.push(5)
person2.arr // [1, 2, 3, 4, 5]
2
3
4
5
6
7
8
# 各大示例
//case1
var A = function () {};
A.prototype.n = 1;
var b = new A(); //new是跟定义时顺序有关
A.prototype = {
  n: 2,
  m: 3
}
var c = new A();
console.log(b.n);//1
console.log(b.m);//undefined
console.log(c.n);//2
console.log(c.m);//3
console.log(b.__proto__);//A { n: 1 }
console.log(A.__proto__);//[Function]

//case2
var F = function () {};
Object.prototype.a = function () {
  console.log('a');
};
Function.prototype.b = function () {//这个特殊;
  console.log('b');
}
var f = new F();
f.a();//a
f.b();//f.b is not a function,直接报错
F.a();//a
F.b();//b

//case3
var foo = {},
    F = function(){};
Object.prototype.a = 'value a';
Function.prototype.b = 'value b';
console.log(foo.a);//value a
console.log(foo.b);//undefined 跟case2一样。原型链升级版中上面一条关系;
console.log(F.a);//value a 原型链升级版中上面一条关系;
console.log(F.b);//value b

//case4
function Person(name) {
  this.name = name
}
Person.prototype.psamy = 111
let p = new Person('test');
console.log(typeof p);//object
console.log(p.__proto__);//Person { psamy: 111 }
console.log(typeof Person.prototype);//object
console.log(Person.prototype);//Person { psamy: 111 }
console.log(typeof Person.__proto__);//function
console.log(Person.__proto__);//[Function] //这里很特别;上面那条链;
console.log(typeof Person.__proto__.__proto__);//object
console.log(Person.__proto__.__proto__);//{}
console.log(typeof Person.__proto__.constructor);//function
console.log(Person.__proto__.constructor);//[Function: Function]

//case5
function Person(age) {
  this.age = age;
  this.eat = function() {
    console.log(age);
  }
}
let p1 = new Person(24);
let p2 = new Person(24);
console.log(p1.eat === p2.eat); // false

function Person2(name) {
  this.name = name;
}
Person2.prototype.eat = function() {
  console.log("吃饭"+ this.name);
}
let p3 = new Person2(24);
let p4 = new Person2(24);
console.log(p3.eat === p4.eat); // true;原型上的方法才一样;
2
3
4
5
6
7
8
9
10
11
12
13
14
15
16
17
18
19
20
21
22
23
24
25
26
27
28
29
30
31
32
33
34
35
36
37
38
39
40
41
42
43
44
45
46
47
48
49
50
51
52
53
54
55
56
57
58
59
60
61
62
63
64
65
66
67
68
69
70
71
72
73
74
75
76
77
# 继承的方式【原构实拷组寄6】
JS是一门弱类型动态语言,封装和继承是他的两大特性;
常用的六种继承方式
方式一:【原型链继承】
方式二:【构造继承】call继承借用构造函数继承://使用父类的构造函数来增强子类实例,等于是复制父类的实例属性给子类(没用到原型)
方式三:【实例继承】;核心:为父类实例添加新特性,作为子类实例返回
方式四: 【拷贝继承】冒充对象继承
方式五:【组合继承】原型链+借用构造函数的组合继承;
优化版本:寄生组合: call继承+Object.create();
与此同时原型链还能保持不变,所以可以正常使用instanceof 和 isPrototypeOf() ,所以寄生组合继承是引用类型最理想的继承方法。
核心部分:三步走:1:修改this指向到孩子;2:设置父的属性构造为孩子;3:设置父的属性为孩子属性;
方式六: ES6 class继承
ES5 的继承,实质是先创造子类的实例对象this,然后再将父类的方法添加到this上面(Parent.apply(this))。
ES6 的继承机制完全不同,实质是先将父类实例对象的属性和方法,加到this上面(所以必须先调用super方法),然后再用子类的构造函数修改this。
# 原型链继承
特点:将父类的实例作为子类的原型 ;基于原型链,既是父类的实例,也是子类的实例。
优缺点 简单易于实现,但是要想为子类新增属性和方法,必须要在new Student()这样的语句之后执行,1,无法实现多继承; 2.所有新实例都会共享父类实例的属性。
function Person(name, age) {
    this.name = name,// 属性
    this.age = age
    this.play = [1, 2, 3]
    this.setName = function () {}// 实例方法
}
Person.prototype.setAge = function () {// 原型方法
    console.log("----Person---setAge-->")
}

function Student(price) {
    this.price = price
    this.setScore = function () {
      console.log("----Student---setScore-->")
    }
}
// 注意:需要在子类中添加新的方法或者是重写父类的方法时候,切记一定要放到替换原型的语句之后
// Student.prototype.sayHello = function () { }//在这里写子类的原型方法和属性是无效的,
//因为会改变原型的指向,所以应该放到重新指定之后
Student.prototype = new Person()//注意这里的顺序;
Student.prototype.sayHello = function () { }
var s1 = new Student(15000)
var s2 = new Student(14000)
console.log(s1, s2)
console.log(s1 instanceof Student, s1 instanceof Person)//true true
s1.play.push(4)
console.log(s1.play, s2.play)//[ 1, 2, 3, 4 ] [ 1, 2, 3, 4 ]
// 子类继承父类的属性和方法是将父类的私有属性和公有方法都作为自己的公有属性和方法
console.log(s1.__proto__ === s2.__proto__)//true
console.log(s1.__proto__.__proto__ === s2.__proto__.__proto__)//true
//属性查找会在原型链上一层一层的寻找属性
console.log(s1.__proto__.__proto__.__proto__ === Object.prototype)//true
2
3
4
5
6
7
8
9
10
11
12
13
14
15
16
17
18
19
20
21
22
23
24
25
26
27
28
29
30
31
32
function F() {}
function O() {}

O.prototype = new F();//注意这里的顺序;
var obj = new O();//注意这里的顺序;

console.log(obj instanceof O); // true
console.log(obj instanceof F); // true
console.log(obj.__proto__ === O.prototype); // true
console.log(obj.__proto__.__proto__ === F.prototype); // true
2
3
4
5
6
7
8
9
10
# 构造继承
实质是利用call继承借用构造函数继承😕/使用父类的构造函数来增强子类实例,等于是复制父类的实例属性给子类(没用到原型)
特点:可以实现多继承(call多个),解决了所有实例共享父类实例属性的问题。
优缺点 1.只能继承父类实例的属性和方法;2.不能继承原型上的属性和方法。
function Person(name, age) {
  this.name = name,
  this.age = age,
  this.setName = function () { }
}
Person.prototype.setAge = function () {
  console.log("111")
}

function Student(name, age, price) {
  Person.call(this, name, age)// 相当于: this.Person(name, age)
  this.price = price
}
var s1 = new Student('Samy', 20, 15000)
console.log(s1)//Student { name: 'Samy', age: 20, setName: [Function], price: 15000 }
// 这种方式只是实现部分的继承,如果父类的原型还有方法和属性,子类是拿不到这些方法和属性的。
console.log(s1.setAge())//Uncaught TypeError: s1.setAge is not a function
2
3
4
5
6
7
8
9
10
11
12
13
14
15
16
17
# 实例继承(略)
实用性不强
核心:为父类实例添加新特性,作为子类实例返回 ;
特点:不限制调用方式,不管是new 子类()还是子类(),返回的对象具有相同的效果
缺点:实例是父类的实例,不是子类的实例; 不支持多继承
function Animal (name) {
  this.name = name || 'Animal';// 属性
  this.sleep = function(){// 实例方法
    console.log(this.name + '正在睡觉!');
  }
}

function Cat(name){
  var instance = new Animal();
  instance.name = name || 'Tom';
  return instance;
}
//Test Code
var cat = new Cat();
console.log(cat.name);
console.log(cat.sleep());
console.log(cat instanceof Animal); // true
console.log(cat instanceof Cat); // false
2
3
4
5
6
7
8
9
10
11
12
13
14
15
16
17
18
# 拷贝继承(略)
实用性不强
核心:冒充对象继承; 将父类的属性和方法拷贝一份到子类中;
特点: 支持多继承
缺点:效率较低,内存占用高(因为要拷贝父类的属性)
无法获取父类不可枚举的方法(不可枚举方法,不能使用for in 访问到)
function Animal (name) {
  this.name = name || 'Animal';// 属性
  this.sleep = function(){// 实例方法
    console.log(this.name + '正在睡觉!');
  }
}

function Cat(name){
  var animal = new Animal();
  for(var p in animal){
    Cat.prototype[p] = animal[p];
  }
  Cat.prototype.name = name || 'Tom';
}
// Test Code
var cat = new Cat();
console.log(cat.name);//Tom
console.log(cat.sleep());//Tom正在睡觉!
console.log(cat instanceof Animal); // false
console.log(cat instanceof Cat); // true
2
3
4
5
6
7
8
9
10
11
12
13
14
15
16
17
18
19
20
# 组合继承
相当于构造继承和原型链继承的组合体
通过调用父类构造,继承父类的属性并保留传参的优点,然后通过将父类实例作为子类原型,实现函数复用;
核心:原型链+借用构造函数的组合继承; 寄生式组合: call继承+Object.create();
特点:可以继承实例属性/方法,也可以继承原型属性/方法
缺点:调用了两次父类构造函数,生成了两份实例
function Person(name, age) {
    this.name = name,
    this.age = age,
    this.setAge = function () { }
}
Person.prototype.setAge = function () {
    console.log("111")
}

var p1 = new Person('samy', 15)
function Student(name, age, price) {
    Person.call(this, name, age)
    this.price = price
    this.setScore = function () { }
}
Student.prototype = new Person()
Student.prototype.constructor = Student//组合继承也是需要修复构造函数指向的
Student.prototype.sayHello = function () { }
// 调用了两次父类构造函数,生成了两份实例
// 	一次是在创建子类型原型的时候
// 	另一次是在子类型构造函数的内部,子类型最终会包含父类型对象的全部实例属性
// 	但我们不得不在调用子类构造函数时重写这些属性。
var s1 = new Student('Samy', 20, 15000)
var s2 = new Student('Jack', 22, 14000)
console.log(s1.constructor) //[Function: Student]
console.log(p1.constructor) //[Function: Person]
console.log(s2.constructor) //[Function: Student]
2
3
4
5
6
7
8
9
10
11
12
13
14
15
16
17
18
19
20
21
22
23
24
25
26
27
//组合继承优化(寄生组合继承)
function Person(name, age) {
    this.name = name,
    this.age = age,
    this.setAge = function () { }
}
Person.prototype.setAge = function () {
    console.log("111")
}

function Student(name, age, price) {
    Person.call(this, name, age)
    this.price = price
    this.setScore = function () { }
}
// 不会初始化两次实例方法/属性,避免的组合继承的缺点
//Student.prototype = Person.prototype//要点
Student.prototype = Object.create(Person.prototype)
Student.prototype.constructor = Student//要点

Student.prototype.sayHello = function () { }
var s1 = new Student('Samy', 20, 15000)
console.log(s1)
// 没办法辨别是实例是子类还是父类创造的,子类和父类的构造函数指向是同一个。
console.log(s1 instanceof Student, s1 instanceof Person)//true true
console.log(s1.constructor)//Person
console.log(s1)
2
3
4
5
6
7
8
9
10
11
12
13
14
15
16
17
18
19
20
21
22
23
24
25
26
27
# 寄生组合继承
组合优化; 通过寄生方式,砍掉父类的实例属性,这样,在调用两次父类的构造的时候,就不会初始化两次实例方法/属性
ES5 的继承,实质是先创造子类的实例对象this,然后再将父类的方法添加到this上面(Parent.apply(this))
优缺点:优点:堪称完美;缺点:实现复杂;
实现步骤:2,3步可以跟原型链图结合看使用, 就是在原型链F原型及O原型中间加入一层父的原型;
- 继承 构造属性;
Person.call(this, name, age) - 继承 原型方法;
Student.prototype = Object.create(Person.prototype) - 纠正构造器;
Student.prototype.constructor = Student指向回来;
用Object.create代替原来的new 操作,减少一次Person操作。详细参照: 【Object.create 和 new 区别】
    Sub.prototype = Object.create(Super.prototype) // 继承父类,原型链指向父类;
    Sub.prototype.constructor = Sub //自己的原型构造再指回自己;
2
function Person(name, age) {
  this.name = name,
  this.age = age
}
Person.prototype.setAge = function () {
  console.log("111")
}

function Student(name, age, price) {
  //调用你类的构造函数以初始化你类派生的成员
  Person.call(this, name, age)//要点 //第二次调用Parent()
  this.price = price//初始化子类的成员
  this.setScore = function () { }
}

function object(o) { //== Object.create()
  //function F() {}
  var F = function(){};
  F.prototype = o;
  return new F();
}
/**
高效率体现在他只调用了一次【初始化时】Parent构造函数,并且因此避免了在Child.prototype上面创建不必要的、多余的属性。
1. 创建超类型原型的副本。
2. 为创建的副本添加constructor属性,弥补因重写原型而失去的默认的constructor属性
3. 将新创建的对象(即副本)赋值给子类型的原型这种方法只调用了一次Parent构造函数,
与此同时原型链还能保持不变,所以可以正常使用instanceof 和 isPrototypeOf() ,所以寄生组合继承是引用类型最理想的继承方法。
*/
function inheritPrototype(child,parent){
  // var prototype = object(parent.prototype);
  var pPrototype = Object.create(parent.prototype);//创建对象
  pPrototype.constructor = child;//增强对象;修改指向;
  child.prototype = pPrototype;//指定对象
// Student.prototype = Object.create(Person.prototype)//要点
// Student.prototype.constructor = Student//要点
}
/**
总共调用了两次Parent构造;(组合继承调用了两次,寄生组合调用了一次,区别就是【Object.create 和 new 区别】)
在第一次调用Parent构造函数时,Child.prototype会得到两个属性: name和age; 他们都是Parent的实例属性,只不过现在位于Child的原型中。
当调用Child构造函数时,又会调用一次Parent构造函数,这一次又在新对象上创建了实例属性name和age。
于是这两个属性就屏蔽了原型中的两个同名属性。
*/
//Student.prototype = new Person()
//Student.prototype.constructor = Student//组合继承也是需要修复构造函数指向的
//Student.prototype.sayHello = function () { }

// 借助原型可以基于已有的对象来创建对象,var B = Object.create(A)以A对象为原型,生成了B对象。B继承了A的所有属性和方法。
// Student.prototype = Person.prototype
// Student.prototype.constructor = Student//组合继承也是需要修复构造函数指向的
// 可以把这三个要点封装成方法;
// Student.prototype = Object.create(Person.prototype)//要点
// Student.prototype.constructor = Student//要点
inheritPrototype(Student,Person)
var s1 = new Student('Samy', 20, 15000)// 同样的,Student继承了所有的Person原型对象的属性和方法。目前来说,最完美的继承方法!
console.log(s1 instanceof Student, s1 instanceof Person) // true true
console.log(s1.constructor) //[Function: Student]
console.log(s1)//Student { name: 'Samy', age: 20, price: 15000, setScore: [Function] }
2
3
4
5
6
7
8
9
10
11
12
13
14
15
16
17
18
19
20
21
22
23
24
25
26
27
28
29
30
31
32
33
34
35
36
37
38
39
40
41
42
43
44
45
46
47
48
49
50
51
52
53
54
55
56
57
其他继承方式:一样的原理,只是创建一个新的类,不用在考虑构造指向啦;
(function(){
  var Super = function(){};// 创建一个没有实例方法的类
  Super.prototype = Animal.prototype;
  Cat.prototype = new Super();//将实例作为子类的原型
})();

var F=function(){}
F.prototype=context.prototype;
bound.prototype=new F();
return bound;
2
3
4
5
6
7
8
9
10
老版本实现方式:(参考 Babel 的降级方案)
function inherits(subClass, superClass) {
    subClass.prototype = Object.create(superClass && superClass.prototype, {
        constructor: {
            value: subClass,
            writable: true,
            configurable: true
        }
    });
    if (superClass) Object.setPrototypeOf(subClass, superClass);
}
2
3
4
5
6
7
8
9
10
# ES6的extends继承
ES6 的 class 可以看作只是一个语法糖,它的绝大部分功能,ES5 都可以做到,新的class写法只是让对象原型的写法更加清晰、更像面向对象编程的语法而已。 // Q:说一下 Class ?
# 继承实质
无非就是是否先创建子类this,或者将父类的属性方法添加到this上;
- ES5实质:先创造子类实例的
this,再将父类的属性方法添加到this上(继承赋值处理) - ES6实质:先将父类实例的属性方法加到
this上(调用super()),再用子类构造函数修改this
class Person {
  constructor(name, age) {//调用类的构造方法
    this.name = name
    this.age = age
  }
  showName() {//定义一般的方法
    console.log("调用父类的方法")
    console.log(this.name, this.age);
  }
}
let p1 = new Person('kobe', 39)
console.log(p1)//Person { name: 'kobe', age: 39 }

//定义一个子类
class Student extends Person {
  constructor(name, age, salary) {
    super(name, age)
    this.salary = salary
  }
  showName() { //在子类自身定义方法
    console.log("调用子类的方法")
    console.log(this.name, this.age, this.salary);//wade 38 1000000000
  }
}
let s1 = new Student('wade', 38, 1000000000)
let s2 = new Student('kobe', 40, 3000000000)
console.log(s1.showName === s2.showName)//true
console.log(s1)//Student { name: 'wade', age: 38, salary: 1000000000 }
s1.showName()
2
3
4
5
6
7
8
9
10
11
12
13
14
15
16
17
18
19
20
21
22
23
24
25
26
27
28
29
# 选择使用类的一些原因
- 语法更简单,更不容易出错。
- 使用新语法比使用旧语法更容易(而且更不易出错)地设置继承层次结构。
class可以避免构造函数中使用new的常见错误(如果构造函数不是有效的对象,则使构造函数抛出异常)。- 用新语法调用父原型方法的版本比旧语法要简单得多,用
super.method()代替Parent.prototype.method.call(this)或Object.getPrototypeOf(Object.getPrototypeOf(this)).method.call(this)
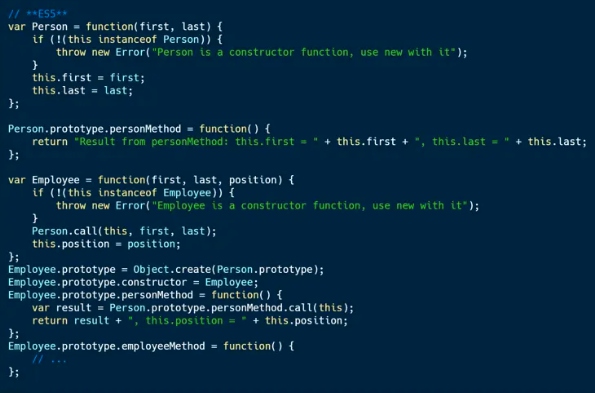
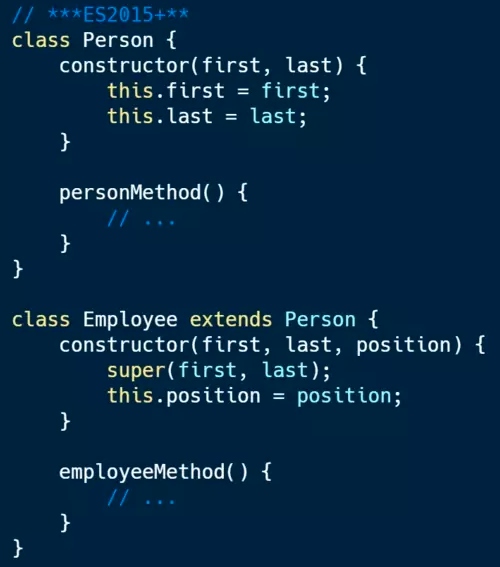
图示:
# 其他相关
# 流和防抖函数
# 定义及比较及应用
| 类型 | 概念 | 应用 |
|---|---|---|
| 防抖(debounce) | 事件触发动作完成后一段时间触发一次 | scroll,resize事件触发完后一段时间触发;1、电脑息屏时间,每动一次电脑又重新计算时间 2、input框变化频繁触发事件可加防抖 3、频繁点击按钮提交表单可加防抖 |
| 节流(throttle) | 事件触发后每隔一段时间触发一次,可触发多次 | scroll,resize事件一段时间触发多次;1、滚动频繁请求列表可加节流 2、游戏里长按鼠标,但是动作都是每隔一段时间做一次 |
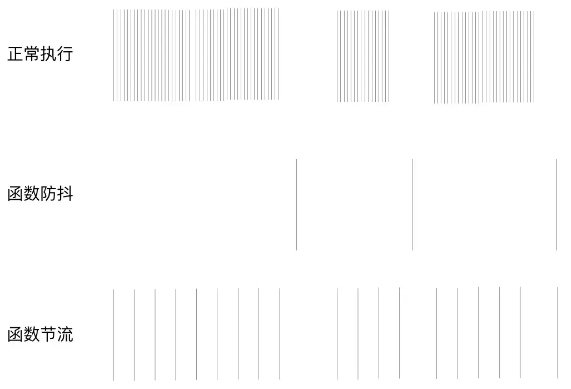
函数节流和防抖都是「闭包」、「高阶函数」的应用
函数防抖 debounce 指的是某个函数在某段时间内,无论触发了多少次回调,都只执行最后一次
- 应用:输入框校验; input 输入回调事件添加防抖函数后,只会在停止输入后触发一次; 按钮的点击事件(某种情况下
once函数 更合适) - 实现方案:
- 使用定时器,函数第一次执行时设定一个定时器,之后调用时发现已经设定过定时器就清空之前的定时器,并重新设定一个新的定时器,如果存在没有被清空的定时器,当定时器计时结束后触发函数执行
函数节流 throttle 指的是某个函数在一定时间间隔内(例如 3 秒)执行一次,在这 3 秒内 无视后来产生的函数调用请求
- 应用:
onscroll时触发的事件; 监听滚动事件添加节流函数后,每隔固定的一段时间执行一次; - 实现方案
- 方案 1:用时间戳来判断是否已到执行时间,记录上次执行的时间戳,然后每次触发后执行回调,判断当前时间距离上次执行时间的间隔是否已经达到时间差(Xms) ,如果是则执行,并更新上次执行的时间戳,如此循环
- 方案 2:使用定时器,比如当 scroll 事件刚触发时,打印一个 hello world,然后设置个 1000ms 的定时器,此后每次触发 scroll 事件触发回调,如果已经存在定时器,则回调不执行方法,直到定时器触发,handler 被清除,然后重新设置定时器
# 防抖实现【DC】
//函数防抖debounce指的是某个函数在某段时间内,无论触发了多少次回调,都只执行最后一次
  let debounce = function (fn, wait) {
    let timeout = null;
    return function () {//return (...args) => {
      if (timeout) clearTimeout(timeout);//如果多次触发将上次记录延迟清除掉
      timeout = setTimeout(() => {
        fn.apply(this, arguments);//fn.apply(this, args);// 或者直接 func()
        timeout = null;
      }, wait);
    };
  }
  // 处理函数
  function handle() {
    console.log(arguments)
    console.log(Math.random());
  }
  // 测试用例
document.getElementsByClassName('scroll-box')[0].addEventListener("scroll", debounce(handle, 3000));
2
3
4
5
6
7
8
9
10
11
12
13
14
15
16
17
18
防抖实现方式:优化版本(实现第一次触发回调事件)【要点】
实现原理比较简单,判断传入的 immediate 是否为 true,另外需要额外判断是否是第一次执行防抖函数,判断依旧就是 timer 是否为空,所以只要
immediate && !timer返回 true 就执行 fn 函数,即fn.apply(this, args)。
// 实现2: immediate 表示第一次是否立即执行
function debounce(fn, wait = 50, immediate) {
    let timer = null
    return function(...args) {
        if (timer) clearTimeout(timer)
      	// ------ 新增部分 start ------
      	// immediate 为 true 表示第一次触发后执行
      	// timer 为空表示首次触发
        if (immediate && !timer) {
            fn.apply(this, args)
        }
      	// ------ 新增部分 end ------
        timer = setTimeout(() => {
            fn.apply(this, args)
        }, wait)
    }
}
// 执行 debounce 函数返回新函数
const betterFn = debounce(() => console.log('fn 防抖执行了'), 1000, true)
// 第一次触发 scroll 执行一次 fn,后续只有在停止滑动 1 秒后才执行函数 fn
document.addEventListener('scroll', betterFn)
2
3
4
5
6
7
8
9
10
11
12
13
14
15
16
17
18
19
20
21
# 节流实现【TJ】
节流的实现方案一:【推荐】
let throttle = function (func, wait) {
    let timeout = null;
    return function () {//return (...args) => {
        if (!timeout) {
            timeout = setTimeout(() => {
                func.apply(this, arguments);//fn.apply(this, args);// 或者直接 func()
                timeout = null;
            }, wait);
        }
    };
};

// 处理函数
function handle() {
    console.log(arguments)
    console.log(Math.random());
}
// 测试用例
document.getElementsByClassName('scroll-box')[0].addEventListener("scroll", throttle(handle, 3000));
2
3
4
5
6
7
8
9
10
11
12
13
14
15
16
17
18
19
节流的实现方案二:
// fn 是需要执行的函数; // wait 是时间间隔
const throttle = (fn, wait = 50) => {
  let previous = 0 // 上一次执行 fn 的时间
  return function(...args) {// 将 throttle 处理结果当作函数返回
    let now = +new Date()// 获取当前时间,转换成时间戳,单位毫秒// = Date().now();
    // 将当前时间和上一次执行函数的时间进行对比; 大于等待时间就把 previous 设置为当前时间并执行函数 fn
    if (now - previous > wait) {
      previous = now
      fn.apply(this, args)
    }else{
      //TODO; 加强功能;在这里加入防抖;
    }
  }
}
const betterFn = throttle(() => console.log('fn 函数执行了'), 1000)//执行throttle函数返回新函数
setInterval(betterFn, 10)// 每10毫秒执行一次 betterFn 函数,但是只有时间差大于 1000 时才会执行 fn
2
3
4
5
6
7
8
9
10
11
12
13
14
15
16
# 加强版节流 throttle
现在考虑一种情况,如果用户的操作非常频繁,不等设置的延迟时间结束就进行下次操作,会频繁的清除计时器并重新生成,所以函数 fn 一直都没办法执行,导致用户操作迟迟得不到响应。
有一种思想是将「节流」和「防抖」合二为一,变成加强版的节流函数,关键点在于「 wait 时间内,可以重新生成定时器,但只要 wait 的时间到了,必须给用户一个响应」。这种合体思路恰好可以解决上面提出的问题。
结合 throttle 和 debounce 代码,加强版节流函数 throttle 如下,新增逻辑在于当前触发时间和上次触发的时间差小于时间间隔时,设立一个新的定时器,相当于把 debounce 代码放在了小于时间间隔部分。
// fn 是需要执行的函数; // wait 是时间间隔
const throttle = (fn, wait = 50) => {
  let previous = 0,  timer = null // 上一次执行 fn 的时间
  return function(...args) {// 将 throttle 处理结果当作函数返回
    let now = +new Date()// 获取当前时间,转换成时间戳,单位毫秒// = Date().now();
    // 将当前时间和上一次执行函数的时间进行对比; 大于等待时间就把 previous 设置为当前时间并执行函数 fn
    // ------ 新增部分 start ------
    // 判断上次触发的时间和本次触发的时间差是否小于时间间隔
    if (now - previous < wait) {
      // 如果小于,则为本次触发操作设立一个新的定时器; // 定时器时间结束后执行函数 fn
       if (timer) clearTimeout(timer)
       timer = setTimeout(() => {
          previous = now
          fn.apply(this, args)
        }, wait)
    // ------ 新增部分 end ------
    }else if (now - previous > wait) {
      previous = now
      fn.apply(this, args)
    }
  }
}

// 执行 throttle 函数返回新函数
const betterFn = throttle(() => console.log('fn 函数执行了'), 1000)
// 每 10 毫秒执行一次 betterFn 函数,但是只有时间差大于 1000 时才会执行 fn
setInterval(betterFn, 10)
2
3
4
5
6
7
8
9
10
11
12
13
14
15
16
17
18
19
20
21
22
23
24
25
26
27
都处理的话:设置了 500ms 的延迟,和 1000ms 的间隔,当超过 1000ms 未触发该函数,则立即执行该函数,不然则延迟 500ms 执行该函数。
function throttle(fn, delay, atleast) {
  var timer = null, previous = new Date();
  return function() {
      var curTime = new Date();
      if(curTime - previous < atleast) {
        clearTimeout(timer);
        timer = setTimeout(() => {
        	previous = curTime;
        	fn();
        }, delay);
      }else {
        previous = curTime;
        fn();
      }
  }
}
var loadImages = lazyload();
loadImages();//初始化首页的页面图片
window.addEventListener('scroll', throttle(loadImages, 500, 1000), false);
2
3
4
5
6
7
8
9
10
11
12
13
14
15
16
17
18
19
# lodashjs中的使用
原理:【详见lodashjs模块讲解】
https://www.lodashjs.com/docs/latest#_throttlefunc-wait0-options
https://www.lodashjs.com/docs/latest#_debouncefunc-wait0-options
使用
// 避免在滚动时过分的更新定位
jQuery(window).on('scroll', _.throttle(updatePosition, 100));
// 点击后就调用 `renewToken`,但5分钟内超过1次。
var throttled = _.throttle(renewToken, 300000, { 'trailing': false });
jQuery(element).on('click', throttled);
// 取消一个 trailing 的节流调用。
jQuery(window).on('popstate', throttled.cancel);


// 避免窗口在变动时出现昂贵的计算开销。
jQuery(window).on('resize', _.debounce(calculateLayout, 150));
// 当点击时 `sendMail` 随后就被调用。
jQuery(element).on('click', _.debounce(sendMail, 300, {
  'leading': true,
  'trailing': false
}));
// 确保 `batchLog` 调用1次之后,1秒内会被触发。
var debounced = _.debounce(batchLog, 250, { 'maxWait': 1000 });
var source = new EventSource('/stream');
jQuery(source).on('message', debounced);
// 取消一个 trailing 的防抖动调用
jQuery(window).on('popstate', debounced.cancel);
2
3
4
5
6
7
8
9
10
11
12
13
14
15
16
17
18
19
20
21
22
