 html居中及常用布局
# 水平/垂直居中
# 水平居中
- 行内元素:
display: inline(-block); text-align: center; - 块级元素:
margin: 0 auto;display: block - Flex:
display: flex; justify-content: center;//节水 - 元素为行内元素,设置父元素text-align:center
- 如果元素宽度固定,可以设置左右margin为auto
- 如果元素为绝对定位,设置父元素position为relative,元素设 left:0;right:0;margin:auto
- 使用flex-box布局,指定justify-content属性为center
# 垂直居中
- 行高 = 元素高:
line-height: height(单行文本) - Flex:
display: flex; align-items: center;(单行文本) - 多行文本 垂直居中; (下面的table处理类似)
# 水平垂直居中
文本水平居中:
text-algin: center文本垂直居中:
line-height等于容器height;display: flex; algin-items: center;div水平居中:
- margin: 0 auto;
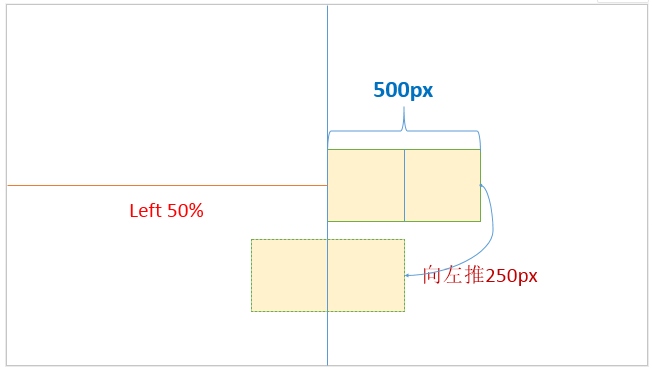
- 已知父元素宽度:margin-left: width / 2; transform: tranlateX(-50%)
- 未知父元素宽度:position: absolute: top: 50%; transform: tranlateX(-50%)
- display: flex; justify-content: center;
div垂直居中:
- 已知父元素高度:margin-top: height / 2; transform: tranlateY(-50%)
- 未知父元素高度:position: absolute: top: 50%; transform: tranlateY(-50%)
- display: flex; algin-items: center;
div水平垂直居中;
绝对定位定宽情况下;
.son {
    position: absolute;
    width: 宽度;
    left: 50%;
    margin-left: -宽度/2;
    top: 50%;
    height: 高度;
    margin-top: -0.5高度;
}
1
2
3
4
5
6
7
8
9绝对定位不定宽情况下; 案例:登陆页面居中,再右偏移250px;
.login-wapper{
  position: absolute;
  left: 0;
  right: 0;
  top: 0;
  bottom: 0;
  height: 100%;
  .login-form{
    width: 280px;
    position: absolute;
    left: ~"calc(50% + 250px)"; //水平方向
    top: 50%;//垂直方向
    transform: translate(-50%,-50%);//水平垂直方向;
  }
}
1
2
3
4
5
6
7
8
9
10
11
12
13
14
15
简单示范:
在父容器中设置; 利用flex布局;实际使用时应考虑兼容性
<!--通过 Flex 实现元素水平垂直居中 -->
<style>
.container {
  margin: 0 auto;
  width: 300px;
  height: 200px;
  background: deepskyblue;
  display: flex;
  justify-content: center;/* 元素水平居中 */
  align-items: center;/* 元素垂直居中 */
}
.child {
  width: 100px;
  height: 100px;
  background: #fff;
}
</style>
<div class="container">
  <div class="child"></div>
</div>
2
3
4
5
6
7
8
9
10
11
12
13
14
15
16
17
18
19
20
# div居中详细情况分析
# 水平居中一个div
- 行内元素
.parent {
    text-align: center;
}
2
3
- 块级元素
.son {
    margin: 0 auto;
}
2
3
- flex布局
.parent {
    display: flex;
    justify-content: center;
}
/*或者*/
.parent{
    display: flex;
    /*display: flex;
    justify-content: center;
    align-items: center;*/
}
.son{
    margin: auto;
}
2
3
4
5
6
7
8
9
10
11
12
13
14
- 绝对定位定宽 【让绝对定位的div居中】
- 通过 绝对定位 + left: 50% + 负margin;
- 通过 绝对定位 +
margin: auto;left/right: 0 ; margin: 0 auto; 【推荐这种】
.son {
    position: absolute;
    width: 宽度;
    left: 50%;
    margin-left: -宽度/2
}
.son {
    position: absolute;
    width: 宽度;
    left: 0;
    right: 0;
    margin: 0 auto;
}
2
3
4
5
6
7
8
9
10
11
12
13
- 绝对定位不定宽; 跟上面的定宽第一种类似,
margin-left: -宽度/2变成transform: translate(-50%, 0)。 在x轴上操作;
.son {
    position: absolute;
    left: 50%;
    transform: translate(-50%, 0);
}
/*第二种通过flex实现;参照上面flex实现*/
2
3
4
5
6
# 垂直居中一个div
- 行内元素
.parent {
    height: 高度;
}
.son {
    line-height: 高度;
}
2
3
4
5
6
- flex
.parent {
    display: flex;
    align-items: center;
}
2
3
4
- table,相比水平的多了这种;
.parent {
  display: table;
}
.son {
  display: table-cell;
  vertical-align: middle;
}
2
3
4
5
6
7
- 绝对定位定高; 跟水平的操作类似,就是
margin-left换成了margin-top
.son {
    position: absolute;
    top: 50%;
    height: 高度;
    margin-top: -0.5高度;
}
2
3
4
5
6
- 绝对定位不定高; 跟水平的操作类似;在y轴上操作;
.son {
    position: absolute;
    top: 50%;
    transform: translate( 0, -50%);
}
2
3
4
5
- 绝对定位 定高;top/bottom: 0; 跟水平的操作类似,就是
left, right换成了top, bottom
.son {
    position: absolute;
    height: 高度;
    top: 0;
    bottom: 0;
    margin: auto 0;
}
2
3
4
5
6
7
# 水平垂直居中
上面两种方式配合统一处理;案例:登陆页面居中,再右偏移250px;
.login-wapper{
  position: absolute;
  left: 0;
  right: 0;
  top: 0;
  bottom: 0;
  height: 100%;
  background: url('/img/login-back.png') no-repeat 0 0;
  background-size: 100% 100%;
  overflow-y: none;
  .login-form{
    width: 280px;
    min-height: 388px;
    opacity: 0.96;
    border-radius: 2px;
    background-color: rgba(255, 255, 255, 1);
    position: absolute;
    top: 50%;
    left: ~"calc(50% + 250px)";
    transform: translate(-50%,-50%);
    .iconfont-lang{
      padding: 14px 21px 0 0;
      text-align: right;
      .language-dropdown{
        position: absolute;
        top: 30px;
        left: 190px;
        min-width: 86px;
        height: 40px;
        padding: 0;
        li{
          width: 100%;
          height: 20px;
          line-height: 20px;
          a{
            color: #000;
          }
        }
      }
    }
  }
}
2
3
4
5
6
7
8
9
10
11
12
13
14
15
16
17
18
19
20
21
22
23
24
25
26
27
28
29
30
31
32
33
34
35
36
37
38
39
40
41
42
# 水平居中绝对定位的div
参照上面的【绝对定位定宽,及绝对定位不定宽】
# 水平居中一个浮动元素
宽度固定的浮动元素
要点:position:relative;left:50%; margin: -width/2 ; 于left 50%,再向左边margin; -width/2使内容居中;
方式二:居中一个浮动元素(套一个大盒子给它margin:0px auto。)父的width跟子float的宽度一致;
.div31 {/*推荐*/
    float: left;
    height: 200px;
    width: 300px;
    background-color: blanchedalmond;
    margin-left: -150px;
    position: relative;
    left: 50%;
}
.div32 {
    float: left;
    height: 200px;
    width: 300px;
    background-color: green;
    position: relative;
    margin-left: 50%;
    left: -150px;
    top:50%;/*再垂直居中*/
}/*上面两个一样的实现,推荐第一种,方便跟下面接轨*/
<div class="div31">浮动元素</div>
<h4 style="clear: both;">居中浮动元素不知道宽高的情况下</h4>
1
2
3
4
5
6
7
8
9
10
11
12
13
14
15
16
17
18
19
20
21

宽度不固定的互动元素; 全适用;
要点:position:relative; left:50% (父) position:relative;right :50% (子)
.outerbox{
    float:left;
    position:relative;
    left:50%;
}
.innerbox{
    float:left;
    height: 200px;/*可省略*/
    width: 300px; /*可省略*/
    position:relative;
    right:50%;
    background-color:chartreuse
}
<h4 style="clear: both;">居中浮动元素不知道宽高的情况下</h4>
<div class="outerbox">
	<div class="innerbox">浮动元素2</div>
 </div>
1
2
3
4
5
6
7
8
9
10
11
12
13
14
15
16
17
# 总括
水平居中的主要属性有
- text-alin:center;
- margin:0 auto
- position:relative|absolute; left:50%;
垂直居中的主要属性有
- line-height/ height;
- vertical-align:middle;// display:table-cell; 垂直居中对齐
# css常见布局
# 两列布局
方式一:两列布局是一侧固定,另一侧自适应。
一般一个浮动,另一个设置margin,左侧的div给浮动,右侧的div margin-left;
或者一个绝对定位,另一个设置margin; 使其从左侧div右侧开始展现
方式二:要考虑那边左右那边是动态的;
用flex布局来写; flex-end + 左边flex=1;
直接用flex,+右边 flex=1也可以;
# 三列布局
左中右三列,左右个200px固定,中间自适应占满(flex=1);以下两种简单示例方式(float&flex);
三列布局特点是其中两列宽度固定,剩下一个自适应,方法是两个浮动自适应那个设置margin,比如左右固定,中间自适应可以左右分别设置float为left,right,然后中间那个设置margin left right分别为左右两栏宽度。 注意:
左右中的先后顺序;涉及用到float的都要考虑margin及回去补位;用flex布局来写; space-between + 中间flex=1
float方式实现 注意:三个布局时,左右中的先后顺序;涉及用到float的都要考虑margin及回去补位;
这种方式压缩到很小时,最右边也会掉空;所以有后面的圣杯布局/双飞翼布局
<style>
    .left{
       float: left;
       width: 200px;
       background: green;
       height: 200px;
    }
    .right{
        margin-left:200px;
        background: red;
        height: 200px;
    }
    .left2{
        float: left;
        width: 200px;
        background: green;
        height: 200px;
    }
    .center2{
        margin: 0 300px 0 200px;
        background: yellow;
        height: 200px;
    }
    .right2{
        float: right;
        width:300px;
        background: red;
        height: 200px;
    }
  </style>
  <body>
    <div>
      <div class="left">左边左边左边左边左边左边</div>
      <div class="right">右边右边右边右边右边右边</div>
    </div>
    <div>
      <div class="left2">左边左边左边左边左边左边</div>
      <div class="right2">右边右边右边右边右边右边</div>
      <div class="center2">中间中间中间中间中间中间</div>
    </div>
  </body>
2
3
4
5
6
7
8
9
10
11
12
13
14
15
16
17
18
19
20
21
22
23
24
25
26
27
28
29
30
31
32
33
34
35
36
37
38
39
40
41
flex方式实现: 分别设置flex-end(2个布局时), space-between(三个布局时), 再保存左边或中间有一个flex=1即可;
<style>
  .div1 {
    display: flex;
    justify-content: flex-end;
  }
  .left {
    flex: 1;
    background: green;
    height: 200px;
  }

  .right {
    width: 300px;
    background: red;
    height: 200px;
  }
  .div2 {
    display: flex;
    justify-content: space-between;
  }
  .left2 {
    width: 200px;
    background: green;
    height: 200px;
  }
  .center2 {
    /* margin: 0 300px 0 200px; */
    background: yellow;
    height: 200px;
    flex: 1;
  }
  .right2 {
    width: 300px;
    background: red;
    height: 200px;
  }
</style>

<body>
  <div class="div1" 两列布局>
    <div class="left">左边左边左边左边左边左边</div>
    <div class="right">右边右边右边右边右边右边</div>
  </div>
  <div class="div2" 三列布局>
    <div class="left2">左边左边左边左边左边左边</div>
    <div class="right2">右边右边右边右边右边右边</div>
    <div class="center2">中间中间中间中间中间中间</div>
  </div>
</body>
2
3
4
5
6
7
8
9
10
11
12
13
14
15
16
17
18
19
20
21
22
23
24
25
26
27
28
29
30
31
32
33
34
35
36
37
38
39
40
41
42
43
44
45
46
47
48
49

# 上中下布局
上中下三行,头部200px高,底部200px高,中间自适应占满
绝对定位,把上面的和下面的分别设置top:0,bottom:0 固定在上下两端,中间的距离上下200px即可;
涉及到绝对定位的,中间要考虑top ,bottom补位;
<style>
  * {
    margin: 0;
    padding: 0;
  }
  .divBox {
    background: yellow;
    width: 100%;
  }
  .top {
    background: red;
    width: 100%;
    height: 200px;
    position: absolute;
    top: 0;
  }
  .center {
    width: 100%;
    background: grey;
    position: absolute;
    top: 200px;
    bottom: 200px;
  }
  .bottom {
    width: 100%;
    background: green;
    height: 200px;
    position: absolute;
    bottom: 0;
  }
</style>
<body>
  <div class="divBox">
    <div class="top"></div>
    <div class="center"></div>
    <div class="bottom"></div>
  </div>
</body>
2
3
4
5
6
7
8
9
10
11
12
13
14
15
16
17
18
19
20
21
22
23
24
25
26
27
28
29
30
31
32
33
34
35
36
37
38
上下两部分,底下这个固定高度200px,如果上面的内容少,那么这个footer就固定在底部,如果内容多,就把footer挤着往下走;【实现底部超出后悬浮效果】
<style>
	* {
		margin: 0;
		padding: 0;
	}
	html {
		height: 100%;
	}
	body {
		min-height: 100%;
		position: relative;
	}
	.content {
		width: 100%;
		background: red;
		padding-bottom: 200px;
	}
	.footer {
		width: 100%;
		height: 200px;
		background: green;
		position: absolute;
		bottom: 0;
	}
</style>
<body>
	<div class="divBox">
		<div class="content"></div>
		<div class="footer"></div>
	</div>
</body>
2
3
4
5
6
7
8
9
10
11
12
13
14
15
16
17
18
19
20
21
22
23
24
25
26
27
28
29
30
31
# 三栏布局
特征:中间列自适应宽度,旁边两侧固定宽度
圣杯布局与双飞翼布局针对的都是三列左右栏固定中间栏边框自适应的网页布局(想象一下圣杯是主体是加上两个耳朵;鸟儿是身体加上一对翅膀)
# 圣杯布局
特点是有个头部, 底部,中间是主要内容区,主要内容区又分成左中右三块,其中中间是最主要内容区
实现步骤:
- 朝一个方向浮动,再用负margin把挤下去的两侧给拉上来再设置相对定位,
- 为了避免中间里面内容被拉上来的挡住再对中间内容设置padding。
特点:比较特殊的三栏布局,同样也是两边固定宽度,中间自适应,唯一区别是dom结构必须是先写中间列部分,这样实现中间列可以优先加载。
# 双飞翼布局
与圣杯布局类似,只是在中间内容区加了个父元素,这样可以省略对左右栏设置相对定位。
目的:为了优先显示中间主要部分,浏览器渲染引擎在构建和渲染渲染树是异步的(谁先构建好谁先显示),故在编写时,先构建中间main部分,但由于布局原因,将left置于center左边,故而出现了双飞翼布局。
特点:同样也是三栏布局,在圣杯布局基础上进一步优化,解决了圣杯布局错乱问题,实现了内容与布局的分离。而且任何一栏都可以是最高栏,不会出问题。
实现步骤(前两步与圣杯布局一样)
- 三个部分都设定为左浮动,然后设置center的宽度为100%,此时,left和right部分会跳到下一行;
- 通过设置margin-left为负值**, 让left和right部分回到与center部分同一行**;负的margin-left会让元素沿文档流向左移动,如果负的数值比较大就会一直移动到上一行。
- center部分增加一个内层div,并设margin;跟圣杯布局的反过来,它的是在父设置padding处理,再通过相对布局填充;
缺点: 多加一层 dom 树节点,增加渲染树生成的计算量。
# 圣杯/双飞翼实现方式对比
两种布局方式都是把主列放在文档流最前面,使主列优先加载。
相同之处:都是让三列浮动,然后通过负外边距形成三列布局。
不同之处:在于如何处理中间主列的位置:
圣杯布局是利用父容器的左、右内边距+两个从列相对定位; 用了position: relative; float: left; margin-left: -100%; left: -100px; margin-left: -200px; right: -200px; container容器 padding: 0 200px 0 100px; 双飞翼布局是把主列嵌套在一个新的父级块中利用主列的左、右外边距进行布局调整; 用了float: left; margin-left: -100%; main中的content margin: 0 200px 0 100px;
圣杯/双飞翼实现源码比较:
  <head>
    <meta charset="utf-8" />
    <title>实现三栏水平布局之圣杯布局</title>
    <style type="text/css">
      .container {
        padding: 0 200px 0 100px;
        overflow: hidden;
      }
      .left, .main, .right {
        min-height: 300px;
        position: relative;
        float: left;
      }
      .main {
        background-color: blue;
        /* background: blue; */
        width: 100%;
      }
      .left {
        background: green;
        width: 100px;
        margin-left: -100%;
        left: -100px;
      }
      .right {
        background-color: red;
        width: 200px;
        margin-left: -200px;
        right: -200px;
      }
      .footer {
        clear: both;
      }
    </style>
  </head>
  <body>
    <div class="container">
      <div class="main">main</div>
      <div class="left">left</div>
      <div class="right">right</div>
    </div>
  </body>

  <head>
    <meta charset="utf-8" />
    <title>实现三栏水平布局之双飞翼布局</title>
    <style type="text/css">
      .left, .main, .right {
        min-height: 300px;
        float: left;
        text-align: center;
      }
      .main {
        background-color: blue;
        width: 100%;
      }
      .content {
        margin: 0 200px 0 100px;
      }
      .left {
        background: green;
        width: 100px;
        margin-left: -100%;
      }
      .right {
        background-color: red;
        width: 200px;
        margin-left: -200px;
      }
    </style>
  </head>
  <body>
    <div class="container">
      <div class="main">
        <div class="content">main</div>
      </div>
      <div class="left">left</div>
      <div class="right">right</div>
    </div>
  </body>
2
3
4
5
6
7
8
9
10
11
12
13
14
15
16
17
18
19
20
21
22
23
24
25
26
27
28
29
30
31
32
33
34
35
36
37
38
39
40
41
42
43
44
45
46
47
48
49
50
51
52
53
54
55
56
57
58
59
60
61
62
63
64
65
66
67
68
69
70
71
72
73
74
75
76
77
78
79
80
# 完整案例实现比较
针对如下DOM结构,编写CSS,实现三栏水平布局,其中left、right分别位于左右两侧,left宽度为200px,right宽度为300px,main处在中间,宽度自适应。 要求:允许增加额外的DOM节点,但不能修改现有节点顺序。
<div class="container">
  <div class="main">main</div>
  <div class="left">left</div>
  <div class="right">right</div>
</div>
<!--或者-->
<body>
  <header>header</header>
  <section class="wrapper">
    <section class="col main">main</section>
    <aside class="col left">left</aside>
    <aside class="col right">right</aside>
  </section>
  <footer>footer</footer>
</body>
2
3
4
5
6
7
8
9
10
11
12
13
14
15
cup/fly/flex/absolute四种方式实现比较:
相同之处:为了比较统一性,都设置为mian, left, right顺序;

圣杯布局
优点:不需要添加dom节点
缺点:圣杯布局的缺点:正常情况下是没有问题的,但是特殊情况下就会暴露此方案的弊端,如果将浏览器无线放大时,「圣杯」将会「破碎」掉。如图,当main部分的宽小于left部分时就会发生布局混乱。(main<left即会变形)
实现:父容器控制预览左右预览大小;main宽度控制100%,使用负的margin-left:
负的margin-left会让元素沿文档流向左移动,如果负的数值比较大就会一直移动到上一行。
设置left部分的margin-left为-100%,就会使left向左移动一整个行的宽度,由于left左边是父元素的边框,所以left继续跳到上一行左移,一直移动到上一行的开头,并覆盖了main部分(仔细观察下图,你会发现main里面的字“main”不见了,因为被left遮住了),left上移过后,right就会处于上一行的开头位置,这时再设置right部分margin-left为负的宽度,right就会左移到上一行的末尾。
双飞翼布局
目的:为了优先显示中间主要部分,浏览器渲染引擎在构建和渲染渲染树是异步的(谁先构建好谁先显示),故在编写时,先构建中间main部分,但由于布局原因,将left置于center左边,故而出现了双飞翼布局。
优点:不会像圣杯布局那样变形
缺点是:多加了一层dom节点
实现: 跟圣杯比较,不需要相对布局,直接通过float加 margin-left: -100%实现;content中设置margin;
flex布局 简洁推荐
中间设置 flex-grow: 1;, left设置 order: -1;即可;也可以用 display: flex; flex:1; order: -1;
absolute布局
全局设置相对布局,中间预留margin 左右的大小;左右子设置绝对布局,占用左边及右边即可; 用了 position: absolute; left: 0; right: 0;
flex与absolute的源码实现方式:
<head>
  <meta charset="utf-8" />
  <title>实现三栏水平布局之Flex布局</title>
  <style type="text/css">
    .container {
      display: flex;
      min-height: 300px;
    }
    .main {
      background-color: blue;
      /* flex-grow: 1; */
      flex:1;
      text-align: center;
      height: 300px;
      line-height: 300px;
    }
    .left {
      background-color: green;
      order: -1;
      /* flex-basis: 100px; */
      width: 100px;
    }
    .right {
      background-color: red;
      /* flex-basis: 200px; */
      width: 200px;
    }
  </style>
</head>

<head>
  <meta charset="utf-8" />
  <title>实现三栏水平布局之绝对定位布局</title>
  <style type="text/css">
    .container {
      position: relative;
    }
    .main, .right, .left {
      top: 0;
      height: 300px;
    }
    .main {
      background-color: blue;
      margin: 0 200px 0 100px;
    }
    .left {
      background-color: green;
      position: absolute;
      width: 100px;
      left: 0;
    }
    .right {
      background-color: red;
      position: absolute;
      width: 200px;
      right: 0;
    }
  </style>
</head>
2
3
4
5
6
7
8
9
10
11
12
13
14
15
16
17
18
19
20
21
22
23
24
25
26
27
28
29
30
31
32
33
34
35
36
37
38
39
40
41
42
43
44
45
46
47
48
49
50
51
52
53
54
55
56
57
58
59
