 react-router&dom实践使用
# react-router-dom的常用操作
# 基本语法操作
分别命名为“home”和“detail”。在页面中编写如下代码:
home.js
import React from 'react';
export default class Home extends React.Component {
    render() {
        return (
            <div><a>去detail</a></div>
        )
    }
}
2
3
4
5
6
7
8
detail.js
import React from 'react';
export default class Home extends React.Component {
    render() {
        return (
            <div><a>回到home</a> </div>
        )
    }
}
2
3
4
5
6
7
8
然后再新建一个路由组件,命名为“router.js”,并编写如下代码:
import React from 'react';
import {HashRouter, Route, Switch} from 'react-router-dom';
import Home from '../home';
import Detail from '../detail';
const BasicRoute = () => (
    <HashRouter>
        <Switch>
            <Route exact path="/" component={Home}/>
            <Route exact path="/detail" component={Detail}/>
        </Switch>
    </HashRouter>
);
export default BasicRoute;
2
3
4
5
6
7
8
9
10
11
12
13
如上代码定义了一个纯路由组件,将两个页面组件Home和Detail使用Route组件包裹,外面套用Switch作路由匹配,当路由组件检测到地址栏与Route的path匹配时,就会自动加载响应的页面。
import React from 'react';
import ReactDOM from 'react-dom';
import Router from './router/router';
ReactDOM.render(<Router/>,document.getElementById('root'));
2
3
4
# 简单的路由跳转及传参
使用this.props.history.push的具体方法:
- pathname:写跳转界面的路径
- state:要传过去的数据
 <a href='#/detail'>去detail</a> //通过a便签跳转;
this.props.history.push({ pathname: '/dashboard/samy', state: { 数据名 } }); //通过函数跳转
this.props.location.state.数据名 // 下一个页面取值
2
3
# replace
有些场景下,重复使用push或a标签跳转会产生死循环,为了避免这种情况出现,react-router-dom提供了replace。在可能会出现死循环的地方使用replace来跳转:
this.props.history.replace('/detail');
# goBack
场景中需要返回上级页面的时候使用:
this.props.history.goBack();
# 嵌套路由
- 嵌套路由的适用场景还是比较多的,接下来就来介绍一下实现方法。
- 首先在Vue中实现嵌套路由,只需要将配置文件写成children嵌套,然后在需要展示子路由的位置加上
<router-view></router-view>即可。 - React中应该如何实现呢?其实原理和Vue类似,只需要在父级路由中包含子路由即可。 首先定义父级组件MainLayout
import React from 'react';
import './MainLayout.scss';
const { Header, Sider, Content } = Layout;
export default class MainLayout extends React.Component {
    render() {
        return (
            <div className='main-layout'> 父组件</div>
        );
    }
}
2
3
4
5
6
7
8
9
10
然后定义子组件Home:
import React, {useState} from 'react';
import {Modal, Select} from "antd";
import {connect} from 'react-redux';
import {addCount} from '../../servers/home';
function Home(props) {
    const [visible, setVisible] = useState(false);
    const {countNum: {count}, dispatch} = props;
    return (<div>子组件</div>)
}
export default Home;
2
3
4
5
6
7
8
9
10
然后将它们添加进路由router.js,并且关联父子关系:
import React from 'react';
import {HashRouter, Route, Switch} from "react-router-dom";
import Home from '../pages/Home/Home';
import MainLayout from '../layout/MainLayout';
const BasicRouter = () => (
    <HashRouter>
        <Switch>
            <Route path="/index" component={
                <MainLayout>
                  <Route exact path="/" component={Home}/>
                  <Route exact path="/index" component={Home}/>
                  <Route path="/index/home" component={Home}/>
                </MainLayout>
             }/>
        </Switch>
    </HashRouter>
);
export default BasicRouter;
2
3
4
5
6
7
8
9
10
11
12
13
14
15
16
17
18
在MainLayout中,修改如下代码:
import React from 'react';
import './MainLayout.scss';
const { Header, Sider, Content } = Layout;
export default class MainLayout extends React.Component {
    render() {
        return (
            <div className='main-layout'>{this.props.children}</div>
        );
    }
}
2
3
4
5
6
7
8
9
10
# react-router与react-router-dom的区别
# API对比
**React-router:**提供了router的核心api。如Router、Route、Switch等,但没有提供有关dom操作进行路由跳转的api;
**React-router-dom:**提供了BrowserRouter、Route、Link等api,可以通过dom操作触发事件控制路由。
# 功能对比
**React-router:**实现了路由的核心功能
React-router-dom:基于React-router,加入了一些在浏览器运行下的一些功能,
react-router: 实现了路由的核心功能react-router-dom: 基于react-router,加入了在浏览器运行环境下的一些功能,例如:Link组件,会渲染一个a标签,Link组件源码a标签行 (opens new window);BrowserRouter和HashRouter组件,前者使用pushState和popState事件构建路由,后者使用window.location.hash和hashchange事件构建路由。react-router-native: 基于react-router,类似react-router-dom,加入了react-native运行环境下的一些功能。
例如:
Link组件会渲染一个a标签,- BrowserRouter使用 HTML5 提供的 history API可以保证你的 UI 界面和 URL 保持同步,
- HashRouter使用 URL 的
hash部分保证你的 UI 界面和 URL 保持同步
# 写法对比
React-router不能通过操作dom控制路由,此时还需引入React-router-dom; 写法一:
import {Switch, Route, Router} from 'react-router';
import {HashHistory, Link} from 'react-router-dom';
2
React-router-dom在React-router的基础上扩展了可操作dom的api;写法二:
import {Swtich, Route, Router, HashHistory, Link} from 'react-router-dom';
# 路由跳转对比
React-router:
- router4.0以上版本用**this.props.history.push('/path')**实现跳转;
- router3.0以上版本用**this.props.router.push('/path')**实现跳转
**React-router-dom:直接用this.props.history.push('/path')**就可以实现跳转;
使用:
$ npm install --save react-router
// using an ES6 transpiler, like babel
import { Router, Route, Link } from 'react-router'
$ npm install react-router-dom@next
# or
$ yarn add react-router-dom@next
import {
    BrowserRouter as Router,
    StaticRouter, // for server rendering
    Route,
    Link
    // etc.
} from 'react-router-dom';
2
3
4
5
6
7
8
9
10
11
12
13
# 总结
在使用React的大多数情况下,会想要通过操作dom来控制路由,例如点击一个按钮完成跳转,这种时候使用React-router-dom就比较方便。安装也很简单:npm install react-router-dom --save
从react-router-dom中package.json的依赖就可以看出:react-router-dom是依赖react-router的,所以我们使用npm安装react-router-dom的时候,不需要npm安装react-router。
//react-router-dom的依赖
"dependencies": {
    "history": "^4.7.2",
    "invariant": "^2.2.2",
    "loose-envify": "^1.3.1",
    "prop-types": "^15.5.4",
    "react-router": "^4.2.0",
    "warning": "^3.0.0"
  }
2
3
4
5
6
7
8
9
# 路由跳转方式
# 1.使用 react-router-dom 中的 Link/history 实现页面跳转
一般适用于,点击按钮或其他组件进行页面跳转,具体使用方式如下:
<Link
    to={{
        pathname: '/path/newpath',
        state: {  // 页面跳转要传递的数据,如下
              data1: {},
              data2: []
        },
    }}
>
   <Button> 点击跳转 </Button>
</Link>
// 动态路由
<Link to={`/content/${value.aid}`}>{value.title}</Link> //对应着动态路由传参
<Route path="/content/:aid" component={Content}></Route>  //动态路由传值path要照着这个格式写,将参数名/:name以这种格式填写 (跳转的路由界面内容显示处)

//get方式传值
<Link to={`/gettvalue?aid=${value.aid}`}>{value.title}</Link> // 类似a标签带参数跳转即可
//取值
this.props.location.search// get方式取值,取出来的时?aid=1这种格式,需手动转或者引入url模块,进行路由解析
this.props.match.params.aid// 动态路由方式时取值
2
3
4
5
6
7
8
9
10
11
12
13
14
15
16
17
18
19
20
<Route path="/views" render={()=> <Redirect replace to='/views/home' />}></Route>
<Route path="/views/home" component={require('./page/Home').default}></Route>
<button id={'home'} onClick={this.tabbClick}>首页</button>
2
3
在js中处理跳转:
this.props.history.push('/views/home')
this.props.history.push({
  pathname: '/views/home'
})
2
3
4
在 this.props 中找不到 history的解决
- 在
React中正常来说只有在<Route>包裹的组件中才能在this.props属性中找到history对象; - 但有些情况下我们就是希望在一个没被
<Route>包裹的组件中用到history对象,比如:异步加载数据后跳转
网上有些方法提到可以在 class 前加上 @withRouter 的修饰
import { withRouter } from 'react-router-dom'
@withRouter
class ...
2
3
这种做法有时候会出现 Support for the experimental syntax 'decorators-legacy' isn't currently enabled 的报错; 可以试着改成
export default withRouter(YourComponent)
或者(如果你还需要 connect)
export default withRouter(connect(mapStateToProps)(YourComponent))
# 2.使用 react-router-redux 中的 push 进行页面跳转
react-router-redux 中包含以下几个函数,一般会结合redux使用:
- push - 跳转到指定路径
- replace - 替换历史记录中的当前位置
- go - 在历史记录中向后或向前移动相对数量的位置
- goForward - 向前移动一个位置。相当于go(1)
- goBack - 向后移动一个位置。相当于go(-1)
具体使用时通过发送disppatch来进行页面跳转:
let param1 = {}
dispatch(push("/path/newpath'", param1));
dispatch(replace("/path/newpath'", param1));
2
3
# 3.使用RouteComponentProps 中的history进行页面回退
一般在完成某种操作,需要返回上一个页面时使用。
this.props.history.goBack(); //这个是返回上一个路由的界面;不一定是上一级路径;
# 4.React-Router 历史版本使用方式
React-Router 2.0.0 版本
2.0.0版本需要使用browserHistory进行跳转,具体参考一下代码:
import { browserHistory } from 'react-router'
browserHistory.push('/path')
2
React-Router 2.4.0版本以上
React-Router 2.4.0版本以上,可以通过mixin的方法,使组件增加this.router属性,然后进行相应的操作,具体mixin代码参考如下:
import { withRouter } from 'react-router';
clsss ABC extends Component {}
module.exports = withRouter(ABC);
2
3
用过mixin的组件,会具有this.router的属性,只需要使用this.props.router.push('/path') 就可以跳转到相应的路由了。
React-Router 3.0.0版本以上
3.0.0版本以后不需要再手动mixin相关的router属性,在任何需要跳转的组件中写this.props.router.push('/path') 就可以跳转到响应的路由了。
React-Router 4.0版本以上
1) 路由的跳转
React-Router 4.0对路由进行了改进,router属性改为了history属性,使用方法还是和3.0差不多,任何需要跳转的地方使用this.props.history.push('/path')就可以进行跳转了
2) 参数的获取
使用this.props.match.params.xxx可以获取到当前路由的参数
# 5.打开一个新的tab页,并截取路径
首先定义路由为 :
path: "/pathname/:param1/:param2/:param3",
点击事件跳转到新页面 打开一个新的tab:
window.open(`pathname/${param1}/${param2}/${param3}`)
在新的页面获取路径上的参数:
param1:  this.props.match.params.param1,
param2:  this.props.match.params.param2,
param3:  this.props.match.params.param3,
2
3
获取路径参数 :
path?key1=value1&key2=value2
const query = this.props.match.location.search
const arr = query.split('&')  // ['?key1=value1', '&key2=value2']
const successCount = arr[0].substr(6) // 'value1'
const failedCount = arr[1].substr(6) // 'value2'
2
3
4
或者
function getUrlParam(url, paramName) {
  var arr = url.split("?");
  if (arr.length > 1) {
    var paramArr= arr[1].split("&");
    var arr;
    for (var i = 0; i < paramArr.length; i++) {
      arr = paramArr[i].split("=");
      if (arr != null && arr[0] == paramName) {
        return arr[1];
      }
    }
    return "";
  }else {
    return "";
  }
}
2
3
4
5
6
7
8
9
10
11
12
13
14
15
16
# 路由传参方式
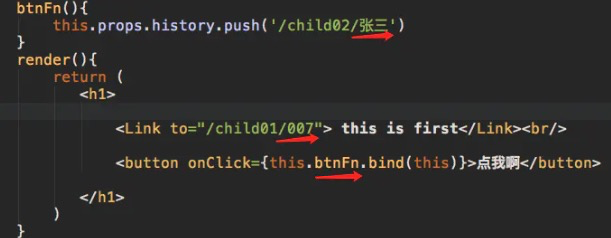
# params传参(url传参)

1、在路由配置中以/:的方式评接参数标识;
2、在路径后面将参数拼接上(/参数);
3、在被跳转页使用this.props.match.params.xxx(此处为id) 接收参数
<Route exact path="/detail/:id" component={Detail}/>
//在地址栏输入“http://localhost:3000/#/detail/3”
componentDidMount() {
    console.log(this.props.match.params);//3
}
2
3
4
5
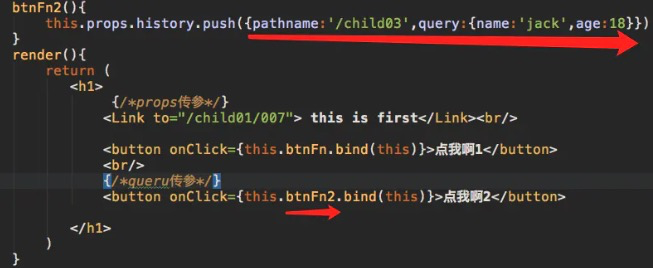
# query传参(url传参)

1、在router文件中配置为正常配置 <Route path="/Child03" component={Child03}/>
2、在跳转时 路径为一个对象{} 其中 pathname为路径 query为一个对象 对象里是携带的参数
3、使用this.props.location.query接收参数
# state传参(隐式传参)
使用this.props.location.state接收参数;其实跟query一个意思的;query是放在url路径上体现出来;state直接是在内存中;

# 相关文档
- https://github.com/ReactTraining/react-router/issues/4648
- https://github.com/ReactTraining/react-router
- https://reacttraining.com/react-router/
