 长列表优化
长列表优化
# 背景
后端一次给你10万条数据,如何优雅展示;
# 前置工作
先把前置工作给做好,后面才能进行测试
# 后端搭建
新建一个server.js文件,简单起个服务,并返回给前端10w条数据,并通过nodemon server.js开启服务;全局安装npm i nodemon -g
// server.js

const http = require('http')
const port = 8000;

http.createServer(function (req, res) {
  // 开启Cors
  res.writeHead(200, {
    //设置允许跨域的域名,也可设置*允许所有域名
    'Access-Control-Allow-Origin': '*',
    //跨域允许的请求方法,也可设置*允许所有方法
    "Access-Control-Allow-Methods": "DELETE,PUT,POST,GET,OPTIONS",
    //允许的header类型
    'Access-Control-Allow-Headers': 'Content-Type'
  })
  let list = []
  let num = 0

  // 生成10万条数据的list
  for (let i = 0; i < 100000; i++) {
    num++
    list.push({
      src: 'https://p3-passport.byteacctimg.com/img/user-avatar/d71c38d1682c543b33f8d716b3b734ca~300x300.image',
      text: `我是${num}号嘉宾yessz`,
      tid: num
    })
  }
  res.end(JSON.stringify(list));
}).listen(port, function () {
  console.log('server is listening on port ' + port);
})
2
3
4
5
6
7
8
9
10
11
12
13
14
15
16
17
18
19
20
21
22
23
24
25
26
27
28
29
30
31
# 前端页面
先新建一个index.html
// index.html

// 样式
<style>
    * {
      padding: 0;
      margin: 0;
    }
    #container {
      height: 100vh;
      overflow: auto;
    }
    .samy {
      display: flex;
      padding: 10px;
    }
    img {
      width: 150px;
      height: 150px;
    }
  </style>

// html部分
<body>
  <div id="container">
  </div>
  <script src="./index.js"></script>
</body>
复制代码
2
3
4
5
6
7
8
9
10
11
12
13
14
15
16
17
18
19
20
21
22
23
24
25
26
27
28
29
然后新建一个index.js文件,封装一个AJAX函数,用来请求这10w条数据
// index.js

// 请求函数
const getList = () => {
    return new Promise((resolve, reject) => {
        //步骤一:创建异步对象
        var ajax = new XMLHttpRequest();
        //步骤二:设置请求的url参数,参数一是请求的类型,参数二是请求的url,可以带参数
        ajax.open('get', 'http://127.0.0.1:8000');
        //步骤三:发送请求
        ajax.send();
        //步骤四:注册事件 onreadystatechange 状态改变就会调用
        ajax.onreadystatechange = function () {
            if (ajax.readyState == 4 && ajax.status == 200) {
                //步骤五 如果能够进到这个判断 说明 数据 完美的回来了,并且请求的页面是存在的
                resolve(JSON.parse(ajax.responseText))
            }
        }
    })
}

// 获取container对象
const container = document.getElementById('container')
2
3
4
5
6
7
8
9
10
11
12
13
14
15
16
17
18
19
20
21
22
23
# 优化方案
# 直接渲染
最直接的方式就是直接渲染出来,但是这样的做法肯定是不可取的,因为一次性渲染出10w个节点,是非常耗时间的,咱们可以来看一下耗时,差不多要消耗12秒,非常消耗时间

const renderList = async () => {
    console.time('列表时间')
    const list = await getList()
    list.forEach(item => {
        const div = document.createElement('div')
        div.className = 'samy'
        div.innerHTML = `<img src="${item.src}" /><span>${item.text}</span>`
        container.appendChild(div)
    })
    console.timeEnd('列表时间')
}
renderList()
2
3
4
5
6
7
8
9
10
11
12
# setTimeout分页渲染
这个方法就是,把10w按照每页数量limit分成总共Math.ceil(total / limit)页,然后利用setTimeout,每次渲染1页数据,这样的话,渲染出首页数据的时间大大缩减了

const renderList = async () => {
    console.time('列表时间')
    const list = await getList()
    console.log(list)
    const total = list.length
    const page = 0
    const limit = 200
    const totalPage = Math.ceil(total / limit)

    const render = (page) => {
        if (page >= totalPage) return
        setTimeout(() => {
            for (let i = page * limit; i < page * limit + limit; i++) {
                const item = list[i]
                const div = document.createElement('div')
                div.className = 'samy'
                div.innerHTML = `<img src="${item.src}" /><span>${item.text}</span>`
                container.appendChild(div)
            }
            render(page + 1)
        }, 0)
    }
    render(page)
    console.timeEnd('列表时间')
}
2
3
4
5
6
7
8
9
10
11
12
13
14
15
16
17
18
19
20
21
22
23
24
25
# requestAnimationFrame
使用requestAnimationFrame代替setTimeout,减少了重排的次数,极大提高了性能,建议大家在渲染方面多使用requestAnimationFrame
const renderList = async () => {
    console.time('列表时间')
    const list = await getList()
    console.log(list)
    const total = list.length
    const page = 0
    const limit = 200
    const totalPage = Math.ceil(total / limit)

    const render = (page) => {
        if (page >= totalPage) return
        // 使用requestAnimationFrame代替setTimeout
        requestAnimationFrame(() => {
            for (let i = page * limit; i < page * limit + limit; i++) {
                const item = list[i]
                const div = document.createElement('div')
                div.className = 'samy'
                div.innerHTML = `<img src="${item.src}" /><span>${item.text}</span>`
                container.appendChild(div)
            }
            render(page + 1)
        })
    }
    render(page)
    console.timeEnd('列表时间')
}
2
3
4
5
6
7
8
9
10
11
12
13
14
15
16
17
18
19
20
21
22
23
24
25
26
# 文档碎片 + requestAnimationFrame【推荐】
文档碎片的好处
1、之前都是每次创建一个div标签就appendChild一次,但是有了文档碎片可以先把1页的div标签先放进文档碎片中,然后一次性appendChild到container中,这样减少了appendChild的次数,极大提高了性能
2、页面只会渲染文档碎片包裹着的元素,而不会渲染文档碎片
const renderList = async () => {
    console.time('列表时间')
    const list = await getList()
    console.log(list)
    const total = list.length
    const page = 0
    const limit = 200
    const totalPage = Math.ceil(total / limit)

    const render = (page) => {
        if (page >= totalPage) return
        requestAnimationFrame(() => {
            // 创建一个文档碎片
            const fragment = document.createDocumentFragment()
            for (let i = page * limit; i < page * limit + limit; i++) {
                const item = list[i]
                const div = document.createElement('div')
                div.className = 'samy'
                div.innerHTML = `<img src="${item.src}" /><span>${item.text}</span>`
                // 先塞进文档碎片
                fragment.appendChild(div)
            }
            // 一次性appendChild
            container.appendChild(fragment)
            render(page + 1)
        })
    }
    render(page)
    console.timeEnd('列表时间')
}
2
3
4
5
6
7
8
9
10
11
12
13
14
15
16
17
18
19
20
21
22
23
24
25
26
27
28
29
30
# 懒加载
为了比较通俗的讲解,咱们启动一个vue前端项目,后端服务还是开着
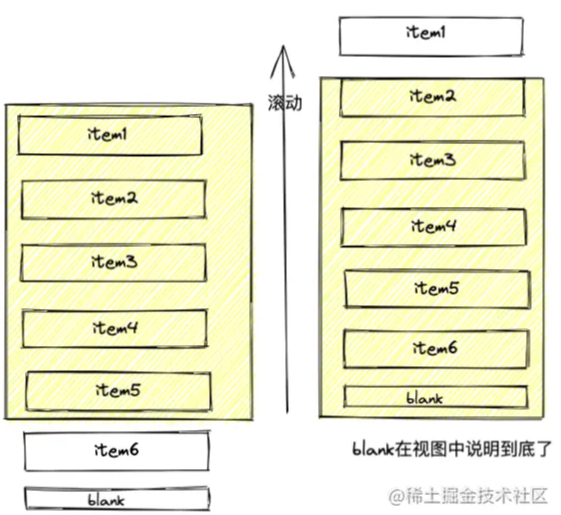
其实实现原理很简单,咱们通过一张图来展示,就是在列表尾部放一个空节点blank,然后先渲染第1页数据,向上滚动,等到blank出现在视图中,就说明到底了,这时候再加载第二页,往后以此类推。
至于怎么判断blank出现在视图上,可以使用getBoundingClientRect方法获取top属性
IntersectionObserver性能更好,但是我这里就拿getBoundingClientRect来举例

<script setup lang="ts">
import { onMounted, ref, computed } from 'vue'
const getList = () => {
  // 跟上面一样的代码
}

const container = ref<HTMLElement>() // container节点
const blank = ref<HTMLElement>() // blank节点
const list = ref<any>([]) // 列表
const page = ref(1) // 当前页数
const limit = 200 // 一页展示
// 最大页数
const maxPage = computed(() => Math.ceil(list.value.length / limit))
// 真实展示的列表
const showList = computed(() => list.value.slice(0, page.value * limit))
const handleScroll = () => {
  // 当前页数与最大页数的比较
  if (page.value > maxPage.value) return
  const clientHeight = container.value?.clientHeight
  const blankTop = blank.value?.getBoundingClientRect().top
  if (clientHeight === blankTop) {
    // blank出现在视图,则当前页数加1
    page.value++
  }
}

onMounted(async () => {
  const res = await getList()
  list.value = res
})
</script>

<template>
  <div id="container" @scroll="handleScroll" ref="container">
    <div class="samy" v-for="(item) in showList" :key="item.tid">
      <img :src="item.src" />
      <span>{{ item.text }}</span>
    </div>
    <div ref="blank"></div>
  </div>
</template>
2
3
4
5
6
7
8
9
10
11
12
13
14
15
16
17
18
19
20
21
22
23
24
25
26
27
28
29
30
31
32
33
34
35
36
37
38
39
40
41
# 虚拟列表
# 多数据渲染
现在解决多数据渲染,相信大家可能会想到分页,触底加载,懒加载等等,但其实
虚拟列表也是多数据高性能加载的一个重要解决方案。
# 虚拟列表的概念
虚拟滚动,就是根据
容器可视区域的列表容积数量,监听用户滑动或滚动事件,动态截取长列表数据中的部分数据渲染到页面上,动态使用空白站位填充容器上下滚动区域内容,模拟实现原生滚动效果

描述:
- 浏览器渲染===康熙选秀:一次性渲染10000个肯定会使浏览器压力大,造成用户体验差;
- 容器可视区域===选秀大殿:10000个排队去渲染,比如一次渲染10个;
- 上方下方区域===左右偏殿:轮不到你渲染,你就乖乖进空白区待着;
# 基本实现手写【要点】
- 可视区域的高度
- 列表项的高度
- 可视区域能展示的列表项个数 = ~~(可视区域高度 / 列表项高度) + 2
- 开始索引
- 结束索引
- 预加载(防止滚动过快,造成暂时白屏)
- 根据开始索引和结束索引,截取数据展示在可视区域
- 滚动节流
- 上下空白区使用padding实现
- 滑动到底,再次请求数据并拼接
<template>
  <div class="v-scroll" @scroll.passive="doScroll" ref="scrollBox">
    <div :style="blankStyle" style="height: 100%">
      <div v-for="item in tempYess" :key="item.id" class="scroll-item">
        <span>{{ item.msg }}</span>
        <img :src="item.src" />
      </div>
    </div>
  </div>
</template>

<script>
import { throttle } from "../../utils/tools";
export default {
  data() {
    return {
      allYess: [], // 所有数据
      itemHiehgt: 150, // 列表每一项的宽度
      boxHeight: 0, // 可视区域的高度
      startIndex: 0, // 元素开始索引
    };
  },
  created() {
    // 模拟请求数据
    this.getAllYes(30);
  },
  mounted() {
    // 在mounted时获取可视区域的高度
    this.getScrollBoxHeight();
    // 监听屏幕变化以及旋转,都要重新获取可视区域的高度
    window.onresize = this.getScrollBoxHeight;
    window.onorientationchange = this.getScrollBoxHeight;
  },
  methods: {
    getAllYes(count) {
      // 模拟获取数据
      const length = this.allYess.length;
      for (let i = 0; i < count; i++) {
        this.allYess.push({
          id: `Yes${length + i}`,
          msg: `我是三心${length + i}号`,
          // 这里随便选一张图片就行
          src: require("../../src/asset/images/Yes.jpg").default,
        });
      }
    },
    // 使用节流,提高性能
    doScroll: throttle(function () {
      // 监听可视区域的滚动事件
      // 公式:~~(滚动的距离 / 列表项 ),就能算出已经滚过了多少个列表项,也就能知道现在的startIndex是多少
      // 例如我滚动条滚过了160px,那么index就是1,因为此时第一个列表项已经被滚上去了,可视区域里的第一项的索引是1
      const index = ~~(this.$refs.scrollBox.scrollTop / this.itemHiehgt);
      if (index === this.startIndex) return;
      this.startIndex = index;
      if (this.startIndex + this.itemNum > this.allYess.length - 1) {
        this.getAllYes(30);
      }
    }, 200),
    getScrollBoxHeight() {
      // 获取可视区域的高度
      this.boxHeight = this.$refs.scrollBox.clientHeight;
    },
  },
  computed: {
    itemNum() {
      // 可视区域可展示多少个列表项? 计算公式:~~(可视化区域高度 / 列表项高度) + 2
      // ~~是向下取整的运算符,等同于Math.floor(),为什么要 +2 ,是因为可能最上面和最下面的元素都只展示一部分
      return ~~(this.boxHeight / this.itemHiehgt) + 2;
    },
    endIndex() {
      // endIndex的计算公式:(开始索引 + 可视区域可展示多少个列表项 * 2)
      // 比如可视区域可展示8个列表项,startIndex是0的话endIndex就是0 + 8 * 2 = 16,startIndex是1的话endIndex就是1 + 8 * 2 = 17,以此类推
      // 为什么要乘2呢,因为这样的话可以预加载出一页的数据,防止滚动过快,出现暂时白屏现象
      let index = this.startIndex + this.itemNum * 2;
      if (!this.allYess[index]) {
         // 到底的情况,比如startIndex是99995,那么endIndex本应该是99995 + 8 * 2 = 10011
        // 但是列表数据总数只有10000条,此时就需要让endIndex = (列表数据长度 - 1)
        index = this.allYess.length - 1;
      }
      return index;
    },
    tempYess() {
      //   可视区域展示的截取数据,使用了数组的slice方法,不改变原数组又能截取
      let startIndex = 0;
      if (this.startIndex <= this.itemNum) {
        startIndex = 0;
      } else {
        startIndex = this.startIndex + this.itemNum;
      }
      return this.allYess.slice(startIndex, this.endIndex + 1);
    },
    blankStyle() {
      // 上下方的空白处使用padding来充当
      let startIndex = 0;
      if (this.startIndex <= this.itemNum) {
        startIndex = 0;
      } else {
        startIndex = this.startIndex - this.itemNum;
      }
      return {
        // 上方空白的高度计算公式:(开始index * 列表项高度)
        // 比如你滚过了3个列表项,那么上方空白区高度就是3 * 150 = 450,这样才能假装10000个数据的滚动状态
        paddingTop: startIndex * this.itemHiehgt + "px",
         // 下方空白的高度计算公式:(总数据的个数 - 结束index - 1) * 列表项高度
        // 例如现在结束index是100,那么下方空白高度就是:(10000 - 100 - 1) * 150 = 1,484,850
        paddingBottom:
          (this.allYess.length - this.endIndex - 1) * this.itemHiehgt + "px",
          // 不要忘了加px哦
      };
    },
  },
};
</script>

<style lang="scss" scoped>
.v-scroll {
  height: 100%;
  /* padding-bottom: 500px; */
  overflow: auto;

  .scroll-item {
    height: 148px;
    /* width: 100%; */
    border: 1px solid black;
    display: flex;
    justify-content: space-between;
    align-items: center;
    padding: 0 20px;

    img {
      height: 100%;
    }
  }
}
</style>
2
3
4
5
6
7
8
9
10
11
12
13
14
15
16
17
18
19
20
21
22
23
24
25
26
27
28
29
30
31
32
33
34
35
36
37
38
39
40
41
42
43
44
45
46
47
48
49
50
51
52
53
54
55
56
57
58
59
60
61
62
63
64
65
66
67
68
69
70
71
72
73
74
75
76
77
78
79
80
81
82
83
84
85
86
87
88
89
90
91
92
93
94
95
96
97
98
99
100
101
102
103
104
105
106
107
108
109
110
111
112
113
114
115
116
117
118
119
120
121
122
123
124
125
126
127
128
129
130
131
132
133
134
135
# 第三方库实现
# 加载性能优化
- 第三方模块按需导入(
babel-plugin-component); - 滚动到可视区域动态加载(
vue-virtual-scroll-list);始终加载上中下屏; - 图片懒加载(
vue-lazyload);
# 参考链接
- https://juejin.cn/post/7031923575044964389
- https://juejin.cn/post/6966179727329460232
