 vue-config详解及实践
# vue-cli脚手架(vue.config.js)
# 查看内部配置
查看全部配置:
可以执行vue inspect查看完整配置信息:
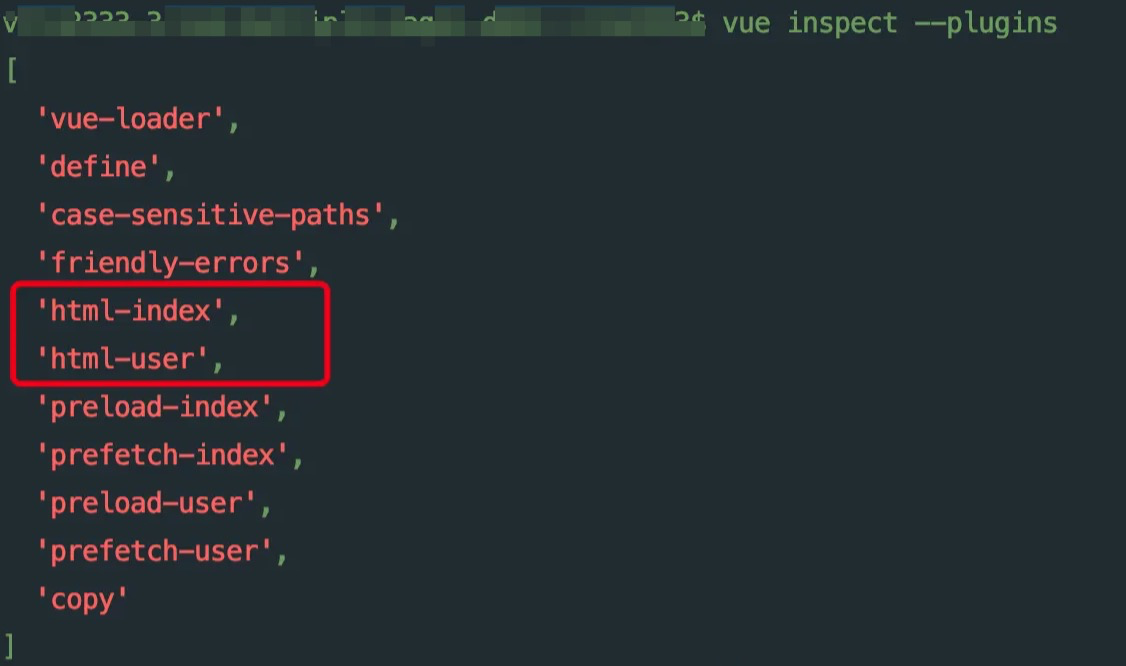
查看插件配置:
vue inspect --plugins

# publicPath
类型:String
默认:'/'
部署应用包时的基本 URL。默认情况下,Vue CLI会假设你的应用是被部署在一个域名的根路径上,例如https://www.my-app.com/。如果应用被部署在一个子路径上,你就需要用这个选项指定这个子路径。例如,如果你的应用被部署在https://www.my-app.com/my-app/,则设置publicPath为/my-app/
这个值也可以被设置为空字符串 ('') 或是相对路径 ('./'),这样所有的资源都会被链接为相对路径,这样打出来的包可以被部署在任意路径,也可以用在类似 Cordova hybrid 应用的文件系统中。
# productionSourceMap
类型:boolean
moren:true
不允许打包时生成项目来源映射文件,在生产环境下可以显著的减少包的体积
注 Source map的作用:针对打包后的代码进行的处理,就是一个信息文件,里面储存着位置信息。也就是说,转换后的代码的每一个位置,所对应的转换前的位置。有了它,出错的时候,除错工具将直接显示原始代码,而不是转换后的代码。这无疑给开发者带来了很大方便
# assetsDir
放置生成的静态资源 (js、css、img、fonts) 的 (相对于 outputDir 的) 目录,默认是'',
# indexPath
指定生成的 index.html 的输出路径(相对于outputDir)。也可以是一个绝对路径。默认是'index.html'
# lintOnSave
是否在每次保存时使用eslint检查,这个对语法的要求比较严格,对自己有要求的同学可以使用
# css
css: {
    //是否启用css分离插件,默认是true,如果不启用css样式分离插件,打包出来的css是通过内联样式的方式注入至dom中的,
    extract: true,
    sourceMap: false,//效果同上
    modules: false,// 为所有的 CSS 及其预处理文件开启 CSS Modules。
    // 这个选项不会影响 `*.vue` 文件。
  },
2
3
4
5
6
7
# devServer
本地开发服务器配置,此处直接贴上我常用的配置,以注释的方式介绍
devServer: {
    //配置开发服务器
    host: "0.0.0.0",
    //是否启用热加载,就是每次更新代码,是否需要重新刷新浏览器才能看到新代码效果
    hot: true,
    //服务启动端口
    port: "8080",
    //是否自动打开浏览器默认为false
    open: false,
    //配置http代理
    proxy: {
      "/api": { //如果ajax请求的地址是http://192.168.0.118:9999/api1那么你就可以在jajx中使用/api/api1路径,其请求路径会解析
        // http://192.168.0.118:9999/api1,当然你在浏览器上开到的还是http://localhost:8080/api/api1;
        target: "http://192.168.0.118:9999",
        //是否允许跨域,这里是在开发环境会起作用,但在生产环境下,还是由后台去处理,所以不必太在意
        changeOrigin: true,
        pathRewrite: {
            //把多余的路径置为''
          "api": ""
        }
      },
      "/api2": {//可以配置多个代理,匹配上那个就使用哪种解析方式
        target: "http://api2",
        // ...
      }
    }
},
2
3
4
5
6
7
8
9
10
11
12
13
14
15
16
17
18
19
20
21
22
23
24
25
26
27
# pluginOptions
这是一个不进行任何 schema 验证的对象,因此它可以用来传递任何第三方插件选项,例如:
{
    //定义一个全局的less文件,把公共样式变量放入其中,这样每次使用的时候就不用重新引用了
    'style-resources-loader': {
      preProcessor: 'less',
      patterns: [
        './src/assets/public.less'
      ]
    }
}
2
3
4
5
6
7
8
9
# configureWebpack
Type:
Object | Function如果这个值是一个对象,则会通过 webpack-merge (opens new window) 合并到最终的配置中。
如果这个值是一个函数,则会接收被解析的配置作为参数。该函数既可以修改配置并不返回任何东西,也可以返回一个被克隆或合并过的配置版本。
# chainWebpack
Type:
Function是一个函数,会接收一个基于 webpack-chain (opens new window) 的
ChainableConfig实例。允许对内部的 webpack 配置进行更细粒度的修改。是一个函数,会接收一个基于 webpack-chain 的 ChainableConfig 实例。允许对内部的 webpack 配置进行更细粒度的修改。例如:
chainWebpack(config) {
//添加一个路径别名 假设有在assets/img/menu/目录下有十张图片,如果全路径require("/assets/img/menu/img1.png")
//去引入在不同的层级下实在是太不方便了,这时候向下方一样定义一个路劲别名就很实用了
    config.resolve.alias
      //添加多个别名支持链式调用
      .set("assets", path.join(__dirname, "/src/assets"))
      .set("img", path.join(__dirname, "/src/assets/img/menu"))
      //引入图片时只需require("img/img1.png");即可
}
1
2
3
4
5
6
7
8
9
# configureWebpack 与 chainWebpack
- chainWebpack通过链式编程的形式,来修改默认的webpack配置
- configureWebpack通过操作对象的形式,来修改默认的webpack配置
configureWebpack 与 chainWebpack 本质上没有什么区别,只是前者配置 简单方便,后者可以 更为细粒度地控制配置
# 实践
下边两种方式均可以 提升编译速度 启动本地项目 第一遍速度普遍都慢, 第二遍后速度提升很多
安装插件在开发环境,仅优化开发环境的编译速度 npm i hard-source-webpack-plugin -D // 提编译速度 npm i speed-measure-webpack-plugin -D // 显示编译时长
在vue.config.js中引入 const HardSourceWebpackPlugin = require('hard-source-webpack-plugin'); const SpeedMeasurePlugin = require('speed-measure-webpack-plugin');
1. 普通写法
configureWebpack: {
    plugins: [
        new HardSourceWebpackPlugin(),
        new SpeedMeasurePlugin()
    ]
},
2
3
4
5
6
2.链式写法
chainWebpack: (config) => {
    config.plugin('xcCache').use(HardSourceWebpackPlugin); // 自定义插件名称
    config.plugin('xcTime').use(SpeedMeasurePlugin);
},
2
3
4
# 多页面配置
# pages加载及title设置
function getEntry(globPath) {
  let pages = {}
  glob.sync(globPath).forEach(entry => {
    const chunk = entry.split('./src/views/')[1].split('/main.js')[0]
    //let chunk = entry.slice(10, -8)
    console.log("----chunk----", chunk);
    pages[chunk] = {
      entry: entry,
      template: 'public/index.html',
      title: titles[chunk],
      chunks: ['chunk-vendors', 'chunk-common', chunk]
    }
  })
  return pages
}
//let pages = getEntry('src/views/**/main.js');
let pages = getEntry('./src/views/**/main.js');
module.exports = {
  publicPath: buildCfg.publicPath,
  outputDir: buildCfg.outputDir,
  pages,
}

//处理cdn和标题冬天修改
 chainWebpack: config => {
 if (isProd) {
      glob.sync("./src/views/**/main.js").forEach(path => {
        const chunk = path.split("./src/views/")[1].split("/main.js")[0];
        config.plugin("html-" + chunk).tap(args => {
          args[0].title = titles[chunk]
          if (buildCfg.isUseCdn) {
            args[0].cdn = cdn;
          }
          return args;
        });
      });
    }
 }
2
3
4
5
6
7
8
9
10
11
12
13
14
15
16
17
18
19
20
21
22
23
24
25
26
27
28
29
30
31
32
33
34
35
36
37
38
# 配置路由懒加载
注意事项
- 必须为hash的
- path 路径为/
- 或者访问路径上加上path 例如: http://localhost:8080/login.html#/ http://localhost:8080/login.html#/login/
import Vue from 'vue'
import VueRouter from 'vue-router'
Vue.use(VueRouter)
// const originalPush = VueRouter.prototype.push
// VueRouter.prototype.push = function push(location) {
//   return originalPush.call(this, location).catch((err) => err)
// }
const routes = [
    {
        path: '/login',
        name: 'login',
        component: () => import('./views/index.vue'),
        // component:()=>import('./reset.vue'),
        meta: {
            title: '这里是动态title'
        },
        children: [
            /*
            单页面应用的写法
            {
                path: 'reset',
                name: 'reset',
                component: () => import('./reset.vue')
            },
            */

            //  ***多页面的写法
            {
                path: 'editJobs',
                components: {
                    'editJobs': () => import('./views/reset.vue'),
                },
            },],
    },
    // {
    //     path: '/',
    //     redirect: '/'
    // }
]
export default new VueRouter({
    mode: 'hash',
    base: process.env.BASE_URL,
    routes
})
2
3
4
5
6
7
8
9
10
11
12
13
14
15
16
17
18
19
20
21
22
23
24
25
26
27
28
29
30
31
32
33
34
35
36
37
38
39
40
41
42
43
44
vue-router官方给出的示例如下,这里webpackChunkName如果不写打包时会自动生成序号代替。
//router/index.js
{
    path: '/about',
    name: 'about',
    // route level code-splitting
    // this generates a separate chunk (about.[hash].js) for this route
    // which is lazy-loaded when the route is visited.
    component: () => import(/* webpackChunkName: "about" */ '../views/About.vue')
  },
2
3
4
5
6
7
8
9
为了方便追踪打包情况最好写上,就可以看到about.[hash].js的大小了
如果想要多个路由打包进一个js里,写同一个webpackChunkName即可
  {
    path: '/another',
    name: 'another',
    // route level code-splitting
    // this generates a separate chunk (about.[hash].js) for this route
    // which is lazy-loaded when the route is visited.
    component: () => import(/* webpackChunkName: "about" */ '../views/Another.vue')
  }
2
3
4
5
6
7
8
打包后about.js文件变大了0.33Kb,多了一个页面。
# 路由子模块设置
路由配置方法
const routes = [
    {
        path: '/login',
        name: 'login',
        component: () => import('./views/index.vue'),
        meta: {
            title: '这里是动态title'
        },
        children: [//  ***多页面的写法
            {
                path: 'editJobs',
                components: {
                    'editJobs': () => import('./views/reset.vue'),
                },
            },],
    },
]
2
3
4
5
6
7
8
9
10
11
12
13
14
15
16
17
页面中渲染写法
<template>
  <div>
    login
    <router-link :to="{ name: 'reset' }" tag="li">我的收藏</router-link>
    这里的name对应的是route配置里的名字(别忘了地址连里面的path)
    <router-view name="editJobs">待完善信息</router-view>
  </div>
</template>
2
3
4
5
6
7
8
