 vuepress主题模版及实践
# 主题
# 文档主题
也适合用在博客中,非常简洁,推荐;
参考:https://github.com/xugaoyi/vdoing-demo-repository
# 博客主题
参考 https://github.com/xugaoyi/vuepress-theme-vdoing
# 修改主题库
# patch修改步骤
patch-package
npm i patch-package --save-dev
npx patch-package vuepress-theme-vdoing
rm -rf node_modules
npm install
2
3
4
package.json
{
  "name": "bdpcloud-doc",
  "description": "bdpcloud documents",
  "version": "1.0.0",
  "scripts": {
    "start": "vuepress dev docs",
    "build": "vuepress build docs",
    "deploy": "bash deploy.sh",
    "editFm": "node utils/editFrontmatter.js",
    "postinstall": "patch-package"
  },
  "license": "MIT",
  "devDependencies": {
    "moment": "^2.25.3",
    "patch-package": "^6.2.2",
    "vuepress": "^1.4.1",
    "vuepress-plugin-demo-block": "^0.7.2",
    "vuepress-plugin-one-click-copy": "^1.0.2",
    "vuepress-plugin-thirdparty-search": "^1.0.2",
    "vuepress-plugin-zooming": "^1.1.7",
    "vuepress-theme-vdoing": "^1.5.1",
    "yamljs": "^0.3.0"
  }
}
2
3
4
5
6
7
8
9
10
11
12
13
14
15
16
17
18
19
20
21
22
23
24
25
# 内嵌内容
# 内嵌在线代码预览
为了更直观的展示一些代码的效果,文档库添加了demo模块插件,可查看demo、源码,以及跳转到codepen在线编辑。示例:
# 内嵌文档书目录
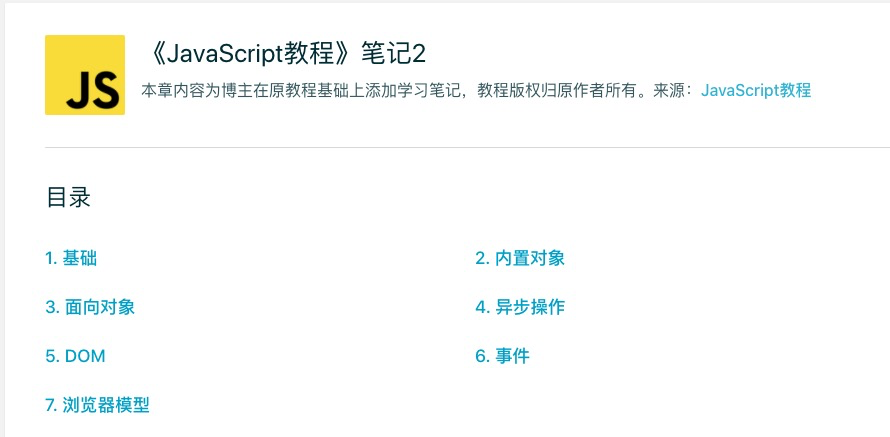
pageComponent,约定 data, 下面的key和文章目录一致就匹配到文章的目录;以下设置;
---
pageComponent:
  name: Catalogue
  data:
    key: 《JavaScript教程》笔记
    imgUrl: https://cdn.jsdelivr.net/gh/xugaoyi/image_store/blog/20200112120340.png
    description: 本章内容为博主在原教程基础上添加学习笔记,教程版权归原作者所有。来源:<a href='https://wangdoc.com/javascript/' target='_blank'>JavaScript教程</a>
title: 《JavaScript教程》笔记2
date: 2018-01-12 11:51:53
permalink: /note/javascript
article: false
comment: false
editLink: false
---
2
3
4
5
6
7
8
9
10
11
12
13
14
15
# 内嵌在线视频
# 添加组件
bilibili.vue 或者后面的dplayer.vue , 暂时先用bilibili组件;
<template>
  <div>
    <iframe
      class="bbplayer"
      :src="src"
      allowfullscreen="allowfullscreen"
      scrolling="no"
      frameborder="0"
      sandbox="allow-top-navigation allow-same-origin allow-forms allow-scripts allow-popups"
    ></iframe>
    <script>
      var bbplayers = document.getElementsByClassName("bbplayer");
      bbplayers.forEach(function (item, index, arr) {
        item.style.height = item.scrollWidth * 0.76 + "px";
      });
      window.onresize = function () {
        bbplayers.forEach(function (item, index, arr) {
          item.style.height = item.scrollWidth * 0.76 + "px";
        });
      };
    </script>
  </div>
</template>

<script>
export default {
  props: {
    bvid: {
      type: String,
      default: null,
      required: true,
    },
    page: {
      type: Number,
      default: 1,
      required: false,
    },
    highQuality: {
      type: Boolean,
      default: false,
      required: false,
    },
    danmaku: {
      type: Boolean,
      default: false,
      required: false,
    },
  },
  data() {
    return {
      src: `//player.bilibili.com/player.html?bvid=${this.bvid}&page=${
        this.page
      }&high_quality=${this.highQuality ? 1 : 0}&danmaku=${this.danmaku}`,
    };
  },
};
</script>

<style lang="stylus" scoped>
.bbplayer {
  width: 100%;
}
</style>
2
3
4
5
6
7
8
9
10
11
12
13
14
15
16
17
18
19
20
21
22
23
24
25
26
27
28
29
30
31
32
33
34
35
36
37
38
39
40
41
42
43
44
45
46
47
48
49
50
51
52
53
54
55
56
57
58
59
60
61
62
63
64
# 使用
<bilibili bvid="BV1Lv411173Q" :page=1 :highQuality="true" :danmaku="true" />
# config.js 插件扩展
# 解决 markdown 图片引用路径问题
安装:npm i markdown-it-disable-url-encode -D
在config.js中添加如下代码
module.exports = {
  markdown: {
    extendMarkdown: md => {
      md.use(require("markdown-it-disable-url-encode"));
    }
  },
}
2
3
4
5
6
7
ps:这种方式这是用默认的图片加载方法;如果是高级点的图片缩放就失效没用的,会导致build构建失败;
 # 默认方式
<img src="_image/01.nginx常用设置/72100681.png" alt="img" /> #高级方式,可以做缩放;
<img src="_image/01.nginx常用设置/71771498.png" alt="img" style="zoom:80%;" /><img src="_image/01.nginx常用设置/48f103a8-a133-4c92-a382-3bfefd81a0fb.png" alt="img" style="zoom:80%;" />
2
3
4
# 自动生成docs下文档目录侧边栏
安装:npm i vuepress-plugin-auto-sidebar -D
project
├─── docs
│   ├── guides
│   	├── a.md
│   	└── b.md
│   ├── ...
│   └── .vuepress
└── package.json
2
3
4
5
6
7
8
在config.js中添加如下代码
module.exports = {
  plugins: {
    // 自动生成侧边栏
    "vuepress-plugin-auto-sidebar": {
      titleMap: { // 指定路径对应标题映射
        'guides': '规划指南'
      }
    },
  }
}
2
3
4
5
6
7
8
9
10
# 部署
# Nginx上部署
# 一:配置端口及静态目录
sudo vim bdp-website.conf
server {
  listen 8888;
  root /home/npm/deploy/bdp-website/dist;
  index index.html index.htm index.nginx-debian.html;
  client_max_body_size 500M;
  proxy_connect_timeout       500s;
  proxy_send_timeout          500s;
  proxy_read_timeout          500s;
  send_timeout                500s;
  location / {
      try_files $uri $uri/ =404;
      #try_files $uri $uri/ /index.html;
    }
}
2
3
4
5
6
7
8
9
10
11
12
13
14
# 二: 配置conf文件,及处理软引用
cd /etc/nginx
sudo vim /sites-available/bdp-website-8888.conf
cd sites-enabled/
sudo ln -s ../sites-available/bdp-website-8888.conf bdp-website-8888.conf

sudo nginx -t
sudo nginx -s reload
curl localhost:8888
2
3
4
5
6
7
8
scp拷贝文件备注
mkdir -p deploy/bdp-website
#从本地上传服务器
scp -P 2829 -r website/dist samy@172.21.64.12x:/home/samy/deploy/bdp-website/
#从服务器下载到本地
scp -P 2829 -r samy@172.21.64.12x:/samy/ubuntu/deploy/bdp-website/website public
#从本地上传自己开发机
scp -r public/uploads samyit@192.168.11.17:/home/samyit/samy/work/onyx/code/kInfo/public
#pm2 deploy deploy.json stage
2
3
4
5
6
7
8
# 注意事项
- win平台下,要用git bash 终端
# GitHub/GitLab部署
- 上传到gh-pages分支;
- github设置gh-pages;
git push -f git@gitlab.xxx.com:xx-fe/bdp-website.git master:gh-pages
# 部署脚本
# 同时部署上传到git page及nginx上处理
deploy.sh
#!/usr/bin/env sh

# 当发生错误时中止脚本
set -e
cd website

# 构建
npm run build

# cd 到构建输出的目录下
cd dist
# cd docs/.vuepress/dist

# 部署到自定义域域名
# echo 'www.example.com' > CNAME

git init
git add -A
git commit -m 'deploy'

git push -f git@gitlab.xxx.com:xx-fe/bdp-website.git master:gh-pages
scp -r dist/ samy@10.45.47.xxx:/home/samy/deploy/bdp-website/

cd -
2
3
4
5
6
7
8
9
10
11
12
13
14
15
16
17
18
19
20
21
22
23
24
启动脚本
  "scripts": {
    "start": "npm run doc",
    "doc": "./website/node_modules/.bin/vuepress dev ./docs",
    "deploy": "./website/deploy.sh"
  },
2
3
4
5
# 图床问题
# 当前项目图床设置
- 图片路径设置当前文档下平级别的文件夹路径设置图标即可;【相对路径处理】
- 统一放在docs/.vuepress/public/img 目录下;【绝对路径】
# 第三方图床
# GitHub图床
推荐使用GitHub作为图床,特点是免费、稳定,有一个小缺点是国内访问速度慢,不过没关系,可以使用jsDelivr免费CDN加速。
jsDelivr
jsDelivr是国外的一家优秀的公共 CDN 服务提供商,该平台是首个「打通中国大陆与海外的免费CDN服务」,无须担心中国防火墙问题而影响使用。官网:http://www.jsdelivr.com/(opens new window) (opens new window)
# 图床打造
- 新建GitHub仓库,注意仓库要设置成公开
- 参照 官方文档 (opens new window) (opens new window)生成一个token密钥
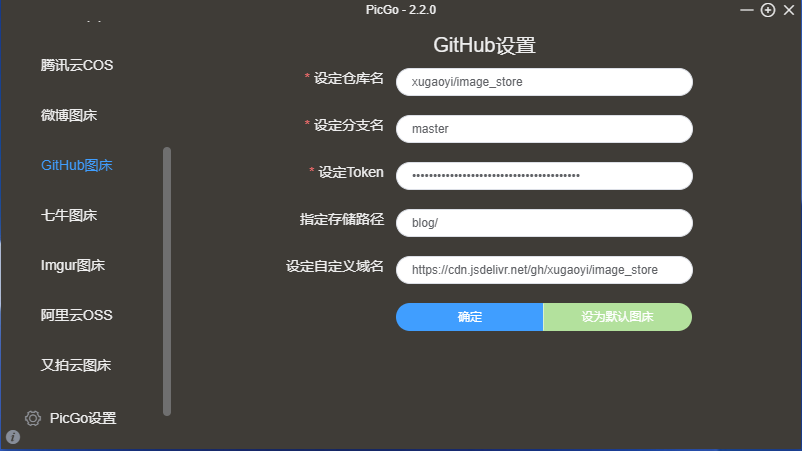
- 在 这里 (opens new window) (opens new window)下载PicGo,安装完成后打开,
图床设置选GitHub图床,并填写相应的信息- 仓库名:前面新建的仓库,格式:
<用户名>/<仓库名> - 分支名:填写主分支
master即可 - Token:前面生成的token密钥
- 存储路径:按你自己的需求填写
- 自定义域名:图片上传后,PicGo 会按照
自定义域名+上传的图片名的方式生成访问链接,此处我们填写jsDelivr的CDN加速地址,格式:https://cdn.jsdelivr.net/gh/<用户名>/<仓库名>
- 仓库名:前面新建的仓库,格式:
- 使用https://tinypng.cn/ (opens new window) (opens new window)压缩你要上传的图片(如图片已经很小或你有更好的压缩工具可省略这一步)
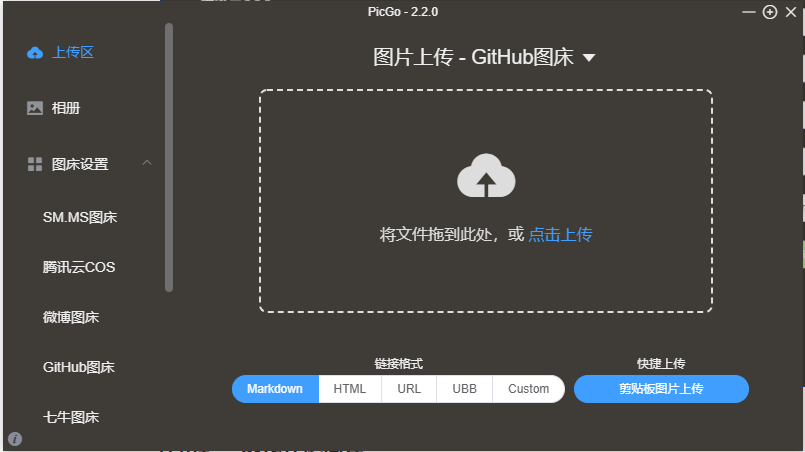
- 在PigGo的
上传区上传你的图片,到相册一键复制刚刚上传的图片URL,至此,你就可以在你的文章当中愉快的插入图片啦~, 更多功能自己去探索吧~~
# 百度统计及录入
# 百度统计 (opens new window)
设置网站,获取代码;修改统计插件的token;
[
    "vuepress-plugin-baidu-tongji", // 百度统计 https://tongji.baidu.com/
    {
        hm: "xxx",
    },
],
2
3
4
5
6
# 百度链接推送 (opens new window)
设置git acton定时推送文件;生成百度链接推送文件
# 确保脚本抛出遇到的错误
set -e

# 百度链接推送
curl -H 'Content-Type:text/plain' --data-binary @urls.txt "http://data.zz.baidu.com/urls?site=my.samyz.cn&token=xx"

rm -rf urls.txt # 灭迹
2
3
4
5
6
7
# 博客导流设置
# 默认配置
# 使用指南
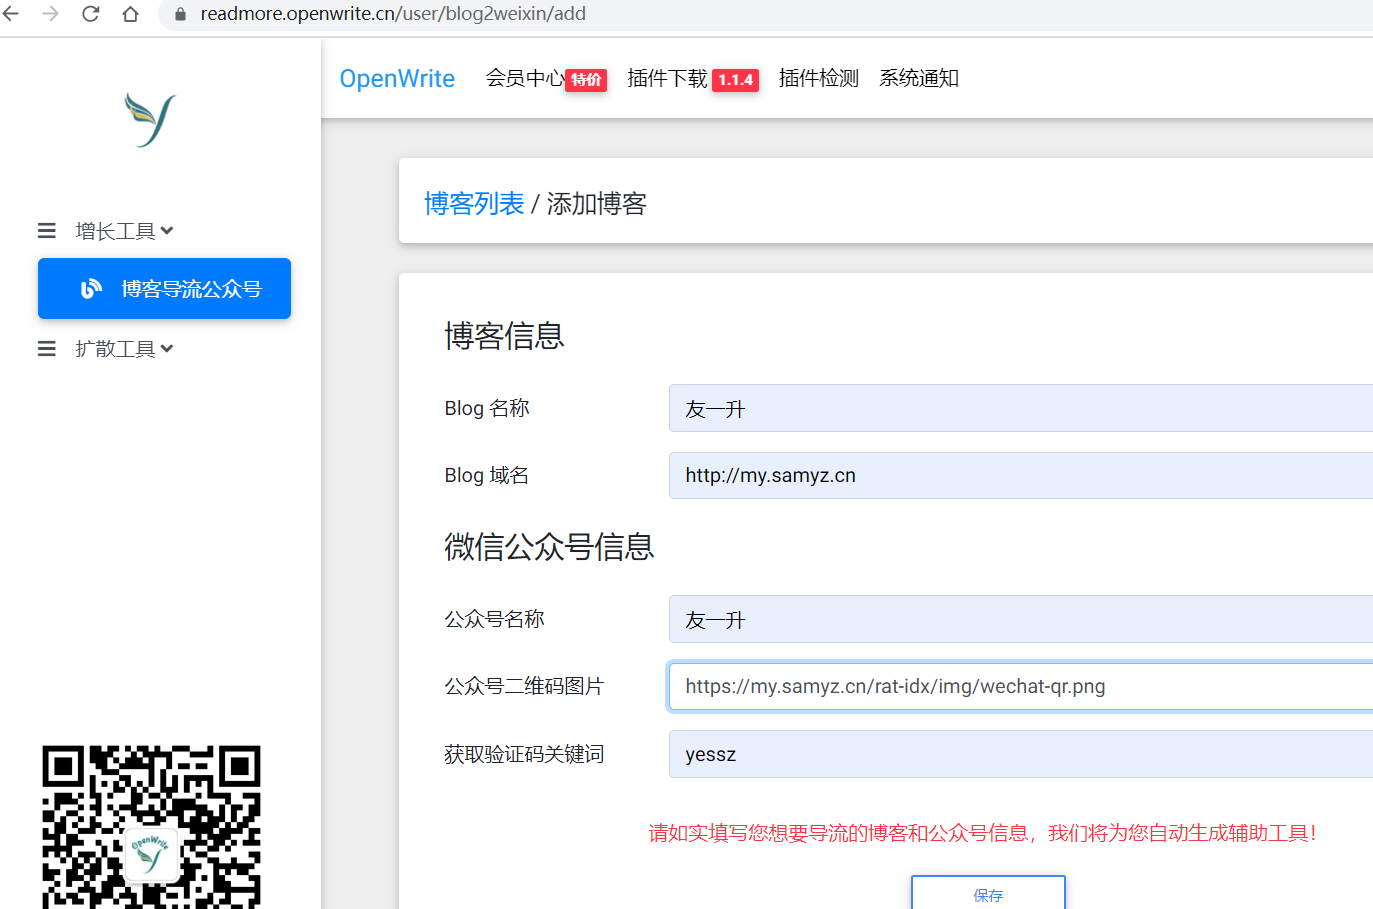
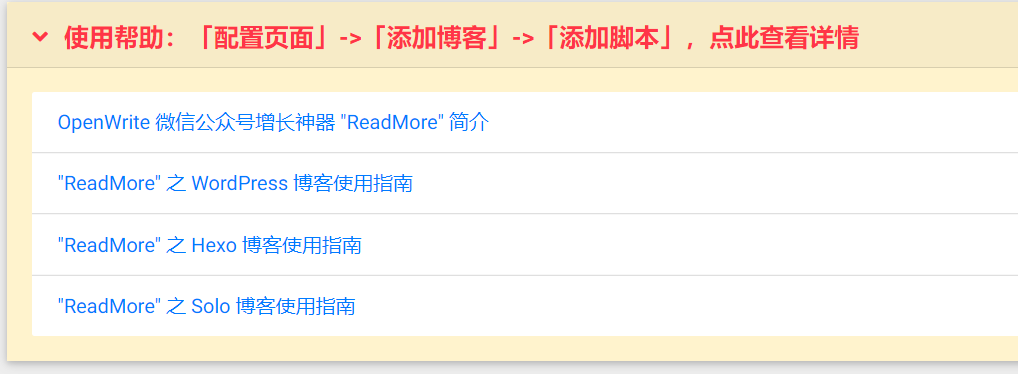
下面您只需要在公众号和博客中做如下设置,然后就等着来自博客的自然增长吧!
# 第一步:公众号设置
登录要增粉的微信公众号,按如下规则设置关键词回复
关键词,设置为:yessz
回复内容,设置为如下文本内容:
<a href="https://readmore.openwrite.cn/code/generate?blogId=19129-1613919859857-xx">点击该链接,获取博客解锁验证码</a>
2
# 第二步:博客设置
在您博客的文章页面的末尾,增加如下js代码。
<script src="https://readmore.openwrite.cn/js/readmore.js" type="text/javascript"></script>
<script>
    const btw = new BTWPlugin();
    btw.init({
        id: 'container',
        blogId: '19129-1613919859857-xx',
        name: '友一升',
        qrcode: 'https://my.samyz.cn/rat-idx/img/wechat-qr.png',
        keyword: 'yessz',
    });
</script>
2
3
4
5
6
7
8
9
10
11
其中id中设置的container需要用户根据文章页面中的文章容器来调整【核心】,或者直接将文章最外面的容器设置为该id。
# 在vuepress及新主题中的设置
btwplugin.js
window.onload = function() {
  themeDefaultContent = $(
    "#app > div.theme-container.have-rightmenu > div:nth-child(4) > main > div"
    );
    // "#app > div.theme-container > main > div.theme-default-content.content__default"
    // "#app > .theme-container> .page > .theme-default-content" //vuepress默认的
  themeDefaultContent.attr("id", "container");
  btw = new BTWPlugin(); // 注意btw需要是个全局变量,把const去掉
  btw.init({
    id: "container",
    blogId: "19129-1613919859857-xx",
    name: "友一升",
    qrcode: "/img/wechat-qr.png",
    // qrcode: "https://my.samyz.cn/rat-idx/img/wechat-qr.png",
    keyword: "yessz",
  });
};
2
3
4
5
6
7
8
9
10
11
12
13
14
15
16
17
config.js
 head: [
    ["script", { charset: "utf-8", src: "/js/readmore.js" }], // openwrite
    // { charset: "utf-8", src: "https://my.openwrite.cn/js/readmore.js" },
  ],
2
3
4
enhanceApp.js
/*
 * @Author: samy
 * @email: yessz#foxmail.com
 * @time: 2021-01-11 00:40:13
 * @modAuthor: samy
 * @modTime: 2021-02-27 21:41:56
 * @desc: 它可以对 VuePress 应用进行拓展配置,这个文件应当 export default 一个钩子函数,并接受一个包含了一些应用级别属性的对象作为参数
 * @Copyright © 2015~2021 BDP FE
 */
// import vue from 'vue/dist/vue.esm.browser'
// import ElementUI from 'element-ui';
export default ({
  Vue, // VuePress 正在使用的 Vue 构造函数
  options, // 附加到根实例的一些选项
  router, // 当前应用的路由实例
  siteData, // 站点元数据
  isServer, // 当前应用配置是处于 服务端渲染 或 客户端
}) => {
  // window.Vue = vue // 使页面中可以使用Vue构造函数 (使页面中的vue demo生效)
  //  ...做一些其他的应用级别的优化
  // 全局注入组件
  // Vue.use(ElementUI);
  Vue.mixin({
    // 混合注入,加载全局文件
    mounted() {
      import("./public/js/btwplugin");
    },
  });

  // 注意百度统计添加, 考虑在每个页面点击时作记录,在enhanceApp.js中拦截router:
  // router.beforeEach((to, from, next) => {
  //   // @pdai: 对每个页面点击添加百度统计
  //   if (typeof _hmt != "undefined") {
  //     if (to.path) {
  //       _hmt.push(["_trackPageview", to.fullPath]);
  //     }
  //   }
  //   next();
  // });
};
2
3
4
5
6
7
8
9
10
11
12
13
14
15
16
17
18
19
20
21
22
23
24
25
26
27
28
29
30
31
32
33
34
35
36
37
38
39
40
# PWA桌面快捷
# 图标尺寸生成
访问地址:
https://lp-pwa.gitee.io/pwa-genicon/ (Gitee 托管) https://lecepin.github.io/pwa-genico/ (Github 托管)
功能:
- 提供 PNG 图片,勾选要生成的尺寸,可以直接进行转换生成。
- 勾选
生成 favicon.ico,可用于生成浏览器支持的favicon.ico图标文件。
# 配置
 head: [
    // 注入到页面<head> 中的标签,格式[tagName, { attrName: attrValue }, innerHTML?]
    ["link", { rel: "icon", href: "/icons/favicon.ico" }],
    ["link", { rel: "manifest", href: "/manifest.json" }],
 ]
  plugins: [
    [
      "@vuepress/pwa",
      {
        serviceWorker: true,
        updatePopup: {
          message: "发现新内容可用",
          buttonText: "刷新",
        },
      },
    ],
 ]
2
3
4
5
6
7
8
9
10
11
12
13
14
15
16
17
manifest.json,按照 icon 的尺寸和格式进行填写到 icons 属性中即可:
{
  "name": "BDP文档中心",
  "short_name": "BDP-DOC",
  "description": "bdp doc show detail",
  "start_url": "/index.html",
  "display": "standalone",
  "background_color": "#fff",
  "theme_color": "#3eaf7c",
  "icons": [
    {
      "src": "icons/512.png",
      "type": "image/png",
      "sizes": "512x512"
    },
    {
      "src": "icons/256.png",
      "type": "image/png",
      "sizes": "256x256"
    },
    {
      "src": "icons/192.png",
      "type": "image/png",
      "sizes": "192x192"
    },
    {
      "src": "icons/144.png",
      "type": "image/png",
      "sizes": "144x144"
    }
    ,
    {
      "src": "icons/128.png",
      "type": "image/png",
      "sizes": "128x144"
    }
  ]
}
2
3
4
5
6
7
8
9
10
11
12
13
14
15
16
17
18
19
20
21
22
23
24
25
26
27
28
29
30
31
32
33
34
35
36
37
注意:
- type 必须是 image/png,sizes也必须和实际尺寸一致,且宽高是1:1;
- 如果是设置base路径的话,
manifest.json中的start_url和src也得加上base中的路径;比如:/rat-skill/index.html,"src": "/rat-skill/icons/512.png", - favicon.ico 的话,可以直接放入站点根目录,即可生效;
# 其他相关设置
# 添加SEO优化autometa
这里给个链接供参考
# 添加Sitemap信息
主要用于生成站点的Sitemap,有助于SEO。
# 添加Copy自动加版权信息
复制你网站时,禁用复制或者添加版权信息等。
方式一:直接用第三方插件:vuepress-plugin-copyright;
方式二:自己实现;
修改我们的.vuepress/enhanceApp.js文件
import copy from './common/copy'

export default ({
  Vue, // VuePress 正在使用的 Vue 构造函数
  options, // 附加到根实例的一些选项
  router, // 当前应用的路由实例
  siteData // 站点元数据
}) => {
  setTimeout(() => {
    try {
      document && (() => { //对document的判断是防止编译的时候报错
        copy()
      })()
    } catch (e) {
      console.error(e.message)
    }
  },500)
}
2
3
4
5
6
7
8
9
10
11
12
13
14
15
16
17
18
copy.js
export default () => {
  function addCopy(e) {
    let copyTxt = ""
    e.preventDefault(); // 取消默认的复制事件
    copyTxt = window.getSelection(0).toString()
    copyTxt = `${copyTxt}\n作者:haha\n原文:${window.location.href}\n著作权归作者所有。商业转载请联系作者获得授权,非商业转载请注明出处。`
    const clipboardData = e.clipboardData || window.clipboardData
    clipboardData.setData('text', copyTxt);
  }
  document.addEventListener("cut", e => {
    addCopy(e)
  });
  document.addEventListener("copy", e => {
    addCopy(e)
  });
}
2
3
4
5
6
7
8
9
10
11
12
13
14
15
16
# 添加百度站点自动推送
主要用于向百度站点自动推送,有助于SEO。
# 添加代码拷贝【已有其他】
在代码区,添加一个拷贝按钮,用来拷贝代码。
npm install vuepress-plugin-code-copy
plugins: [['vuepress-plugin-code-copy', true]]
# 谷歌统计
ga
# 添加评论插件
代码托管平台遵从 OAuth 2 spec (opens new window) 提供了 OAuth API。Vssue 利用平台提供的 OAuth API,使得用户可以登录并发表评论。那么有哪些评论插件可以使用?这里使用Vssue,它比较新,可能知道的人还不多。
Vssue , Gitalk (opens new window) 和 Gitment (opens new window),为何选择Vssue:
- Vssue 支持 Github、Gitlab 和 Bitbucket,并且很容易扩展到其它平台。Gitment 和 Gitalk 仅支持 Github。
- Vssue 可以发表、编辑、删除评论。Gitment 和 Gitalk 仅能发表评论。
- Vssue 是基于 Vue.js (opens new window) 开发的,可以集成到 Vue 项目中,并且提供了一个 VuePress 插件 (opens new window)。 Gitment 基于原生JS,而 Gitalk 基于 Preact (opens new window)。
下面是 Vssue 的简要工作过程:
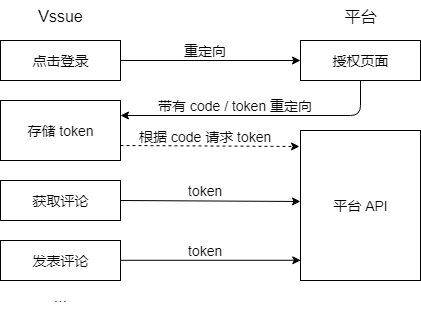
V3 与 V4 最大的差别就是:
V3 可以不登录浏览评论,但 API 有调用频率限制
V4 要求登陆后才能浏览评论
首先需要安装 VuePress的 Vssue插件:
npm install @vssue/vuepress-plugin-vssue然后安装 Vssue:
npm install @vssue/api-github-v4如果你希望使用V3版本的 Vssue,则:
npm install @vssue/api-github-v3
# 以上一起配置
ga: "UA-xxxxxxxxxxx-1",
plugins: [
['autometa', {
    site: {
        name: 'samyzh',
        github: 'github.com/samyzh',
    },
    canonical_base: 'https://my.samyz.cn',
}],
    [
    "sitemap",
    {
        hostname: "https://my.samyz.cn",
    },
],
    [
    "copyright",
    {
        noCopy: true, // 选中的文字将无法被复制
        minLength: 100, // 如果长度超过 100 个字符
        authorName: "https://my.samyz.cn",
        // clipboardComponent: "请注明文章出处, [全栈知识体系](https://my.samyz.cn)"
    },
],
"vuepress-plugin-baidu-autopush", // 百度自动推送
'@vssue/vuepress-plugin-vssue': {
     // 设置平台,而不是 `api`
      platform: 'github-v4',

      // 其他的 Vssue 配置
      owner: 'OWNER_OF_REPO', // 仓库的拥有者的名称
      repo: 'NAME_OF_REPO', // 存储 Issue 和评论的仓库的名称
      clientId: 'YOUR_CLIENT_ID', // 刚保存下来的  Client ID
      clientSecret: 'YOUR_CLIENT_SECRET', //  刚才保存下来的 Client secrets
  },
]
2
3
4
5
6
7
8
9
10
11
12
13
14
15
16
17
18
19
20
21
22
23
24
25
26
27
28
29
30
31
32
33
34
35
36
# 添加图片缩放插件
图片缩放可以使用@vuepress/plugin-medium-zoom插件,它基于medium-zoom 插件。
yarn add -D @vuepress/plugin-medium-zoom@next
# OR npm install -D @vuepress/plugin-medium-zoom@next
2
简单使用:
module.exports = {
  plugins: ['@vuepress/medium-zoom']
}
2
3
自定义选项:
module.exports = {
  plugins: {
    '@vuepress/medium-zoom': {
      selector: 'img.zoom-custom-imgs',
      // medium-zoom options here
      // See: https://github.com/francoischalifour/medium-zoom#options
      options: {
        margin: 16
      }
    }
  }
}
2
3
4
5
6
7
8
9
10
11
12
