 前端性能监控自己实现
# 简介
本文是该系列 web探针sdk的设计与开发,重点讲解sdk包含的功能与实现。
# 一、web探针sdk
# 功能
- 上报pv uv
- 捕获error
- 上报性能performance
- 上报用户轨迹
- 支持单页面
- hack ajax fetch
- 上报加载的资源
- hack console
- hack onpopstate
- 暴露全局变量__bb
- 埋点 sum avg msg api
# 捕获异常
# window.onerror异常处理
window.onerror = function (msg, url, row, col, error) {
    console.log({
        msg,  url,  row, col, error
    })
    return true;
};
2
3
4
5
6
注意:
- window.onerror 函数只有在返回 true 的时候,异常才不会向上抛出
- window.onerror无法捕获资源异常的错误,因为网络请求异常不会事件冒泡
所以我们一般不用window.onerror,而采用window.addEventListener('error',callback)
window.addEventListener('error', (msg, url, row, col, error) => {
    console.log(
        msg, url, row, col, error
    );
    return true;
}, true);
2
3
4
5
6
tips: 如何区分是捕获的异常还是资源错误,可以通过instanceof区分,捕获的异常instanceof是ErrorEvent, 而资源错误instanceof是Event
可以参考如下代码
export function handleErr(error): void {
  switch (error.type) {
    case 'error':
        error instanceof ErrorEvent ? reportCaughtError(error)  : reportResourceError(error)
      break;
    case 'unhandledrejection':
      reportPromiseError(error)
    break;
    // case 'httpError':
    //     reportHttpError(error)
    //   break;
  }
  setGlobalHealth('error')
}
2
3
4
5
6
7
8
9
10
11
12
13
14
# promise异常
promise异常无法用onerror或 try-catch捕获。可以监听unhandledrejection事件
window.addEventListener("unhandledrejection", function(e){
    e.preventDefault()
    console.log(e.reason);
    return true;
});
2
3
4
5
# iframe异常
iframe异常抛出的异常是Script error.,我们一般直接忽略,不进行上报
Script error.解决方案:www.alibabacloud.com/help/zh/doc… (opens new window)
# 页面性能
通过window.performance我们可以获取到以下各个阶段的耗时,从而计算出关键性能指标。
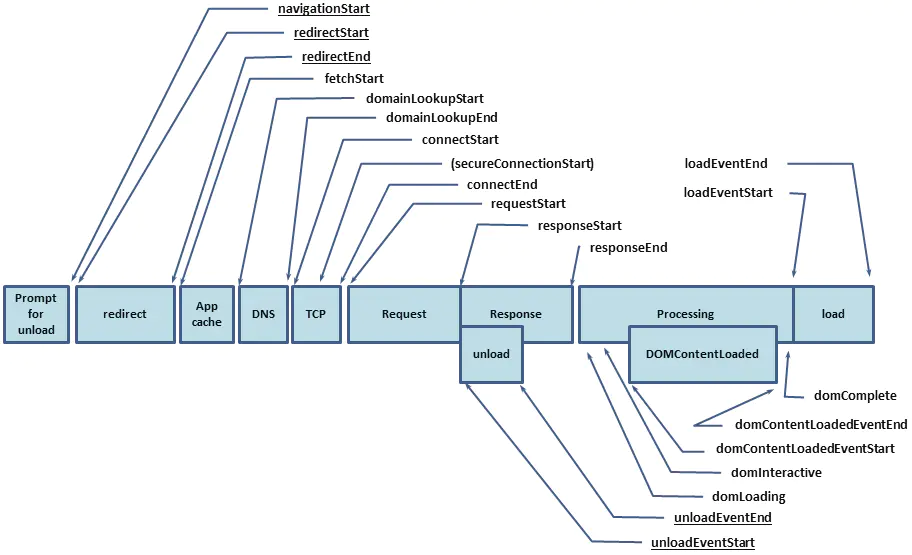
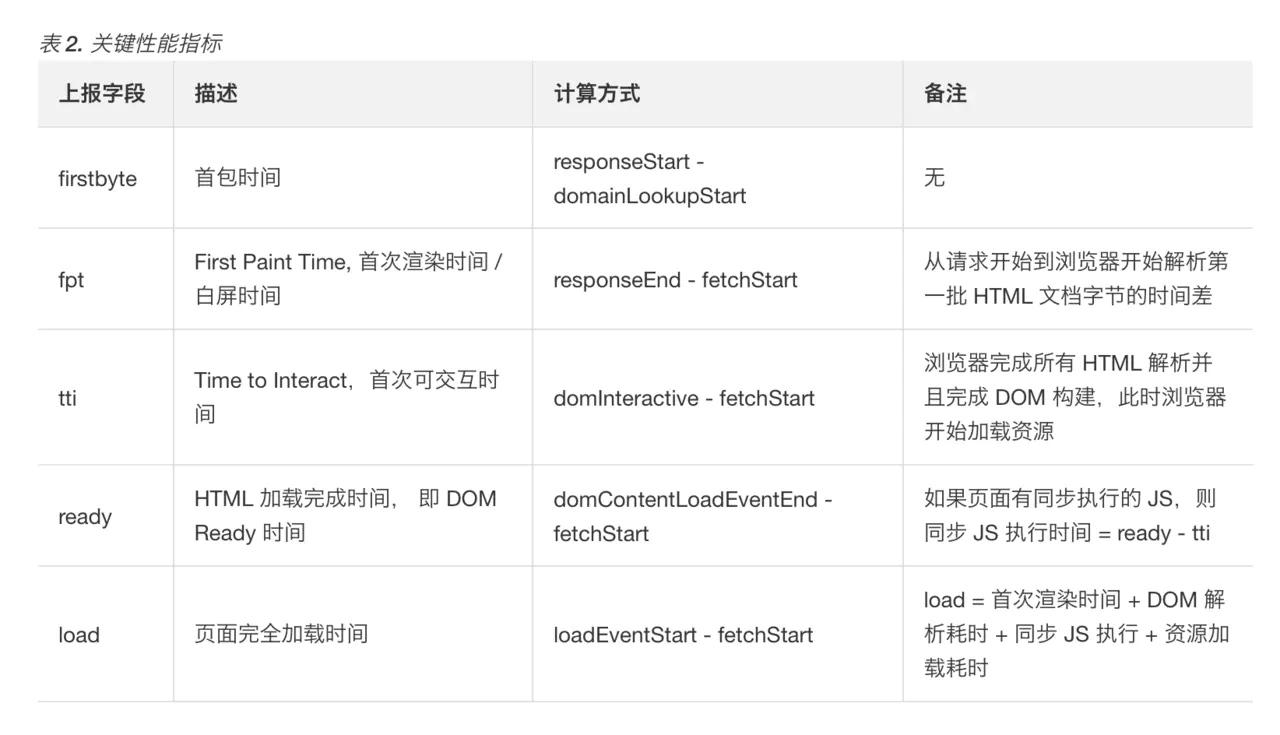
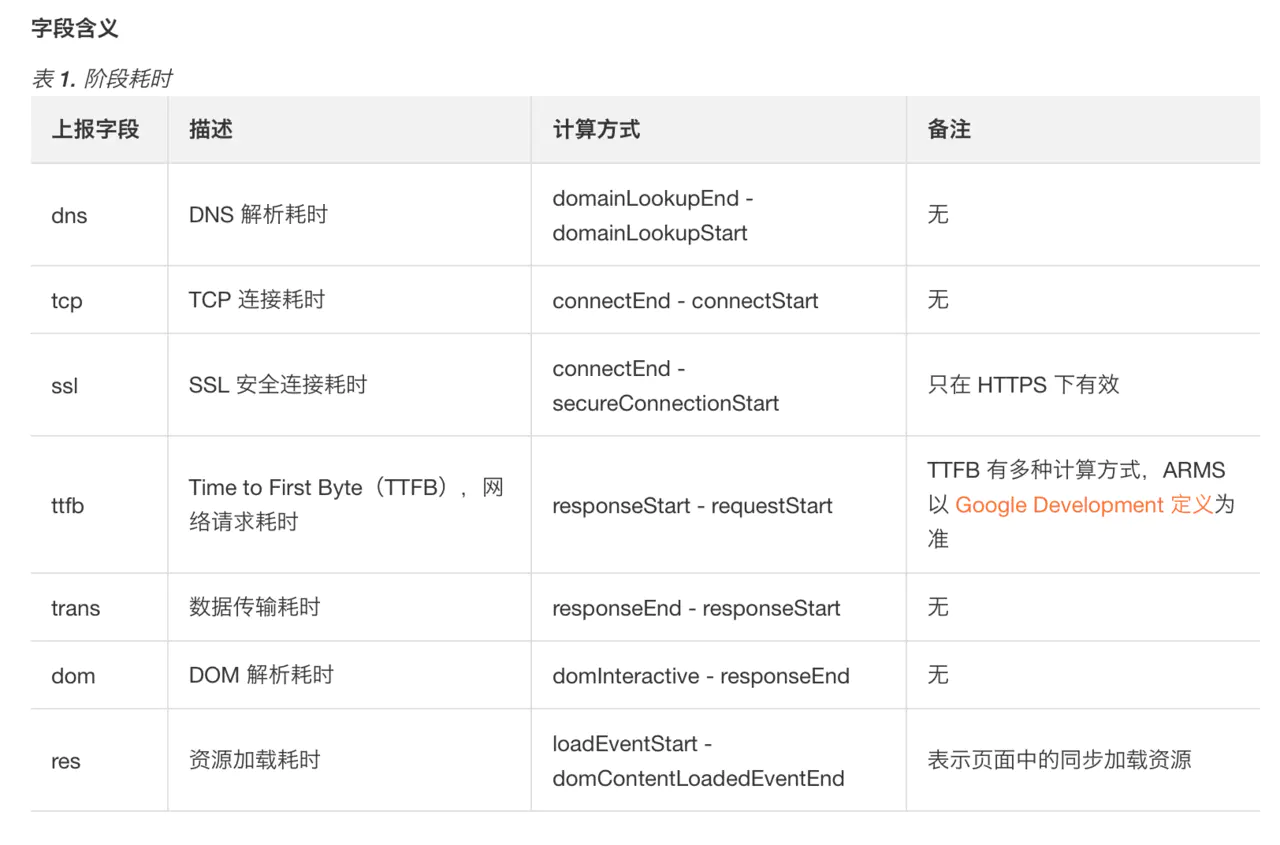
tips: 通过window.navigator.connection.bandwidth我们可以预估带宽
# 用户行为
这里的用户行为暂时只click事件和console
# 监听点击事件
window.addEventListener('click', handleClick, true);

// handleClick事件定义
export function handleClick(event) {
  var target;
  try {
    target = event.target
  } catch (u) {
    target = "<unknown>"
  }
  if (0 !== target.length) {
    var behavior: clickBehavior = {
      type: 'ui.click',
      data: {
        message: function (e) {
          if (!e || 1 !== e.nodeType) return "";
          for (var t = e || null, n = [], r = 0, a = 0,i = " > ".length, o = ""; t && r++ < 5 &&!("html" === (o = normalTarget(t)) || r > 1 && a + n.length * i + o.length >= 80);)
          n.push(o), a += o.length, t = t.parentNode;
          return n.reverse().join(" > ")
      }(target),
      }
    }
    // 空信息不上报
    if (!behavior.data.message) return
    let commonMsg = getCommonMsg()
    let msg: behaviorMsg = {
      ...commonMsg,
      ...{
        t: 'behavior',
        behavior,
      }
    }
    report(msg)
  }
}
2
3
4
5
6
7
8
9
10
11
12
13
14
15
16
17
18
19
20
21
22
23
24
25
26
27
28
29
30
31
32
33
34
35
最终上报数据格式如下
{
    "type": "ui.click",
     "data": {
        "message": "div#mescroll.mescroll.mescroll-bar > div.index__search-content___1Q2eh"
      }
}
2
3
4
5
6
# 重写console
要监听console,我们就得重写window.console方法
// hack console
//  Config.behavior.console 取值为["debug", "info", "warn", "log", "error"]
export function hackConsole() {
  if (window && window.console) {
    for (var e = Config.behavior.console, n = 0; e.length; n++) {
      var r = e[n];
      var action = window.console[r]
      if (!window.console[r]) return;
        (function (r, action) {
          window.console[r] = function() {
            var i = Array.prototype.slice.apply(arguments)
            var s: consoleBehavior = {
              type: "console",
              data: {
                level: r,
                message: JSON.stringify(i),
              }
            };
            handleBehavior(s)
            action && action.apply(null, i)
          }
        })(r, action)
    }
  }
}
2
3
4
5
6
7
8
9
10
11
12
13
14
15
16
17
18
19
20
21
22
23
24
25
# 支持单页面
目前很多监控都不支持单页面,要实现支持单页面我们必须知道单页面跳转原理。目前一般有hash和history两种方式
# hash
hash比较简单,监听hashchange就可以
on('hashchange', handleHashchange)
# history
history依赖 HTML5 History API 和服务器配置。主要依赖history.pushState和history.replaceState
下面我们想浏览器执行这两个方法的时候,派发同一个事件historystatechanged出来,那就需要重写着两个方法
/**
 * hack pushstate replaceState
 * 派送historystatechange historystatechange事件
 * @export
 * @param {('pushState' | 'replaceState')} e
 */
export function hackState(e: 'pushState' | 'replaceState') {
  var t = history[e]
  "function" == typeof t && (history[e] = function (n, i, s) {
    !window['__bb_onpopstate_'] && hackOnpopstate(); // 调用pushState或replaceState时hack Onpopstate
    var c = 1 === arguments.length ? [arguments[0]] : Array.apply(null, arguments),
        u = location.href,
        f = t.apply(history, c);
    if (!s || "string" != typeof s) return f;
    if (s === u) return f;
    try {
        var l = u.split("#"),
            h = s.split("#"),
            p = parseUrl(l[0]),
            d = parseUrl(h[0]),
            g = l[1] && l[1].replace(/^\/?(.*)/, "$1"),
            v = h[1] && h[1].replace(/^\/?(.*)/, "$1");
        p !== d ? dispatchCustomEvent("historystatechanged", d) : g !== v && dispatchCustomEvent("historystatechanged", v)
    } catch (m) {
      warn("[retcode] error in " + e + ": " + m)
    }
    return f
  }, history[e].toString = fnToString(e))
}
复制代码
2
3
4
5
6
7
8
9
10
11
12
13
14
15
16
17
18
19
20
21
22
23
24
25
26
27
28
29
30
然后只需要监听historystatechanged就可以了
on('historystatechanged', handleHistorystatechange)
tips: 这里用到了window.CustomEvent这个api
# 上报资源
资源是指网页外部资源,如图片、js、css等
原理就是通过performance.getEntriesByType("resource")获取页面加载的资源
export function handleResource() {
  var performance = window.performance
  if (!performance || "object" != typeof performance || "function" != typeof performance.getEntriesByType) return null;
  let commonMsg = getCommonMsg()
  let msg: ResourceMsg = {
    ...commonMsg,
    ...{
      dom: 0,
      load: 0,
      t: 'res',
      res: '',
    }
  }
  var i = performance.timing || {},
      o = performance.getEntriesByType("resource") || [];
  if ("function" == typeof window.PerformanceNavigationTiming) {
    var s = performance.getEntriesByType("navigation")[0];
    s && (i = s)
  }
  each({
    dom: [10, 8],
    load: [14, 1]
  }, function (e, t) {
      var r = i[TIMING_KEYS[e[1]]],
          o = i[TIMING_KEYS[e[0]]];
      if (r > 0 && o > 0) {
          var s = Math.round(o - r);
          s >= 0 && s < 36e5 && (msg[t] = s)
      }
  })
  // 过滤忽略的url
  o = o.filter(item => {
    var include = getConfig('ignore').ignoreApis.findIndex(ignoreApi => item.name.indexOf(ignoreApi) > -1)
    return include > -1 ? false : true
  })
  msg.res = JSON.stringify(o)
  report(msg)
}
2
3
4
5
6
7
8
9
10
11
12
13
14
15
16
17
18
19
20
21
22
23
24
25
26
27
28
29
30
31
32
33
34
35
36
37
38
# 监听api接口
这里会通过改写ajax或fetch来实现自动上报接口调用成功失败的信息,当然如果不是通过这两种方式发起网络请求的,也额外支持__bb.api()手动上报
# 重写ajax
// 如果返回过长,会被截断,最长1000个字符
function hackAjax() {
  if ("function" == typeof window.XMLHttpRequest) {
    var begin = 0,
        url ='',
        page = ''
        ;
    var __oXMLHttpRequest_ = window.XMLHttpRequest
    window['__oXMLHttpRequest_'] = __oXMLHttpRequest_
    window.XMLHttpRequest = function(t) {
      var xhr = new __oXMLHttpRequest_(t)
      if (!xhr.addEventListener) return xhr
      var open = xhr.open,
        send = xhr.send
      xhr.open = function (method: string, url?: string) {
        var a = 1 === arguments.length ? [arguments[0]] : Array.apply(null, arguments);
        url = url
        page = parseUrl(url)

        open.apply(xhr,a)
      }
      xhr.send = function() {
        begin = Date.now()
        var a = 1 === arguments.length ? [arguments[0]] : Array.apply(null, arguments);
        send.apply(xhr,a)
      }
      xhr.onreadystatechange = function() {
        if (page && 4=== xhr.readyState) {
          var time = Date.now() - begin
          if (xhr.status >= 200 && xhr.status <= 299) {
            var status = xhr.status || 200
            if ("function" == typeof xhr.getResponseHeader) {
              var r = xhr.getResponseHeader("Content-Type");
              if (r && !/(text)|(json)/.test(r))return
            }
            handleApi(page, !0, time, status, xhr.responseText.substr(0,Config.maxLength) || '', begin)
          } else {
            handleApi(page, !1, time, status || 'FAILED', xhr.responseText.substr(0,Config.maxLength) || '', begin)
          }
        }
      }
      return xhr
    }
  }
}
2
3
4
5
6
7
8
9
10
11
12
13
14
15
16
17
18
19
20
21
22
23
24
25
26
27
28
29
30
31
32
33
34
35
36
37
38
39
40
41
42
43
44
45
# 重写fetch
function hackFetch(){
  if ("function" == typeof window.fetch) {
    var __oFetch_ = window.fetch
    window['__oFetch_'] = __oFetch_
    window.fetch = function(t, o) {
      var a = 1 === arguments.length ? [arguments[0]] : Array.apply(null, arguments);
      var begin = Date.now(),
          url = (t && "string" != typeof t ? t.url : t) || "",
          page = parseUrl((url as string));
      if (!page) return __oFetch_.apply(window, a)
      return __oFetch_.apply(window, a).then(function (e) {
        var response = e.clone(),
            headers = response.headers;
        if (headers && 'function' === typeof headers.get) {
          var ct = headers.get('content-type')
          if (ct && !/(text)|(json)/.test(ct)) return e
        }
        var time = Date.now() - begin;
          response.text().then(function(res) {
            if (response.ok) {
              handleApi(page, !0, time, status, res.substr(0,1000) || '', begin)
            } else {
              handleApi(page, !1, time, status, res.substr(0,1000) || '', begin)
            }
          })
        return e
      })
    }
  }
}
2
3
4
5
6
7
8
9
10
11
12
13
14
15
16
17
18
19
20
21
22
23
24
25
26
27
28
29
30
# 手动埋点
支持sum avg api msg等多种手动上报方式
# 二、实现圈选(无埋点)
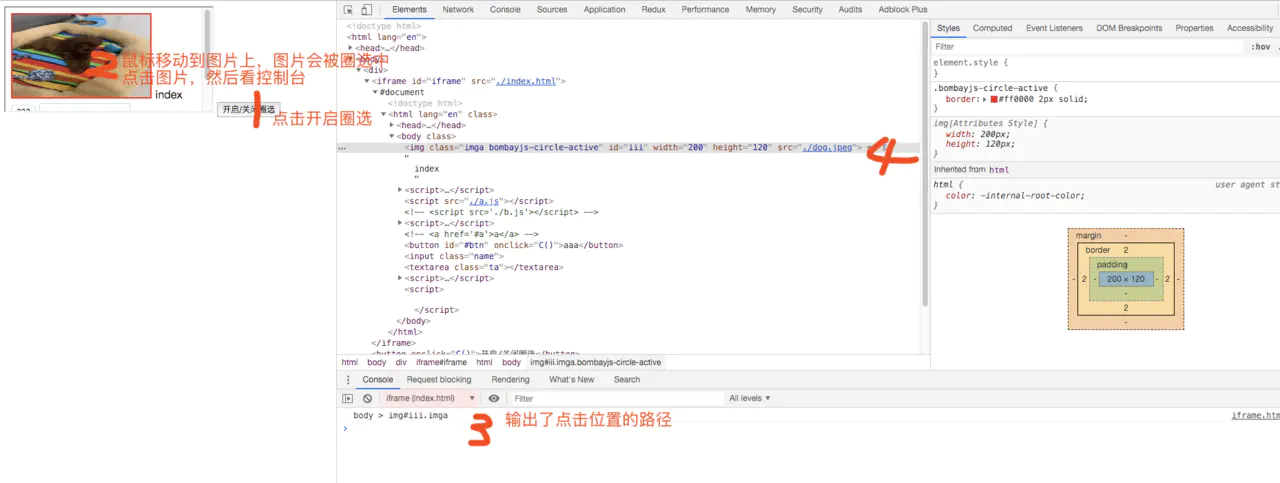
# 演示
# 原理
- 通过postMessage实现iframe的通信
- 通过监听mouseover事件来圈选
- 通过监听click事件获取点击目标的路径
- 通过stopPropagation阻止原来的点击事件
# 实现
# parent
<!DOCTYPE html>
<html lang="en">
<head>
  <meta charset="UTF-8">
  <meta name="viewport" content="width=device-width, initial-scale=1.0">
  <meta http-equiv="X-UA-Compatible" content="ie=edge">
  <title>Document</title>
</head>
<body>
  <div>
    <iframe id='iframe' src='./a.html'></iframe>
</div>
  <script>
    window.addEventListener('message', function(event) {
      console.log(event.data.path)
    }, false)

  </script>
</body>
</html>
2
3
4
5
6
7
8
9
10
11
12
13
14
15
16
17
18
19
20
# iframe
// a.html

<!DOCTYPE html>
<html lang="en">
<head>
  <meta charset="UTF-8">
  <meta name="viewport" content="width=device-width, initial-scale=1.0">
  <meta http-equiv="X-UA-Compatible" content="ie=edge">
  <title>Document</title>
</head>
<body>
  <div>
    <a href='#a'>click me</a>
</div>
  <script>
    window.addEventListener('message', function(event) {
      console.log(event.data.path)
    }, false)


    window.addEventListener('click', function(event) {
      event.stopPropagation()
      window.parent.postMessage({
        path: '此处需要自己解析出元素路径'
      }, '*')
      return
    }, false)

    window.addEventListener('mouseover', function(event) {
      event.target.style = 'border: #ff0000 solid 1px'
    }, false)
  </script>
</body>
</html>
2
3
4
5
6
7
8
9
10
11
12
13
14
15
16
17
18
19
20
21
22
23
24
25
26
27
28
29
30
31
32
33
34
# 三、实现控制iframe前进后退
# 演示
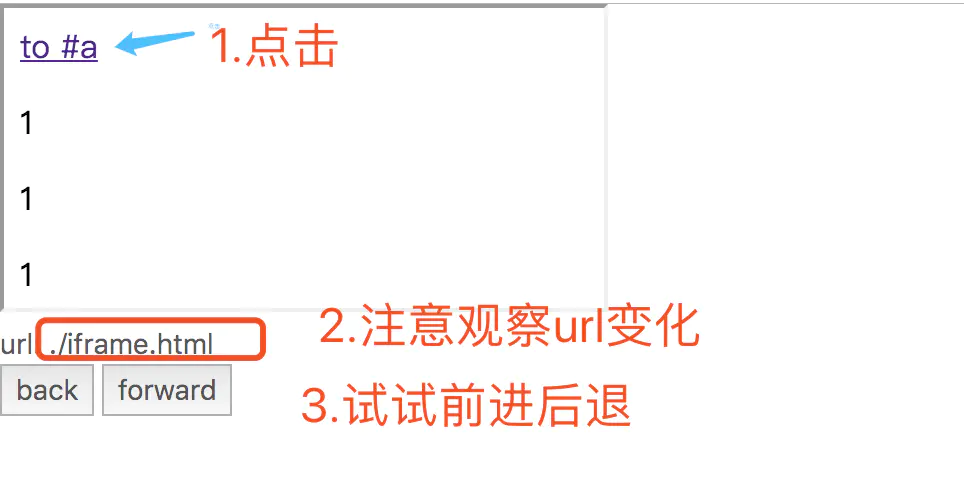
# 难点
document.getElementById('iframe id').contentWindow.history.back();
以上面这种方式控制会存在跨域问题!!!
# 原理
- 解决iframe的跨域问题,我们需要通过postMessage实现iframe的通信
- 通过window.history.back()和window.history.forward()控制前进后退
# 实现
# index.html
<!DOCTYPE html>
<html lang="en">
<head>
  <meta charset="UTF-8">
  <meta name="viewport" content="width=device-width, initial-scale=1.0">
  <meta http-equiv="X-UA-Compatible" content="ie=edge">
  <title>Document</title>
</head>
<body>
  <div>
    <iframe id='iframe'></iframe>
    <br/>
    url: <span id='url'></span>
    <br/>
    <button id='back' onclick='back()'>back</button>
    <button id='forward' onclick='forward()'>forward</button>
</div>
  <script>
    var url = './iframe.html'
    var div = document.getElementById('url'),
        iframe = document.getElementById('iframe')
    iframe.src = url
    div.innerHTML = url
    window.addEventListener('message', function(event) {
      if (!event.data.url) return
      div.innerHTML = event.data.url;
    }, false)

    function back() {
      iframe.contentWindow.postMessage('back', '*');
    }
    function forward() {
      iframe.contentWindow.postMessage('forward', '*');
    }
  </script>
</body>
</html>
2
3
4
5
6
7
8
9
10
11
12
13
14
15
16
17
18
19
20
21
22
23
24
25
26
27
28
29
30
31
32
33
34
35
36
37
# iframe.html
<!DOCTYPE html>
<html lang="en">
<head>
  <meta charset="UTF-8">
  <meta name="viewport" content="width=device-width, initial-scale=1.0">
  <meta http-equiv="X-UA-Compatible" content="ie=edge">
  <title>Document</title>
</head>
<body>
  <div>
    <a href='#a'>to #a</a>
    <p>1</p>
    <p>1</p>
    <p>1</p>
    <p>1</p>
    <p>1</p>
    <p>1</p>
    <p>1</p>
    <p>1</p>
    <p>1</p>
    <p>1</p>
    <p>1</p>
    <p id='a'>a</p>
    <p>2</p>
    <p>2</p>
    <p>2</p>
    <p>2</p>
    <p>2</p>
    <p>2</p>
    <p>2</p>
    <p>2</p>
</div>
  <script>
    window.addEventListener('message', function(event) {
      if (event.data === 'back') {
        window.history.back()
      } else {
        window.history.forward()
      }
    }, false)
    window.addEventListener('hashchange', function(event) {
      window.parent.postMessage({
        url: location.href
      }, '*')
      return
    }, false)
  </script>
</body>
</html>
2
3
4
5
6
7
8
9
10
11
12
13
14
15
16
17
18
19
20
21
22
23
24
25
26
27
28
29
30
31
32
33
34
35
36
37
38
39
40
41
42
43
44
45
46
47
48
49
# 四、js无侵入埋点方案
https://github.com/Qquanwei/trackpoint-tools
# API 列表
- before (opens new window)
- after (opens new window)
- once (opens new window)
- track (opens new window)
- nop (opens new window)
- composeWith (opens new window)
- evolve (opens new window)
- time (opens new window)
- identity (opens new window)
- createCounter (opens new window)
所有的API都满足curryable, 所有的trackFn 都不会影响正常逻辑执行。trackFn 指实际执行逻辑的跟踪函数, fn为普通的业务函数。
# 参考链接
https://juejin.im/post/6844903953319067655
https://juejin.im/post/6844903956267663367
https://juejin.im/post/6844903959115595790
