 sentry部署及实践
# 云服务器安装
# 要点须知
- 买云服务器的话,可以考虑按流量付费使用;
- 设置etc/hosts墙外;【要点】
- 记得设置docker加速;【要点】
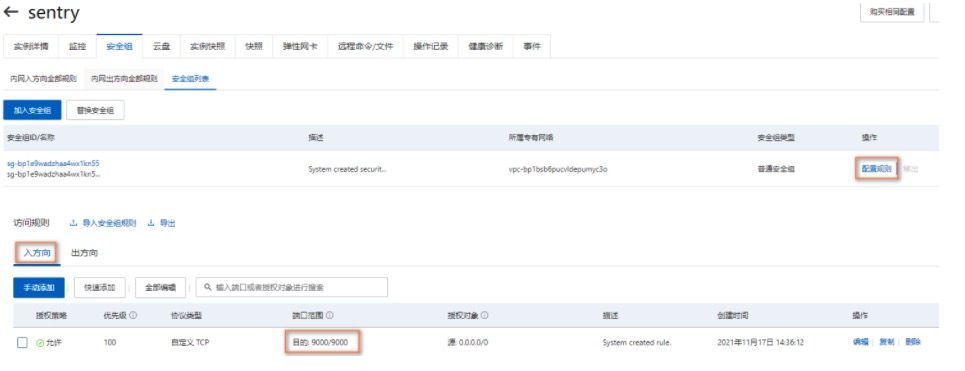
- 开放对应的安全组端口;
购买安装ECS
- 购买地址 (opens new window)
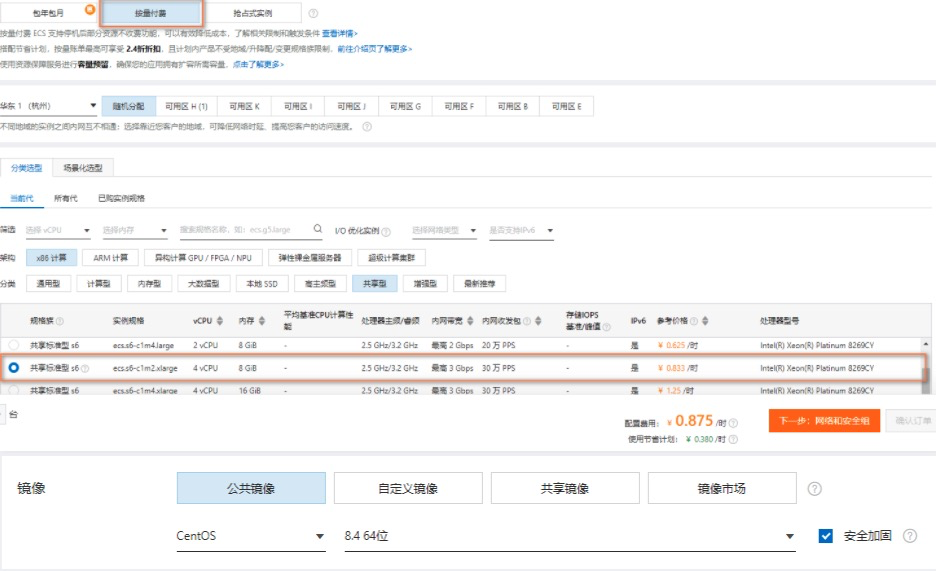
- 选择按需付费,配配置选择共享标准型s6 4vCPU 8GiB
- 操作系统选择 CentoOS 8.4 64位
- 分配公网IPv4地址
# 安装docker
yum remove docker docker-common docker-selinux docker-engine
yum install -y yum-utils   device-mapper-persistent-data   lvm2
yum-config-manager     --add-repo     https://download.docker.com/linux/centos/docker-ce.repo
yum install docker-ce docker-ce-cli containerd.io -y
systemctl start docker
docker version
docker info
2
3
4
5
6
7
# 安装docker-compose
#sudo curl -L "https://static.zhufengpeixun.com/dockercomposeLinuxx8664_1637129076349" -o /usr/local/bin/docker-compose
 sudo curl -L "https://github.com/docker/compose/releases/download/1.29.2/docker-compose-$(uname -s)-$(uname -m)" -o /usr/local/bin/docker-compose

# 添加可执行权限
sudo chmod +x /usr/local/bin/docker-compose
# 查看版本信息
docker-compose -version
2
3
4
5
6
7
# Sentry原理/作用
# 原理
Sentry到底是如何实现实时日志监控报警的呢?首先,Sentry是一个C/S架构,我们需要在自己应用中集成Sentry的SDK才能在应用发生错误是将错误信息发送给Sentry服务端。根据语言和框架的不同,我们可以选择自动或自定义设置特殊的错误类型报告给Sentry服务端。
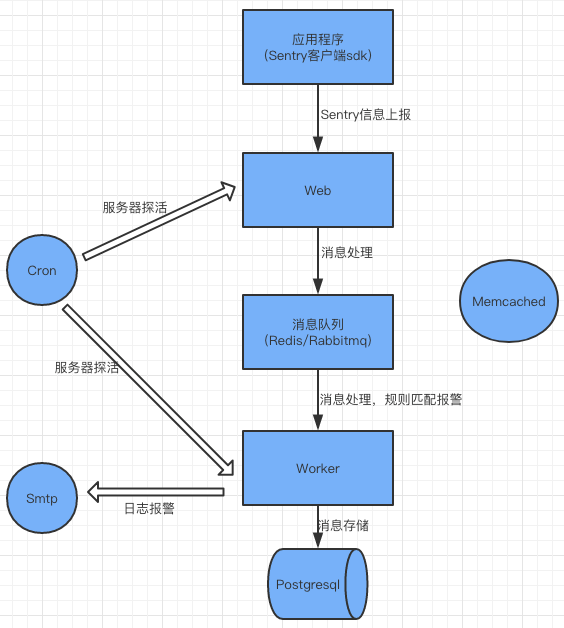
而Sentry的服务端分为web、cron、worker这几个部分,应用(客户端)发生错误后将错误信息上报给web,web处理后放入消息队列或Redis内存队列,worker从队列中消费数据进行处理。
# 作用
Sentry可以帮助我们完成以下工作:例如,线上有一个bug,代码的某处逻辑的NullPointerException造成了这个问题,Sentry会立即发现错误,并通过邮件或其他基于通知规则的集成通知到相关责任人员,这个通知可以把我们引入到一个指示板,这个指示板为我们提供了快速分类问题所需的上下文,如:频率、用户影响、代码那一部分受到影响以及那个团队可能是问题的所有者。
然后,它会显示帮助我们调试的详细信息,比如堆栈跟踪、堆栈本地信息、前面的事件、可能导致问题的提交以及在错误发生时捕获的定制数据。我们还可以在JIRA等项目管理工具中自动开始跟踪问题。
# Sentry本地部署
Sentry 的管理后台是基于 Python Django 开发的。这个管理后台由背后的 Postgres 数据库(管理后台默认的数据库)、ClickHouse(存数据特征的数据库)、relay、kafka、redis 等一些基础服务或由 Sentry 官方维护的总共 23 个服务支撑运行。如果独立的部署和维护这 23 个服务将是异常复杂和困难的。幸运的是,官方提供了基于 docker 镜像的一键部署实现: getsentry/onpremise。
# 硬件要求
- Docker 19.03.6+
- Compose 1.28.0+
- 4 CPU Cores
- 8 GB RAM
- 20 GB Free Disk Space
# docker化安装
- 1、拉取镜像
docker pull sentry       ###目前最新版本9.1.2
docker pull redis
docker pull postgres
2
3
- 2、启动服务
docker run -d --name sentry-redis --restart=always redis   ###保证了,异常自动拉起
docker run -d --name sentry-postgres -e POSTGRES_PASSWORD=secret -e POSTGRES_USER=sentry --restart=always postgres
2
- 3、生成sentry秘钥
docker run --rm sentry config generate-secret-key
xxxxxxxxxxxxxxxxxxxxxxxxxxxxxxxxxxddd  ###打印出secret-keys
2
- 4、数据库及账户初始化
# 注意:过程中需要你创建用户和密码
docker run -it --rm -e SENTRY_SECRET_KEY='xxxxx' --link sentry-postgres:postgres --link sentry-redis:redis sentry upgrade
2
- 5、启动sentry的web服务
docker run -d -p 9000:9000 --name my-sentry -e SENTRY_SECRET_KEY='xxxxx' --link sentry-redis:redis --link sentry-postgres:postgres --restart=always sentry
- 6、启动sentry-cron/work服务
docker run -d --name sentry-cron -e SENTRY_SECRET_KEY='xxxx' --link sentry-postgres:postgres --link sentry-redis:redis sentry run cron

docker run -d --name sentry-worker-1 -e SENTRY_SECRET_KEY='xxxxx' --link sentry-postgres:postgres --link sentry-redis:redis sentry run worker
2
3
- 7、登录测试效果
# 源码docker安装【推荐】
# 运行脚本
yum install git -y
#git clone https://gitee.com/zhufengpeixun/onpremise
git clone https://github.com/getsentry/onpremise
cd onpremise
./install.sh
2
3
4
5
# 注意点
# mac安装
mac如果执行./install.sh报错./install/_lib.sh: line 15: realpath: command not found1在这里找到解决方案: https://github.com/getsentry/onpremise/issues/941
brew install coreutils1重新执行
./install.sh,如果报docker内存分配不够▶ Parsing command line ... ▶ Setting up error handling ... ▶ Checking minimum requirements ... FAIL: Required minimum RAM available to Docker is 3800 MB, found 1985 MB1
2
3
4
5
6docker内存配大点,否则无法安装
Docker->Preferences->Resources->Memory分配4G重新执行
./install.sh,成功----------------------------------------------------------------- You're all done! Run the following command to get Sentry running: docker-compose up -d -----------------------------------------------------------------1
2
3
4
5
6
7
# 安装版本及不创建用户【要点】
要开始使用所有默认值,只需克隆 repo 并在本地检出中运行./install.sh。自 2020 年 12 月 4 日起,Sentry 默认使用 Python 3,Sentry 21.1.0 是最后一个支持 Python 2 的版本。
在安装过程中,会提示您是否要创建用户帐户。如果您要求安装不被提示阻止,请运行 ./install.sh --no-user-prompt。
Did not prompt for user creation due to non-interactive shell.
Run the following command to create one yourself (recommended):

  docker-compose run --rm web createuser


▶ Migrating file storage ...
Unable to find image 'alpine:latest' locally
latest: Pulling from library/alpine
97518928ae5f: Already exists
Digest: sha256:635f0aa53d99017b38d1a0aa5b2082f7812b03e3cdb299103fe77b5c8a07f1d2
Status: Downloaded newer image for alpine:latest

▶ Generating Relay credentials ...
Creating ../relay/config.yml...
Relay credentials written to ../relay/credentials.json

▶ Setting up GeoIP integration ...
Setting up IP address geolocation ...
Installing (empty) IP address geolocation database ... done.
IP address geolocation is not configured for updates.
See https://develop.sentry.dev/self-hosted/geolocation/ for instructions.
Error setting up IP address geolocation.


-----------------------------------------------------------------

You're all done! Run the following command to get Sentry running:

  docker compose up -d

-----------------------------------------------------------------
2
3
4
5
6
7
8
9
10
11
12
13
14
15
16
17
18
19
20
21
22
23
24
25
26
27
28
29
30
31
32
# 启动/停止
# 启动
安装过程中会让我们创建
sentry后台管理员账号,可以先跳过,后面再创建;在
onpremise文件中中启动服务;docker-compose up -d1浏览器访问 http://localhost:9000/ ,进入
sentry管理界面,需要账号密码登录;
# 注册超管
创建超级管理员账号
docker-compose run --rm web createuser --superuser

# 安装完毕后可以用以下指令创建用户:(创建用户,该用户为超级用户,不加 --superuser 则为普通用户,--force-update 可以用来覆盖已经存在的相同账号)
# docker-compose run --rm web createuser --superuser --force-update
1
2
3
4执行结果
Creating sentry_onpremise_web_run ... done
Updating certificates in /etc/ssl/certs...
0 added, 0 removed; done.
Running hooks in /etc/ca-certificates/update.d...
done.
03:02:46 [INFO] sentry.plugins.github: apps-not-configured
* Unknown config option found: 'slack.legacy-app'
Email: test@xxx.tv
Password:
Repeat for confirmation:
Added to organization: sentry
User created: test@xxx.tv
1
2
3
4
5
6
7
8
9
10
11
12如果还使用上述命令,还可以创建新的账号,但数据是共享的
覆盖原账号:如果想修改密码可以使用
docker-compose run --rm web createuser --superuser --force-update1
# 停服
在
onpremise目录docker-compose down1如果再次启动,则数据会保留
# 相关配置其他
# 中文国际化设置
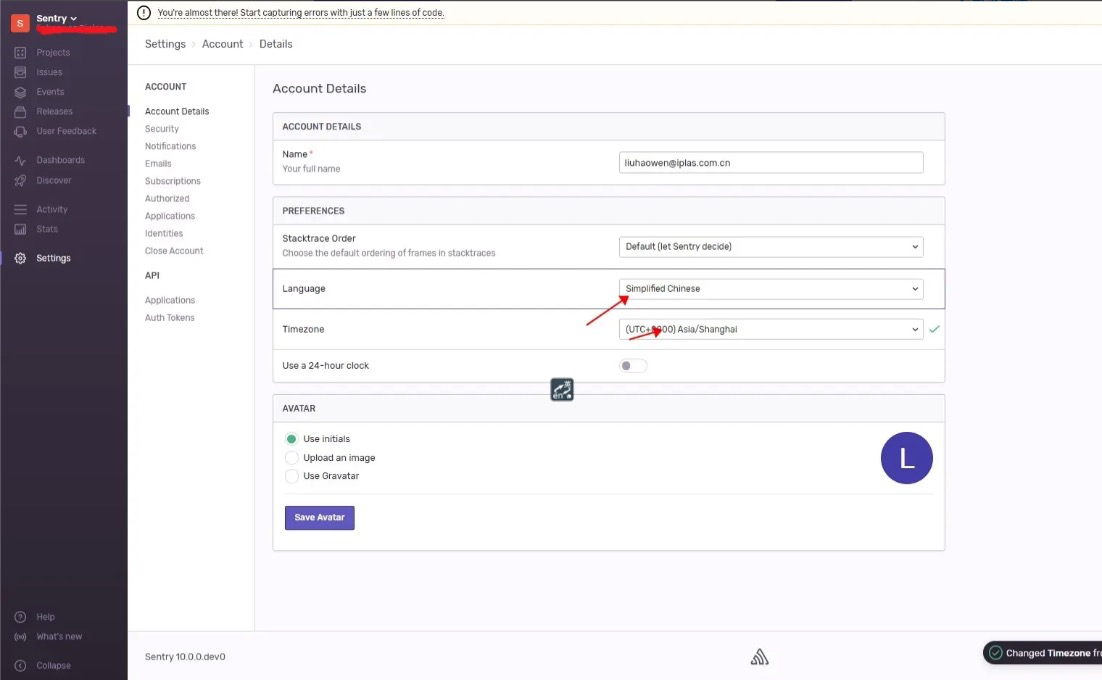
Sentry 在国际化上提供了简体中文的语言支持,通过以下界面可以通过调整语言和所在时区,十分方便。
设置完成后刷新页面,即可应用设置。虽然仍有部分选项没有汉化完成,但也已经足够友好。
# 邮箱配置
修改 /onpremise/sentry/config.yml
# Mail Server #
###############
mail.backend: 'smtp'
mail.host: 'smtp.xxx.com'
mail.port: 25
mail.username: '用户名'
mail.password: '******'
mail.from: 'sentry-dev@xxx.com'

# 记得打开服务器的端口;
# mail.backend: 'smtp'  # Use dummy if you want to disable email entirely
mail.backend: 'django_smtp_ssl.SSLEmailBackend'   // 新的邮件后台
mail.host: 'smtp.163.com'
mail.port: 587                                    // 465 -> 587(465/587 两个是 163 合法的端口,但是确实只有 587 正常使用,具体 issue里有解释)
mail.username: 'your@163.com'
mail.password: 'your smpt sceret'                 // 注意,不是你的邮箱密码
mail.use-tls: true
# The email address to send on behalf of
mail.from: 'your@163.com'
2
3
4
5
6
7
8
9
10
11
12
13
14
15
16
17
18
19
- 这里host、port需要在邮箱服务提供商查询
- username、password就是你邮箱的用户名密码
- from是发件人邮箱地址
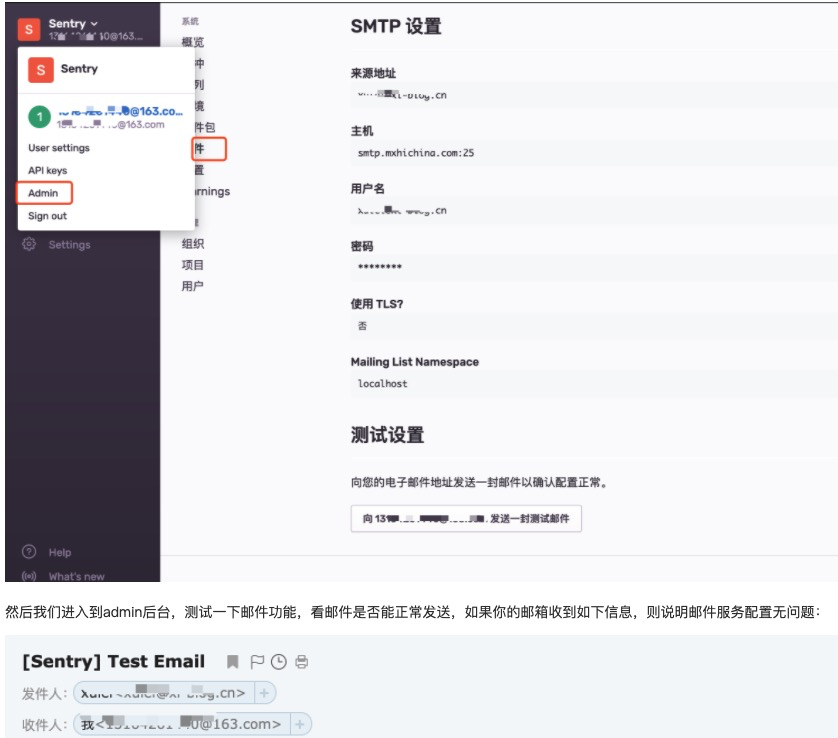
直接管理后台页面查看配置;
# 接入项目监控
# 前端接入 sentry sdk
# react项目
# 初始化及接入
创建一个前端项目
npx create-react-app sentry-sdk-demo
cd sentry-sdk-demo
1
2安装
SDK依赖# Using yarn yarn add @sentry/react @sentry/tracing # Using npm npm install --save @sentry/react @sentry/tracing1
2
3
4
5代码引入
sdk; 直接拷贝创建项目中配置即可;修改
index.jsimport React from 'react'; import ReactDOM from 'react-dom'; import './index.css'; import App from './App'; import reportWebVitals from './reportWebVitals'; import * as Sentry from "@sentry/react"; import { Integrations } from "@sentry/tracing"; Sentry.init({ dsn: "http://0de84f931de34f92b4faf98c248f524e@159.75.243.xxx:9000/3", // dsn: "http://4e43b21b99764a3ea782bc6f02b3feeb9e7e2893ffc846b29e499985efa3748b@159.75.243.174:9000/3", integrations: [new Integrations.BrowserTracing()], // Set tracesSampleRate to 1.0 to capture 100% // of transactions for performance monitoring. // We recommend adjusting this value in production tracesSampleRate: 1.0, release: '0.0.1', }); ReactDOM.render(<App />, document.getElementById("root")); // If you want to start measuring performance in your app, pass a function // to log results (for example: reportWebVitals(console.log)) // or send to an analytics endpoint. Learn more: https://bit.ly/CRA-vitals reportWebVitals();1
2
3
4
5
6
7
8
9
10
11
12
13
14
15
16
17
18
19
20
21
22
23
24
25
26
# 故意制造一个前端报错
function App() {
  function fn() {
    console.log(window.a.b);
  }
  return (
    <button onClick={fn}>Break the world</button>
  );
}

export default App;
2
3
4
5
6
7
8
9
10
点击
Break the world按钮,可以看到控制台报错,并且发送了一个上报错误的请求到sentry:http://0.0.0.0:9000/api/3/store/?sentry_key=c96e4ce910524463a4e6a655a7ebxxxx&sentry_version=7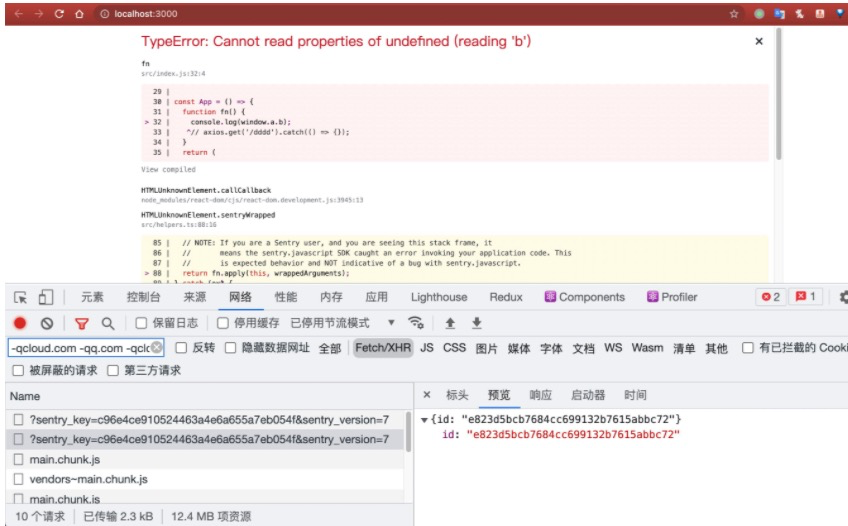
启动npm run start点击主动报错提示;
# vue项目
# 初始化及接入
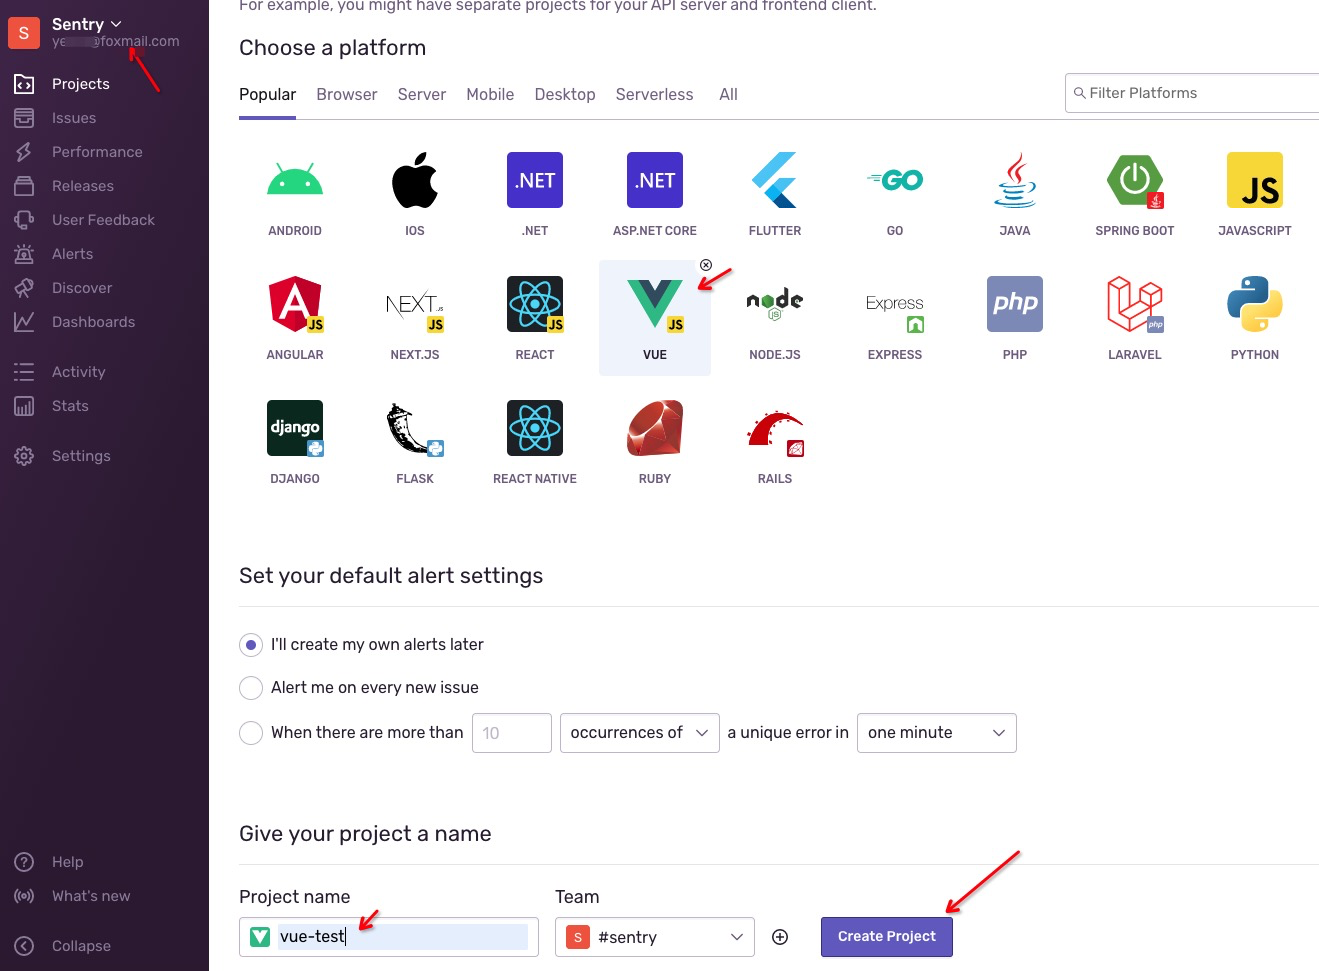
创建一个前端项目
vue create sentry-sdk-demo-vue
cd sentry-sdk-demo-vue
1
2安装
SDK依赖# Using yarn yarn add @sentry/vue @sentry/tracing # Using npm npm install --save @sentry/vue @sentry/tracing1
2
3
4
5代码引入
sdk修改
main.jsVue2
import Vue from "vue";
import Router from "vue-router";
import * as Sentry from "@sentry/vue";
import { Integrations } from "@sentry/tracing";

Vue.use(Router);

const router = new Router({
  // ...
});

Sentry.init({
  Vue,
  dsn: "http://08e7e4d7762a43a08aa61ea0a6c9e79f@159.75.243.xx:9000/4",
  integrations: [
    new Integrations.BrowserTracing({
      routingInstrumentation: Sentry.vueRouterInstrumentation(router),
      tracingOrigins: ["localhost", "my-site-url.com", /^\//],
    }),
  ],
  // Set tracesSampleRate to 1.0 to capture 100%
  // of transactions for performance monitoring.
  // We recommend adjusting this value in production
  tracesSampleRate: 1.0,
});

// ...

new Vue({
  router,
  render: h => h(App),
}).$mount("#app");
1
2
3
4
5
6
7
8
9
10
11
12
13
14
15
16
17
18
19
20
21
22
23
24
25
26
27
28
29
30
31
32vue3
import { createApp } from "vue";
import { createRouter } from "vue-router";
import * as Sentry from "@sentry/vue";
import { Integrations } from "@sentry/tracing";

const app = createApp({
  // ...
});
const router = createRouter({
  // ...
});

Sentry.init({
  app,
  dsn: "http://08e7e4d7762a43a08aa61ea0a6c9e79f@159.75.243.xx:9000/4",
  integrations: [
    new Integrations.BrowserTracing({
      routingInstrumentation: Sentry.vueRouterInstrumentation(router),
      tracingOrigins: ["localhost", "my-site-url.com", /^\//],
    }),
  ],
  // Set tracesSampleRate to 1.0 to capture 100%
  // of transactions for performance monitoring.
  // We recommend adjusting this value in production
  tracesSampleRate: 1.0,
});

app.use(router);
app.mount("#app");
1
2
3
4
5
6
7
8
9
10
11
12
13
14
15
16
17
18
19
20
21
22
23
24
25
26
27
28
29
# 故意制造一个前端报错
修改HelloWorld.vue
<template>
  <div class="hello">
    <h1 @click="handleClick">{{ msg }}</h1>
  </div>
</template>

<script>
export default {
  name: "HelloWorld",
  props: {
    msg: String,
  },
  methods:{
    handleClick(){
      console.log(window.a.b);
    }
  }
};
</script>

<!-- Add "scoped" attribute to limit CSS to this component only -->
<style scoped>
h3 {
  margin: 40px 0 0;
}
ul {
  list-style-type: none;
  padding: 0;
}
li {
  display: inline-block;
  margin: 0 10px;
}
a {
  color: #42b983;
}
</style>
2
3
4
5
6
7
8
9
10
11
12
13
14
15
16
17
18
19
20
21
22
23
24
25
26
27
28
29
30
31
32
33
34
35
36
37
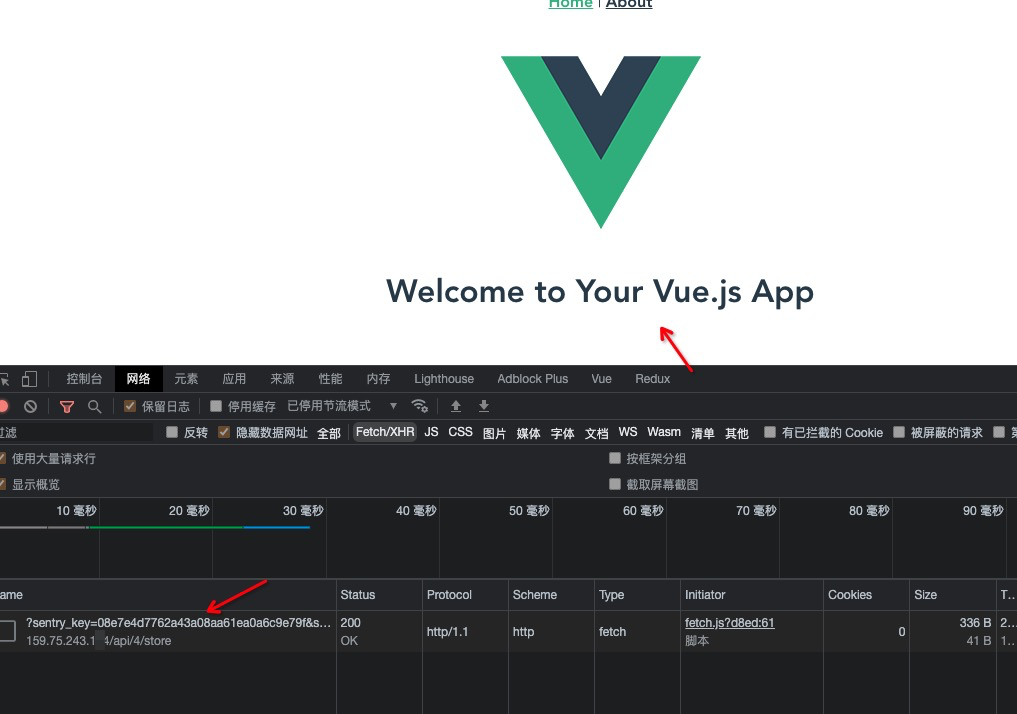
启动npm run serve点击主动报错提示;
# 参数
# 参数说明
Sentry.init 参数说明
官方文档: https://docs.sentry.io/platforms/javascript/configuration/options/
dsn前端通过sentry-sdk上报信息请求的目标地址,其实就是sentry后端地址,拿官方原话就是:
The DSN tells the SDK where to send the events toDSN可以安全地公开,因为它们只允许提交新事件和相关事件数据;它们不允许读取任何信息。 虽然存在滥用 DSN 的风险,其中任何用户都可以将事件连同他们想要的任何信息发送到你的组织,但这种情况很少发生。
管理界面在
Settings -> Projects -> Client Keys (DSN)格式为
{PROTOCOL}://{PUBLIC_KEY}:{SECRET_KEY}@{HOST}{PATH}/{PROJECT_ID}例子:
'http://06b94ee717014df78b9b48c7f9f1xxxx@localhost:9000/2'1
environment- 环境,这个定义是前端根据自己的开发、测试、预发布、线上环境等定义的,不配置的话默认为
"production" - 当错误上报后,
sentry管理界面的错误详情里会展示这个错误对应的environment,并且在issues列表页中,会有一个environment筛选对应环境的错误 - 其实目的是为了区分是哪个前端环境的错误
- 环境,这个定义是前端根据自己的开发、测试、预发布、线上环境等定义的,不配置的话默认为
integrations: [new Integrations.BrowserTracing()]- BrowserTracing 集成为每个页面加载和导航事件创建一个新
Transaction,并为每个XMLHttpRequest或在这些事务打开时发生的获取请求创建一个子Span,Transaction、Span相关术语后续会介绍。
- BrowserTracing 集成为每个页面加载和导航事件创建一个新
release: 一般前端每次发布版本,都需要更新下release版本号,sentry会根据release做分类,对应release下的信息,会体现在sentry管理界面菜单Releases中
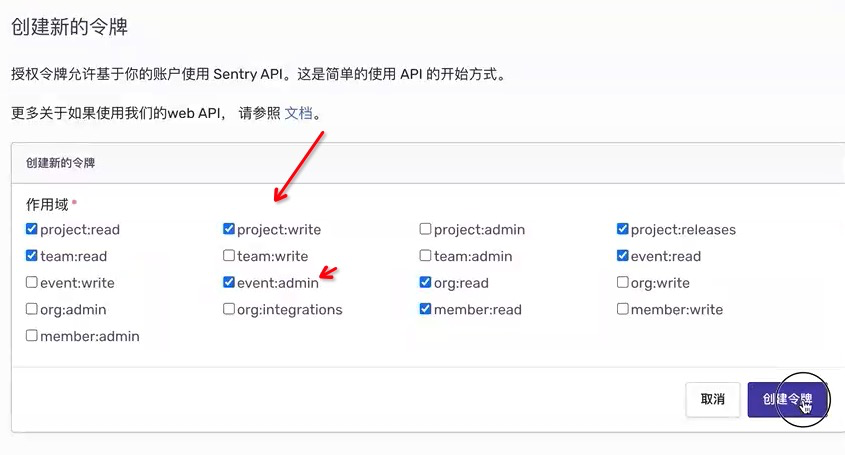
token配置

# 可以设置线上环境下上报错误
process.env.NODE_ENV ==='production' && Sentry.init({
  app,
  dsn: "http://08e7e4d7762a43a08aa61ea0a6c9e79f@159.75.243.xx:9000/4",
  integrations: [
    new Integrations.BrowserTracing({
      routingInstrumentation: Sentry.vueRouterInstrumentation(router),
      tracingOrigins: ["localhost", "my-site-url.com", /^\//],
    }),
  ],
  // Set tracesSampleRate to 1.0 to capture 100%
  // of transactions for performance monitoring.
  // We recommend adjusting this value in production
  tracesSampleRate: 1.0,
});
2
3
4
5
6
7
8
9
10
11
12
13
14
线上调试的话
npm run build
cd dist
http-server
2
3
# sentry 管理界面查看错误详情
- 在菜单
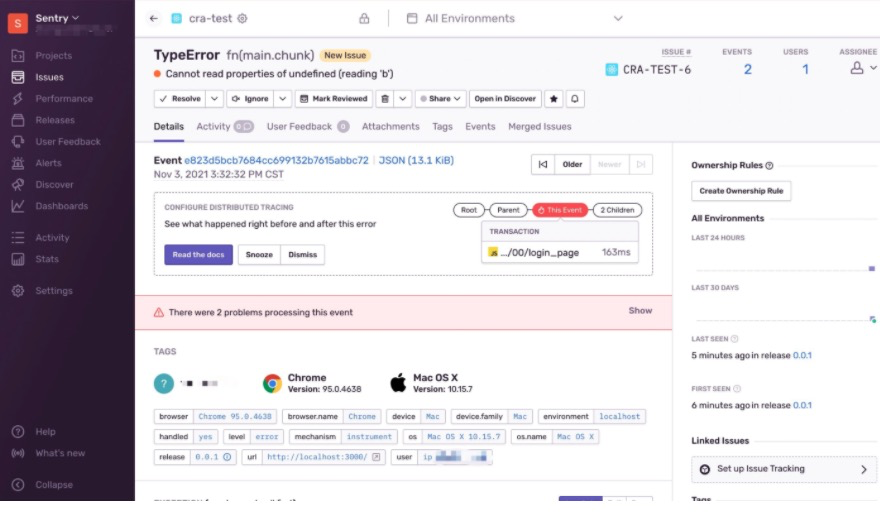
issues中,可以看到刚才上报的错误,点开可以查看详情:TAGS: 包括请求IP、浏览器、操作系统等信息EXCEPTION: 报错的类型、报错内容,错误堆栈信息等BREADCRUMBS: 错误链路信息- 错误发生的页面地址及UA信息
# sourcemap处理
# 命令行工具上传
可参考文档;sentry-cli官方文档 (opens new window)
1.在开发电脑安装@sentry/cli
npm install -g --unsafe-perm=true --allow-root @sentry/cli
sentry-cli -h
2
2.配置 sentry-cli
在上传之前,我们需要配置一下 sentry-cli,主要配置以下几个信息:
url: 要上传的sentry服务的地址,即我们通过docker启动的服务的地址;org: 组织名称,可以在sentry管理界面的Settings中设置组织;project:sentry项目名,可以在sentry管理界面的Projects中查看、创建、设置项目;token:sentry服务准入sentry-cli上传的鉴权token,可以在sentry管理界面的Settings -> Account -> API -> Auth Tokens中创建和删除;
3.执行一下命令创建 sentry-cli 配置文件
# 指定本地搭建的地址
sentry-cli --url http://127.0.0.1:9000 login
# 默认sentry.io
sentry-cli login
2
3
4
4.命令行中弹出选择
This helps you signing in your sentry-cli with an authentication token.
If you do not yet have a token ready we can bring up a browser for you
to create a token now.

Sentry server: 10.10.8.46
Open browser now? [y/n] y
2
3
4
5
6
选择
n,则提示输入token,token可以在sentry管理界面的Settings -> Account -> API -> Auth Tokens中创建,然后粘贴到命令行选择
y,则会自动打开浏览器到sentry管理界面的Settings -> Account -> API -> Auth Tokens,创建或直接复制token来粘贴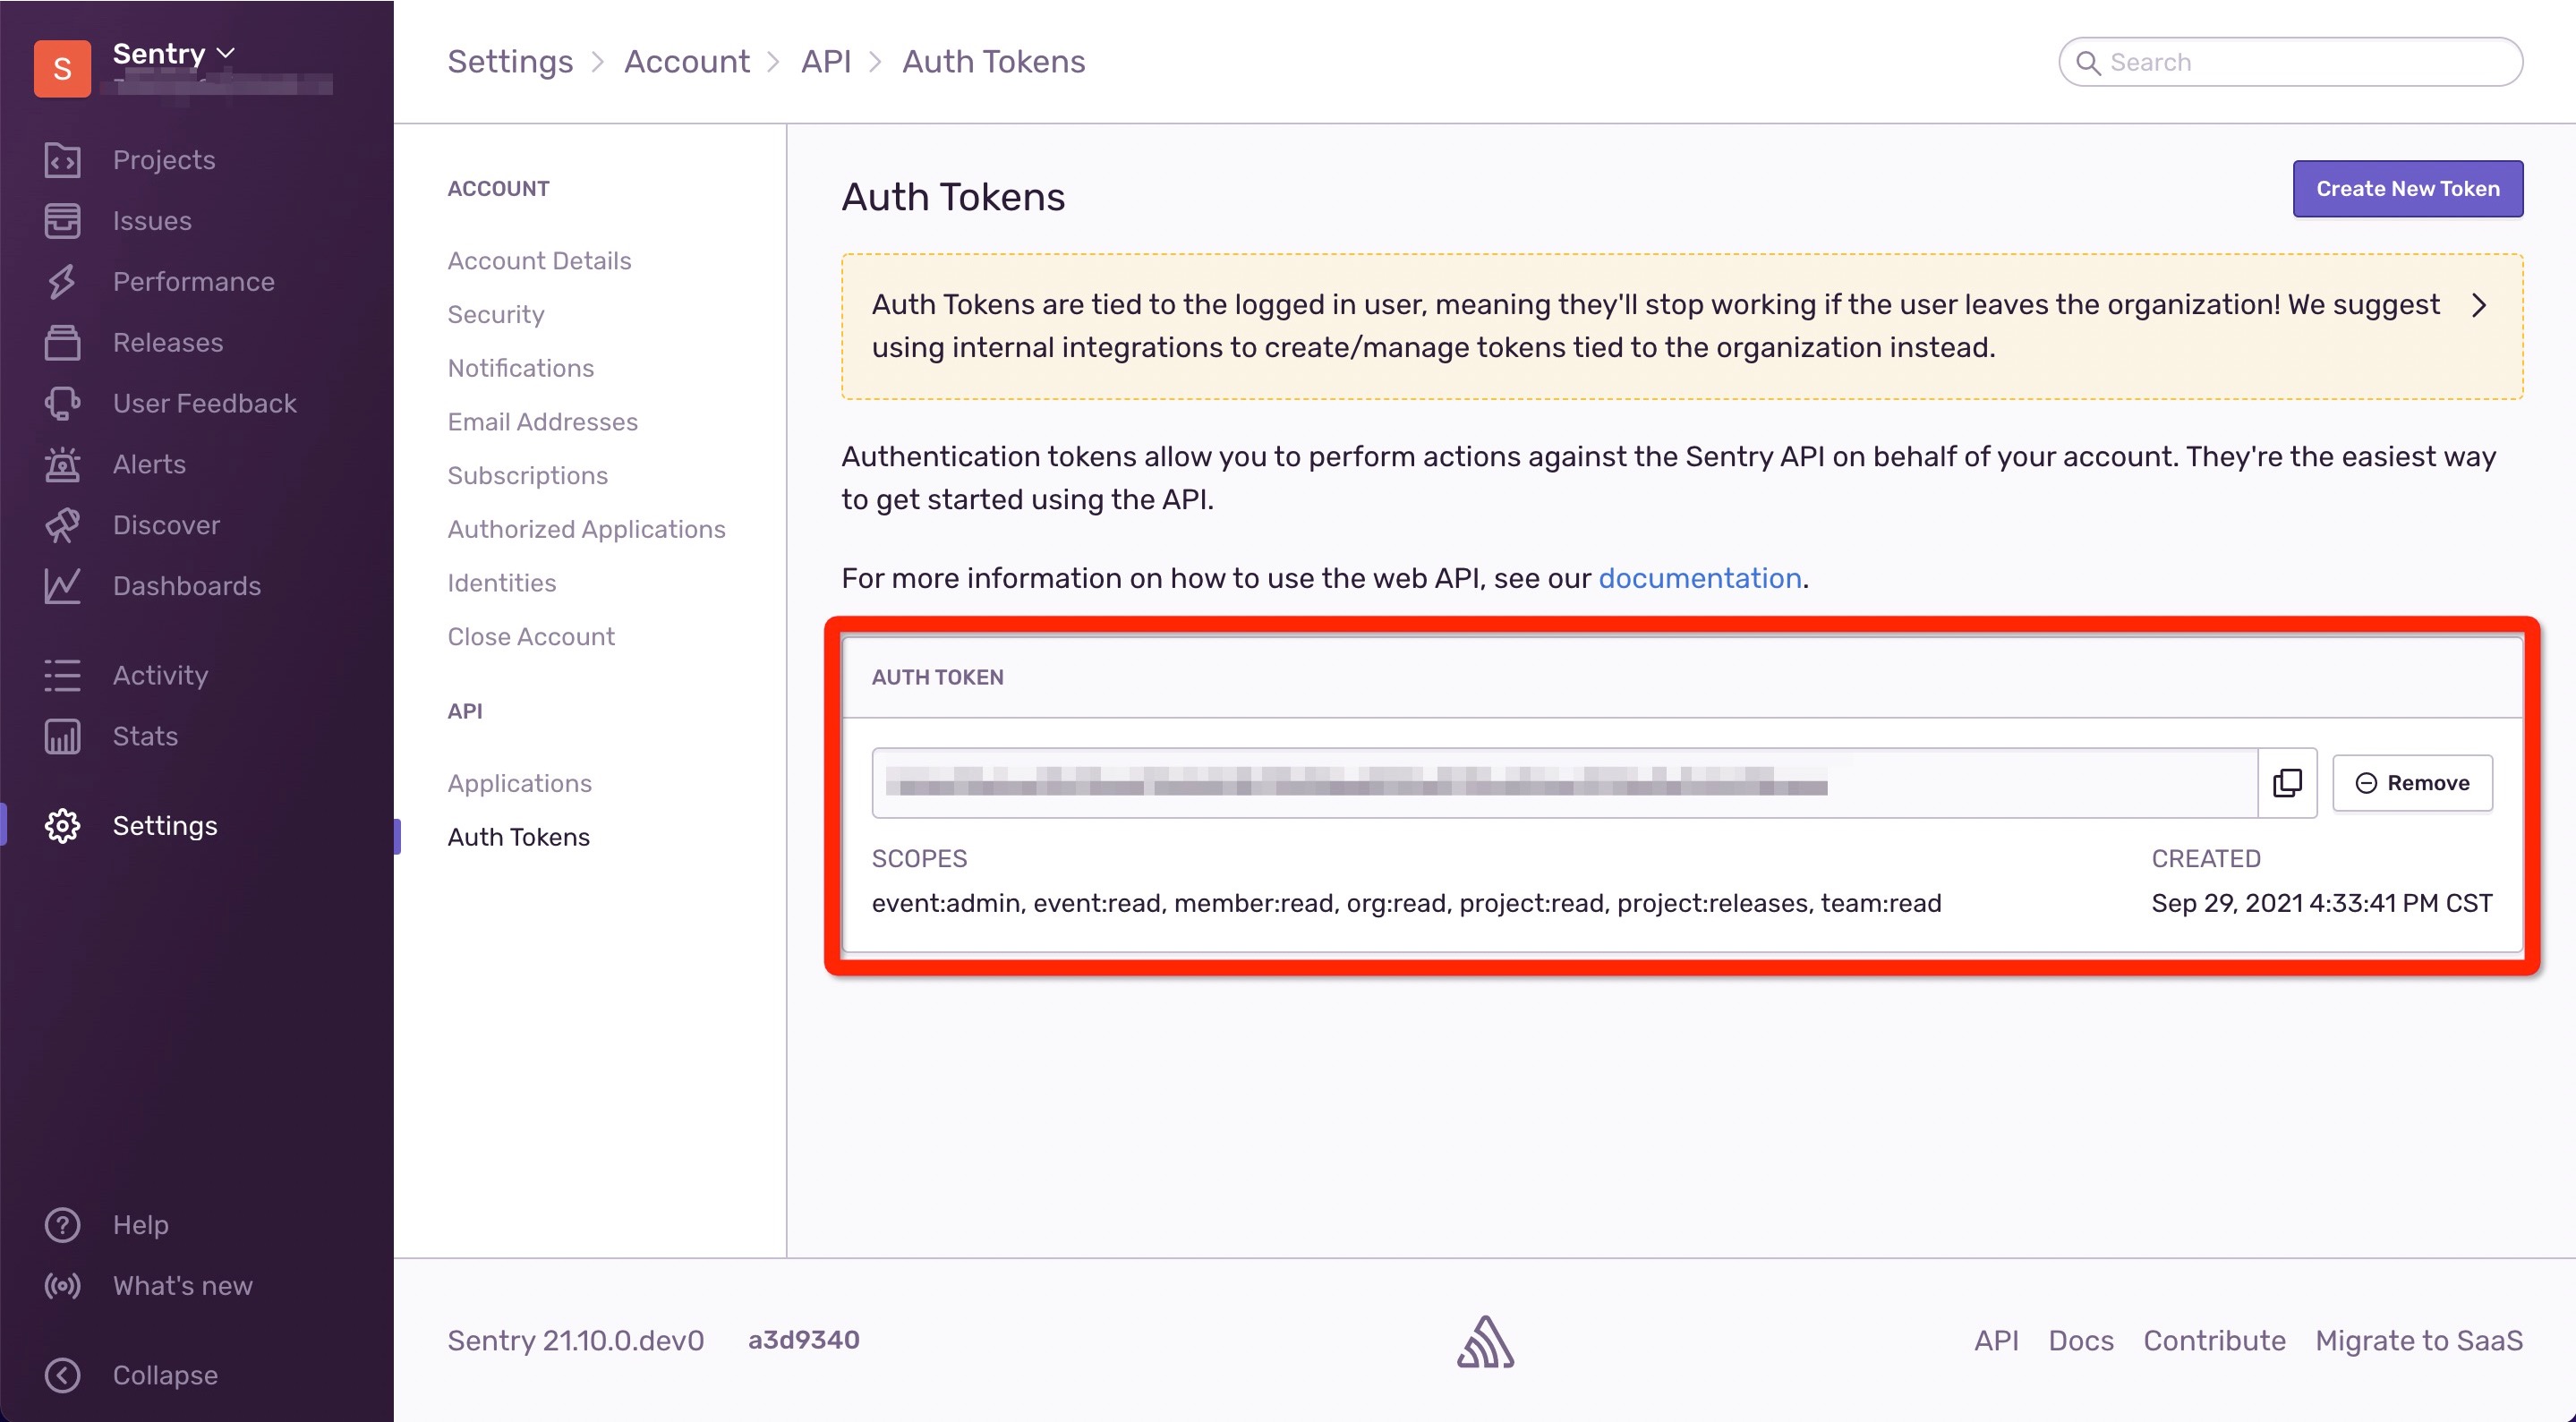
5.命令执行完成后,会生成文件 ~/.sentryclirc;
cat /Users/samy/.sentryclirc; 可以修改添加url, org, project;
[auth]
token=3e5e95abce3541bxxxxxxxxxxxxxxxxxxxx

[defaults]
#url=http://127.0.0.1:9000
url=https://sentry.io/
org=yessz
project=sentry-sdk-demo-react
2
3
4
5
6
7
8
- 这个文件也可以直接写在前端项目根目录中,
sentry-cli命令会优先读取当前目录下的.sentryclirc文件,如果没有这个文件,才会读取~/.sentryclirc
6.手动上传 sourcemap
编译前端项目,生成
build目录,其中包含sourcemap文件npm run build1在上传之前,我们先看下
sentry管理界面Settings -> sentry -> Projects -> sentry-sdk-demo-react -> Source Maps -> Archive,会发现列表中有一个0.0.1版本,这个版本是我们在前端项目里通过sentry.init的release配置的,只要前端上传过报错信息,就会在管理界面生成这个版本。目前列表中应该没有任何文件。上传命令,会把本地的
./build文件夹下的sourcemap文件,上传到sentry服务,并且指定上传到Archive为0.0.1版本中:sentry-cli releases files 0.0.1 upload-sourcemaps --url-prefix '~/' './build'1其中
--url-prefix是指sentry读取sourcemap文件服务的路径,如果项目没有部署在域名根目录,则需要调整这个参数【要点】# 执行结果 > Found 9 release files > Analyzing 9 sources > Analyzing completed in 0.051s > Rewriting sources > Rewriting completed in 0.027s > Adding source map references > Bundling files for upload... > Bundling completed in 0.059s > Optimizing completed in 0.002s > Uploading completed in 0.194s > Uploaded release files to Sentry > Processing completed in 0.1s > File upload complete (processing pending on server) Source Map Upload Report Minified Scripts ~/static/js/2.24e90ef4.chunk.js (sourcemap at 2.24e90ef4.chunk.js.map) ~/static/js/3.dcc4df3d.chunk.js (sourcemap at 3.dcc4df3d.chunk.js.map) ~/static/js/main.edf94630.chunk.js (sourcemap at main.edf94630.chunk.js.map) ~/static/js/runtime-main.d690483e.js (sourcemap at runtime-main.d690483e.js.map) Source Maps ~/static/css/main.6dea0f05.chunk.css.map ~/static/js/2.24e90ef4.chunk.js.map ~/static/js/3.dcc4df3d.chunk.js.map ~/static/js/main.edf94630.chunk.js.map ~/static/js/runtime-main.d690483e.js.map1
2
3
4
5
6
7
8
9
10
11
12
13
14
15
16
17
18
19
20
21
22
23
24
25
26
27回到
sentry管理界面Archive,可以看到sourcemap文件已经上传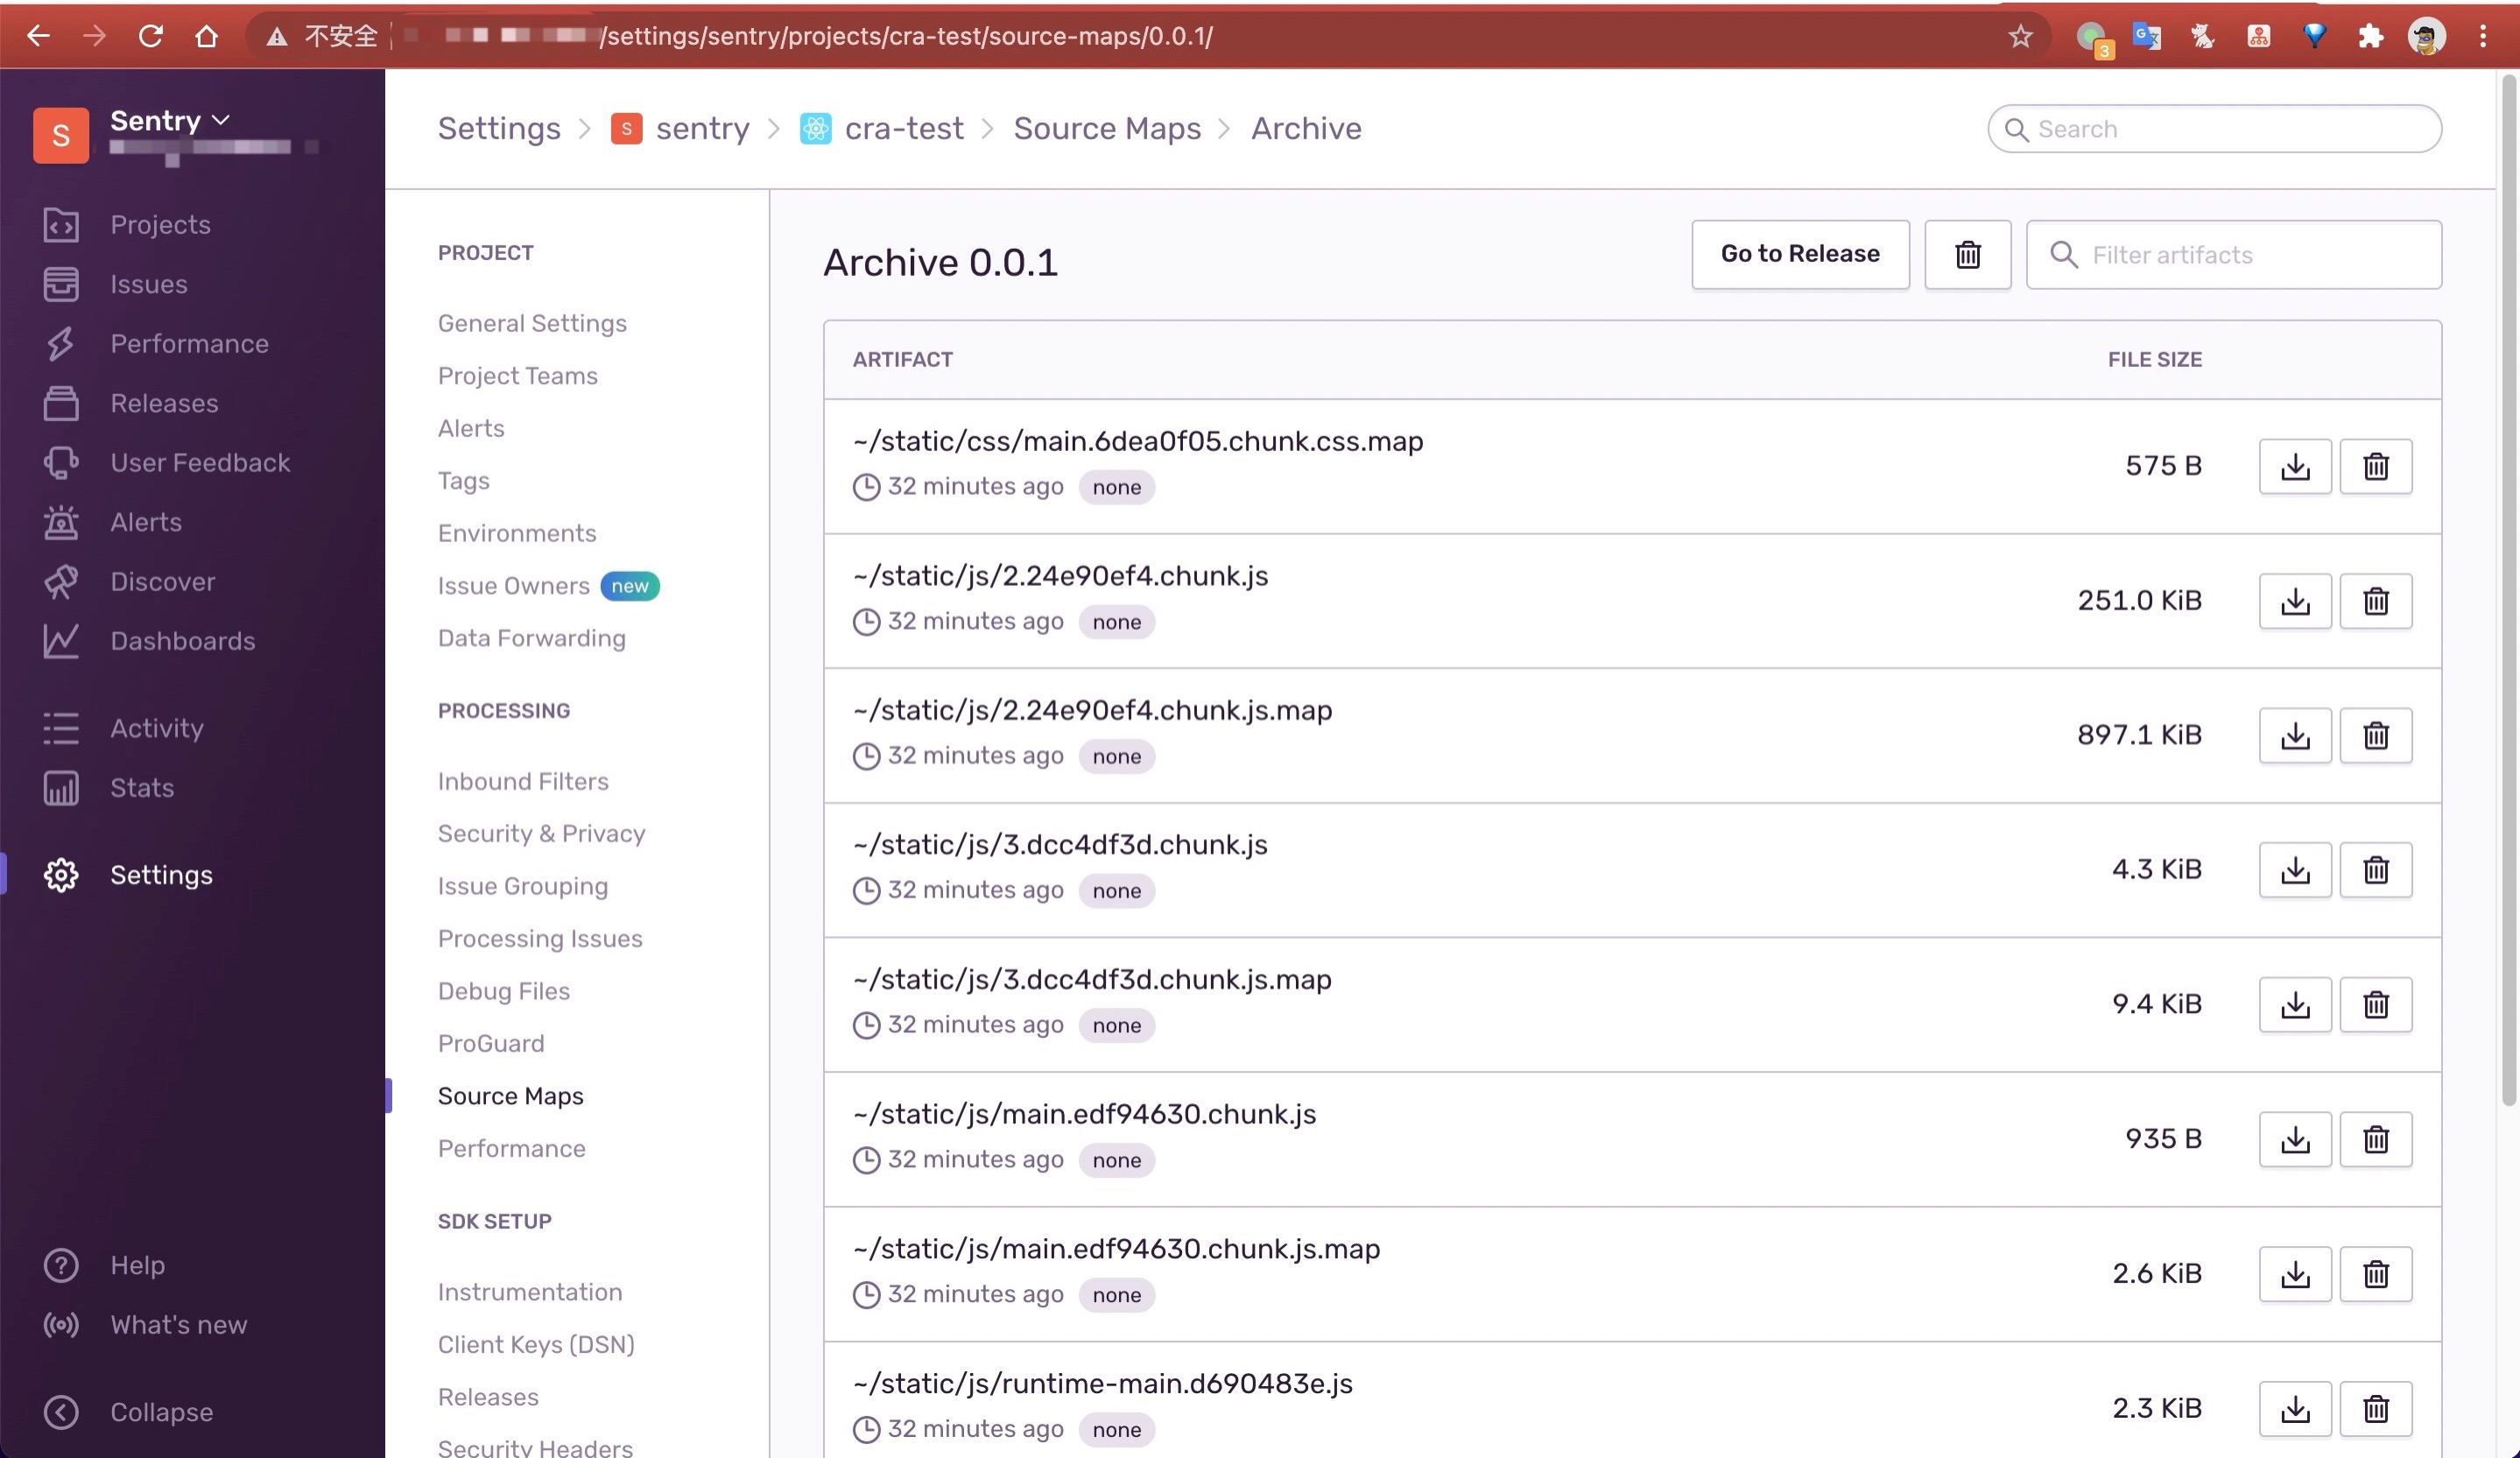
7.查看效果
通过
http-server启动前端服务; 【生产环境下本地调试】cd build && http-server #或者用serve库 The build folder is ready to be deployed. You may serve it with a static server: yarn global add serve serve -s build1
2
3
4
5
6
7
8点击按钮手动制造并上报错误
回到
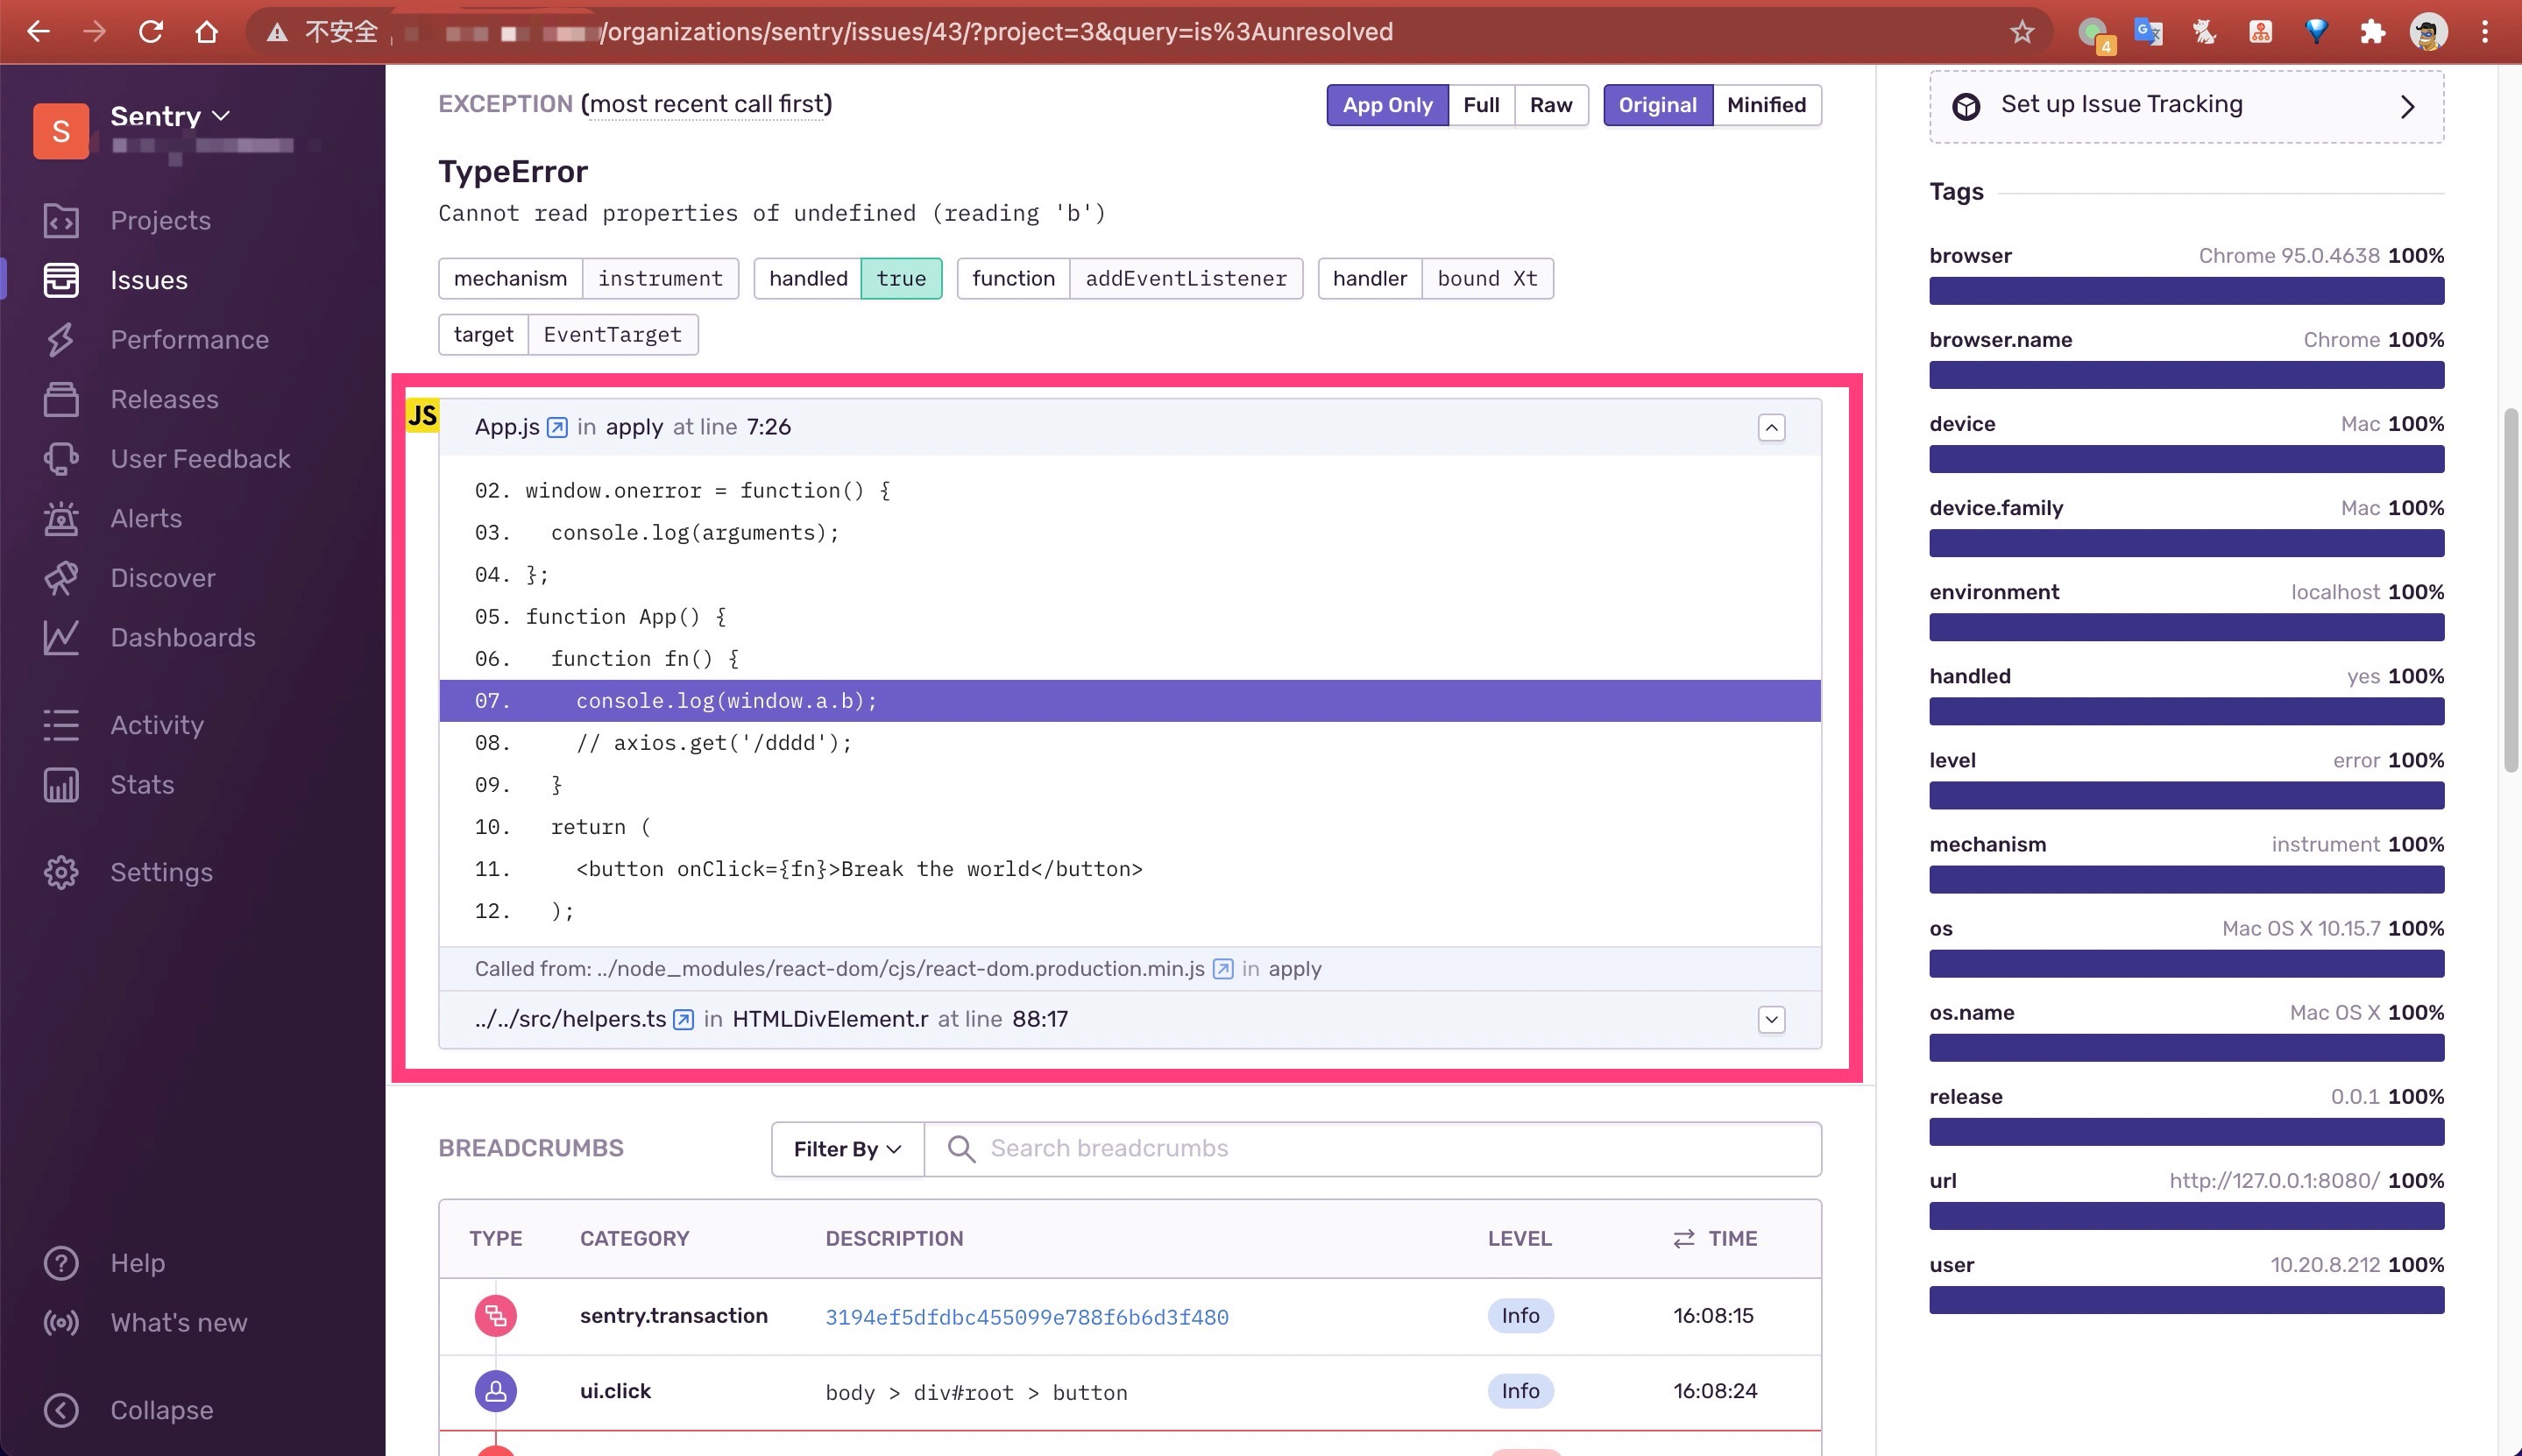
sentry管理界面,查看对应issue,可以看到具体信息:哪个文件发生了错误,错误的行列数,错误行附近的源代码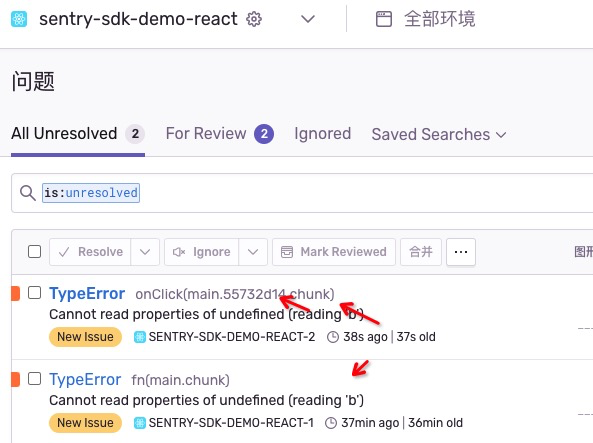
删除
sourcemapsentry-cli releases files 0.0.1 delete --all D ~/static/css/main.6dea0f05.chunk.css.map D ~/static/js/2.24e90ef4.chunk.js D ~/static/js/2.24e90ef4.chunk.js.map D ~/static/js/3.dcc4df3d.chunk.js D ~/static/js/3.dcc4df3d.chunk.js.map D ~/static/js/main.edf94630.chunk.js D ~/static/js/main.edf94630.chunk.js.map D ~/static/js/runtime-main.d690483e.js D ~/static/js/runtime-main.d690483e.js.map1
2
3
4
5
6
7
8
9
10
11
# webpack插件上传【推荐】
第二种方式会在 npm run build 时自动上传 sourcemap,推荐使用这种方式
1.安装 @sentry/webpack-plugin
@sentry/webpack-plugin官方文档 (opens new window)
npm i -D @sentry/webpack-plugin react-app-rewired
2.配置 webpack
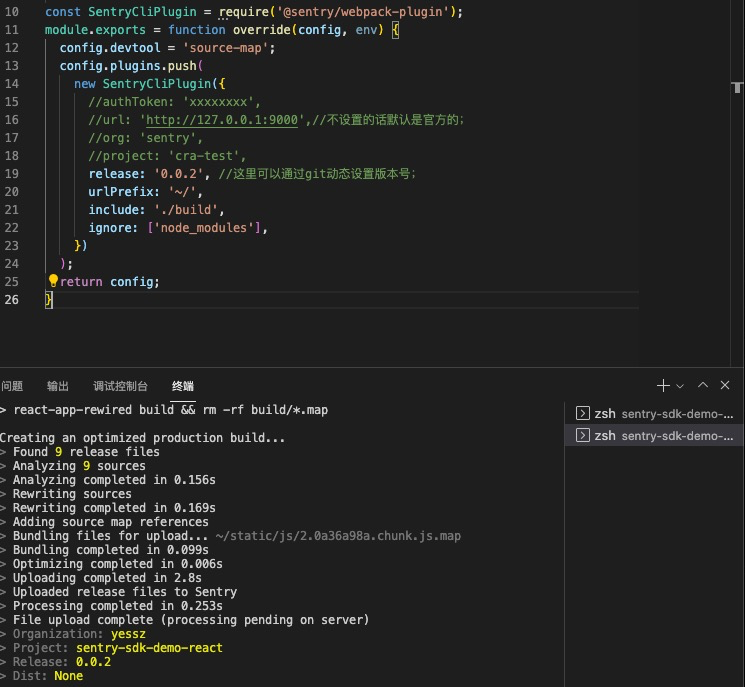
create-react-app修改webpack配置参考 (opens new window);config-overrides.js;const SentryCliPlugin = require('@sentry/webpack-plugin'); module.exports = function override(config, env) { config.devtool = 'source-map'; config.plugins.push( new SentryCliPlugin({ //authToken: 'xxxxxxxx', //url: 'http://127.0.0.1:9000',//不设置的话默认是官方的; //org: 'sentry', //project: 'cra-test', release: '0.0.1', //这里可以通过git动态设置版本号; urlPrefix: '~/', include: './build', ignore: ['node_modules'], }) ); return config; }1
2
3
4
5
6
7
8
9
10
11
12
13
14
15
16
17配置中的
release、urlPrefix、include,authToken、url、org、project、定义同.sentryclirc;如不设置的默认用当前本地的,再查询全局的;ignore: 上传时要忽略的文件夹或文件类型
3.npm run build 编译,会产生一下信息:
Creating an optimized production build...
> Found 9 release files
> Analyzing 9 sources
> Analyzing completed in 0.065s
> Rewriting sources
> Rewriting completed in 0.039s
> Adding source map references
> Bundling files for upload... ~/static/js/2.24e90ef4.chunk.js.map
> Bundling completed in 0.072s
> Optimizing completed in 0.001s
> Uploading completed in 0.146s
> Uploaded release files to Sentry
> Processing completed in 0.069s
> File upload complete (processing pending on server)
> Organization: sentry
> Project: cra-test
> Release: 0.0.1
> Dist: None

Source Map Upload Report
  Minified Scripts
    ~/static/js/2.24e90ef4.chunk.js (sourcemap at 2.24e90ef4.chunk.js.map)
    ~/static/js/3.dcc4df3d.chunk.js (sourcemap at 3.dcc4df3d.chunk.js.map)
    ~/static/js/main.edf94630.chunk.js (sourcemap at main.edf94630.chunk.js.map)
    ~/static/js/runtime-main.d690483e.js (sourcemap at runtime-main.d690483e.js.map)
  Source Maps
    ~/static/css/main.6dea0f05.chunk.css.map
    ~/static/js/2.24e90ef4.chunk.js.map
    ~/static/js/3.dcc4df3d.chunk.js.map
    ~/static/js/main.edf94630.chunk.js.map
    ~/static/js/runtime-main.d690483e.js.map
2
3
4
5
6
7
8
9
10
11
12
13
14
15
16
17
18
19
20
21
22
23
24
25
26
27
28
29
30
31
4.回到 sentry 管理界面 Archive,可以看到 sourcemap 文件已经上传到 sentry 服务中;
5.在上传完以后,需要删除 sourcemap 文件,不要把它们部署到线上去了; package.json
{
  "scripts": {
    "build": "react-app-rewired build && rm -rf build/*.map",
  },
}
2
3
4
5
# 常用实践
# 设置变量
在 Sentry 中,可以使用 set + tags,extra,contexts,user,level,fingerprint 形式,设置变量。下面将简单介绍几种方式,详情使用方法可见文档 (opens new window)。
# 通过 setUser 设置全局变量用户信息示例(不建议使用)
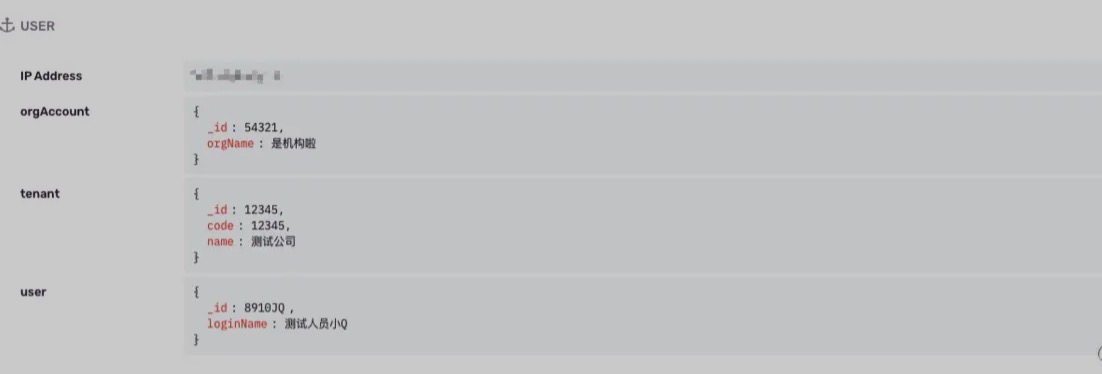
捕捉异常还需要采集用户信息,在用户登录后需要通过 setUser 设置一下用户信息全局变量,如下所示。**注意,通过这种方式设置的全局变量在页面刷新后会消失。**设置用户信息代码:
Sentry.setUser({
    tenant: {
        code: 12345,
        name: '测试公司',
        _id: 12345
    },
    orgAccount: {
        _id: 54321,
        orgName: '是机构啦'
    },
    user: {
        _id: '8910JQ',
        loginName: '测试人员小Q'
    }
})
2
3
4
5
6
7
8
9
10
11
12
13
14
15
设置全局变量后触发的 issue 中,可看到上传的用户数据。
# 通过 beforeSnd 插入用户信息
通过 Sentry 机制设置的全局变量在页面刷新后会消失,这边我建议通过 beforeSend 函数,修改 event 中的数据来插入需要的全局变量。
Sentry.init({
    ...,
 	  // 钩子函数,在每次发送 event 前触发
    beforeSend(event) {
        // 在这里可根据业务情况发送用户信息
        event.user = {
            userNick: 'xiaohu'
        };
        return event;
    }
});
2
3
4
5
6
7
8
9
10
11
# 设置全局变量
// 以下是 Sentry 定义的全局变量,可以直接使用 Sentry api 设置
Sentry.setUser(object);
Sentry.tags(object);
Sentry.extra(object);
Sentry.level(object);
Sentry.fingerprint(object);

// 通过 setContext,设置 key 值,可自定义随事件传递的变量名
Sentry.setContext(key, context);
2
3
4
5
6
7
8
9
# 设置局部变量
captureException 是我常用的一种设置局部变量并上传报错的方式,Sentry.captureException(err[, obj]) 第一个参数为抛出的异常,第二个参数可附加错误信息。 第二个参数为对象,key 值可为 tags,extra,contexts,user,level,fingerprint 这 6 种。
Sentry.captureException(error, {
  contexts: {
    message: {
      a: 1,
      b: { b: 1 },
    },
  },
});
2
3
4
5
6
7
8
# 设置局部变量网络报错信息示例
根据目前前端框架所用的 axios,对网络请求出错的局部数据进行收集,代码示例:
Sentry.captureException(error, {
  contexts: {
    message: {
      url: error.response.config.baseURL + error.response.config.url,
      data: error.response.config.data,
      method: error.response.config.method,
      status: error.response.status,
      statusText: error.response.statusText,
      responseData: JSON.stringify(error.response.data),
    },
  },
});
2
3
4
5
6
7
8
9
10
11
12
# 清除全局变量
在用户退出登录后需要清除该用户的用户信息,有以下两种方式。
- 通过设置为空,可以清除设置过的数据。
Sentry.setUser();
- 通过
scope.clear()清除全局变量。
Sentry.configureScope((scope) => scope.clear()); // 清除所有全局变量
Sentry.configureScope((scope) => scope.setUser(null)); // 清除 user 变量
2
# 添加钉钉通知
参考之前文章【02.sentry集成钉钉】
# 实践详细分析
# 面包屑 Breadcrumbs
在错误详情页中,有 Breadcrumbs 信息,它非常有用,可以追踪错误发生之前的一些事件,例如点击、页面导航等。
Breadcrumbs是一连串的事件跟踪,展示了发生问题之前的一系列操作。这些事件与传统日志非常相似,但可以记录更丰富的结构化数据。Breadcrumbs 官方文档 (opens new window)我们在
Sentry管理界面,点击开之前的一个issue详情,可以看到Breadcrumbs相关信息: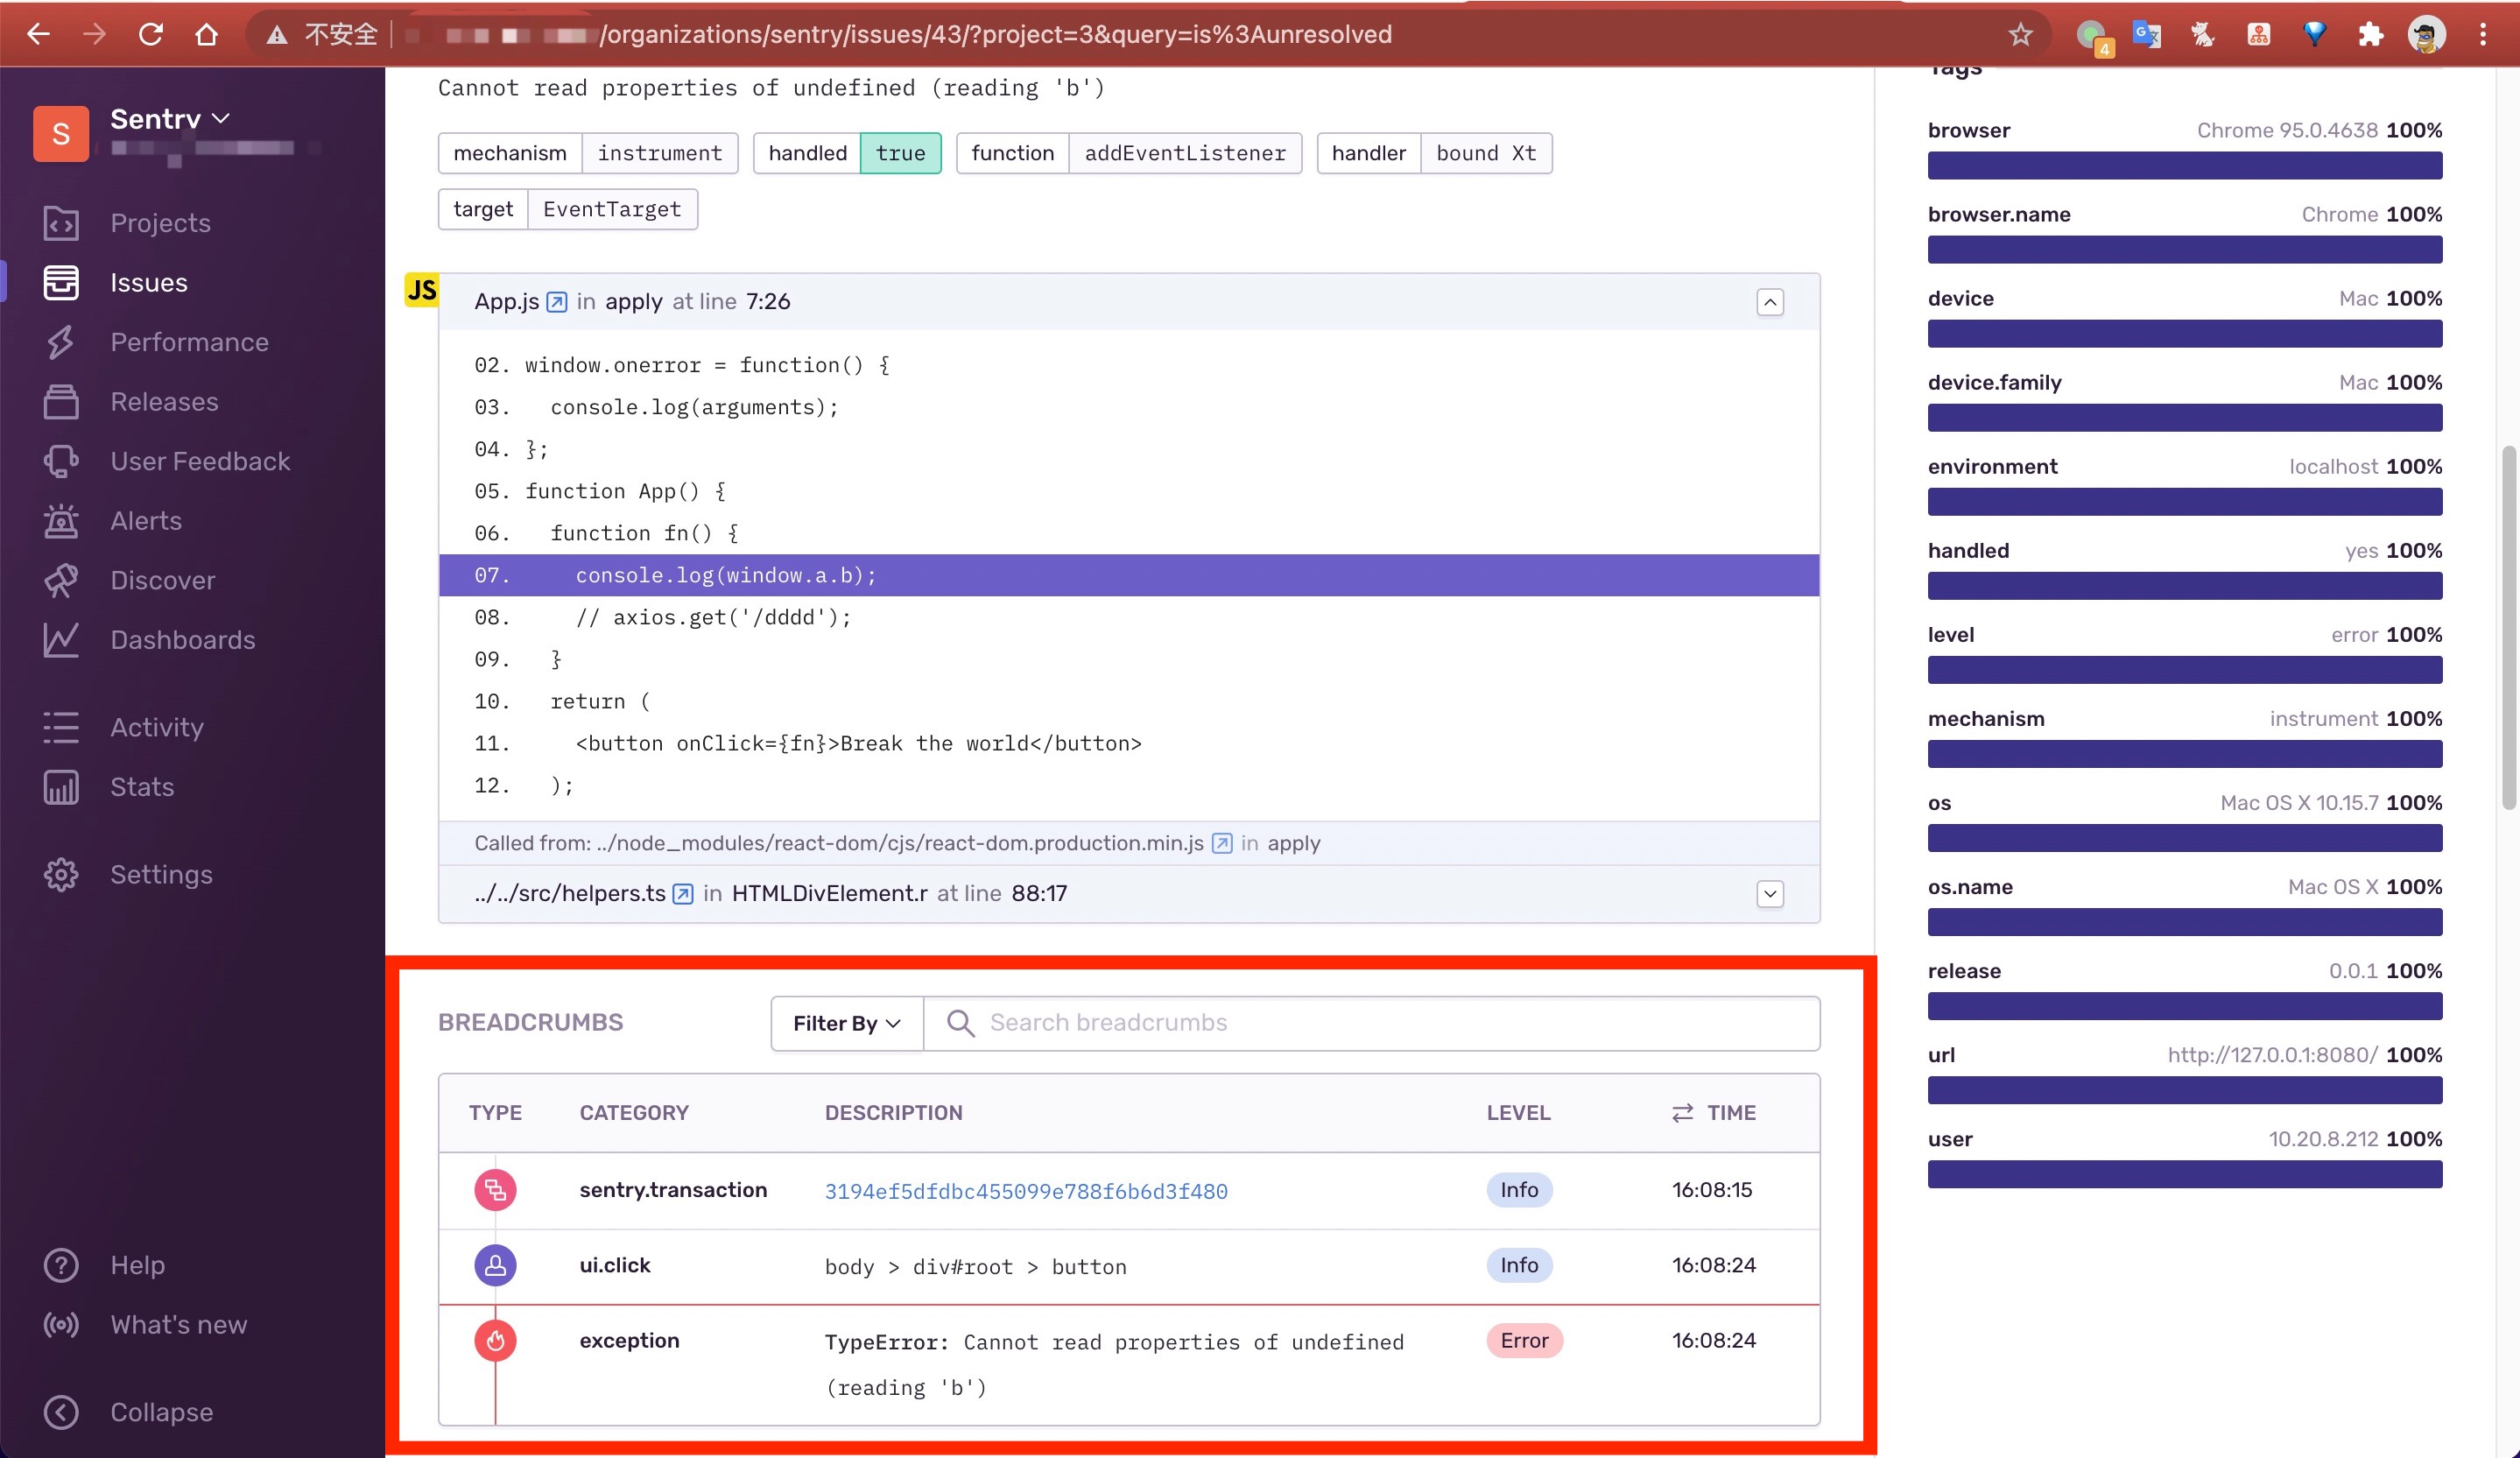
最后一行记录了发生的错误,而在此之前的前面两行记录了在这个错误发生之前的一些操作:先发生了一次页面加载的事务,接着在点击了
body > div#root > button的UI。面包屑可以通过两种方式生成:
- 自动生成: 通过
SDK及其相关的集成将自动记录多种类型的面包屑。例如,浏览器JavaScript SDK将自动记录DOM元素上的点击和按键、XHR请求、控制台API调用以及所有导航变更。 - 手动生成: 官方文档 (opens new window)
Sentry.addBreadcrumb({
  category: "auth",
  message: "Authenticated user " + user.email,
  level: Sentry.Severity.Info,
});
1
2
3
4
5- 自动生成: 通过
# Traces, Transactions 和 Spans
上面
Breadcrumbs中第一行,被称为Transaction,我们先点击开这个连接,进入这个Transaction详情页;可以看到原来这是一个页面加载的过程的记录;
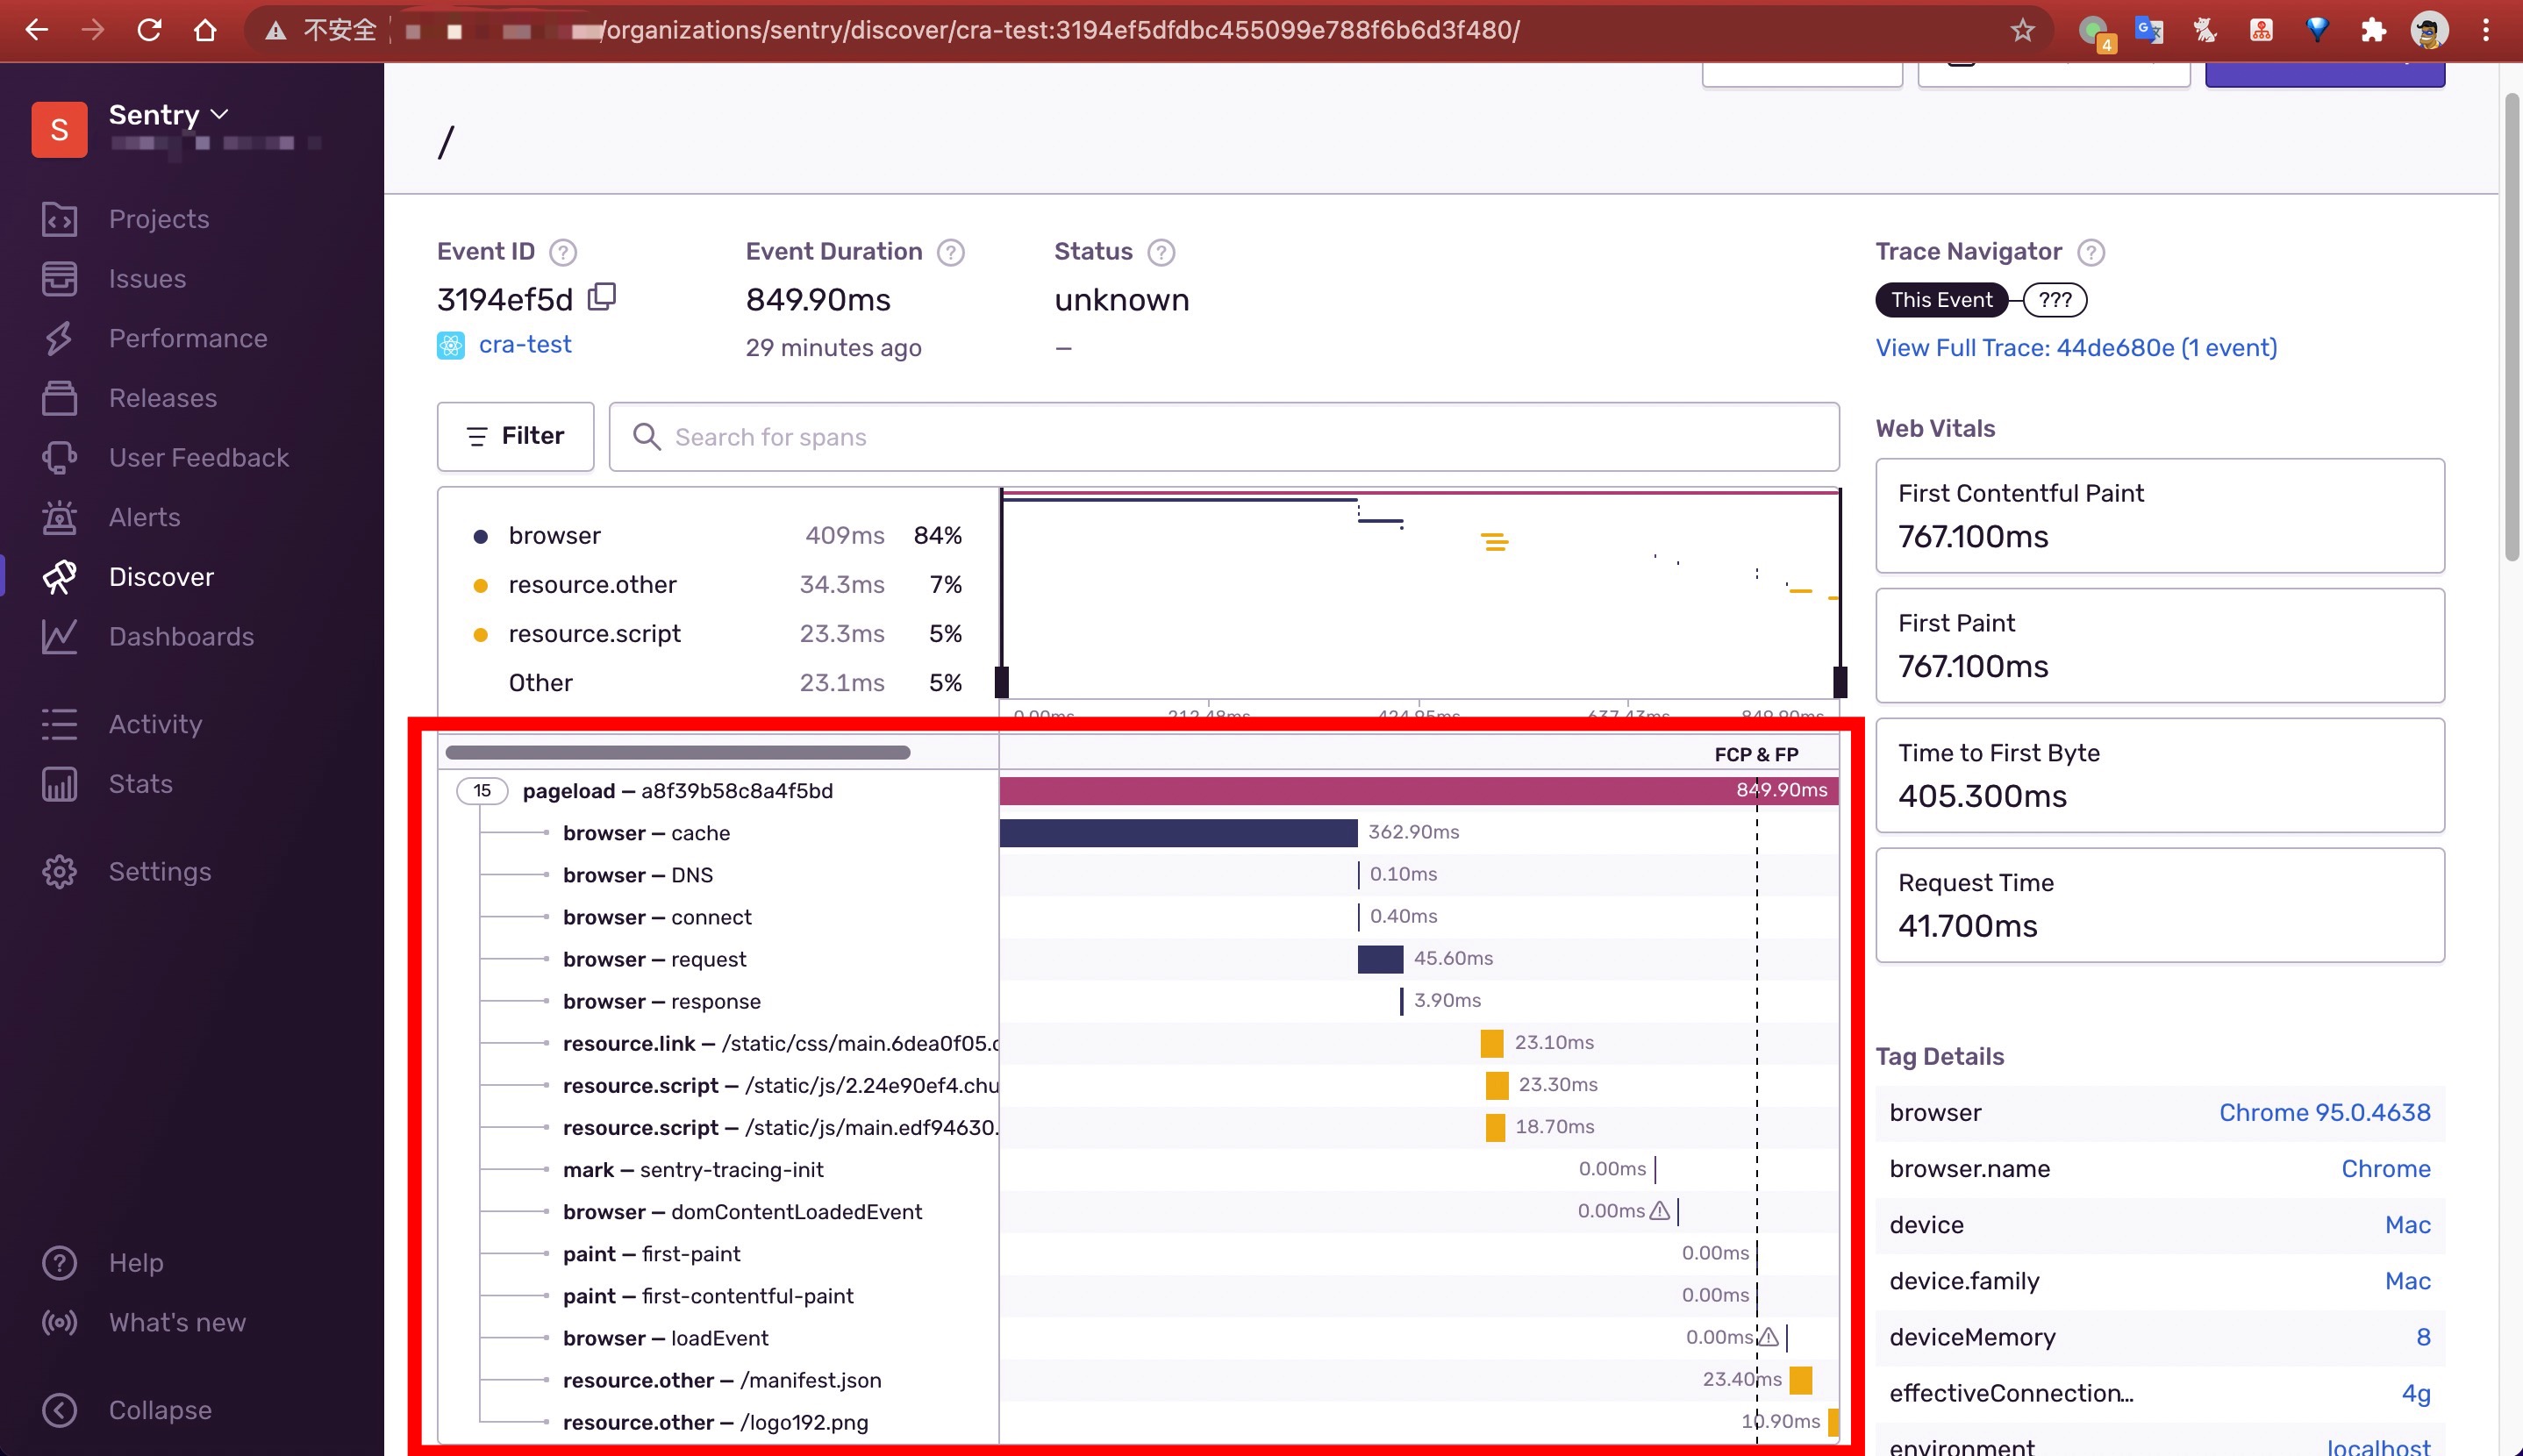
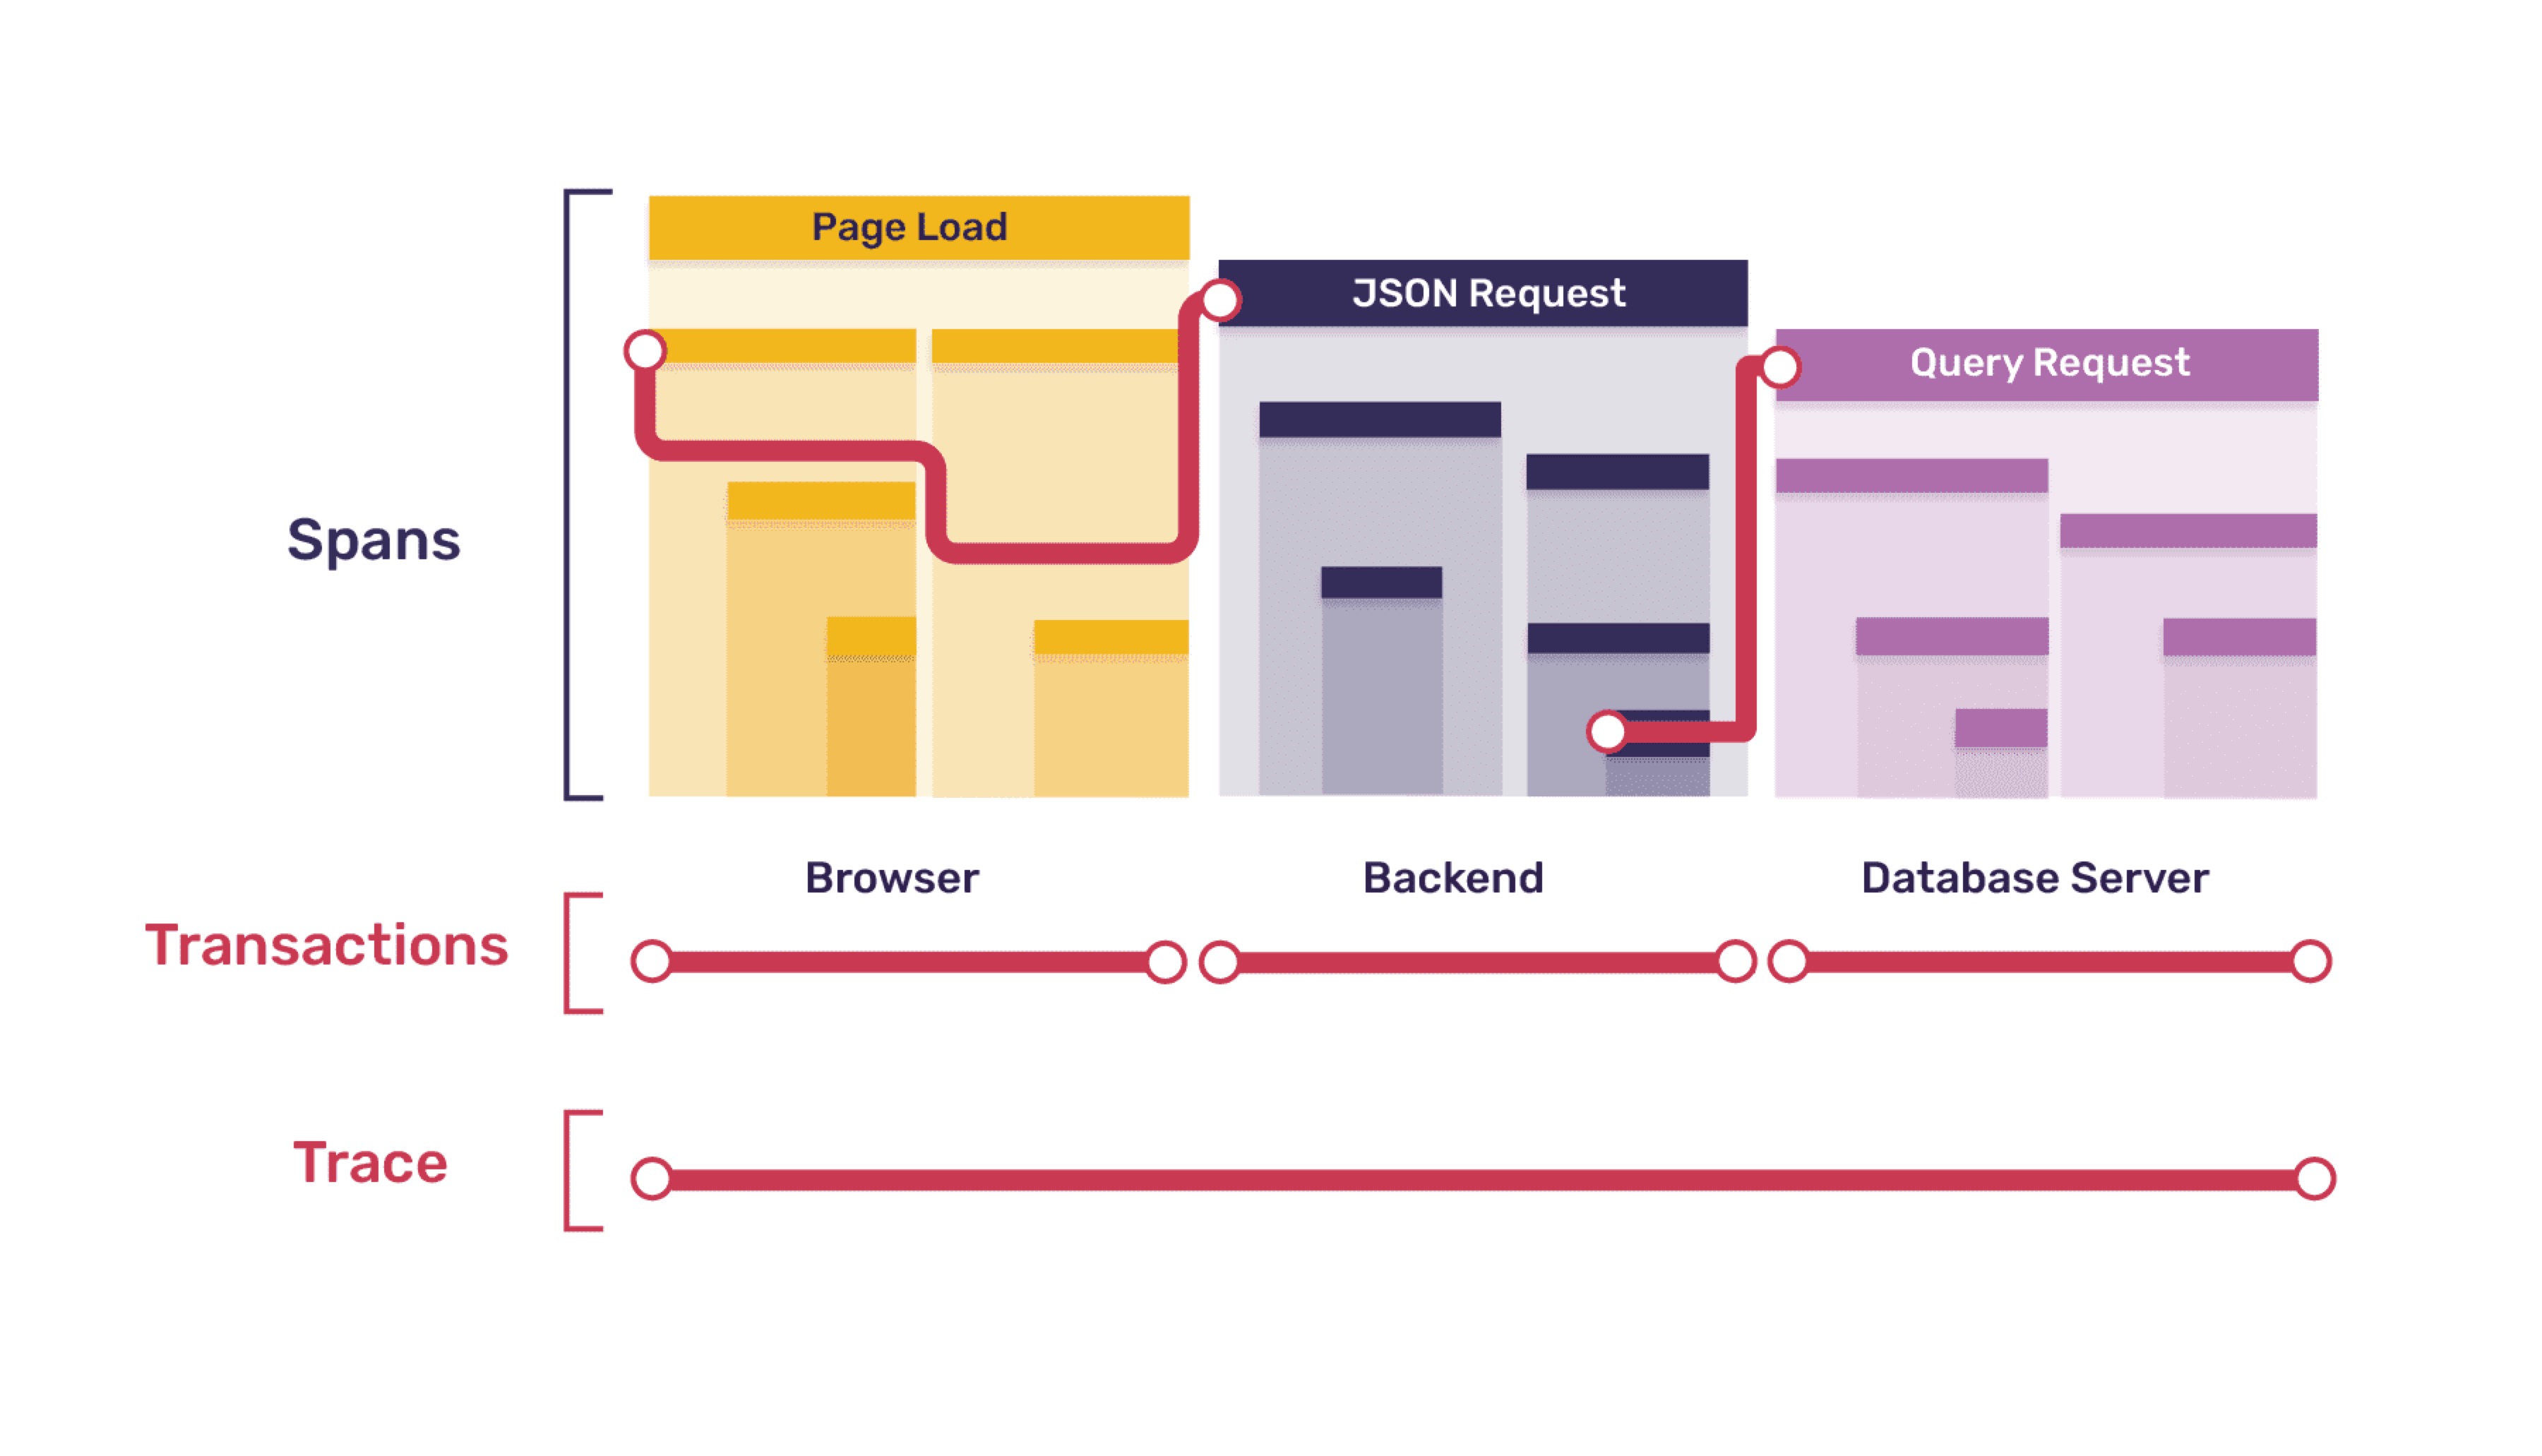
这个页面加载的整个过程,被称为一个
Transaction这个
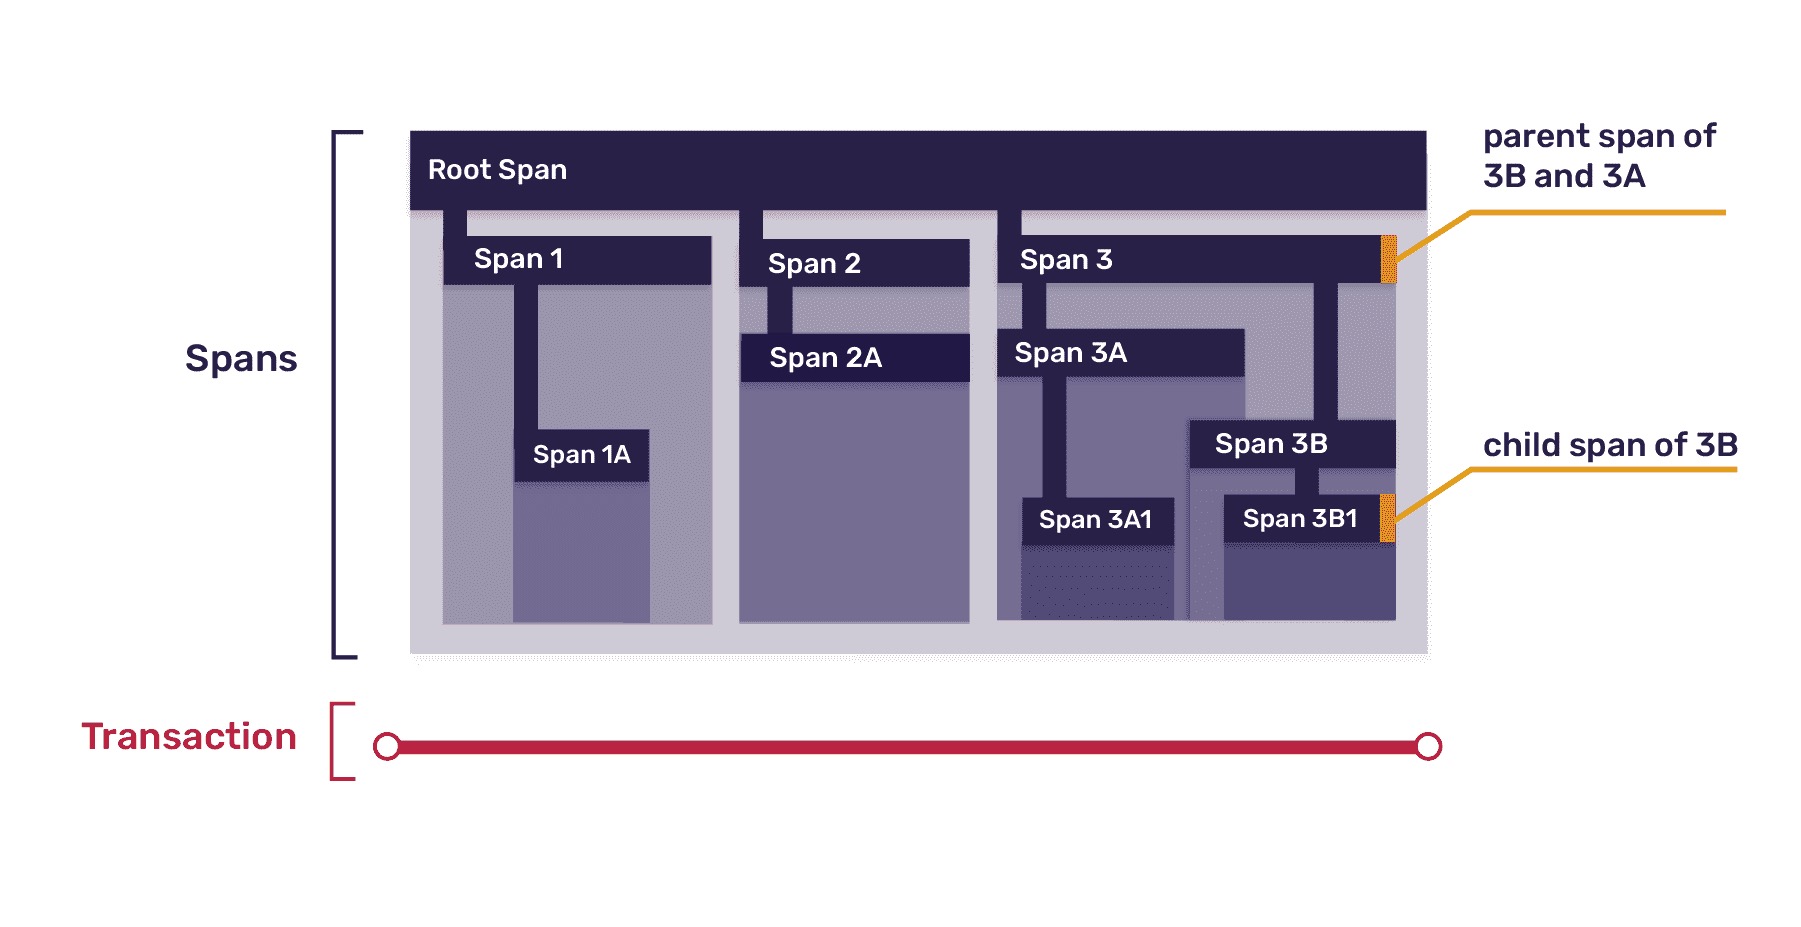
Transaction是一个树状结构,根节点是pageload,表示页面加载,根节点下有浏览器的缓存读取、DNS解析、请求、响应、卸载事件、dom内容加载事件等过程,还有各种资源加载过程点击开任意一个节点,可以看到:
- 每个节点都有一个
id:Span ID Trace ID: 追踪Id- 这个节点过程花费的时间等信息
- 每个节点都有一个
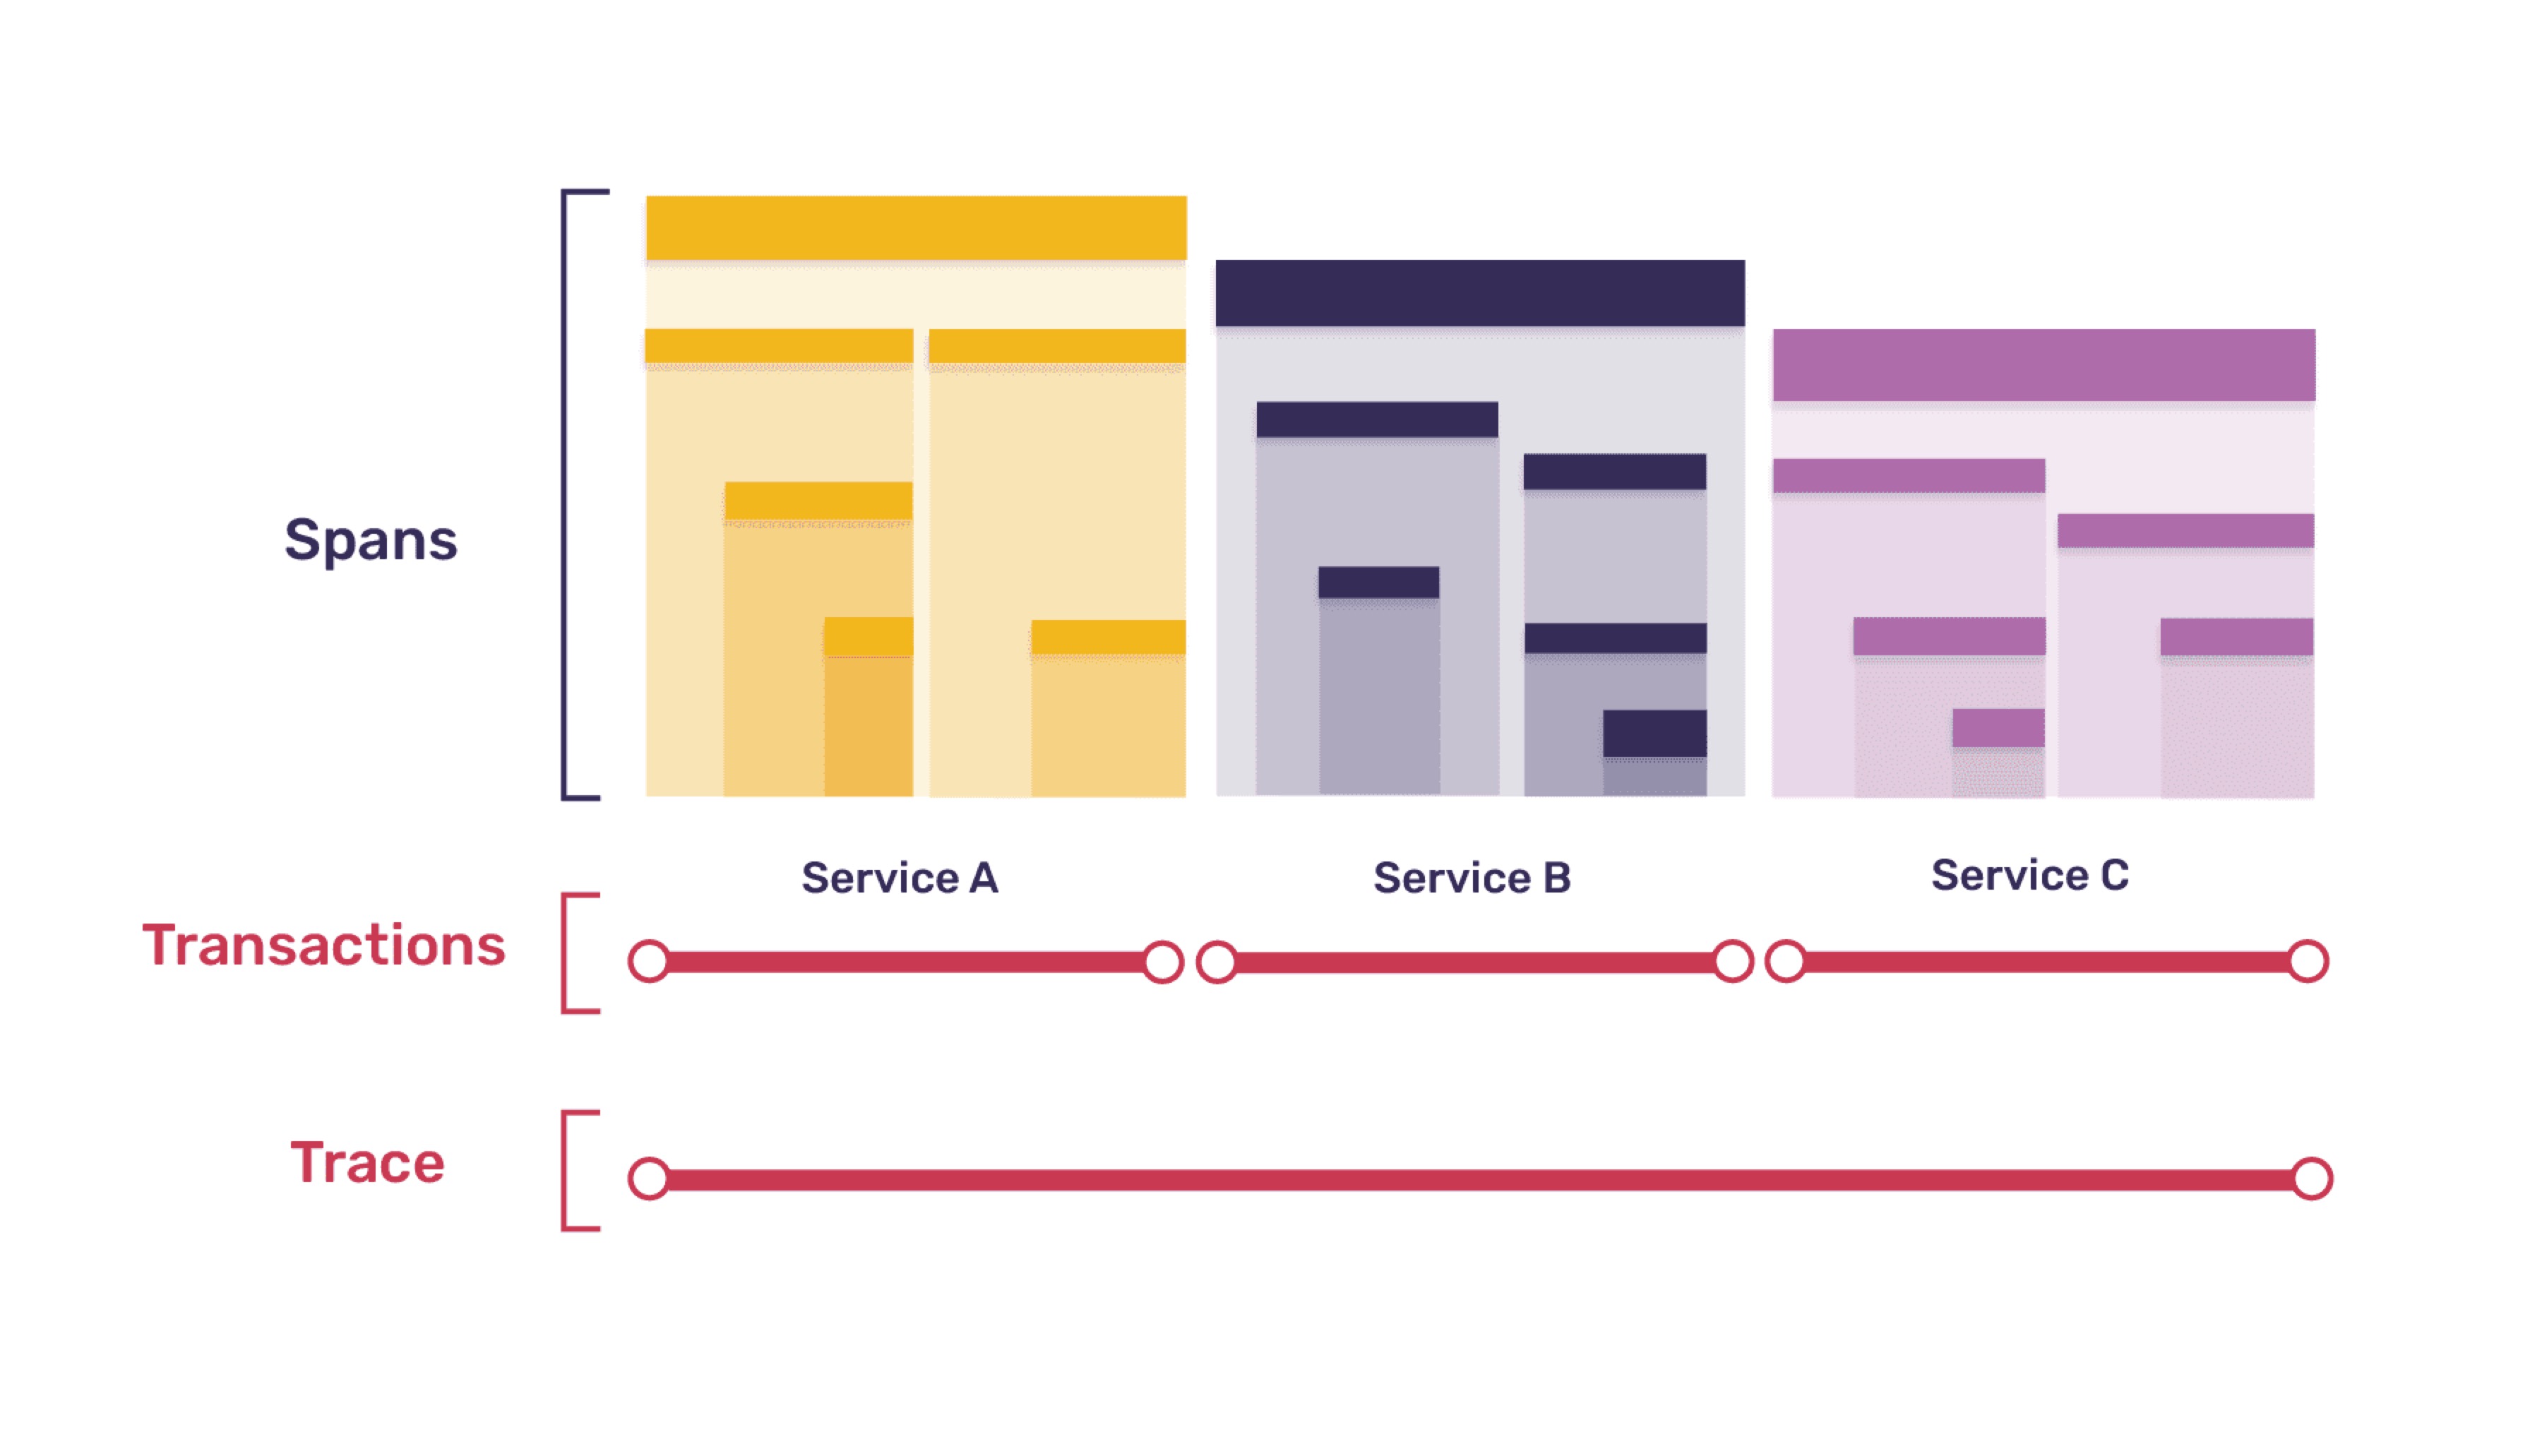
Sentry把这些树状结构的节点称为Span,他们归属于某一个Transaction一般来讲,页面加载是一个
Transaction,后端API接口逻辑是一个Transaction,操作数据库逻辑是一个Transaction,它们共同组成了一个Trace;
# 页面加载及Performance
# 性能指标说明
在上面的分析中,我们看到了一个页面加载(指刷新页面,不是单页面应用的路由变化)的
Transaction,如果我们在SDK的Sentry.init()中,将new Integrations.BrowserTracing()去掉,那么Breadcrumbs不会显示pageload信息:
所以
SDK的BrowserTracing功能,就是用来将浏览器页面加载/导航操作检测为事务,并捕获请求、指标和错误作为跨度。在页面加载的
Transaction中,我们可以看到页面加过程中不同阶段的所花费的时间,例如FCP、FP、LCP、FID等重要的性能指标信息同一个
url下会收集每一次上报的页面加载Transaction在
Sentry管理界面 -> Performance菜单页中,可以查看每个url下收集的综合性能指标信息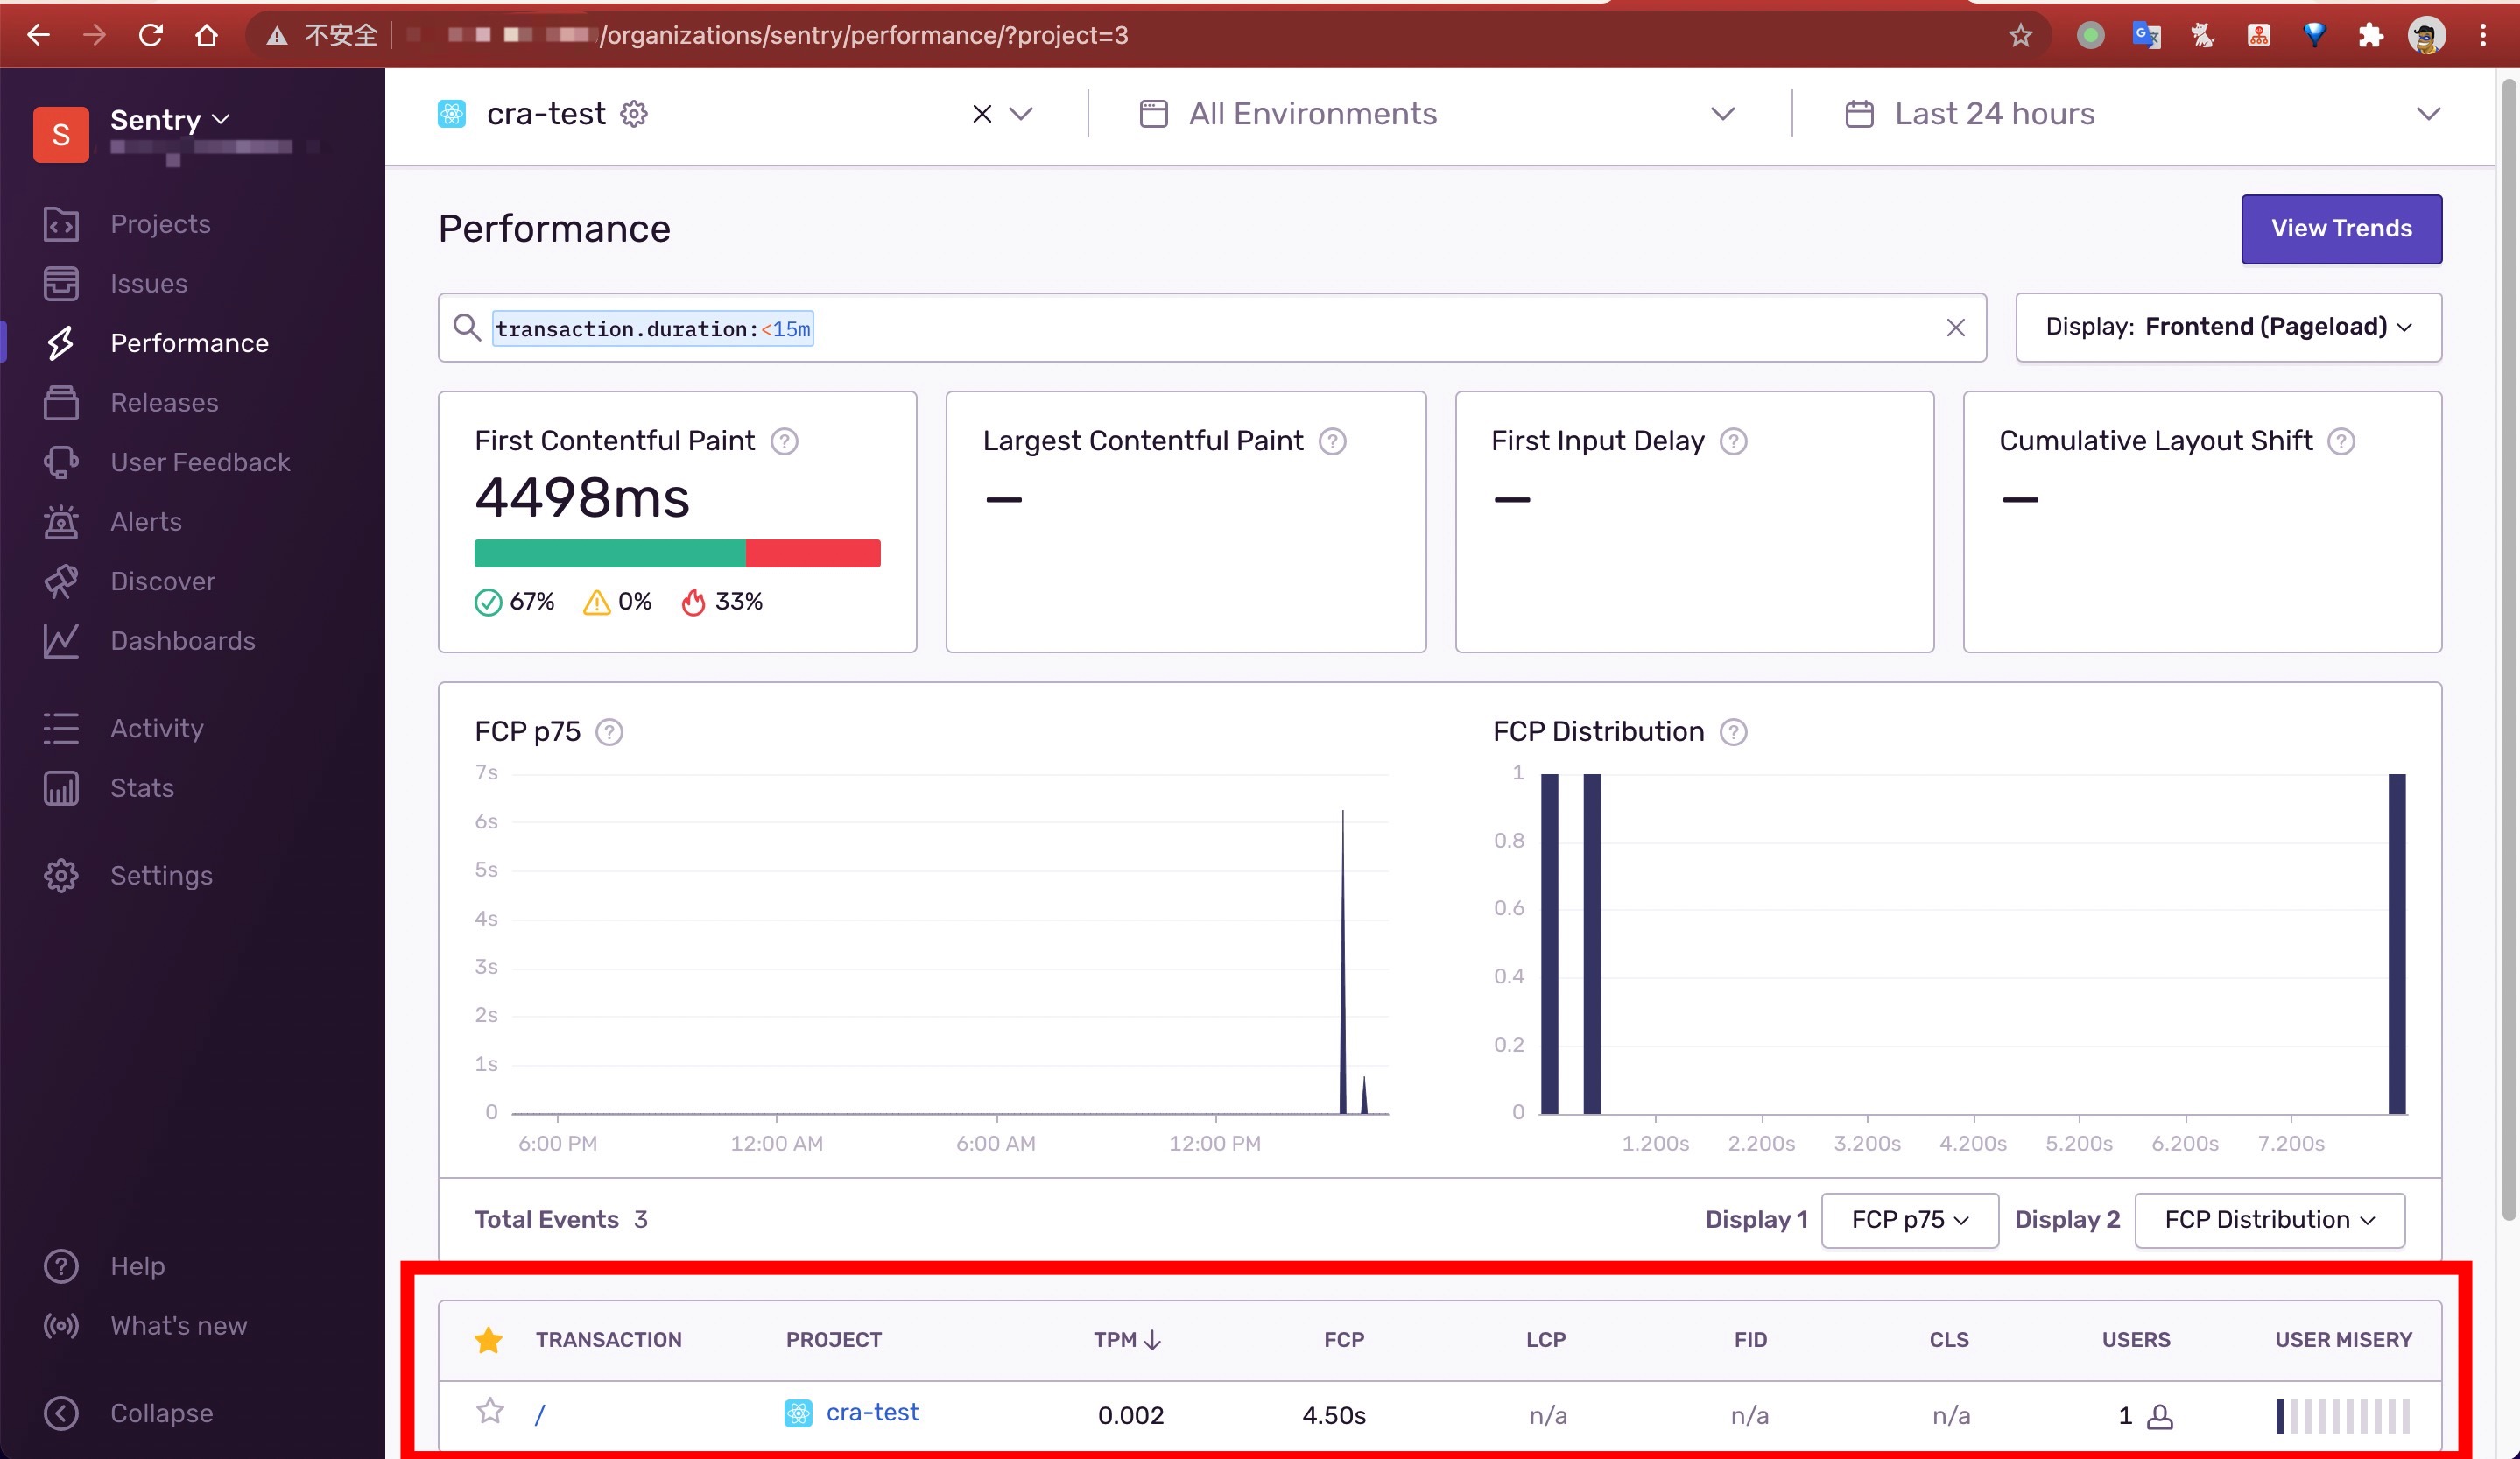
TPM: 平均每分钟事务数FCP: (First Contentful Paint) 首次内容绘制,标记浏览器渲染来自 DOM 第一位内容的时间点,该内容可能是文本、图像、SVG 甚至 元素.LCP: (Largest Contentful Paint) 最大内容渲染,代表在viewport中最大的页面元素加载的时间. LCP的数据会通过PerformanceEntry对象记录, 每次出现更大的内容渲染, 则会产生一个新的PerformanceEntry对象FID: (First Input Delay) 首次输入延迟,指标衡量的是从用户首次与您的网站进行交互(即当他们单击链接,点击按钮等)到浏览器实际能够访问之间的时间CLS: (Cumulative Layout Shift) 累积布局偏移,总结起来就是一个元素初始时和其hidden之间的任何时间如果元素偏移了, 则会被计算进去, 具体的计算方法可看这篇文章 https://web.dev/cls/FP: First Paint (FP) 首次绘制,测量第一个像素出现在视口中所花费的时间,呈现与先前显示内容相比的任何视觉变化。这可以是来自文档对象模型 (DOM) 的任何形式,例如 background color 、canvas 或 image。FP 可帮助开发人员了解渲染页面是否发生了任何意外。TTFB: Time To First Byte (TTFB) 首字节时间,测量用户浏览器接收页面内容的第一个字节所需的时间。TTFB 帮助开发人员了解他们的缓慢是由初始响应(initial response)引起的还是由于渲染阻塞内容(render-blocking content)引起的USERS: UV数USER MISERY: 对响应时间难以容忍度的用户数,User Misery是一个用户加权的性能指标,用于评估应用程序性能的相对大小。虽然可以使用Apdex检查各种响应时间阈值级别的比率,但 User Misery 会根据满意响应时间阈值 (ms) 的四倍计算感到失望的唯一用户数。User Misery 突出显示对用户影响最大的事务。可以使用自定义阈值为每个项目设置令人满意的阈值。阈值设置在Settings -> sentry -> cra-test -> Performance
# 面板细说
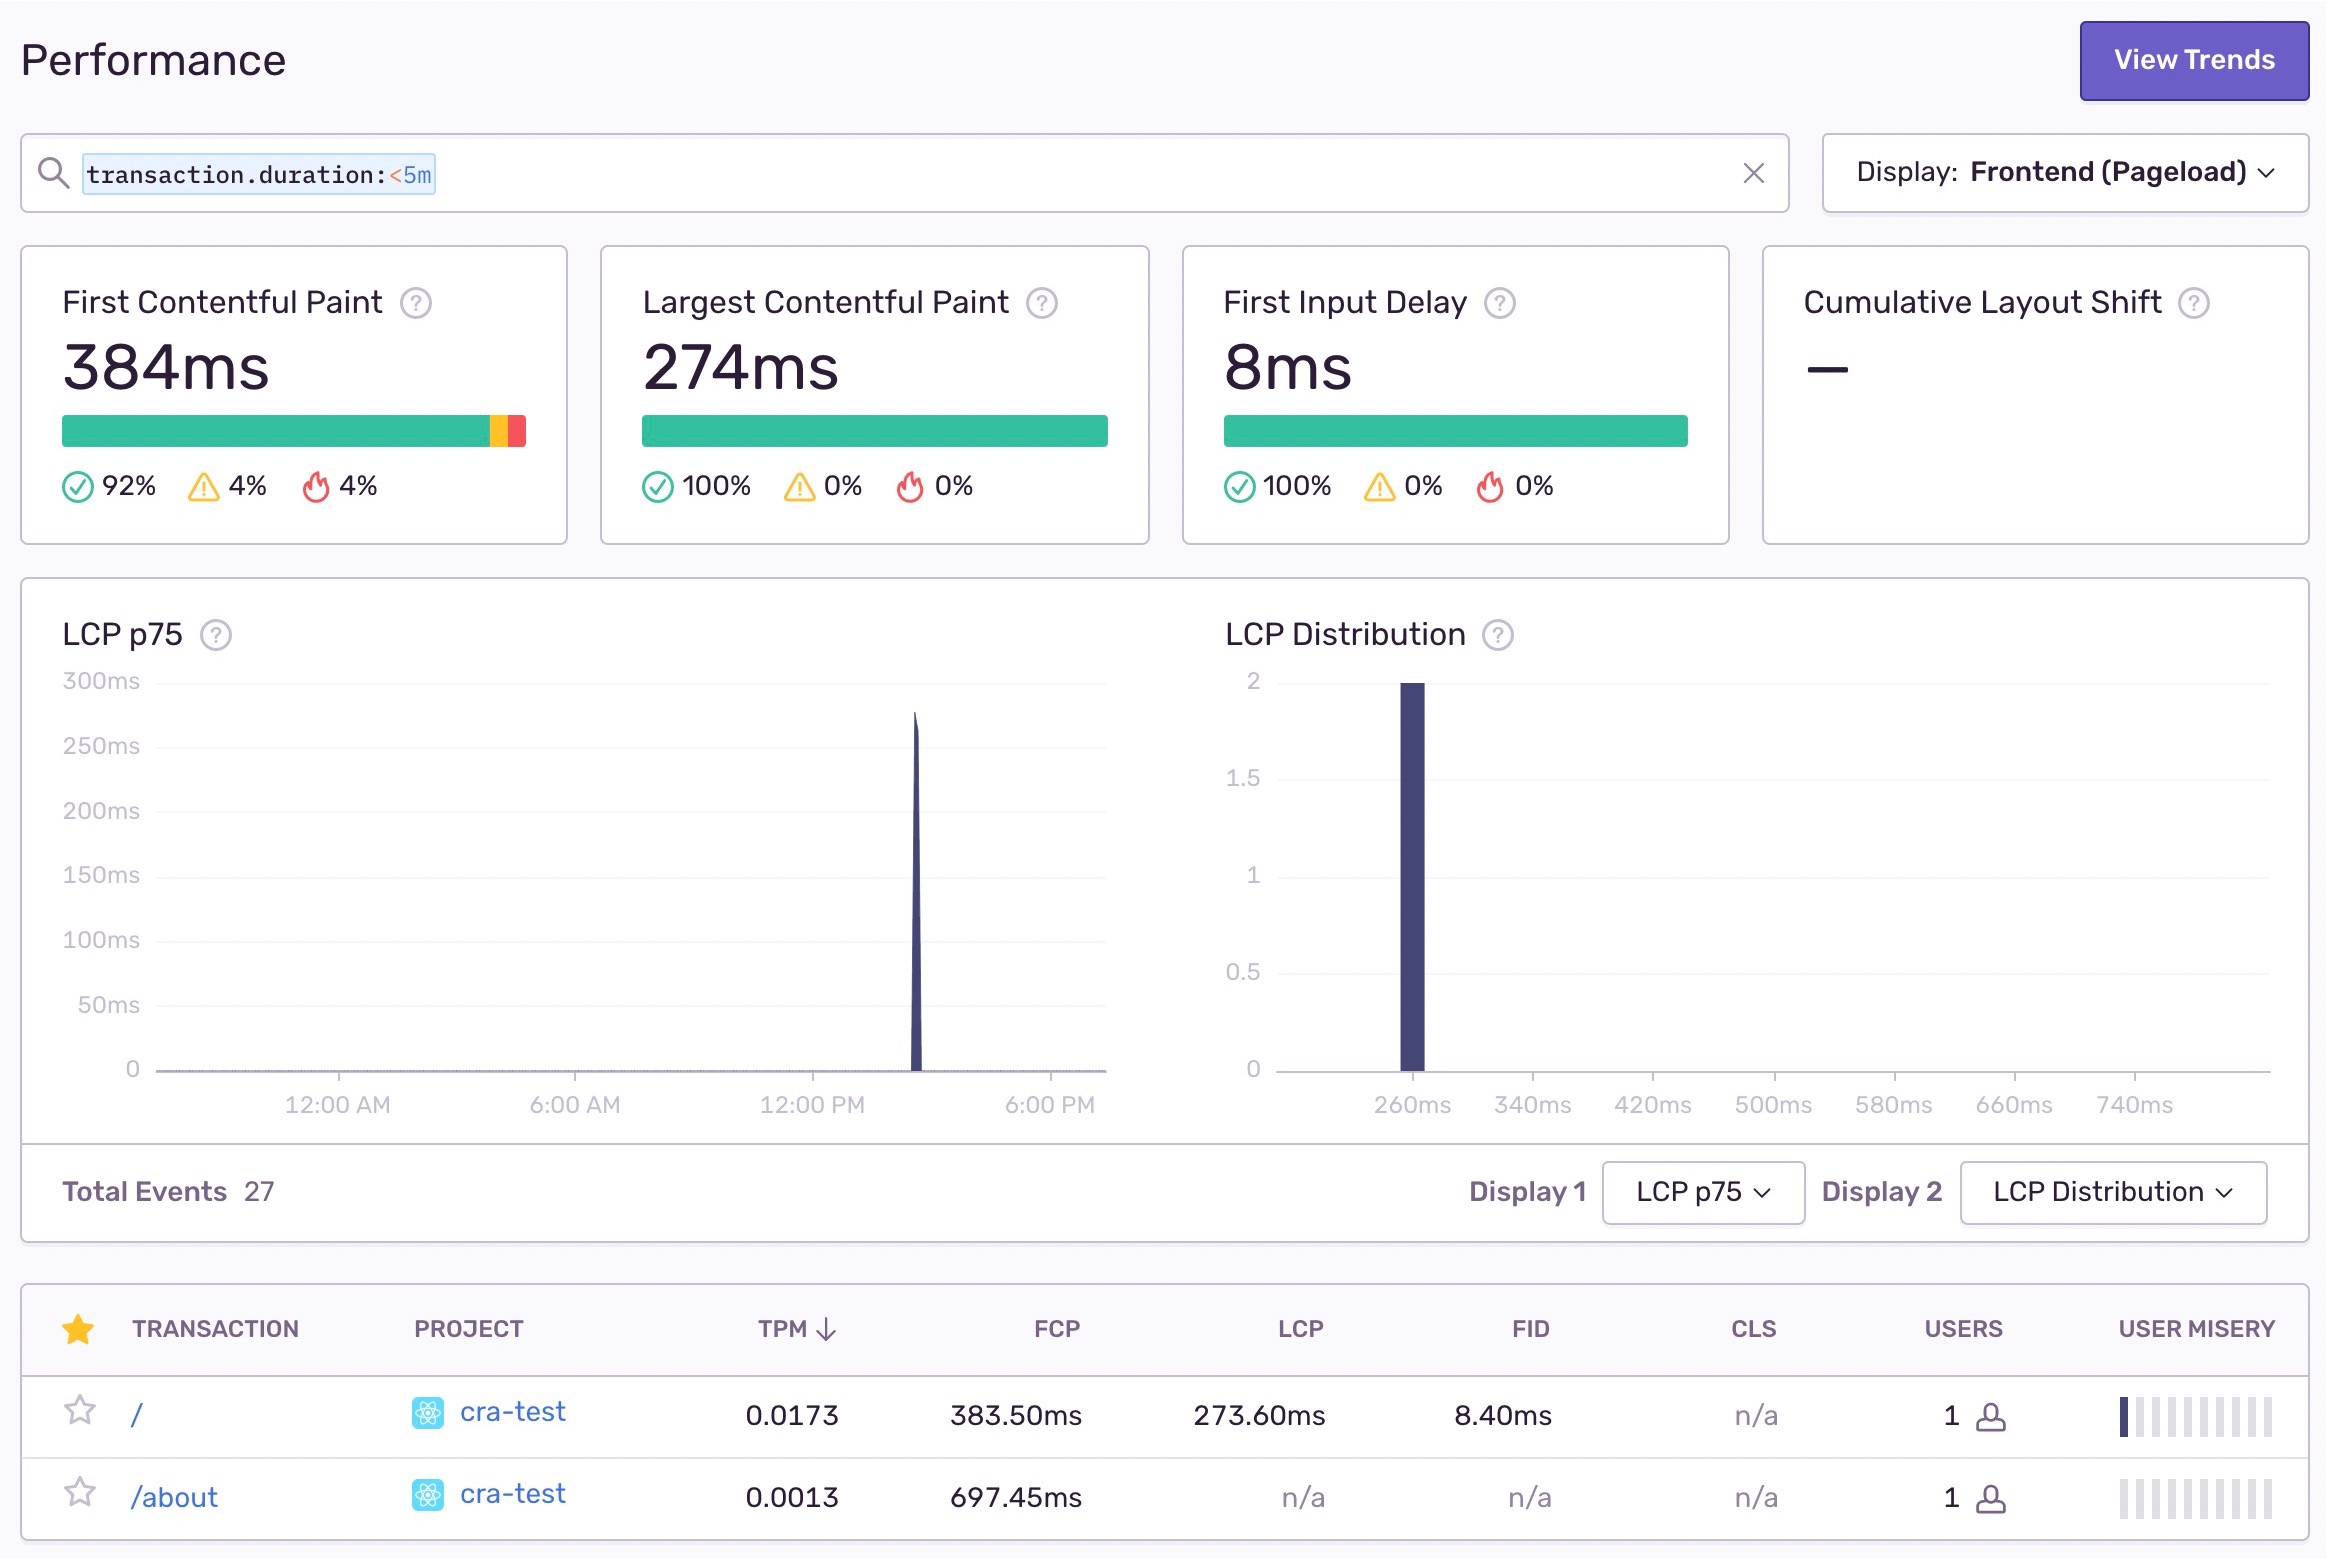
在 Performance 面板中,可以根据一些条件查询某一批 Transaction的:
# FCP、LCP、FID、CLS等信息
图片中筛选出了27个
transaction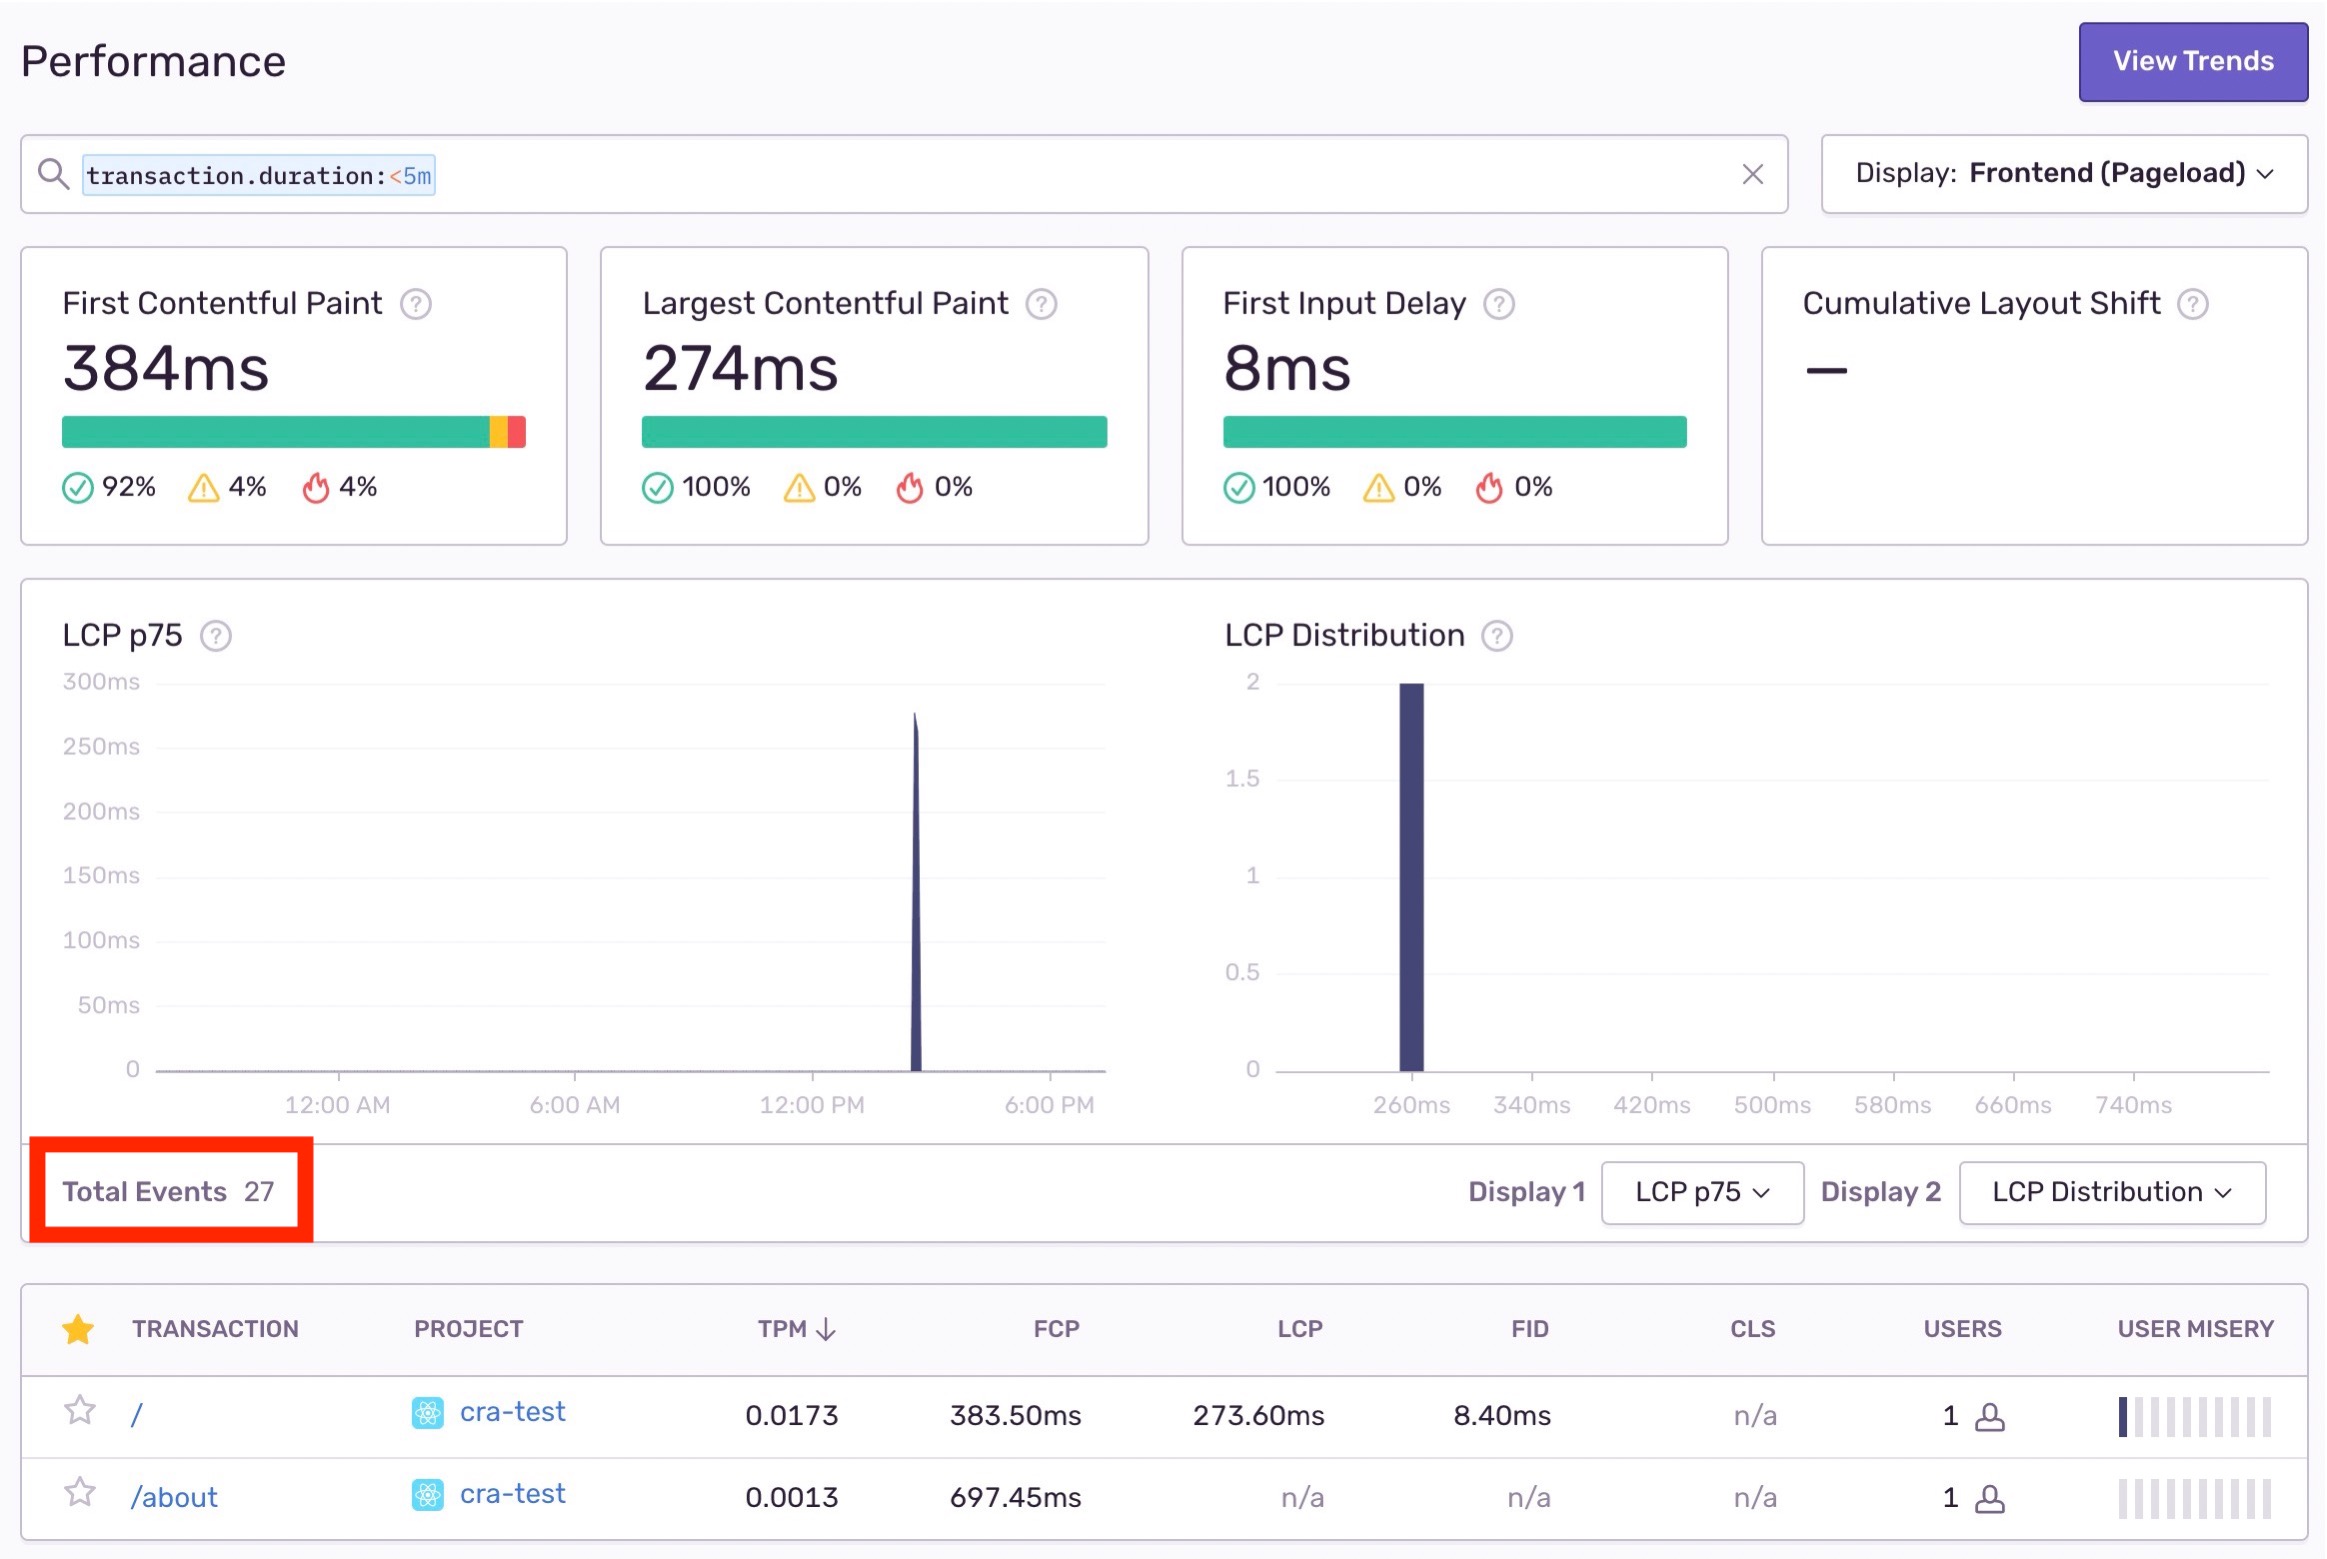
FCP、LCP、FID、CLS卡片中展示了27个transaction的平均值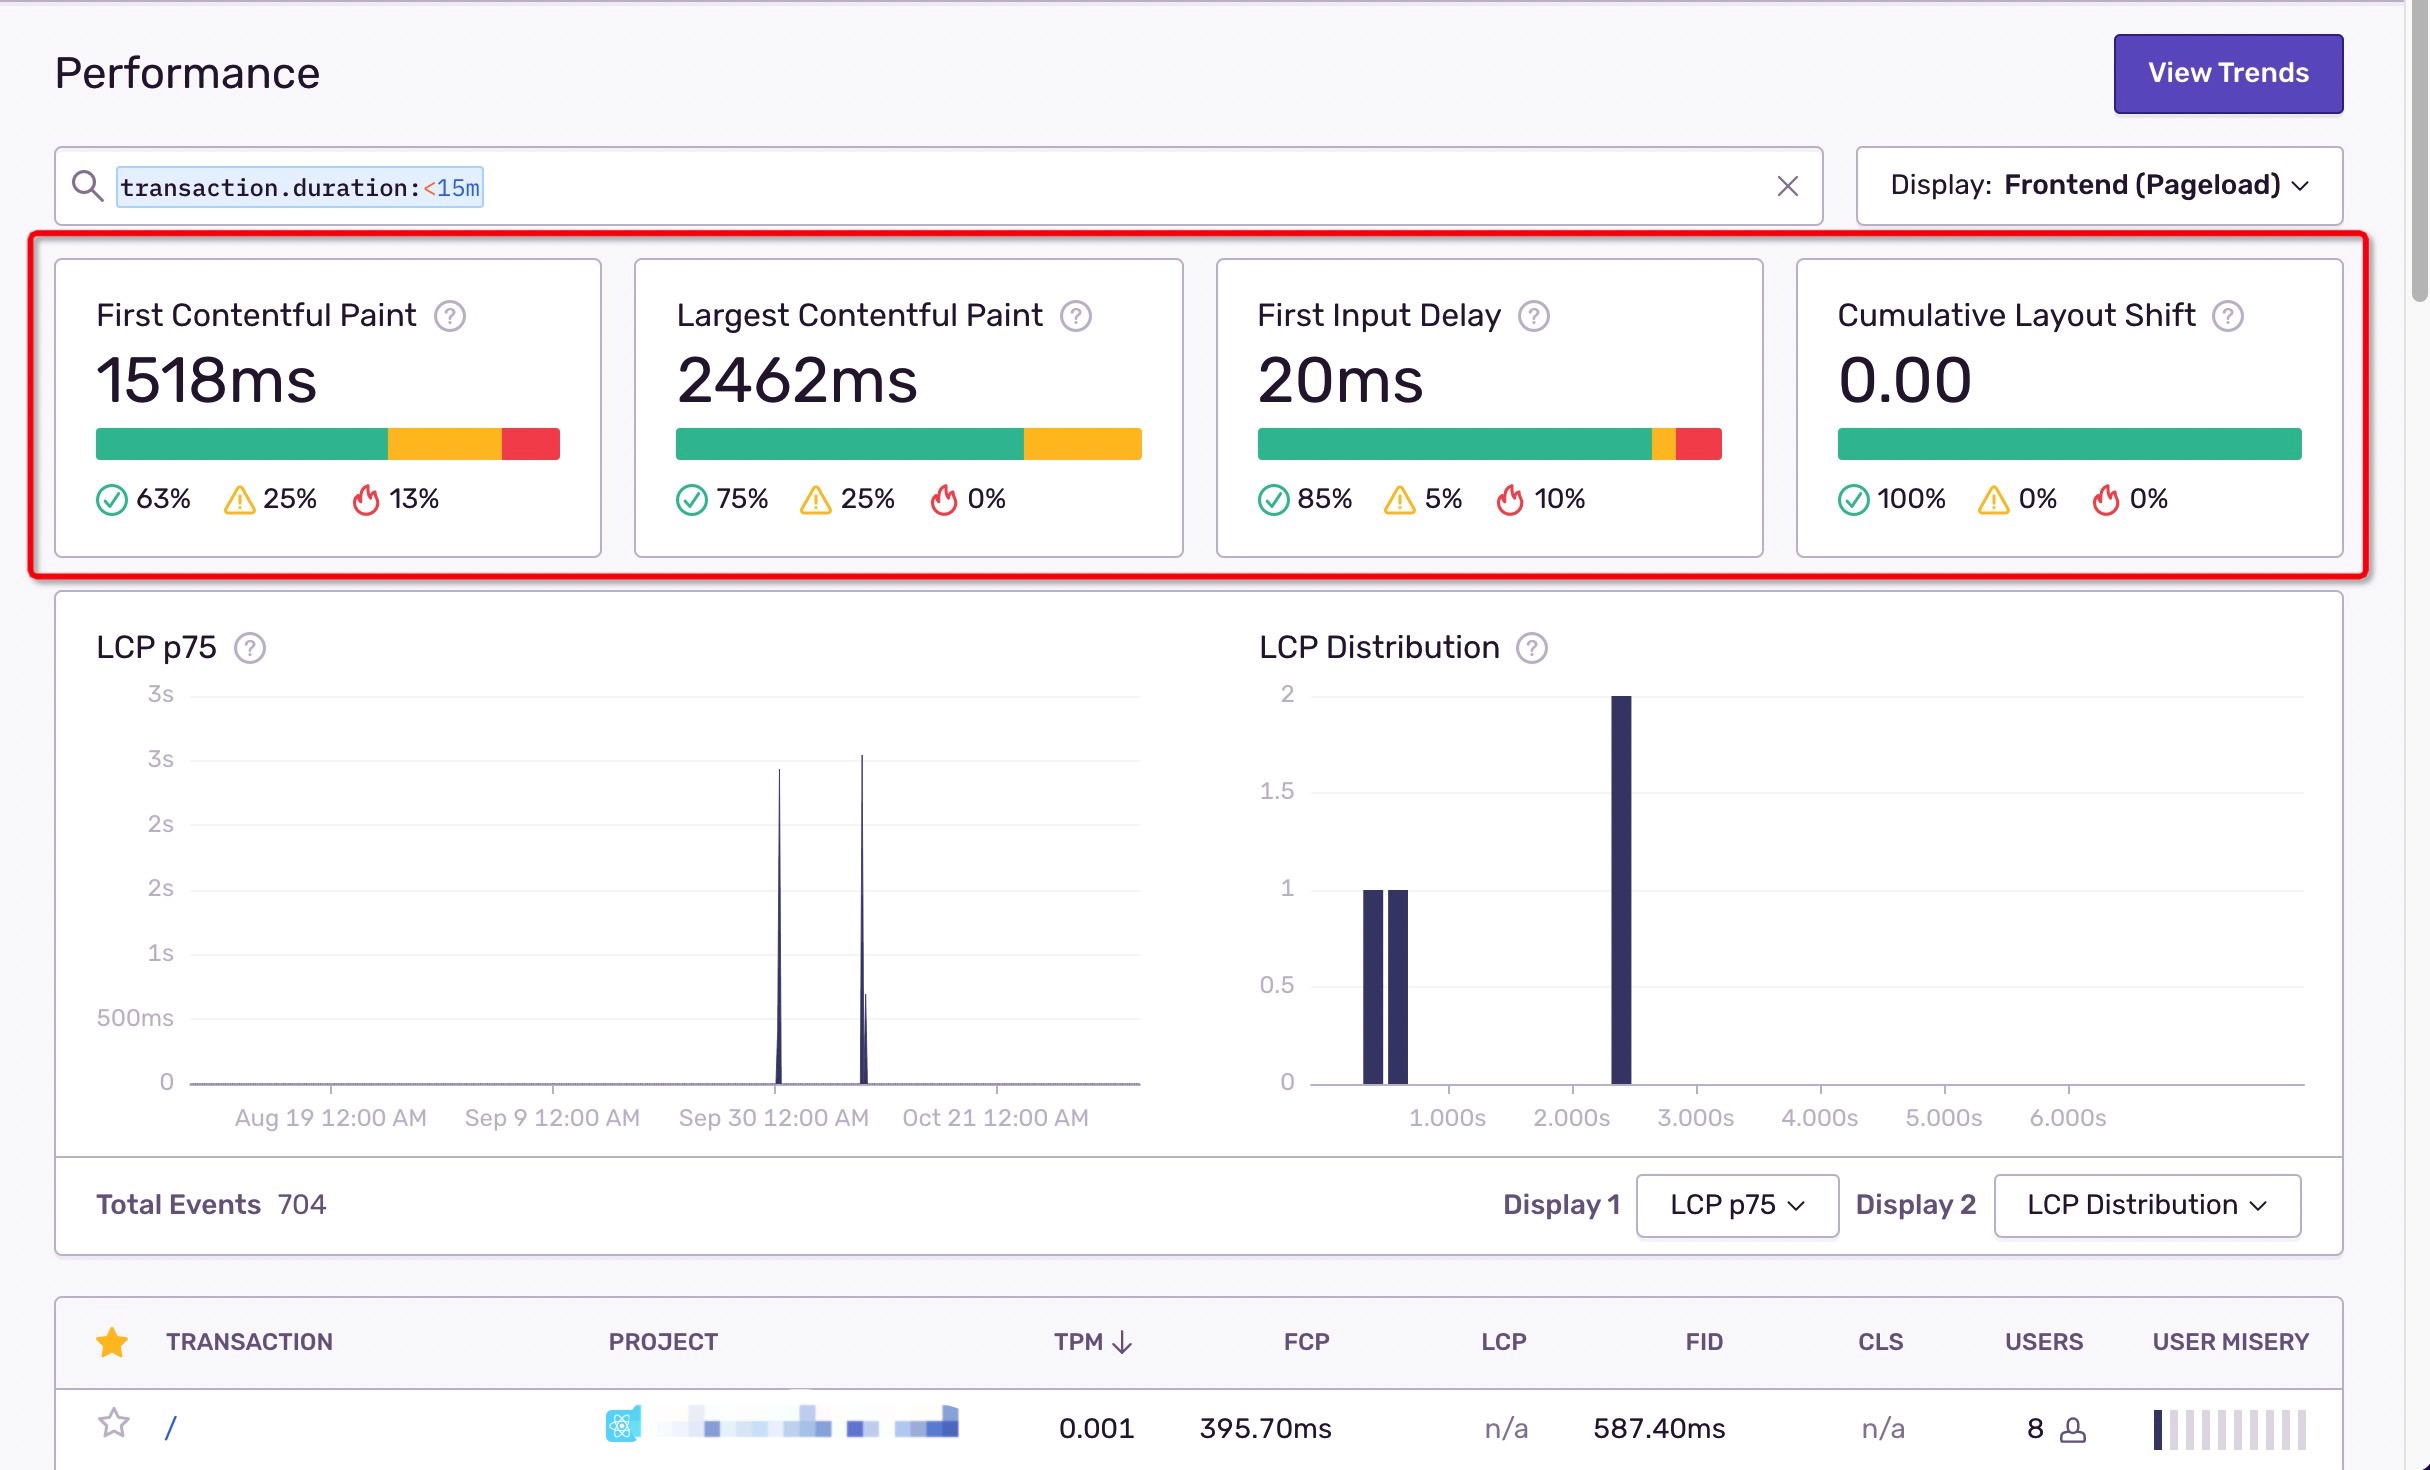
每个卡片上还有绿色、黄色、红色的百分比,分别表示好、一般和差,通过该性能指标的阈值作区分
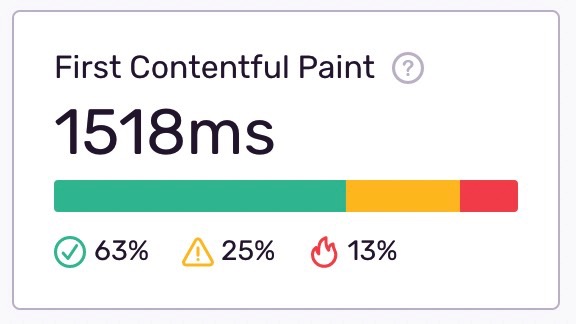
sentry性能指标阈值定义Web Vital Good(绿色) Meh(黄色) Poor(红色) 最大内容绘制 (LCP) <= 2.5s <= 4s > 4s 首次输入延迟 (FID) <= 100ms <= 300ms > 300ms 累积布局偏移 (CLS) <= 0.11s <= 0.25 > 0.25 首次绘制 (FP) <= 1s <= 3s > 3s 最大内容绘制 (LCP) <= 0.1s <= 3s > 3s 首字节时间 (TTFB) <= 100ms <= 200ms > 600ms
# LCP p75、LCP Distribution、TPM
LCP p75面积图:p50、p75、p95都对应一个时间长度的值(例如277.20ms),表示在某一段时间内(例如2021-10-19 2:35 PM到2021-10-19 2:40 PM),采集的所有transaction中(例如采集到了11个transaction),超过25%的transaction样本的LCP值超过了277.20ms。官方文档 (opens new window)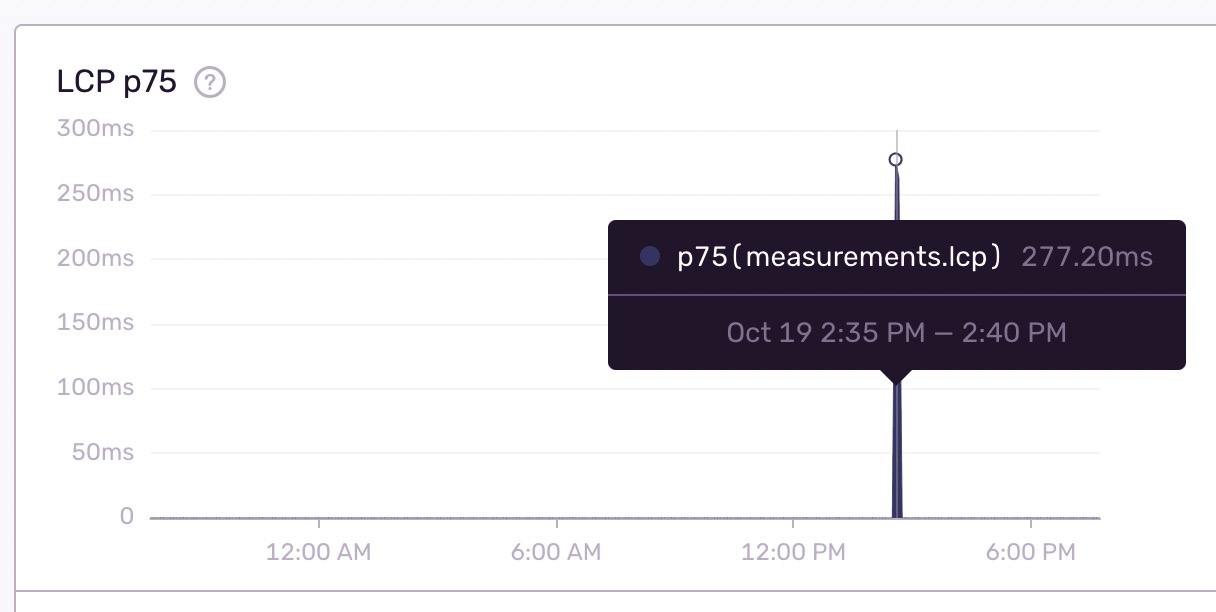
LCP Distribution数量柱状图: 横坐标是LCP时间(单位s),纵坐标是数量(单位个)。一个柱子,表示某个LCP时间的transaction数量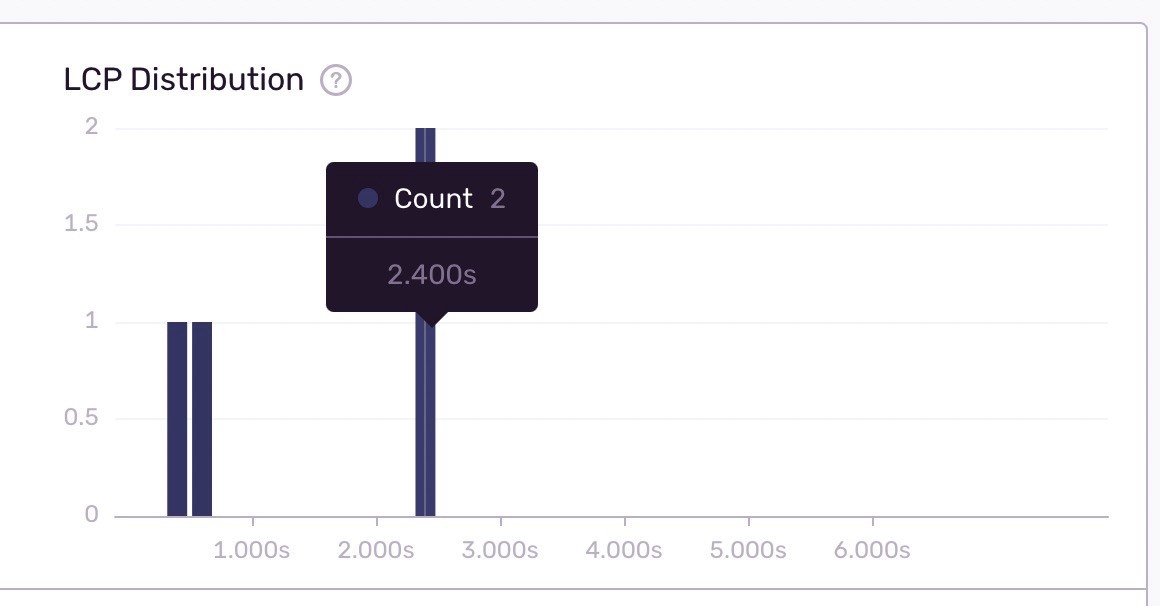
TPM面积图: 平均每分钟的transaction数量。例如,在4:00 PM到8:00 PM时间段内,平均每分钟的transaction数量是0.213个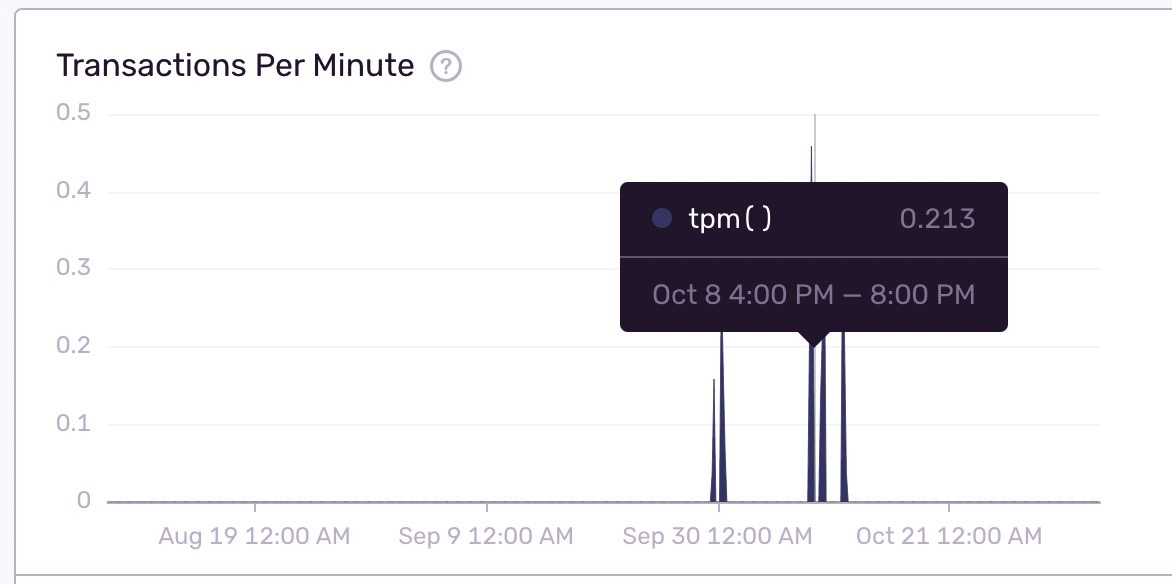
# 某个url路径下的性能信息表格
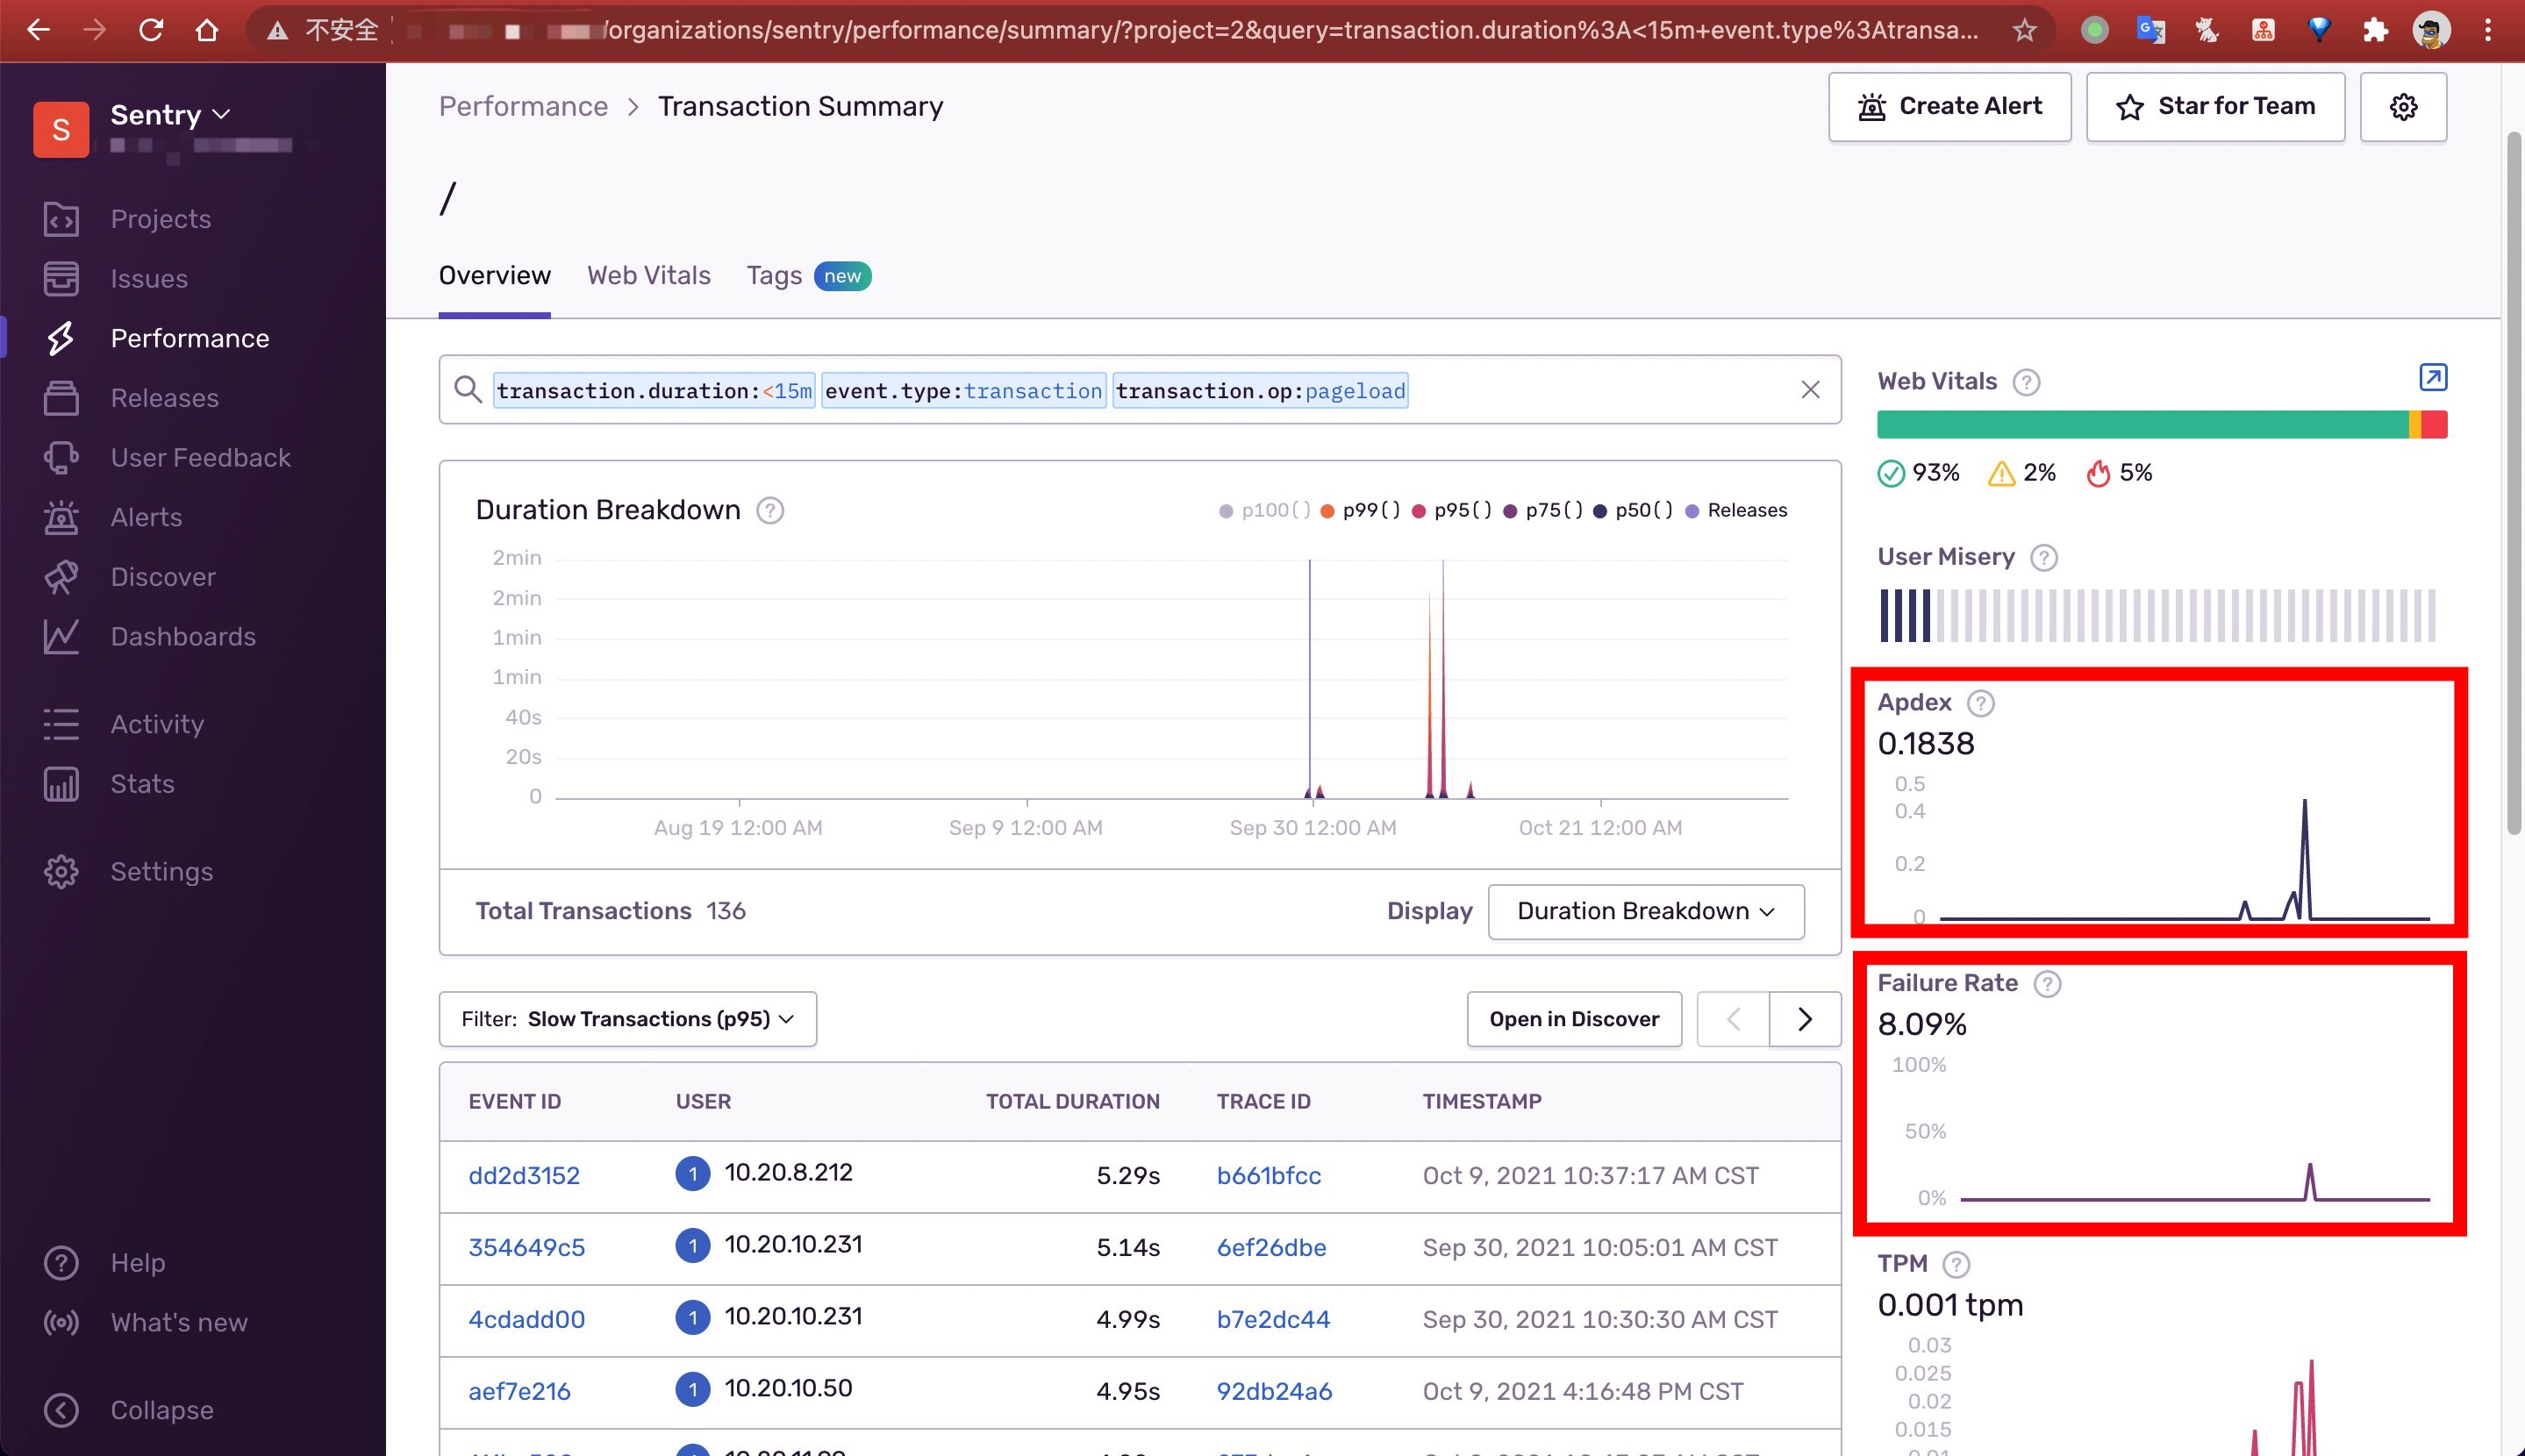
我们应该已经可以读懂表格中的信息的含义了,接下来点开某个url维度下的详情页,还需要介绍两个指标 Apdex 和 Failure Rate
# Apdex
Apdex 是一种行业标准指标,用于根据应用程序响应时间(response time)跟踪和衡量用户满意度(satisfaction)。Apdex 分数提供特定 transaction 或端点中满意(satisfactory)、可容忍(tolerable)和失败(frustrated)请求的比率。该指标提供了一个标准来比较 transaction 性能,了解哪些可能需要额外优化或排查,并为性能设定目标。官方文档 (opens new window)
- 以下是 Apdex 的组成部分及其公式:
T:目标响应时间的阈值。Satisfactory(满意度):当页面加载时间小于或等于 T 时,用户对使用该应用感到满意。Tolerable(可容忍度):当页面加载时间在 T 到 4T 之间时,用户认为该应用程序可以容忍使用。Frustrated(失败):当用户的页面加载时间大于 4T 时,他们对应用程序感到失望。Apdex:(满意请求数 +(可容忍请求数/2))/(总请求数)
- 在
sentry管理界面 -> Performance页面中可以为每个项目设置自定义阈值
# Failure Rate 失败率
failure_rate() 表示不成功 transaction 的百分比。Sentry 将状态为 “ok”、“canceled” 和 “unknown” 以外的 transaction 视为失败。更多状态可以参考 文档 (opens new window)。
# 如何现在就产生Good(绿色)、Meh(黄色)、Poor(红色)的数据
很简单,在Chrome dev tools的Network中,将模拟网速调整为fast 3G、slow 3G,然后刷新几次页面即可。
# 导航操作检测
在前面页面加载与性能指标的介绍中,我们了解到性能信息都是有 SDK 的 BrowserTracing 功能采集的,而 BrowserTracing 除了采集页面加载性能指标外,还可以采集路由导航时的相关信息,这在单页面应用中非常有用
# react-router设置检测
首先我们在前端项目中加上前端路由
# 安装React路由
npm i -S react-router-dom@5
1
2// App.js import { BrowserRouter as Router, Switch, Link } from 'react-router-dom'; function App() { function fn() { console.log(window.a.b); } return ( <Router> <> <nav> <ul> <li> <Link to="/">Home</Link> </li> <li> <Link to="/about">About</Link> </li> </ul> </nav> <Switch> <Router path="/about"> about </Router> <Router path="/"> <button onClick={fn}>Break the world</button> </Router> </Switch> </> </Router> ); } export default App;1
2
3
4
5
6
7
8
9
10
11
12
13
14
15
16
17
18
19
20
21
22
23
24
25
26
27
28
29
30
31
32
33
34接下来我们打开页面
localhost:9000,点击About,跳转到/about页,可以看到此时SDK多上报了一条transaction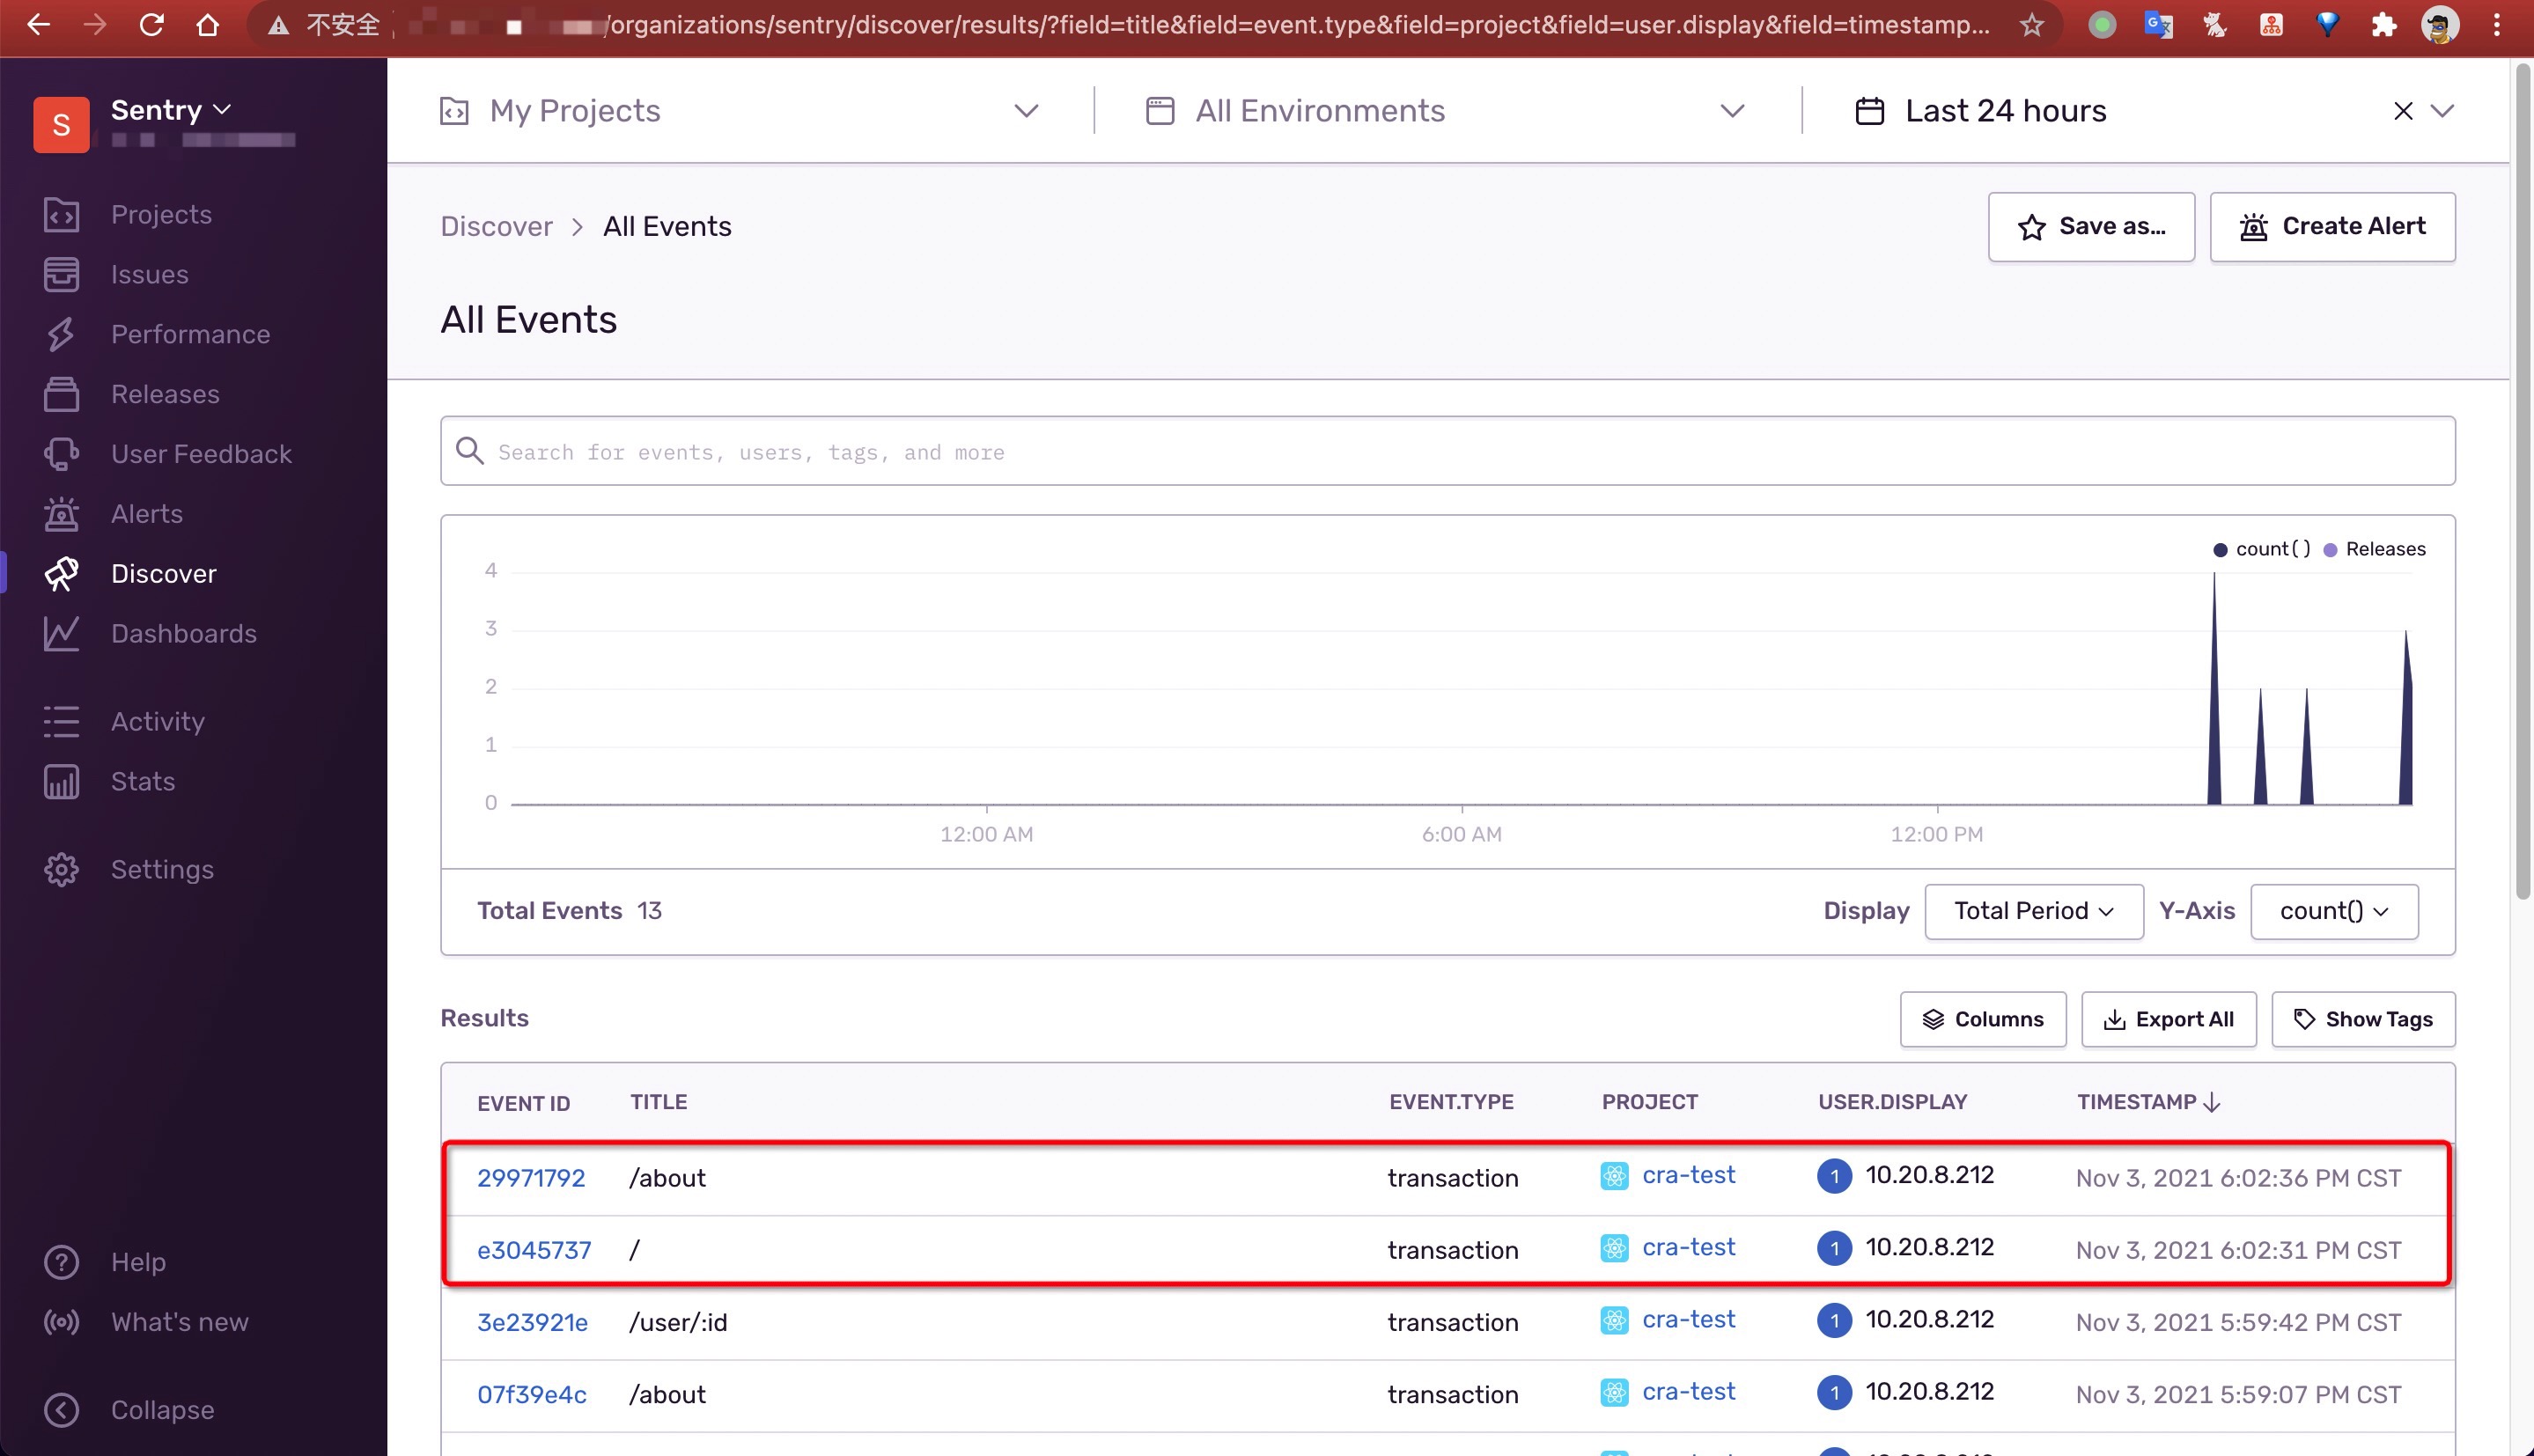
过一会儿,在
Sentry管理界面->Discover菜单 -> All Events中,我们可以看到刚才上报的transaction:/about,点击打开详情在
Breadcrumbs中,我们可以看到这是一个TYPE为navigation,CATEGORY为navigation的transaction,并告诉了我们from,从/路由,to,跳转到了/about路由。在跳转之前,经历了
pageload,和ui.click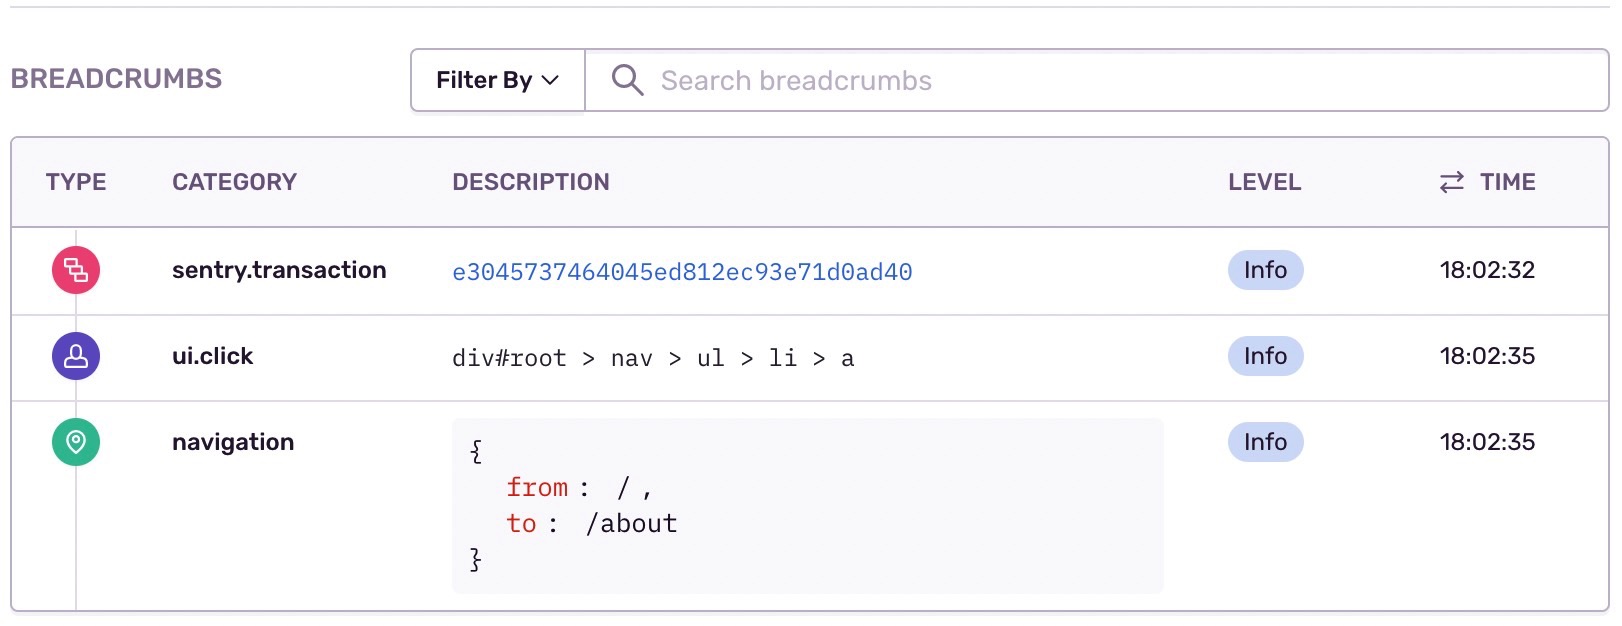
# history配置
安装history
npm i -S history@41配置
React router集成// index.js import React from 'react'; import ReactDOM from 'react-dom'; import { Router, Route, Switch, Link, matchPath } from 'react-router-dom'; import { createBrowserHistory } from 'history'; import * as Sentry from '@sentry/react'; import { Integrations } from '@sentry/tracing'; const history = createBrowserHistory(); const routes = [{ path: '/about' }, { path: '/user/:id' }, { path: '/' }]; Sentry.init({ dsn: "http://xxxxxxxxxxxxxxxx@127.0.0.1:9000/3", environment: 'localhost', integrations: [new Integrations.BrowserTracing({ routingInstrumentation: Sentry.reactRouterV5Instrumentation(history, routes, matchPath), })], tracesSampleRate: 1.0, release: '0.0.1', }); const App = () => { function fn() { console.log(window.a.b); } return ( <Router history={history}> <> <nav> <ul> <li> <Link to="/">Home</Link> </li> <li> <Link to="/about">About</Link> </li> <li> <Link to="/user/1">User1</Link> </li> <li> <Link to="/user/2">User2</Link> </li> </ul> </nav> <Switch> <Route path="/about" children={ () => <div>about</div> } /> <Route path="/user/:id" children={ () => <div>user</div> } /> <Route exact path="/" children={ () => <button onClick={fn}>Break the world</button> } /> </Switch> </> </Router> ); } ReactDOM.render( <React.StrictMode> <App /> </React.StrictMode>, document.getElementById('root') );1
2
3
4
5
6
7
8
9
10
11
12
13
14
15
16
17
18
19
20
21
22
23
24
25
26
27
28
29
30
31
32
33
34
35
36
37
38
39
40
41
42
43
44
45
46
47
48
49
50
51
52
53
54
55
56
57
58
59
60
61
62
63
64
65
66
67
68
69目前为止,对于
/user/:id的路由,不同的id,上报的transaction名称是不同的,例如/user/1、/user/2。我们可以分别在
/user/1、/user/2路由下刷新页面,然后在Sentry管理界面的Performance菜单里查看效果,会看到两条不同的TRANSACTION:/user/1、/user/2
实际上我们希望他们是一条,预期应该显示:
/user/:id,在React项目中,我们可以通过Sentry.reactRouterV5Instrumentation配置。然后我们再在
/user/1、/user/2路由下刷新页面,查看上报的transaction,已经变成了一种:/user/:id
还有一种方式可以也达到这个目的:使用
Sentry.withSentryRouting高阶组件包裹Route,具体可以参考 官方文档 (opens new window)
# Alert 报警
在前面的探索中,我们看到了如何在Sentry管理界面中查看性能、错误等信息。但如果我们手动在页面查看发生了哪些错误,会非常耗时耗力,因此可以配置报警功能Alert
# 配置邮箱
首先我们配置一个可以通过 Sentry 服务发送邮件的邮箱配置
大部分的
Sentry配置可以通过Sentry管理界面配置,但是有些默认配置,比如代表Sentry服务的邮箱,我们不希望通过Sentry管理界面修改,但可以通过下面文件修改cd onpremise vim ./sentry/config.yml1
2选择一个邮箱账号作为
Sentry服务邮箱账号,比如我选择的是我的阿里企业邮箱,找到他们的- 发件服务地址:例如阿里云企业邮箱是
smtp.mxhichina.com - 该邮箱账号
- 该邮箱密码
- 发件服务地址:例如阿里云企业邮箱是
将这些信息填写到
onpremise/sentry/config.yml文件中# mail.backend: 'smtp' # Use dummy if you want to disable email entirely mail.host: 'smtp.mxhichina.com' # mail.port: 465 mail.username: 'xxx@xxx.com' mail.password: 'xxxxxx' # mail.use-tls: false # mail.use-ssl: true # NOTE: The following 2 configs (mail.from and mail.list-namespace) are set # through SENTRY_MAIL_HOST in sentry.conf.py so remove those first if # you want your values in this file to be effective! # The email address to send on behalf of mail.from: 'xxx@xxx.com'1
2
3
4
5
6
7
8
9
10
11
12
13
14
15停止
Sentry服务docker-compose down1启动
Sentry服务docker-compose up -d1测试
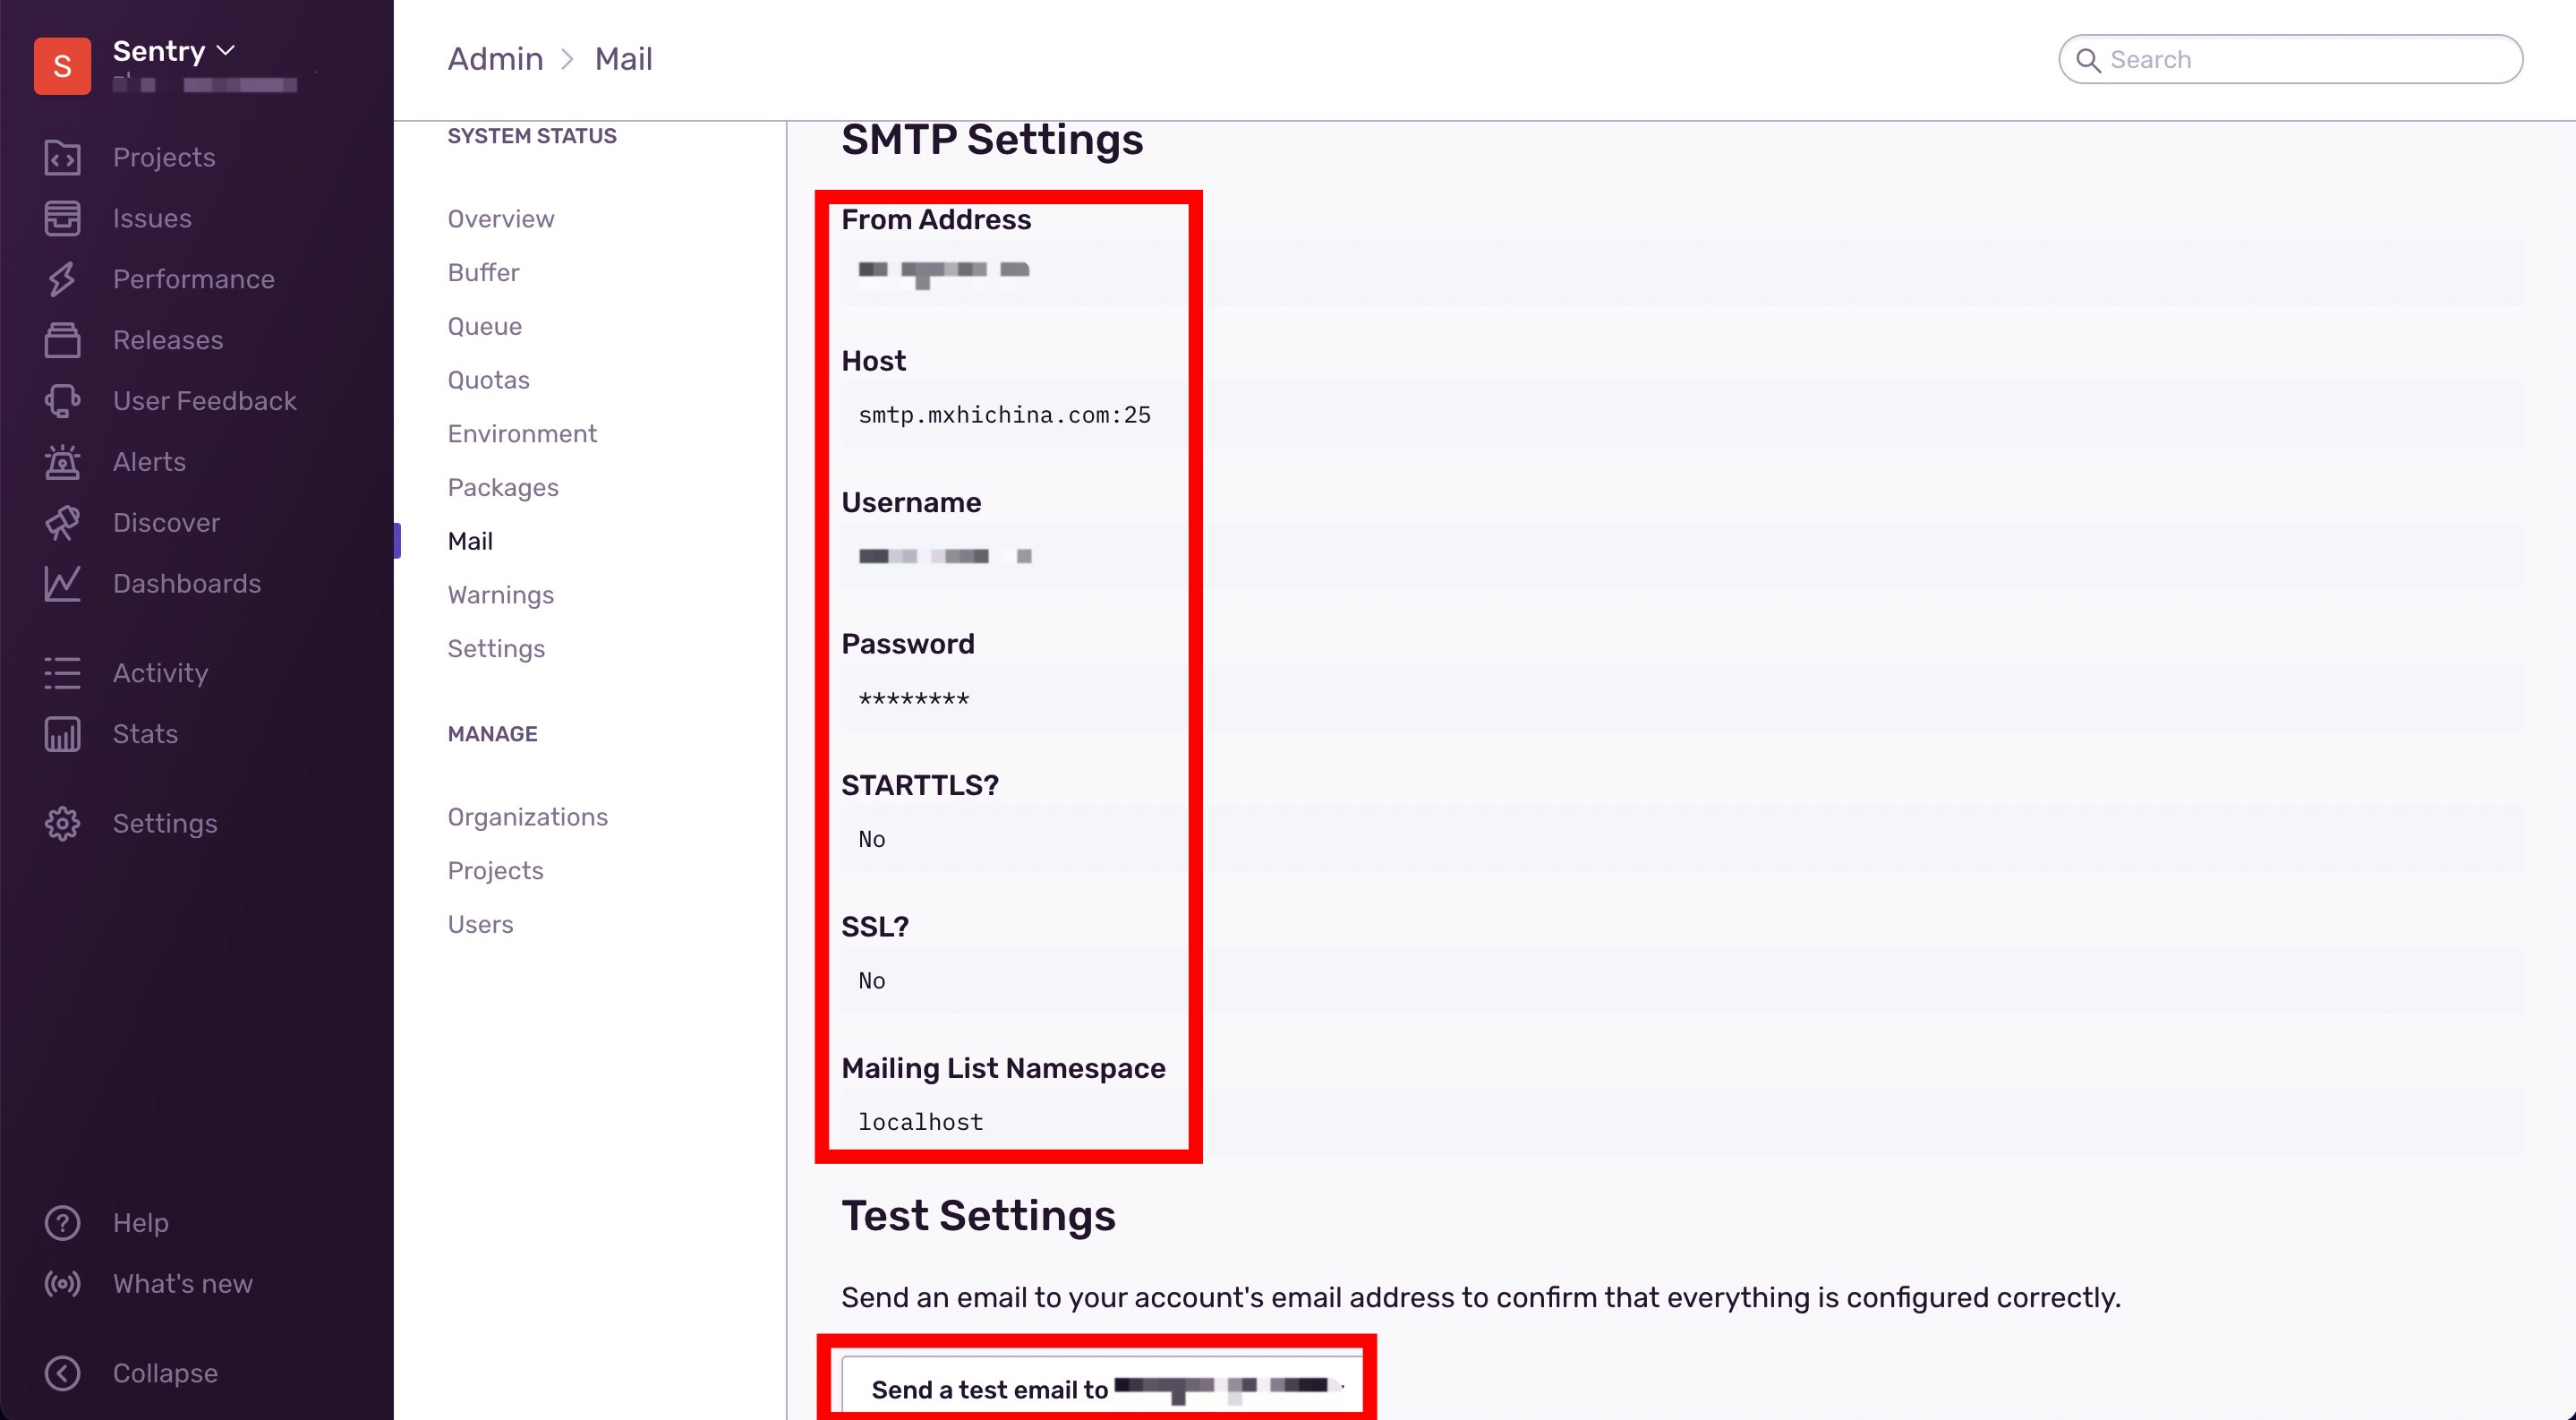
Sentry服务能否发送邮件- 点击
Sentry管理界面左上角头像图标,在下拉框中选择Admin,在接下来的菜单中选择Mail - 可以看到刚才配置的邮箱信息
- 在页面最底部点击
Send a test email to xxx@xxx.xxx - 在
xxx@xxx.xxx邮箱中查看是否收到Sentry发送的邮件
- 点击
# 设置报警规则
我们可以设置一些报警规则,比如性能、错误,和对应的阈值。当触发报警规则后,会发送一封邮件到指定的邮箱,然后可以点击查看报警详情
在
Sentry管理界面 -> Alerts页,可以查看、新增、编辑、删除报警规则点击
Create Alert Rule按钮在新建报警规则页,选择一个监控的内容,分为
Errors、Performance、Other以
Performance的LCP为例,选择之,并点击Set Conditions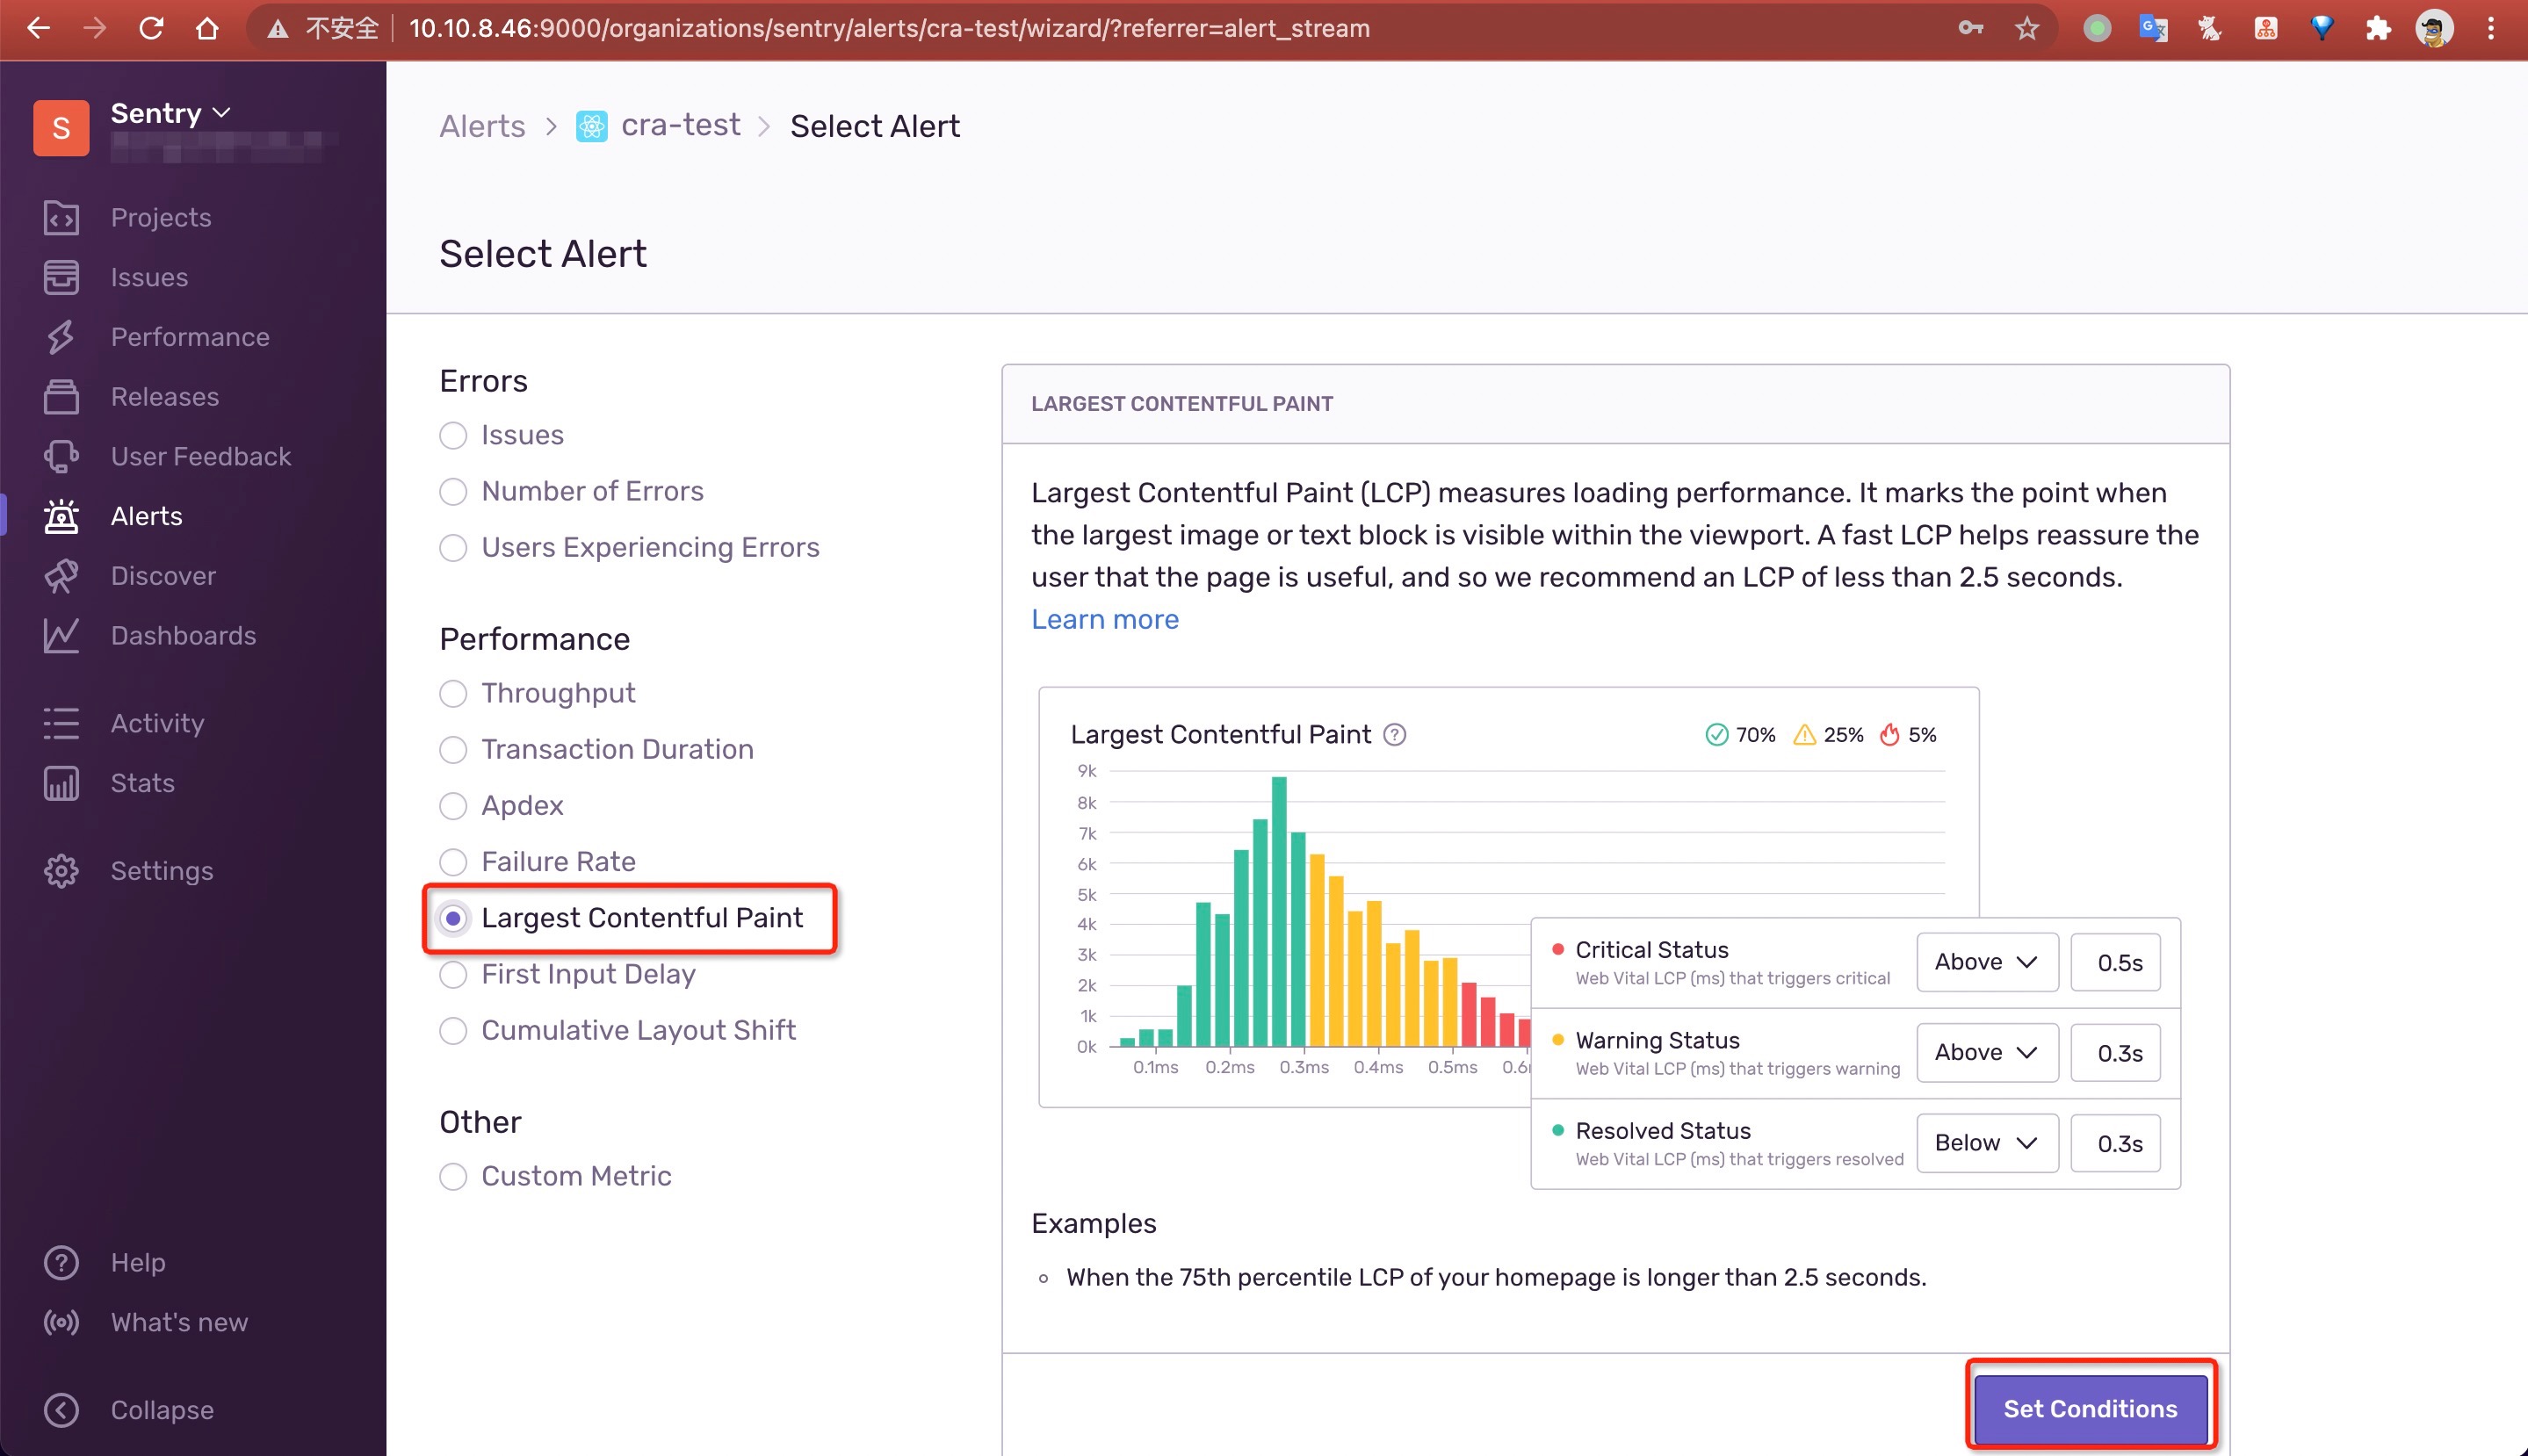
在
Filter events条件设置中,可以对evironment筛选,选择All在
2. Select function and time interval,可以设置报警程序定时任务的间隔时间,以及在间隔时间内监控的内容,选择P50 over 1 minute,表示每1分钟总结一次,如果超过50%的transaction超过了阈值,则报警接下来设置
阈值,在3. Set thresholds to trigger alert中,分别设置Critical(危急)、Warning(警告)、Resolved(满足)的阈值,为了容易看到效果,我们分别设置500、400、300,单位毫秒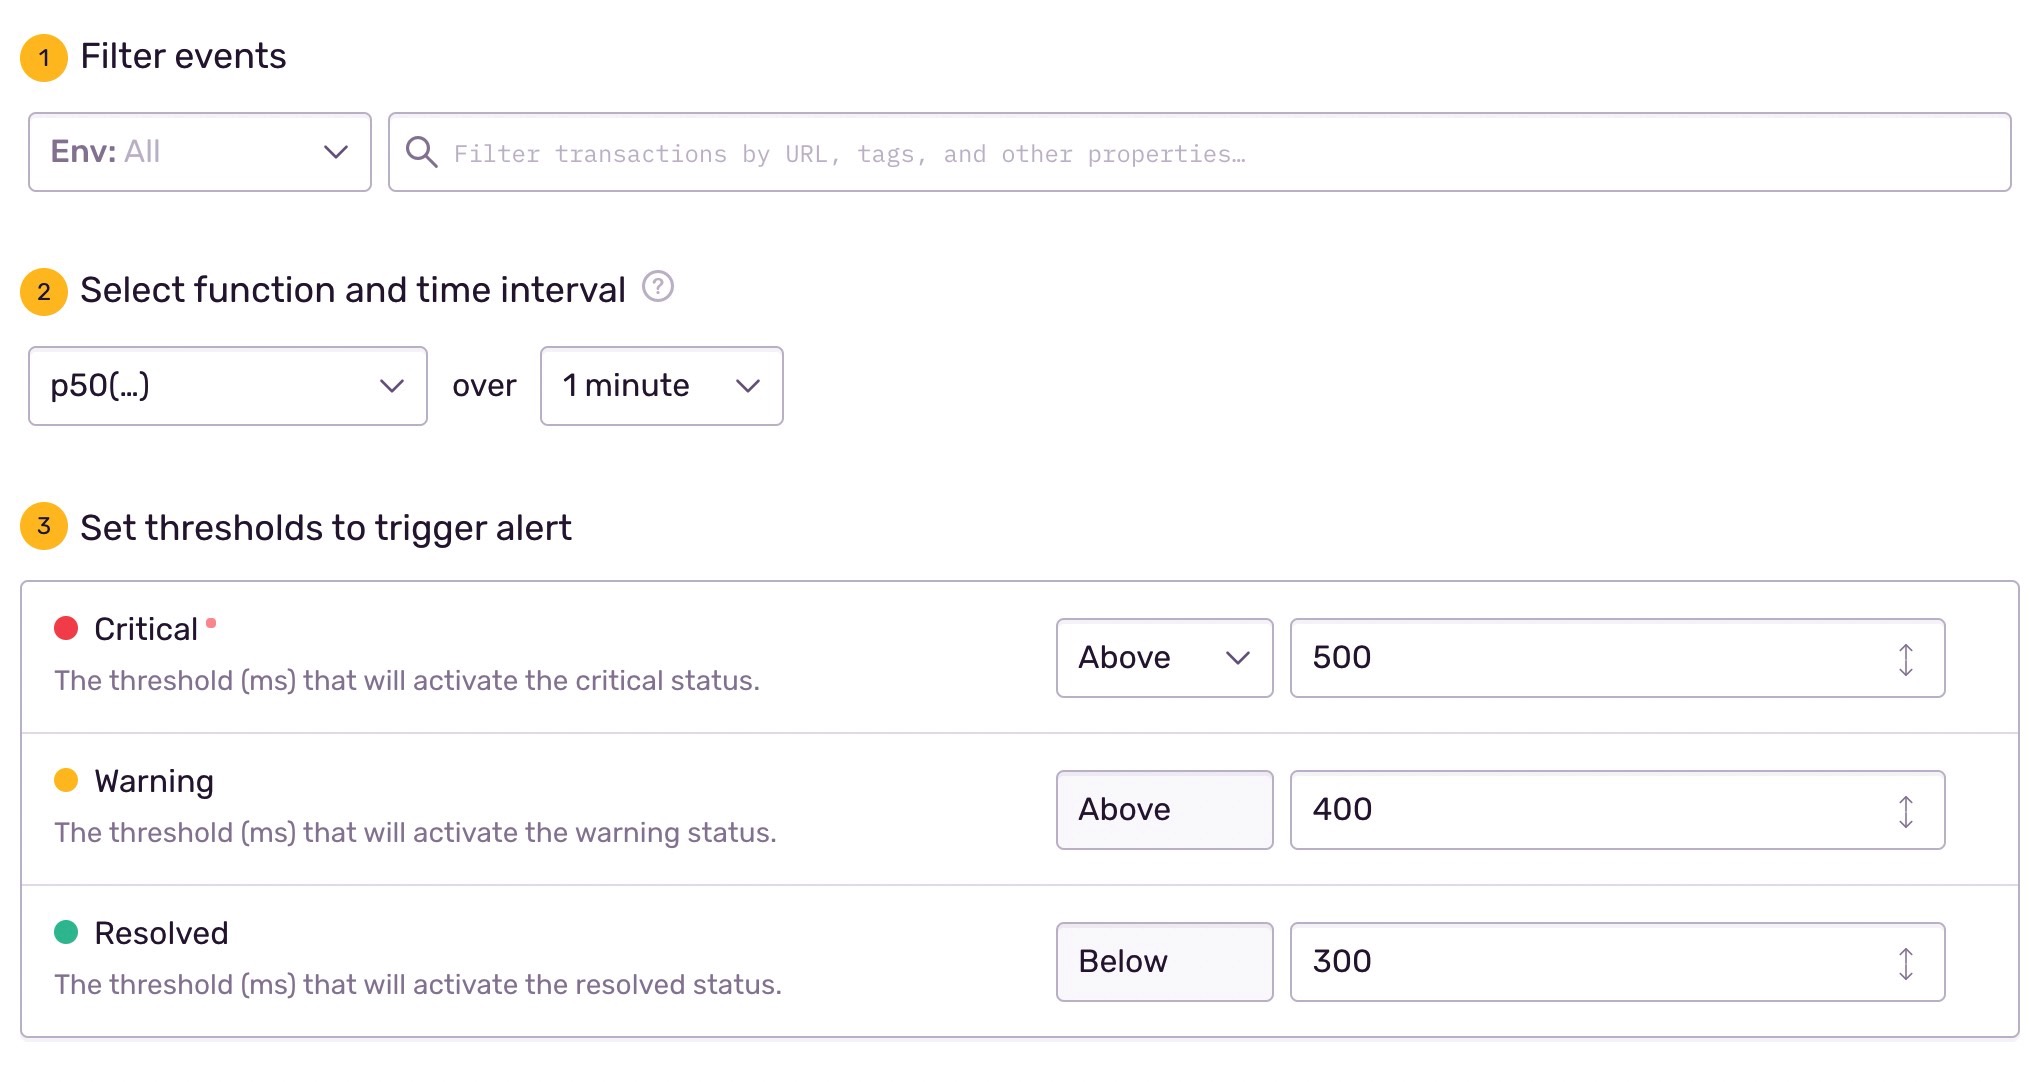
在
4. Perform actions中设置报警后发送的邮件接收人在
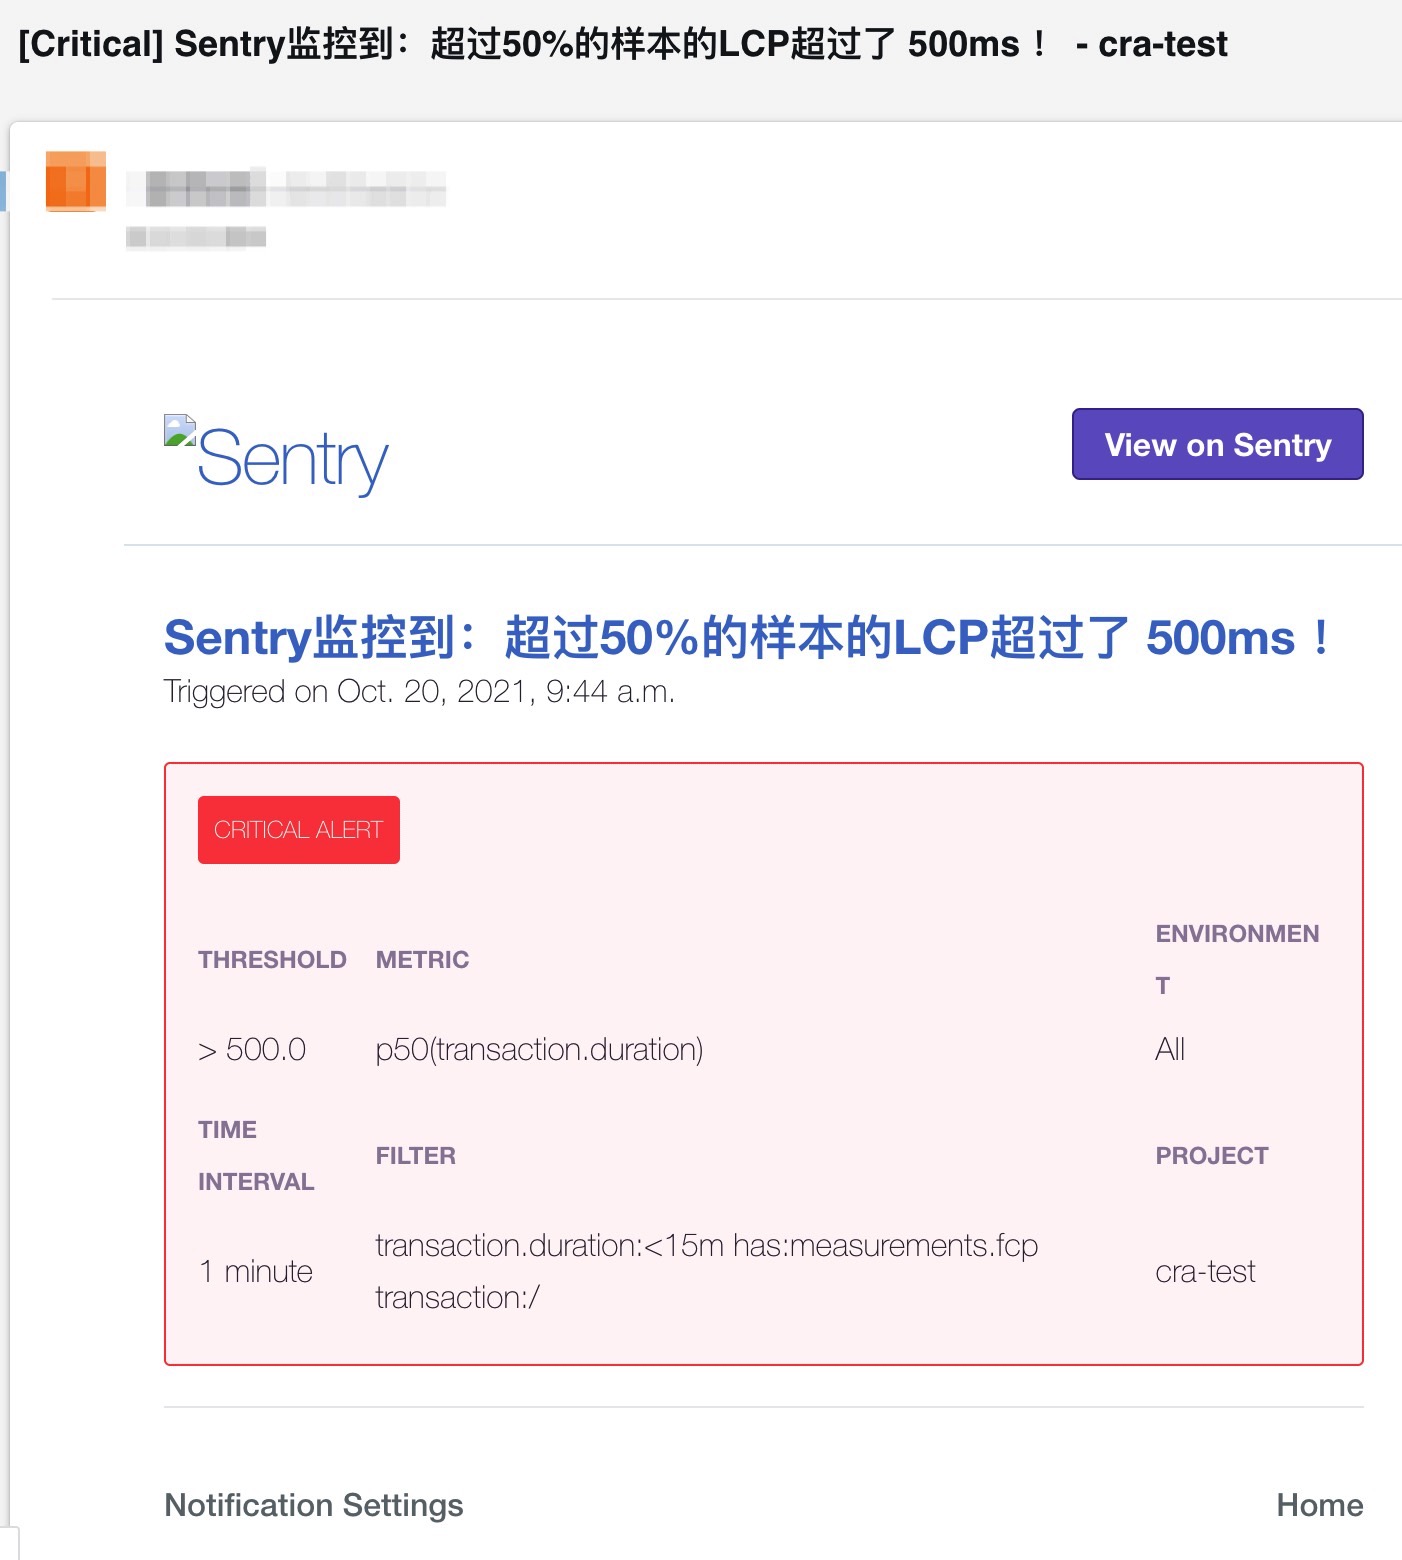
5. Add a rule name and team设置本条报警规则的名称(例如,“Sentry监控到:超过50%的样本的LCP超过了 500ms !”)和可以编辑这条报警规则的人,名称会体现在邮件内容中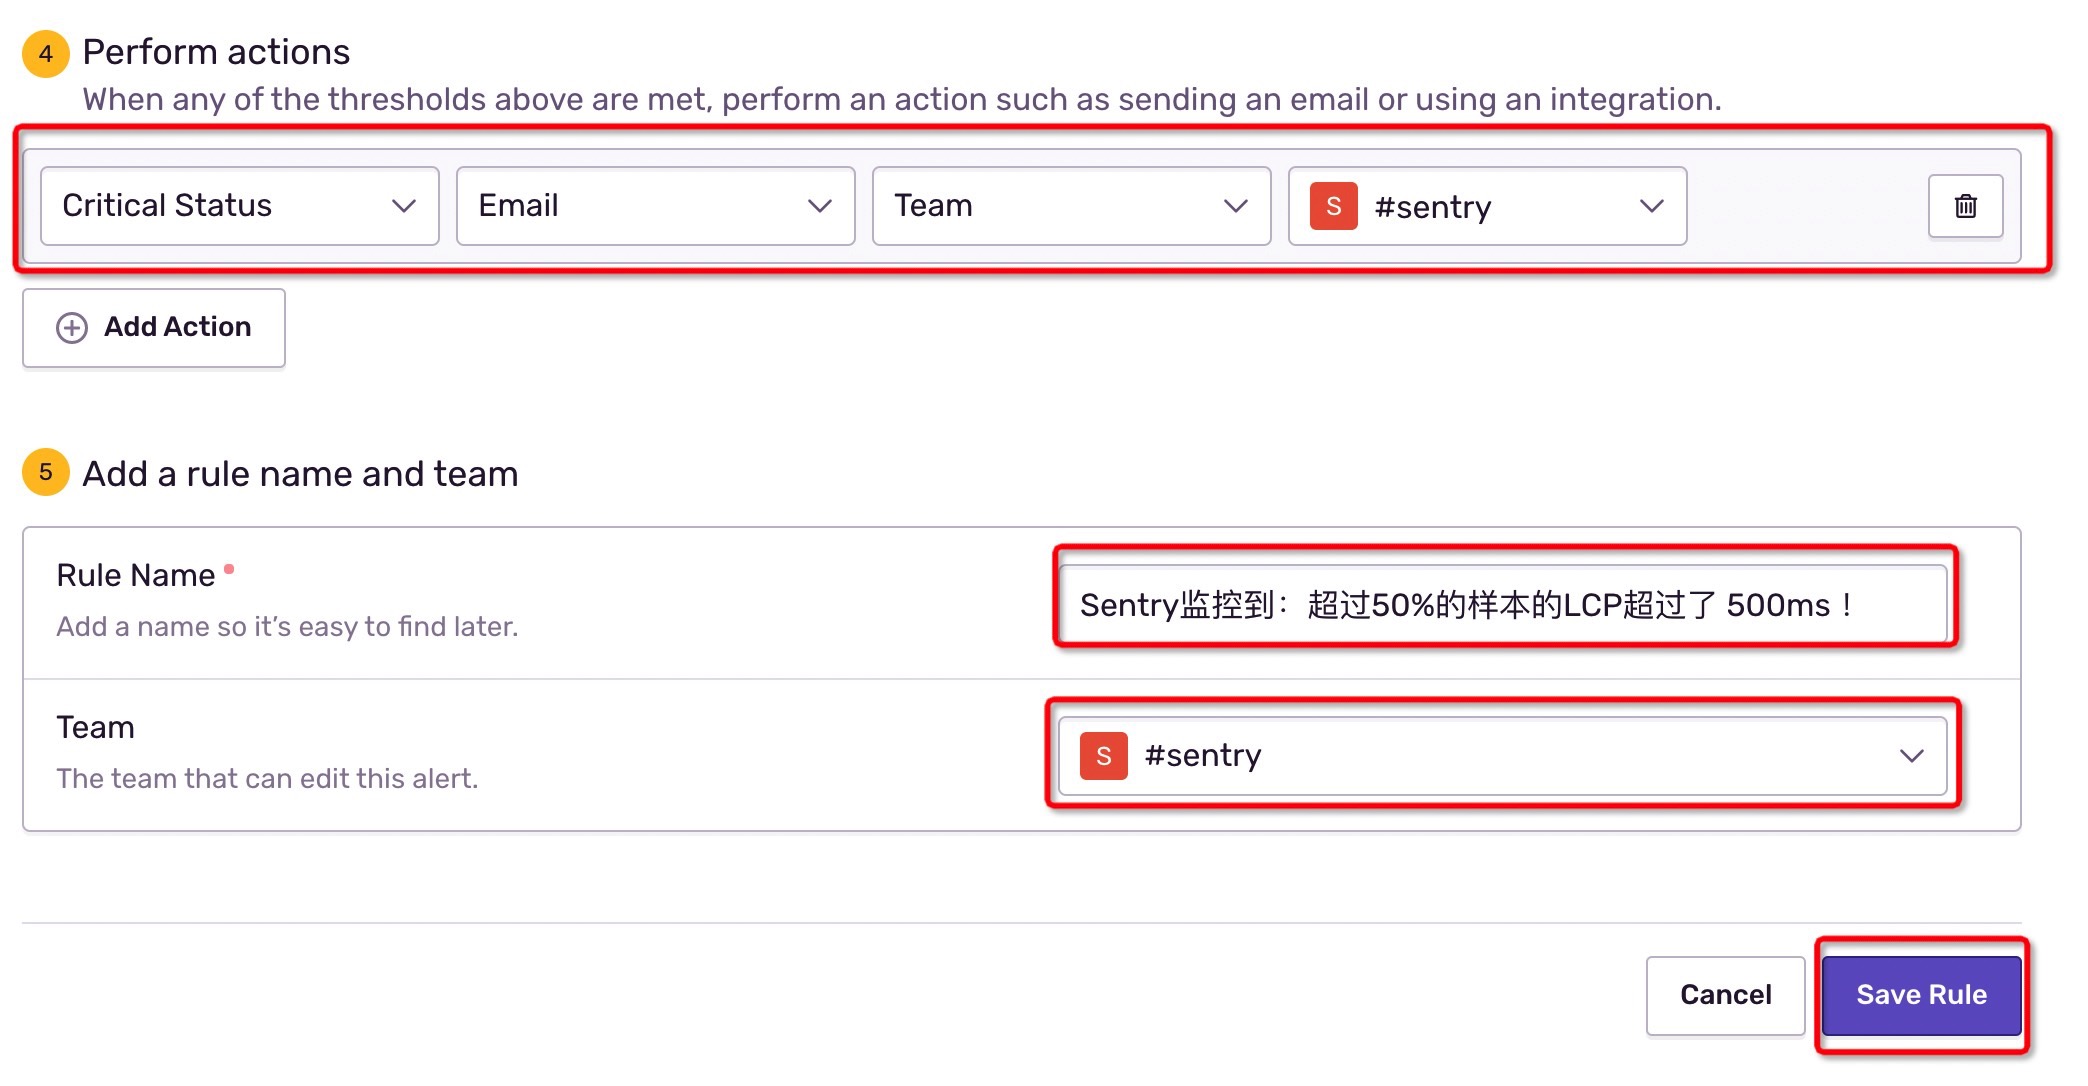
# 制造一些很慢的访问
打开浏览器cra-test页面,在 devtools -> network -> 节流模式 中选择 slow 3G,多刷新几次页面,这些页面加载速度很慢,便会触发报警,很快我们会收到邮件,点击可以查看详情
# 手动上报错误
Sentry的SDK会自动上报错误、未捕获的异常和unhandled rejections以及其他类型的错误。对于未捕获的异常,我们可以手动上报。 官方文档 (opens new window)
import * as Sentry from "@sentry/react";

try {
  aFunctionThatMightFail();
} catch (err) {
  Sentry.captureException(err);
}
1
2
3
4
5
6
7我们同样可以在
Sentry管理界面 -> Issues中查看手动上报的异常另外我们还可以手动上报一些纯文本信息
Sentry.captureMessage("Something went wrong");1
# 设置上报等级
我们可以对上报的信息定义等级,主要包括:
export declare enum Severity {
  Fatal = "fatal",
  Error = "error",
  Warning = "warning",
  Log = "log",
  Info = "info",
  Debug = "debug",
  Critical = "critical"
}
1
2
3
4
5
6
7
8
9手动上报错误定义
leveltry { aFunctionThatMightFail(); } catch (err) { Sentry.captureException(err, { level: Sentry.Severity.Warning, }); }1
2
3
4
5
6
7手动上报纯文本定义
levelSentry.captureMessage("this is a debug message", Sentry.Severity.Warning);1定义一个范围,在范围内容统一定义
levelSentry.configureScope(function(scope) { scope.setLevel(Sentry.Severity.Warning); aFunctionThatMightFail(); bFunctionThatMightFail(); });1
2
3
4
5
# Sentry错误边界组件
Sentry提供了错误边界组件,当 react 组件发生错误,可以上报相关信息
使用
Sentry.ErrorBoundary组件// index.js const App = () => { return ( <> { error && new Error('error') } <button onClick={() => setError(true)}>set error</button> </> ); } const WithSentryErrorBoundaryApp = () => { return ( <Sentry.ErrorBoundary fallback={<div>error boundary error</div>} showDialog> <App /> </Sentry.ErrorBoundary> ); } ReactDOM.render( <WithSentryApp />, document.getElementById('root') );1
2
3
4
5
6
7
8
9
10
11
12
13
14
15
16
17
18
19
20
21点击按钮,页面会展示
fallback内容,并且弹出反馈弹窗,向Sentry提交反馈,反馈内容可以在Sentry管理界面的User Feedback中查看而在
Sentry管理界面的Issues中,我们可以看到上报了名称为Error错误,他的描述是以React ErrorBoundary Error开头的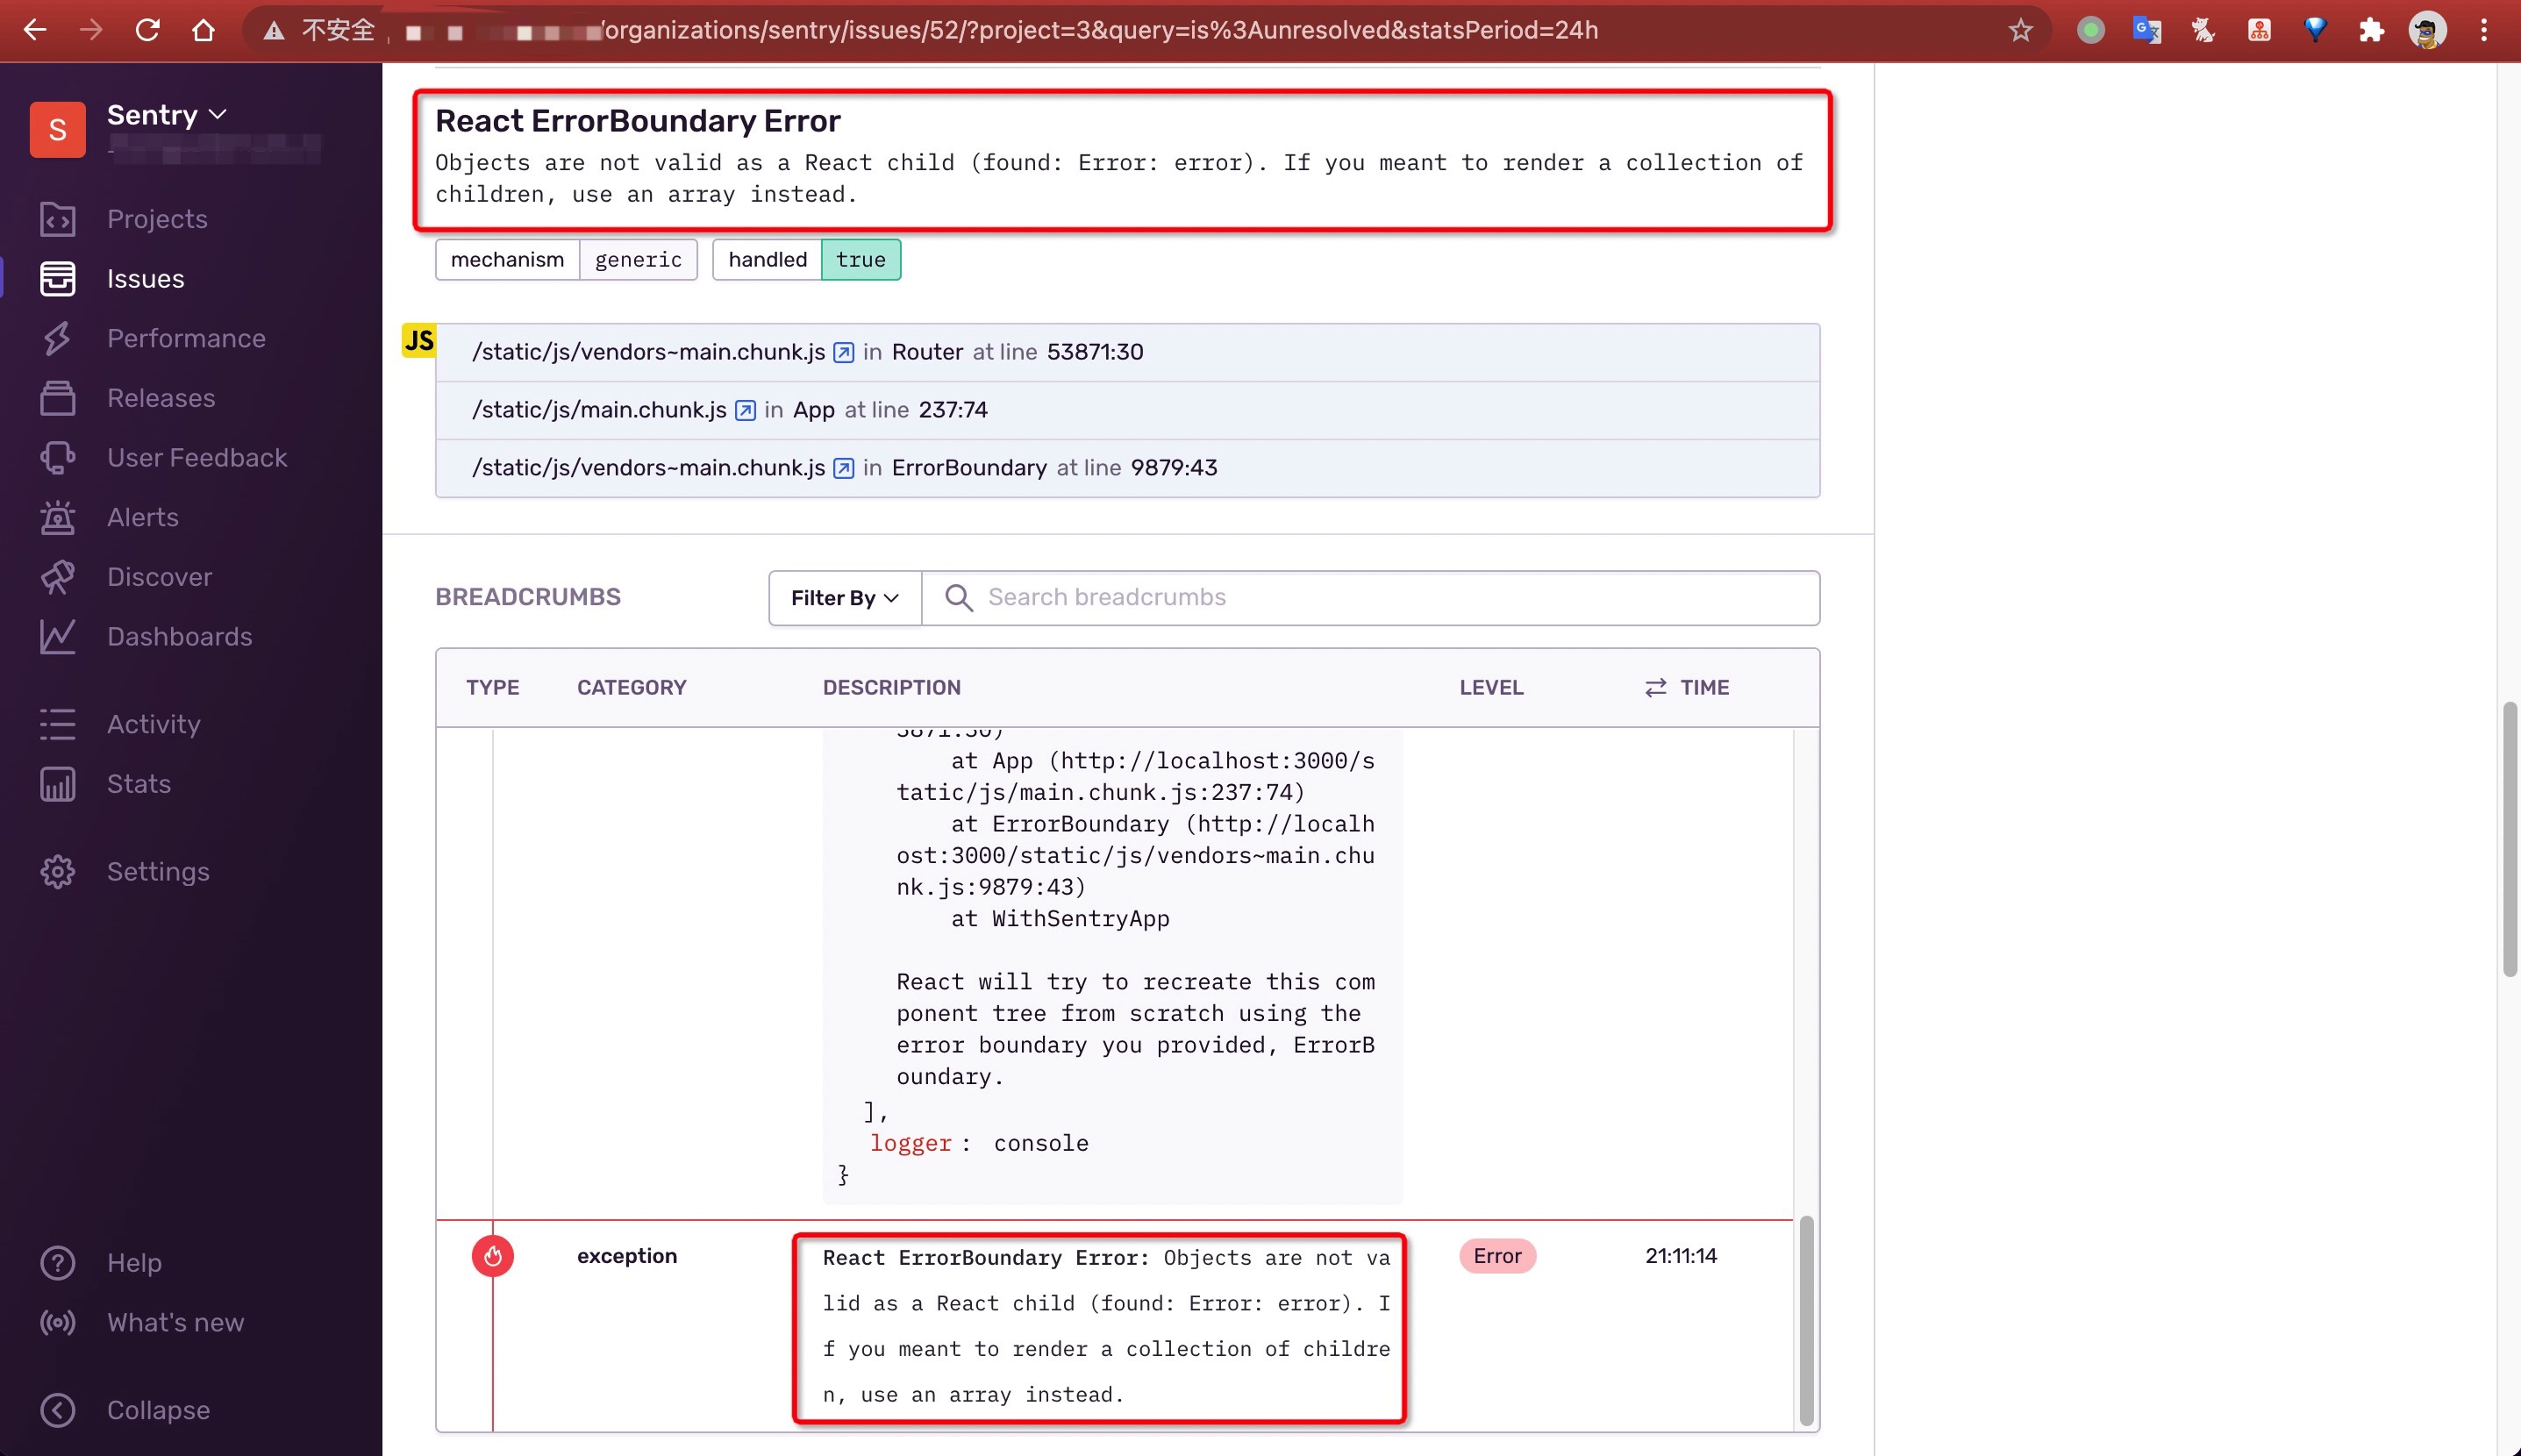
也可以使用Sentry提供的高阶组件
withErrorBoundary实现同样效果const WithSentryApp = Sentry.withErrorBoundary(App, { fallback: <p>an error has occurred</p>, showDialog: true });1更多信息参考: 官方文档 (opens new window)
# 集成 redux
安装
reduxnpm i redux -S1集成
redux通过
sentryReduxEnhancer中的actionTransformer和stateTransformer过滤不需要在sentry管理界面中展示的action和state// index.js import React from 'react'; import ReactDOM from 'react-dom'; import * as Sentry from '@sentry/react'; import { Integrations } from '@sentry/tracing'; import { createStore } from 'redux'; Sentry.init({ dsn: "http://xxx@10.10.8.46:9000/3", environment: 'localhost', integrations: [new Integrations.BrowserTracing()], tracesSampleRate: 1.0, release: '0.0.1', }); const initialState = { a: 'init', b: 'init', c: 'init', }; const rootReducer = (state = initialState, action) => { if (action.type === 'SET_A') { return { ...state, a: 'a_changed', } } if (action.type === 'SET_B') { return { ...state, b: 'b_changed', } } if (action.type === 'SET_C') { return { ...state, c: 'c_changed', } } return state; } const sentryReduxEnhancer = Sentry.createReduxEnhancer({ actionTransformer: action => { if (action.type === 'SET_B') { return null; } return action; }, stateTransformer: state => { return { ...state, c: null, } }, }); const store = createStore( rootReducer, sentryReduxEnhancer, ); const App = () => { function fn() { console.log(window.a.b); // axios.get('/dddd').catch(() => {}); } return ( <> <button onClick={() => store.dispatch({ type: 'SET_A' })}>dispatch SET_A</button> <button onClick={() => store.dispatch({ type: 'SET_B' })}>dispatch SET_B</button> <button onClick={() => store.dispatch({ type: 'SET_C' })}>dispatch SET_C</button> <button onClick={fn}>Break the world</button> </> ); } ReactDOM.render( <App />, document.getElementById('root') );1
2
3
4
5
6
7
8
9
10
11
12
13
14
15
16
17
18
19
20
21
22
23
24
25
26
27
28
29
30
31
32
33
34
35
36
37
38
39
40
41
42
43
44
45
46
47
48
49
50
51
52
53
54
55
56
57
58
59
60
61
62
63
64
65
66
67
68
69
70
71
72
73
74
75
76
77
78
79
80
81
82
83
84访问
localhost:9000,有4个按钮dispatch SET_A、dispatch SET_B、dispatch SET_C、Break the world,依次点击,则报错在
Sentry管理界面 -> issues菜单中找到刚才错误上报详情在
BREADCRUMBS中,可以看到有三条redux相关的CATEGORY,分别表示redux init、dispatch SET_A、dispatch SET_C。dispatch SET_B没有,是因为在actionTransformer中将其过滤掉了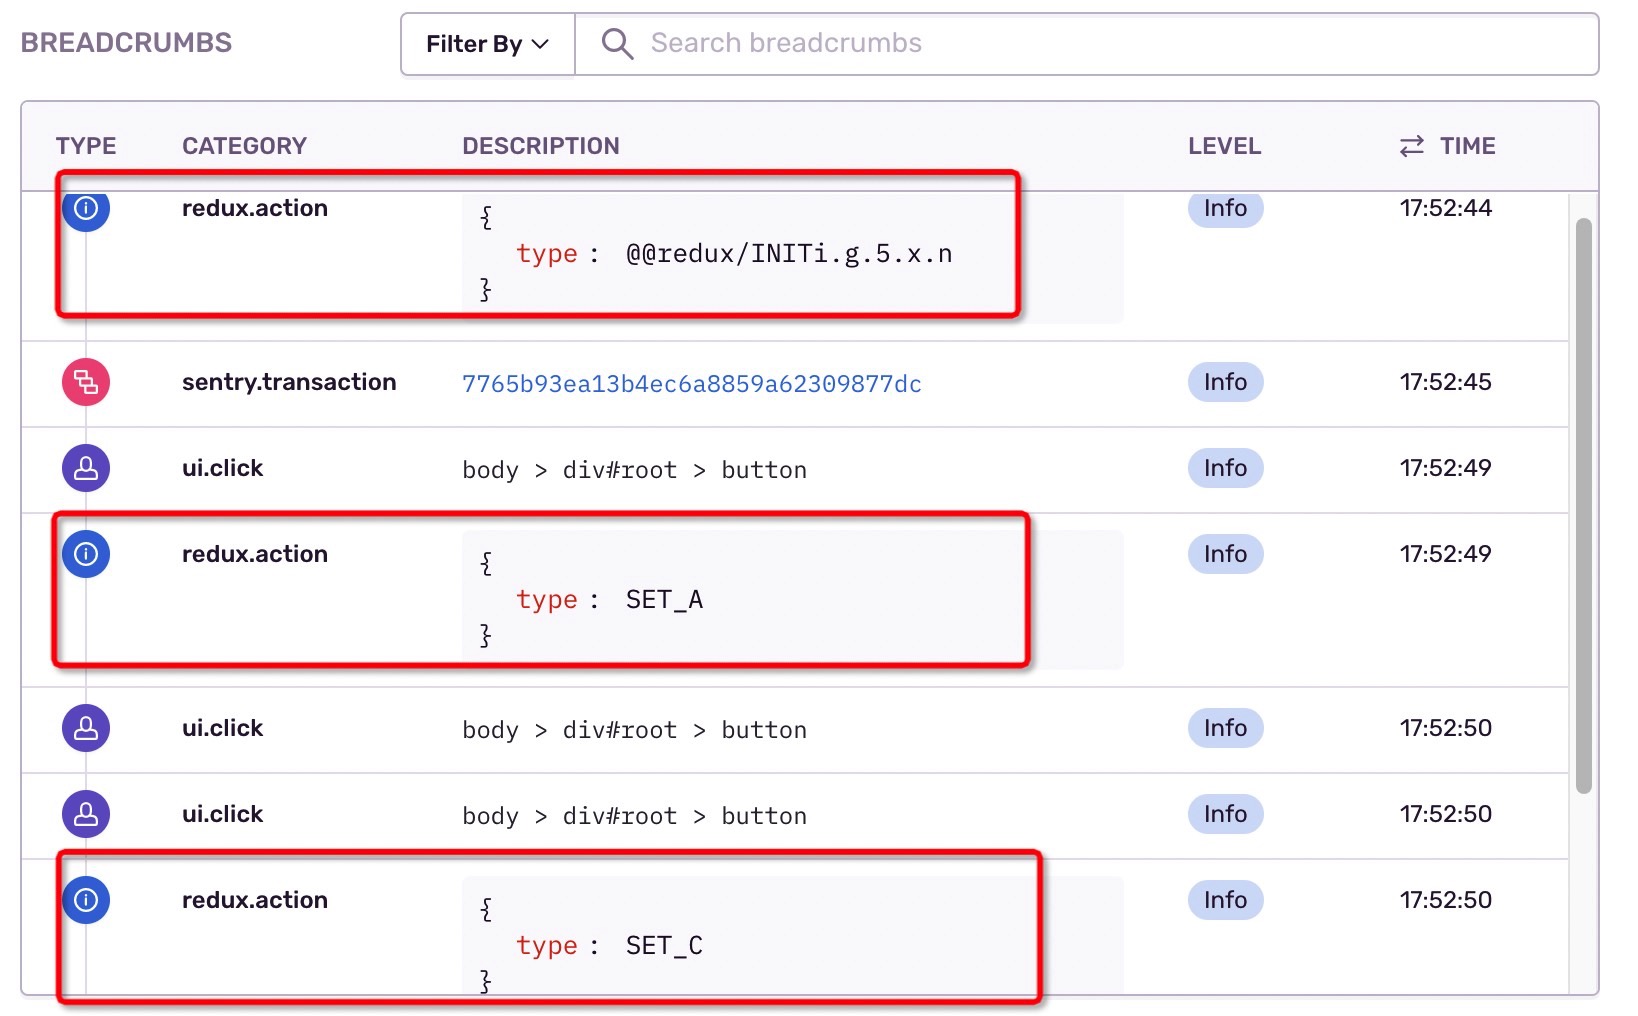
页面往下翻,可以看到
REDIX.STATE中记录了报错前最后的state,有a、b值,但没有c的值,是因为在stateTransformer中过滤了c的值
# rrweb 重播
rrweb 是一个开源的 Web 会话回放库,它提供易于使用的 API 来记录用户的交互并远程回放。
可以记录鼠标移动轨迹、交互动作和页面变化,并播放。
@sentry/rrweb 是 rrweb 的 sentry 插件。
安装
npm install -S @sentry/rrweb rrweb1使用
import SentryRRWeb from '@sentry/rrweb';

Sentry.init({
  integrations: [
    new SentryRRWeb({
      checkoutEveryNms: 10 * 1000, // 每10秒重新制作快照
      checkoutEveryNth: 200, // 每 200 个 event 重新制作快照
      maskAllInputs: false, // 将所有输入内容记录为 *
    }),
  ],
});
1
2
3
4
5
6
7
8
9
10
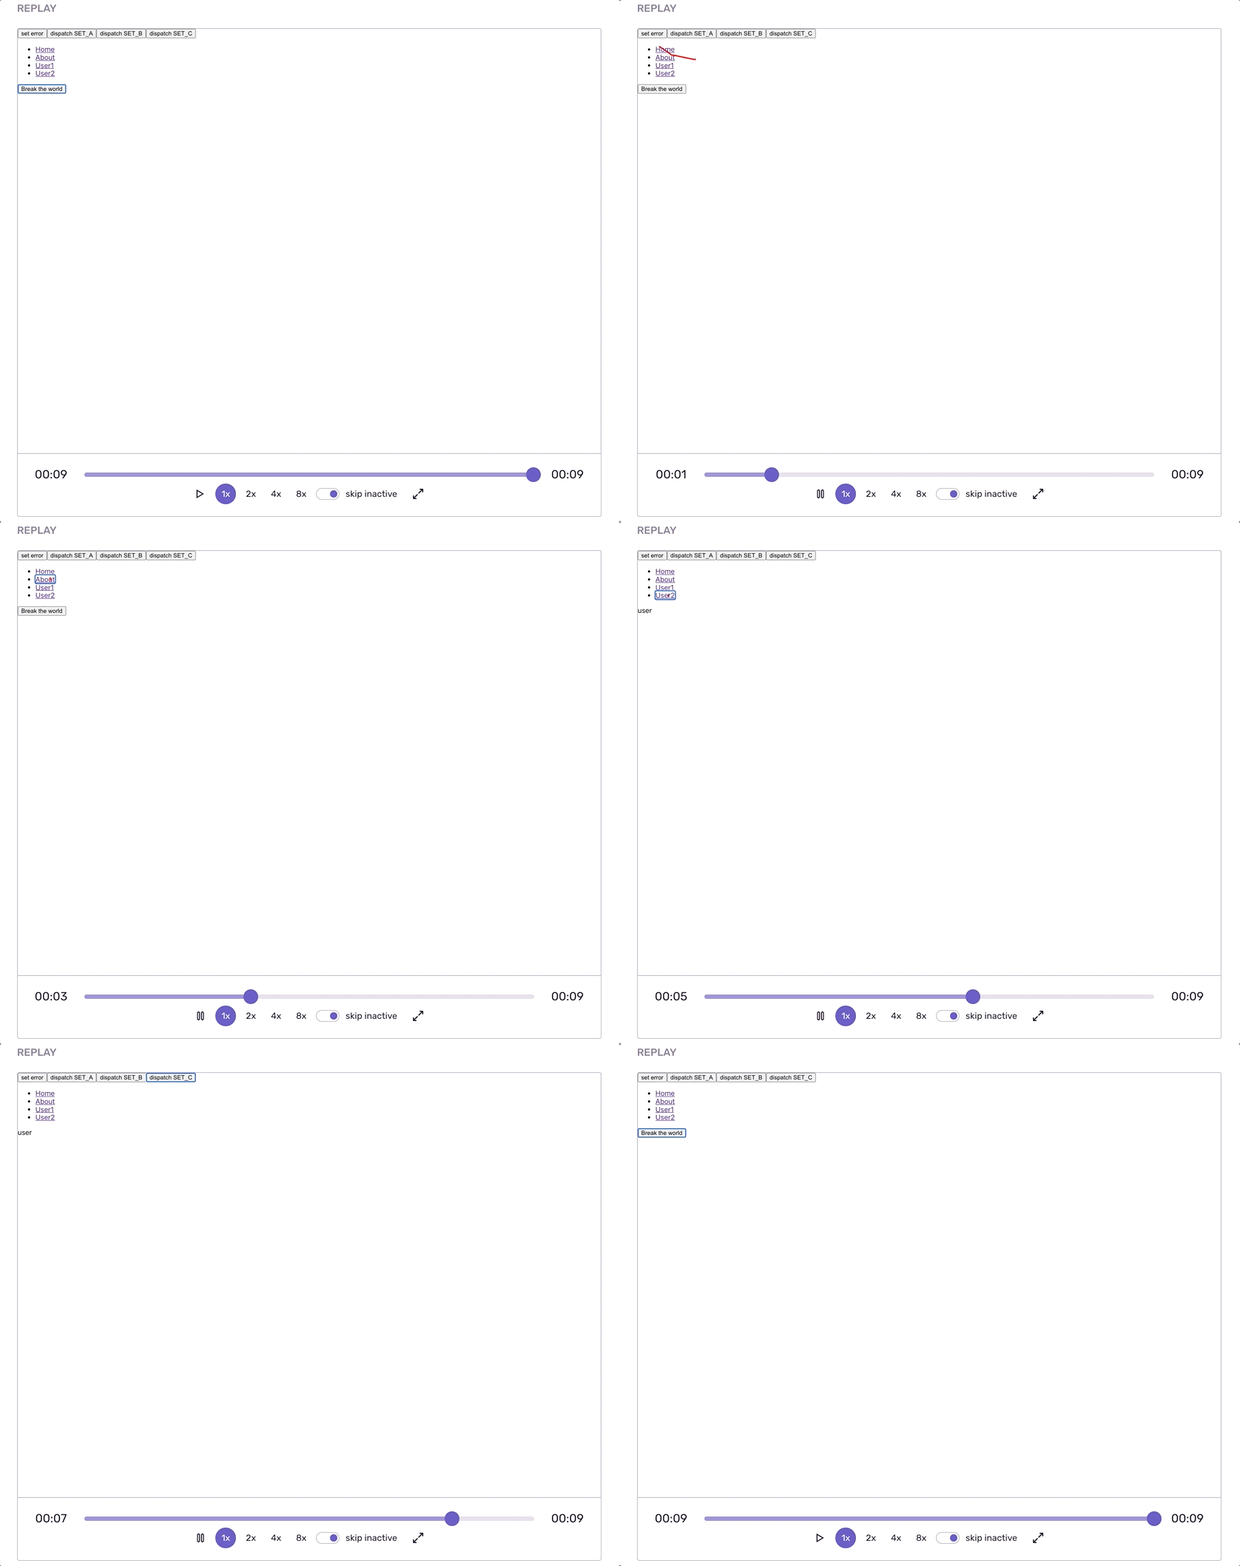
11在页面中点击各个按钮,直到报错,在
Sentry管理界面 -> Isseues中找到相关错误详情,在页面最底部有一个REPLAY模块,点击播放可以回放错误发生前的一系列操作查看效果
# 相关链接
https://github.com/getsentry/onpremise
