 vue项目权限相关
# 简介
权限控制是中后台系统中常见的需求之一
# 登录权限
# 1.用户注册模块实现
API接口定制
后端接口:http://localhost:3000/public/reg
export default {
    reg:'/user/reg',
}
2
3
import config from './config/user';
import axios from '@/utils/request';
export const reg = (options) => axios.post(config.reg,options);
2
3
调用接口
import * as user from '@/api/user.js'
submitForm(formName) {
    this.$refs[formName].validate(async valid => {
        if (valid) {
            try {
                await user.reg(this.ruleForm);
                this.$message({
                    type:'sucess',
                    message:'注册成功,请登录'
                });
                this.$router.push('/login');
            } catch (e) {
                this.$message({
                    type:'error',
                    message:e
                });
            }
        } else {
            return false;
        }
    });
}
2
3
4
5
6
7
8
9
10
11
12
13
14
15
16
17
18
19
20
21
22
# 2.验证码获取
后端接口:http://localhost:3000/public/getCaptcha
export default {
    getSlider: '/public/getSlider', // 获取轮播图接口
    getCaptcha:'/public/getCaptcha' // 获取验证码
}
2
3
4
需要用户产生唯一标识,可以和验证码对应
export const setLocal = (key, value) => {
    if(typeof value === 'object'){
        return localStorage.setItem(key,JSON.stringify(value));
    }
    localStorage.setItem(key, value);
}
export const getLocal = (key,isObject) => {
    if(isObject){
        return JSON.parse(localStorage.getItem(key)) || {}
    }
    return localStorage.getItem(key) || '';
}
2
3
4
5
6
7
8
9
10
11
12
封装
setLocal和getLocal本地存储方法
import {getLocal} from '@/utils/local'
export const getCaptcha = () => axios.get(config.getCaptcha, {params: {
    uid:getLocal('uid')
}});
2
3
4
获取验证码并传入当前用户的唯一标识
import {v4} from 'uuid';
import {setLocal,getLocal} from '@/utils/local';
import {getCaptcha} from '@/api/public.js'
export default {
	async mounted(){
      this.uid = getLocal('uid');
      if(!this.uid){
        setLocal('uid',v4())
      }
      this.getCaptcha();
    },
    methods: {
      async getCaptcha(){
        let {data} = await getCaptcha();
        this.verify = data;
      },
    }
}
2
3
4
5
6
7
8
9
10
11
12
13
14
15
16
17
18
页面加载时获取验证码,同样点击时也可以调用
getCaptcha切换验证码
# 3.登录实现
后端接口:http://localhost:3000/user/login
export default {
    login:'/user/login'
}
2
3
export const login = (options) => axios.post(config.login, options);
Vuex存储用户信息
// 设置用户信息
export const SET_USER = 'SET_USER'
// 用户登录
export const USER_LOGIN = 'USER_LOGIN';
// 设置以及获取权限
export const SET_PERMISSION = 'SET_PERMISSION'
2
3
4
5
6
定制要实现的功能
import * as user from '@/api/user'
import * as types from '../action-types';
import { setLocal,getLocal } from '@/utils/local'
export default {
    state: {
        userInfo: {},
        hasPermission: false,
    },
    mutations: {
        [types.SET_USER](state, payload) {
            state.userInfo = payload;
            setLocal('token',payload.token);
        },
        [types.SET_PERMISSION](state, has) {
            state.hasPermission = has;
        }
    },
    actions: {
        async [types.SET_USER]({ commit, dispatch }, { payload, hasPermission }) {
            commit(types.SET_USER, payload);
            commit(types.SET_PERMISSION, hasPermission);
        },
        async [types.USER_LOGIN]({ dispatch }, userInfo) {
            let result = await user.login(userInfo);
            dispatch(types.SET_USER, {
                payload: result.data,
                hasPermission: true
            });
            return result;
        }
    }
}
2
3
4
5
6
7
8
9
10
11
12
13
14
15
16
17
18
19
20
21
22
23
24
25
26
27
28
29
30
31
32
实现登录逻辑
import * as types from "@/store/action-types";
import { createNamespacedHelpers } from "vuex";
let { mapActions } = createNamespacedHelpers("user");
methods: {
    ...mapActions([types.USER_LOGIN]),
    submitForm(formName) {
      this.$refs[formName].validate(async valid => {
        if (valid) {
          try{
            let {data} = await this[types.USER_LOGIN]({...this.ruleForm,uid:this.uid});
            this.$router.push('/');
          }catch(e){
            this.$message({type:'error',message:e});
          }
        } else {
          alert("失败");
          return false;
        }
      });
    }
}
2
3
4
5
6
7
8
9
10
11
12
13
14
15
16
17
18
19
20
21
用户菜单控制
<template v-if="!hasPermission">
  <el-menu-item index="login">
    <router-link to="/login">登录</router-link>
  </el-menu-item>
  <el-menu-item index="reg">
    <router-link to="/reg">注册</router-link>
  </el-menu-item>
</template>
<el-submenu index="profile" v-else>
  <template slot="title">{{userInfo.username}}</template>
    <el-menu-item @click="$router.push('/manager')">管理后台</el-menu-item>
  <el-menu-item index="logout">退出登录</el-menu-item>
</el-submenu>
2
3
4
5
6
7
8
9
10
11
12
13
import * as types from "@/store/action-types";
import { createNamespacedHelpers } from "vuex";
let { mapActions, mapState, mapMutations } = createNamespacedHelpers("user");
export default {
  computed: {
    ...mapState(["hasPermission", "userInfo"])
  },
};
2
3
4
5
6
7
8
# 4.验证是否登录
后端接口:http://localhost:3000/user/validate
export default {
    validate: '/user/validate'
}
2
3
export const validate = () => axios.get(config.validate);
async [types.USER_VALIDATE]({ dispatch }) {
    if (!getLocal('token')) return false;
    try {
        let result = await user.validate();
        dispatch(types.SET_USER, {
            payload: result.data,
            hasPermission: true
        });
        return true;
    } catch (e) {
        dispatch(types.SET_USER, {
            payload: {},
            hasPermission: false
        });
    }
}
2
3
4
5
6
7
8
9
10
11
12
13
14
15
16
如果没有token返回false,之后通过token校验用户是否登录。
[types.SET_USER](state, payload) {
    state.userInfo = payload;
    if (payload && payload.token) {
        setLocal('token', payload.token);
    } else {
        localStorage.clear('token');
    }
}
2
3
4
5
6
7
8
如果token被修改,验证登录失败,清除token信息.
# 5.路由钩子鉴权
遍历hook文件添加钩子方法
import hooks from './hook'
Object.values(hooks).forEach(hook=>{
    router.beforeEach(hook.bind(router));
})
2
3
4
import store from '../store';
import * as types from '../store/action-types';
const loginPermission = async function(to, from, next) {
    let flag = await store.dispatch(`user/${types.USER_VALIDATE}`);
    next();
}
2
3
4
5
6
config.headers.authorization = 'Bearer '+getLocal('token')
携带token
# 6.根据是否需要登录增加校验
meta:{
    needLogin:true
}
2
3
给路由增添路由源信息
const loginPermission = async function(to, from, next) {
    // 先判断是否需要登录
    let needLogin = to.matched.some(item => item.meta.needLogin);
    let flag = await store.dispatch(`user/${types.USER_VALIDATE}`);
    if (!store.state.user.hasPermission) {
        if (needLogin) { // 没权限需要登录,那就校验是否登陆过
            if (!flag) { // 没登陆过
                next('/login')
            } else {
                next();
            }
        } else { // 没权限不需要登录
            next();
        }
    } else {
        // 有权限
        if (to.path == '/login') {
            next('/');
        } else {
            next();
        }
    }
}
2
3
4
5
6
7
8
9
10
11
12
13
14
15
16
17
18
19
20
21
22
23
# 路由权限
export const ADD_ROUTE  = 'ADD_ROUTE' // 添加路由动作
export const SET_MENU_PERMISSION = 'SET_MENU_PERMISSION' // 表示菜单权限已经拥有
2
export const menuPermission = async function(to, from, next) {
    if (store.state.user.hasPermission) {
        if (!store.state.user.menuPermission) {
            store.dispatch(`user/${types.ADD_ROUTE}`);
            next({...to,replace:true});
        } else {
            next();
        }
    } else {
        next();
    }
}
2
3
4
5
6
7
8
9
10
11
12
根据用户返回的权限过滤需要的路由
import router from '@/router/index'
import per from '@/router/per';
async [types.ADD_ROUTE]({ commit, state }) {
    let authList = state.userInfo.authList;
    if (authList) {
        // 开始 规划路由
        let routes = filterRouter(authList);
        let route = router.options.routes.find(item => item.path === '/manager');
        route.children = routes;
        router.addRoutes([route]);
        commit(types.SET_MENU_PERMISSION, true);
    }
}
2
3
4
5
6
7
8
9
10
11
12
13
过滤的当前用户支持的路由
const filterRouter = (authList) => {
    let auths = authList.map(item => item.auth);
    const filter = (authRoutes) => {
        let result = authRoutes.filter(route => {
            if (auths.includes(route.meta.auth)) {
                if (route.children) {
                    route.children = filter(route.children);
                }
                return route;
            }
        })
        return result
    }
    return filter(per);
}
2
3
4
5
6
7
8
9
10
11
12
13
14
15
[types.SET_MENU_PERMISSION](state, has) {
	state.menuPermission = has;
}
2
3
# 菜单权限
针对不同的用户,提供不同的菜单。
管理员权限
- 用户管理功能
- 用户统计功能
- 信息发布功能
- 文章管理功能
普通用户权限
- 个人中心功能
- 我的收藏功能
- 私信消息功能
- 我的文章功能
import { createNamespacedHelpers } from "vuex";
let { mapState } = createNamespacedHelpers("user");
export default {
    data() {
        return { menuList: [] };
    },
    mounted() {
        this.menuList = this.getMenList(this.userInfo.authList);
    },
    computed: {
        ...mapState(["userInfo"])
    },
    methods: {
        getMenList(authList) {
            let menu = [];
            let sourceMap = {};
            authList.forEach(m => {
                m.children = [];
                sourceMap[m.id] = m;
                if (m.pid === -1) {
                    menu.push(m);
                } else {
                    sourceMap[m.pid] && sourceMap[m.pid].children.push(m);
                }
            });
            return menu;
        }
    },
    render() { // 递归生成菜单
        let renderChildren = (data) => {
            return data.map(child => {
                return child.children.length ?
                    <el-submenu index={child._id}>
                        <div slot="title">{child.name}</div>
                        {renderChildren(child.children)}
                    </el-submenu> :
                    <el-menu-item index={child.path}>{child.name}</el-menu-item>
            })
        }
        return <el-menu
            background-color="#333"
            text-color="#fff"
            default-active={this.$route.path}
            router={true}
        >
            {renderChildren(this.menuList)}
        </el-menu>
    }
}
2
3
4
5
6
7
8
9
10
11
12
13
14
15
16
17
18
19
20
21
22
23
24
25
26
27
28
29
30
31
32
33
34
35
36
37
38
39
40
41
42
43
44
45
46
47
48
49
# 案例实践
# 菜单数据列表
个人中心  Profile.vue
商店     Shop.vue
购物车   Cart.vue
    └── 购物车列表    CartList.vue
       ├── 商品      Product.vue
       └── 彩票      Lottery.vue
2
3
4
5
6
# 后台返回的数据
[
    {pid:-1,path:'/cart',name:'购物车',id:1,auth:'cart'},
    {pid:1,path:'/cart/cart-list',name:'购物车列表',id:4,auth:'cart-list'},
    {pid:4,path:'/cart/cart-list/lottery',auth:'lottery',id:5,name:'彩票'},
    {pid:4,path:'/cart/cart-list/product',auth:'product',id:6,name:'商品'},
    {pid:-1,path:'/shop',name:'商店',id:2,auth:'shop'},
    {pid:-1,path:'/profile',name:'个人中心',id:3,auth:'store'},
];
2
3
4
5
6
7
8
# 服务端返回权限
let express = require('express');
let app = express();
app.all('*', function (req, res, next) {
    res.header('Access-Control-Allow-Origin', '*');
    //Access-Control-Allow-Headers ,可根据浏览器的F12查看,把对应的粘贴在这里就行
    res.header('Access-Control-Allow-Headers', 'Content-Type');
    res.header('Access-Control-Allow-Methods', '*');
    res.header('Content-Type', 'application/json;charset=utf-8');
    next();
});
app.get('/roleAuth',(req,res)=>{
    res.json({
        menuList:[
            {pid:-1,path:'/cart',name:'购物车',id:1,auth:'cart'},
            {pid:1,path:'/cart/cart-list',name:'购物车列表',id:4,auth:'cart-list'},
            {pid:4,path:'/cart/cart-list/lottery',auth:'lottery',id:5,name:'彩票'},
            {pid:4,path:'/cart/cart-list/product',auth:'product',id:6,name:'商品'},
            {pid:-1,path:'/shop',name:'商店',id:2,auth:'shop'},
            {pid:-1,path:'/profile',name:'个人中心',id:3,auth:'profile'},
        ]
    })
})
app.listen(3000);
2
3
4
5
6
7
8
9
10
11
12
13
14
15
16
17
18
19
20
21
22
23
# 递归菜单
let getMenuList = (list) => {
  let auths = [];
  function getList(pid){
    return list.filter(l=>{
      if(l.pid === pid){
        auths.push(l.auth); // 提取用户权限
        let children = getList(l.id);
        l.children = children.length>0?children:null;
        return l;
      }
    });
  }
  let menuList = getList(-1); // 通过根循环列表
  return {menuList,auths};
}
// 获取菜单列表
export default new Vuex.Store({
  state: {
    menuList:[], // 菜单列表
    authList:[], // 权限列表
    hasAuthMenu: false // 默认没有权限菜单,如果获取菜单后改为true
  },
  mutations: {
    setMenuList(state,menuList){
      state.menuList = menuList;
    },
    authList(state,auths){
      state.authList = auths;
    },
    hasAuthMenu(state){
      state.hasAuthMenu = true;
    }
  },
  actions: {
    async getMenuList({commit}){
      let {data} = await axios.get('http://localhost:3000/roleAuth');
      let {menuList,auths} = getMenuList(data.menuList);
      commit('setMenuList',menuList);
      commit('authList',auths);
      commit('hasAuthMenu');
      return auths;
    }
  }
});
2
3
4
5
6
7
8
9
10
11
12
13
14
15
16
17
18
19
20
21
22
23
24
25
26
27
28
29
30
31
32
33
34
35
36
37
38
39
40
41
42
43
44
# 静态菜单
<el-menu default-active="2" class="el-menu-vertical-demo">
    <el-submenu index="1">
        <template slot="title">导航一</template>
        <el-submenu index="1-1">
        <template slot="title">选项1-1</template>
        <el-menu-item index="1-1-1">选项1-1-1</el-menu-item>
        <el-menu-item index="1-1-2">选项1-1-2</el-menu-item>
        </el-submenu>
        <el-menu-item index="1-2">选项1-2</el-menu-item>
    </el-submenu>
    <el-menu-item index="2">
        导航二
    </el-menu-item>
    <el-menu-item index="3">
        导航三
    </el-menu-item>
    <el-menu-item index="4">
        导航四
    </el-menu-item>
</el-menu>
2
3
4
5
6
7
8
9
10
11
12
13
14
15
16
17
18
19
20
# 递归组件
Home.vue
<template>
  <div class="home">
      <el-menu default-active="2" class="el-menu-vertical-demo" :router="true">
        <template v-for="m in menuList">
          <el-menu-item :index="m.path" :key="m.auth" v-if="!m.children">
            {{m.name}}
          </el-menu-item>
          <ReSub :m="m" :key="m.auth" v-else></ReSub>
        </template>
      </el-menu>
  </div>
</template>
2
3
4
5
6
7
8
9
10
11
12
ReSub.vue
<template>
    <el-submenu :index="m.auth">
          <template slot="title">
              <router-link :to="m.path">{{m.name}}</router-link>
          </template>
          <template v-for="l in m.children">
                <el-menu-item v-if="!l.children" :index="l.path" :key="l.auth">{{l.name}}</el-menu-item>
                <ReSub v-else :key="l.auth" :m="l"></ReSub>
          </template>
    </el-submenu>
</template>
<script>
export default {
    name:'ReSub',
    props:['m']
}
</script>
2
3
4
5
6
7
8
9
10
11
12
13
14
15
16
17
# 拆分路由
// 权限路由
export let authRoutes = [
  {
    path:'/cart',
    name:'cart',
    component:()=>import('@/views/menu/Cart'),
    children:[
      {
        path:'cart-list',
        name:'cart-list',
        component:()=>import('@/views/menu/CartList'),
        children:[
          {
            path:'lottery',
            name:'lottery',
            component:()=>import('@/views/menu/Lottery'),
          },
          {
            path:'product',
            name:'product',
            component:()=>import('@/views/menu/Product'),
          }
        ]
      }
    ]
  },
  {
    path:'/profile',
    name:'profile',
    component:()=>import('@/views/menu/Profile'),
  },
  {
    path:'/shop',
    name:'shop',
    component:()=>import('@/views/menu/Shop'),
  }
]
// 默认路由
let defaultRoutes = [
  {
    path: '/',
    name: 'home',
    component: Home
  },
  {
    path: '*',
    component: NotFound
  }
]
2
3
4
5
6
7
8
9
10
11
12
13
14
15
16
17
18
19
20
21
22
23
24
25
26
27
28
29
30
31
32
33
34
35
36
37
38
39
40
41
42
43
44
45
46
47
48
49
# 通过权限筛出路由
router.beforeEach(async (to,from,next)=>{
  if(!store.state.hasAuthMenu){
     // 1) 获取菜单列表
     let auths = await store.dispatch('getMenuList');
     // 2) 获取筛选后的路由
     let newRoutes = await store.dispatch('authRoutes',auths);
     // 3) 根据权限添加路由
     router.addRoutes(newRoutes);
     next({...to,replace:true});
  }else{
    next();
  }
});

// 获取路由数据
let getRoutes = (auths)=>{
  function r(authRoutes){
    return authRoutes.filter(route=>{
      if(auths.includes(route.name)){ // 有权限
        if(route.children){ // 有孩子 递归孩子
          route.children = r(route.children);
        }
        return route;
      }
    })
  }
  return r(authRoutes);
}
//  vuex中获取晒出的路由
async authRoutes({commit},auths){
    return getRoutes(auths)// 全部路由  + 权限 => 晒出需要的路由
},
2
3
4
5
6
7
8
9
10
11
12
13
14
15
16
17
18
19
20
21
22
23
24
25
26
27
28
29
30
31
32
# 权限ant-vue-pro【要点】
使用ant-design-vue (opens new window), ant-design-vue-pro (opens new window)库
Pro 提供了两套权限实现方案;
- 其中默认方案为前端固定路由表和权限配置,由后端提供用户权限标识,来识别是否拥有该路由权限;
- 另一套方案为后端提供权限和路由信息结构接口,动态生成权限和菜单;
# 路由和默认权限控制
默认实现方式是通过获取当前用户的权限去比对路由表,生成当前用户具有的权限可访问的路由表,通过 router.addRoutes 动态挂载到 router 上。
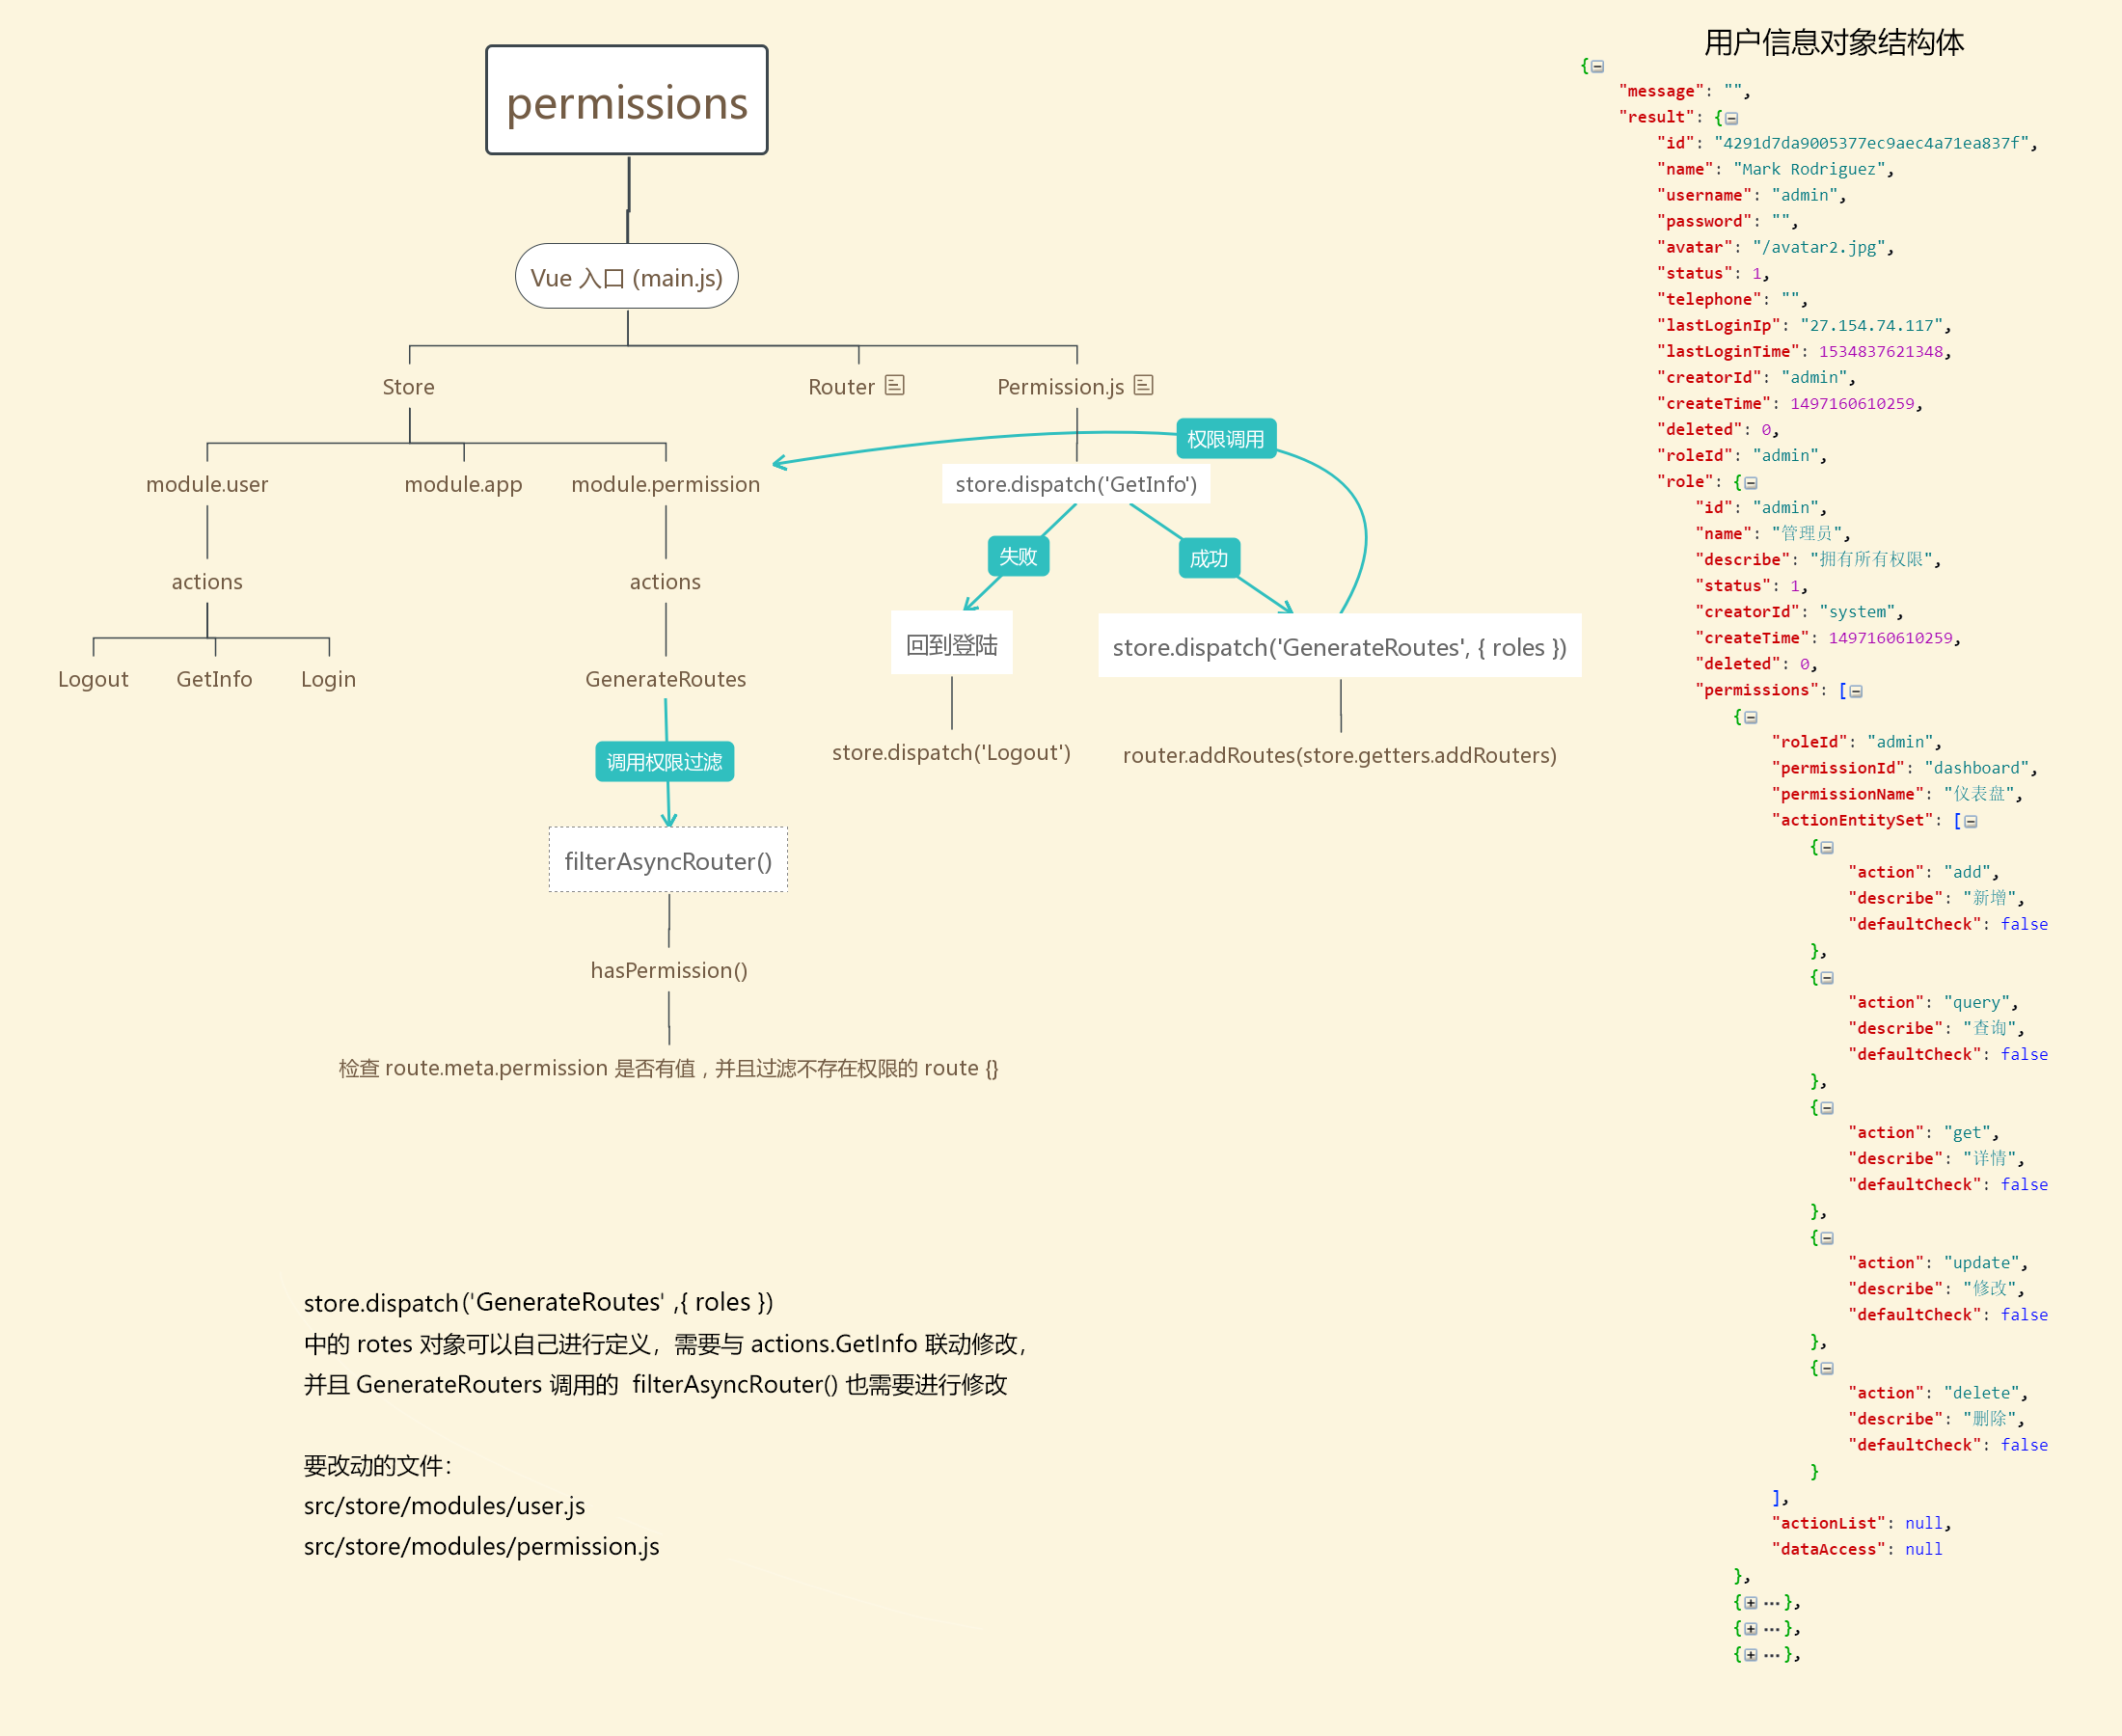
整体流程可以看这张图:

步骤如下:
- 判断是否有
AccessToken如果没有则跳转到登录页面 - 获取用户信息和拥有权限
store.dispatch('GetInfo') - 用户信息获取成功后, 调用
store.dispatch('GenerateRoutes', userInfo)根据获取到的用户信息构建出一个已经过滤好权限的路由结构(src/store/modules/permission.js) - 将构建的路由结构信息利用
Vue-Router提供的动态增加路由方法router.addRoutes加入到路由表中 - 加入路由表后将页面跳转到用户原始要访问的页面,如果没有
redirect则进入默认页面 (/dashboard/workplace)
这里可以看出把
登录和获取用户信息分成了两个接口,主要目的在于当用户刷新页面时,可以根据登录时获取到的身份令牌(cookie/token)等,去获取用户信息,从而避免刷新需要调用登录接口Pro 实现的路由权限的控制代码都在 @/permission.js (opens new window) 中,如果想修改逻辑,直接在适当的判断逻辑中
next()释放钩子即可。 两套权限实现 均使用 @/permission.js (opens new window) (路由守卫)来进行控制。
# 动态路由 router.addRoutes
但其实很多公司的业务逻辑可能并不是上面描述的简单实现方案;比如正常业务逻辑下 每个页面的信息都是动态从后端配置的,并不是像 Pro 默认的路由表那样写死在预设的。可以在后台通过一个 tree 或者其它展现形式给每一个页面动态配置权限,之后将这份路由表存储到后端。
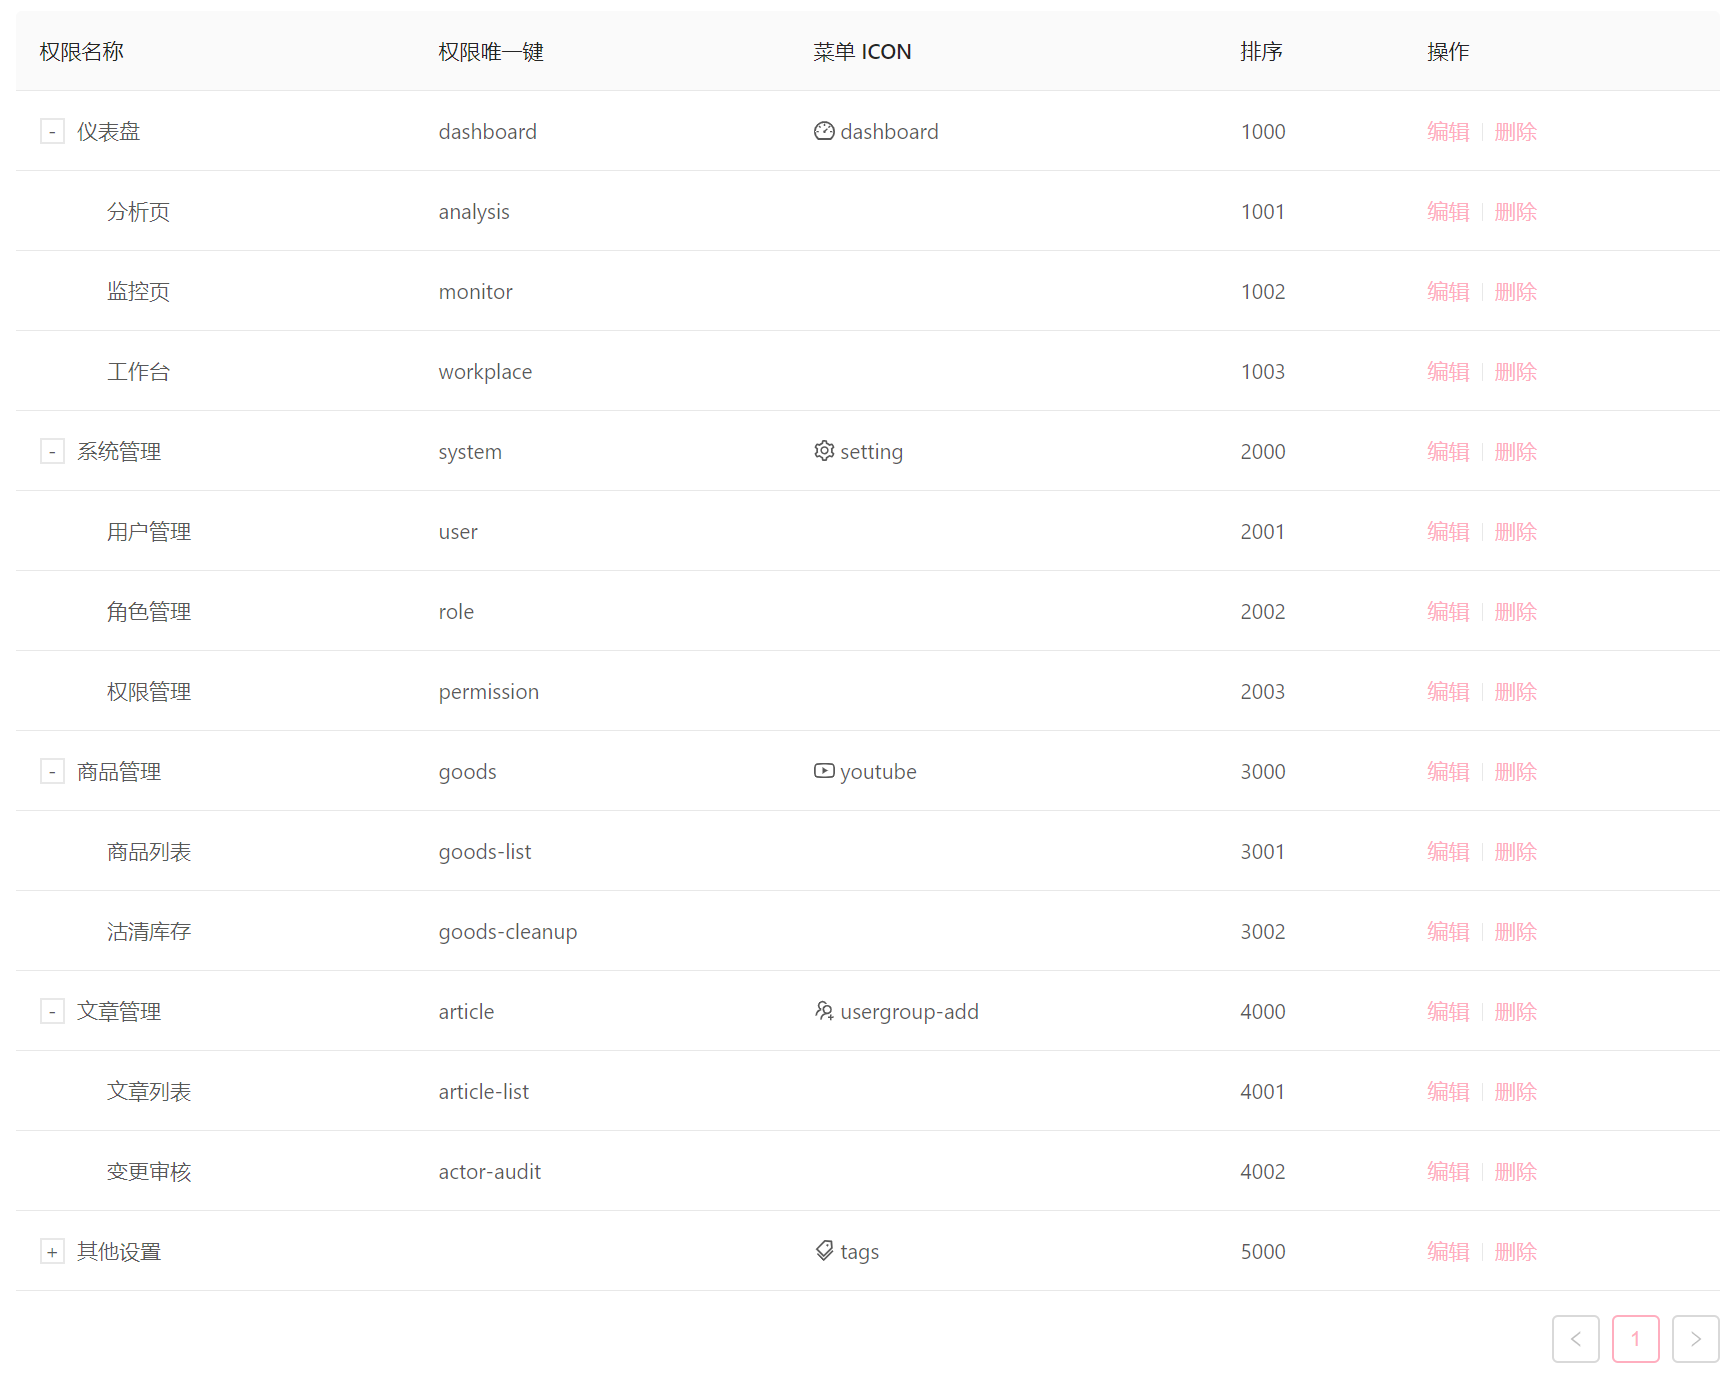
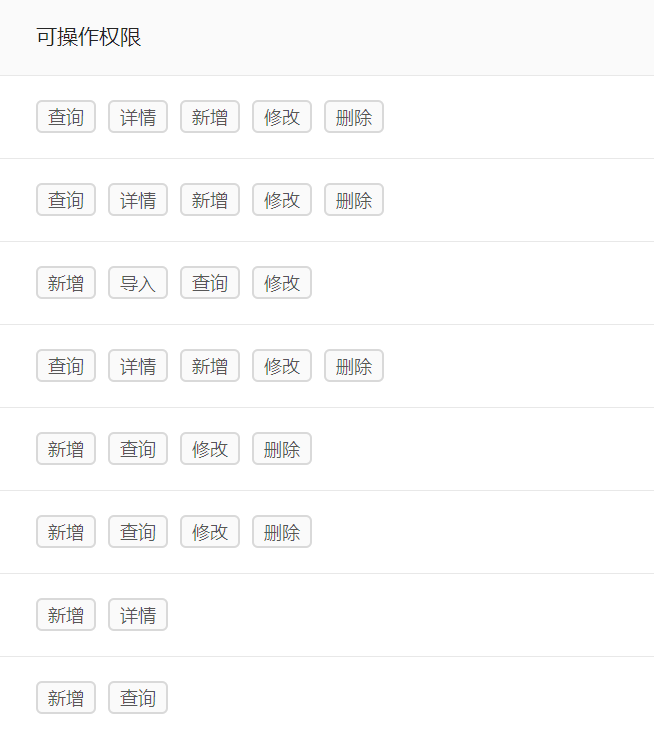
权限/菜单 eg:


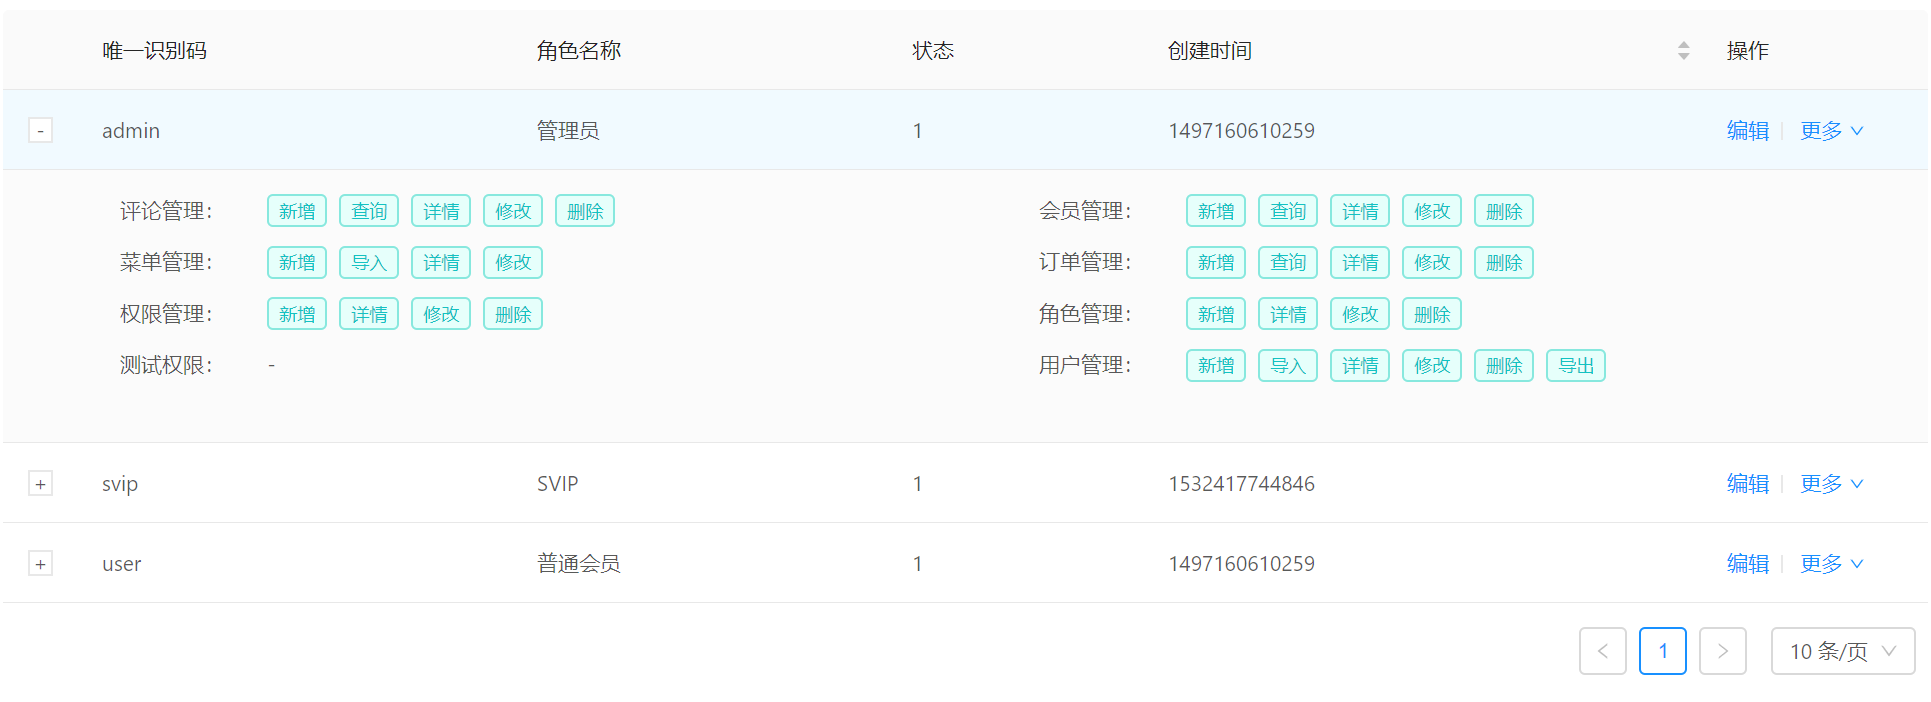
角色 eg:

由 角色关联 到多个 权限(菜单) 。 角色 1 对多权限,用户 1 对多角色 或 用户 1 对 1 角色;
当用户登录后得到 roles,前端根据 roles 去向后端请求可访问的路由表,从而动态生成可访问页面,之后就是 router.addRoutes 动态挂载到 router 上,会发现原来是相同的,万变不离其宗。
eg:
// 后端返回的 JSON 动态路由结构
const servicePermissionMap = {
"message": "",
"result": [
 {
   "title": "首页",
   "key": "",
   "name": "index",
   "component": "BasicLayout",
   "redirect": "/dashboard/workplace",
   "children": [
     {
       "title": "仪表盘",
       "key": "dashboard",
       "component": "RouteView",
       "icon": "dashboard",
       "children": [
         {
           "title": "分析页",
           "key": "analysis",
           "icon": ""
         },
         ...
       ]
     },
     {
       "title": "系统管理",
       "key": "system",
       "component": "PageView",
       "icon": "setting",
       "children": [
         {
           "title": "用户管理",
           "key": "userList"
         },
         ...
       ]
     }
   ]
 }
],
"status": 200,
"timestamp": 1534844188679
}
import { axios } from '@/utils/request'
// eslint-disable-next-line
import { UserLayout, BasicLayout, RouteView, BlankLayout, PageView } from '@/layouts'

// 前端路由映射表
const constantRouterComponents = {
  // 基础页面 layout 必须引入
  BasicLayout: BasicLayout,
  BlankLayout: BlankLayout,
  RouteView: RouteView,
  PageView: PageView,

  // 你需要动态引入的页面组件
  analysis: () => import('@/views/dashboard/Analysis'),
  workplace: () => import('@/views/dashboard/Workplace'),
  monitor: () => import('@/views/dashboard/Monitor')
  // ...more
}

// 前端未找到页面路由(固定不用改)
const notFoundRouter = {
  path: '*', redirect: '/404', hidden: true
}

/**
 * 格式化 后端 结构信息并递归生成层级路由表
 * @param routerMap
 * @param parent
 * @returns {*}
 */
export const generator = (routerMap, parent) => {
  return routerMap.map(item => {
    const currentRouter = {
      // 路由地址 动态拼接生成如 /dashboard/workplace
      path: `${parent && parent.path || ''}/${item.key}`,
      // 路由名称,建议唯一
      name: item.name || item.key || '',
      // 该路由对应页面的 组件
      component: constantRouterComponents[item.component || item.key],
      // meta: 页面标题, 菜单图标, 页面权限(供指令权限用,可去掉)
      meta: { title: item.title, icon: item.icon || undefined, permission: item.key && [ item.key ] || null }
    }
    // 为了防止出现后端返回结果不规范,处理有可能出现拼接出两个 反斜杠
    currentRouter.path = currentRouter.path.replace('//', '/')
    // 重定向
    item.redirect && (currentRouter.redirect = item.redirect)
    // 是否有子菜单,并递归处理
    if (item.children && item.children.length > 0) {
      // Recursion
      currentRouter.children = generator(item.children, currentRouter)
    }
    return currentRouter
  })
}
2
3
4
5
6
7
8
9
10
11
12
13
14
15
16
17
18
19
20
21
22
23
24
25
26
27
28
29
30
31
32
33
34
35
36
37
38
39
40
41
42
43
44
45
46
47
48
49
50
51
52
53
54
55
56
57
58
59
60
61
62
63
64
65
66
67
68
69
70
71
72
73
74
75
76
77
78
79
80
81
82
83
84
85
86
87
88
89
90
91
92
93
94
95
96
97
98
下方提供的链接可参考并理解其作用(2.0.3及以上版本中提供) 方案2: https://github.com/vueComponent/ant-design-vue-pro/blob/master/src/router/generator-routers.js https://github.com/vueComponent/ant-design-vue-pro/blob/master/src/store/modules/async-router.js
方案1:
需要注意的是,上面的代码只是一个例子,实际上可能更加复杂。需要开发者自身有一定的编码能力来实现动态路由功能。
# 指令权限
Pro 封装了一个非常方便实现按钮级别权限的自定义指令。 v-action (opens new window)
使用
<!-- eg: 当前页面为 dashboard -->

<template>
    <!-- 校验是否有 dashboard 权限下的 add 操作权限 -->
    <a-button v-action:add >添加用户</a-button>

    <!-- 校验是否有 dashboard 权限下的 del 操作权限 -->
    <a-button v-action:del>删除用户</a-button>

    <!-- 校验是否有 dashboard 权限下的 edit 操作权限 -->
    <a v-action:edit @click="edit(record)">修改</a>
</template>
2
3
4
5
6
7
8
9
10
11
12
需要注意的是,指令权限默认从 store 中获取当前已经登陆的用户的角色和权限信息进行比对,所以也要对指令权限的获取和校验 Action 权限部分进行自定义。
在某些情况下,不适合使用 v-action,例如 Tab 组件,只能通过手动设置 v-if 来实现。
这时候,Pro 为其提供了原始 v-if 级别的权限判断。
<template>
    <a-tabs>
        <a-tab-pane v-if="$auth('dashboard.add')" tab="Tab 1">
            some context..
        </a-tab-pane>
        <a-tab-pane v-if="$auth('dashboard.del')" tab="Tab 2">
            some context..
        </a-tab-pane>
        <a-tab-pane v-if="$auth('dashboard.edit')" tab="Tab 3">
            some context..
        </a-tab-pane>
    </a-tabs>
</template>
2
3
4
5
6
7
8
9
10
11
12
13
以上代码的 if 判断会检查,当前登录用户是否存在
dashboard下的add / del / edit权限
# 实现思路
在 Vue 初始化时,@/utils/helper/permission.js (opens new window) 作为插件注册到 Vue 原型链上,在 Vue 实例中就可以用 this.$auth() 方法进行权限判断。 当然这里也要对权限的获取和校验 Action 权限部分进行自定义。
# 参考文档
https://pro.antdv.com/docs/authority-management
https://juejin.cn/post/6949453195987025927
